Sew long gloves with your own hands patterns. How to sew gloves to your liking is difficult, but possible
Before you start working on leather, it is best to make a test glove out of cotton or muslin.
You will need:
- soft skin
- pattern paper ()
- skin tone thread
- scissors ()
- pencil
- sewing machine
Step 1
Take a sheet of paper and fold it in half. Place your hand on the folded edge of the paper so that your thumb stays out of the paper. Leave space between your index finger and the edge of the paper. Slightly spread your fingers and circle your hand, leaving 3 mm above the fingertips and on the side of the little finger. When drawing between the fingers, start at the little finger and spread your fingers just to make dots in the tightest places. It is important that the lines between the fingers are parallel.Step 2

Mark with points B and C where the thumb meets the hand. Draw a vertical line from A (this is the point at the top of the gap between the index and middle fingers) and horizontal lines from B and C. Draw an oval for the thumb hole.

Cut out the pattern.
Step 3

To make a gusset pattern, place your finger on the edge of the paper and circle each (except the large one) with a pencil and cut it out.
Idea: Use threads in contrasting colors to bring out the leather color of the gloves. For decoration, use small bows, embroidery or frill
Step 4

Connect the corresponding fingers with the gussets: index finger with the middle finger, middle finger with the ring finger, ring finger with the little finger. Circle around each pair of fingers. Label each finger.
Tip: For sewing gloves, choose thin and smooth leather. It should be elastic, but only in one direction - along the width of the glove, otherwise it will stretch a lot when worn.
Step 5

Before cutting, draw a curve at the bottom of each insert. Cut out patterns along this curve. Your three gussets will look something like this.
Step 6

Make a pattern for the thumb. Circle around your finger. At the middle point of the gap, draw a "wing/sash" to the right, then draw a pattern. At this stage, you only draw half of the pattern. At the tip of your thumb, add some seam space as the thumb does not have a gusset. Fold the paper in half and draw the outline of half of the pattern you just drew.
Step 7
Do a test run first. Before you start working on the leather, it's best to make a test glove out of cotton or muslin to make sure the pattern is correct. Use thread in a contrasting color so you can easily see where you are sewing and where you need to adjust the pattern. Once you get the pattern right, you can make as many leather gloves as you want without a test piece.Step 8

Pin the pattern to the back of the leather, placing the longest side of each gusset towards the back of the hand (where there is no thumb hole). Sew with a 3mm indent from the edge. If you need to adjust the shape of the fingers, do it now.

Turn out and try on.
Step 9
Fold each part of the thumb piece (right sides together) in half lengthwise and sew. Leave the bottom open. Trim the corner so that it turns right side out. Turn the thumb piece right side out.Step 10
Pin the right sides to the glove, aligning the seam of the thumb piece with the seam of the index finger. Try on the glove to make sure it fits. Adjust if necessary. The "wings" of the thumb piece may need to be trimmed to fit well. Pin again and try on. When all is well, sew the thumb piece onto the glove.Step 11
Sew the sides and hem the bottom of the gloves.Photo: Sweet Living (5), sergey titov, LenLis /Fotolia.com, Legion-Media, Crafty magazine 3/2015
The material was prepared by Anna Soboleva
Gloves in all their fantastic variety of colors, lengths and materials are back in style and a must for a well-dressed woman. Whether it's a pair of long sexy gloves made of stretchy satin or a serene and elegant model made of the thinnest husky, few people will be left indifferent.
The rekindled interest in this most timeless of fashion accessories is not limited to the creations of Gaultier, Louis Vuitton, Prada and Hermes. In nightclubs in major cities around the world, gloves are becoming a fashion statement. It has never been so easy to choose the right pair of gloves for the right occasion - from short leather models for the day to evening black elbow-length gloves.
Hand measurement
The size of the glove is the girth of the palm, expressed in "Paris" inches, measured at the base of the fingers.
Along with the actual size of the gloves, other dimensional features are also important for the correct design of the glove. It is necessary to determine the length of the fingers, which deviates from the standard. It is necessary to remember: the length of each finger is measured from the highest point at the base of the finger to the tip of the finger. The length of the thumb is also determined.
Ampon- a dimensional sign, which is measured from the base of the thumb to the base of the index finger.
Rebras is the main dimensional feature for determining the length of the glove. Rebras is measured from the muscle tubercle at the base of the thumb (wrist) to the desired length.
It is useful to indicate additional information about the deviation of the shape of the hand from the standard (for example, a long, narrow hand, short and thick fingers, etc.).
In addition to complete information about dimensional features, data on the material and processing technology are needed.
Material: nappa, suede, velour, jersey, stretch fabrics.
Glove lining: knitted, woolen, silk lining, fur lining (short-haired).
Glove seams: rustic (cut-out) hand and machine stitches, traditional machine-cut (cut-to-back), various decorative stitches.
The most common units of measurement in the production of gloves are:
- "Paris" inch = 27.07 mm
- English square foot = 9.29 square decimetres.
Building a drawing of gloves
Divide the value of the circumference of the palm by 8.
19.2: 8 = 2.4 cm.
Draw five vertical lines about 20 cm long with an interval of 2.4 cm. Draw a horizontal line approximately in the middle (to set aside the finger length values).
On the little finger section, lay down 1 cm from the horizontal and draw another horizontal here (the base of the little finger on the hand is below the rest of the fingers).
From the horizontal lines, put up the obtained values \u200b\u200bof the length of the fingers. Draw horizontal lines through the obtained points and divide them in half.
Draw rounded lines for the fingertips.
Draw a hole for the thumb, for this, along the line 0/1, set aside 5 cm down from the horizontal (Ampon). From the obtained point, lay down another 5 cm (the length of the muscle tubercle at the base of the thumb).
Set aside from the right outer line and line 2/3 0.5 cm inward.
From a point on the line 0/1, 5 cm away from the horizontal, set aside 2 cm up. From the obtained point, set aside to the left and right 1.1 cm horizontally (if the palm is wide, you can set aside a larger value). Make the top section of the hole for the thumb.
From the resulting horizontal, set aside 1 cm upwards along the 0/1 line. Through this point (on line 0/1) draw a line 2.1 cm long from the upper left point - a slot for the thumb (with a large brush, the line may be longer). Draw line segments c and d.
From the mark corresponding to the lower point of the hole for the thumb (from the lower point of the muscle tubercle), set aside Rebras (corresponding to the length of the glove). Connect the bottom point of the thumb hole with points 0.5 cm away from the vertical lines.
From the material cut out (for one glove):
- 1 piece with thumb hole;
- 1 piece without thumb hole - for the top of the glove.
Building a drawing of the thumb
Draw mutually perpendicular vertical and horizontal lines. Vertically from the point of intersection, lay up the length of the thumb, down - the length of the muscle tubercle at the base of the thumb.
Lay horizontally from the vertical line to the left and right equally the value of the girth of the thumb plus 1 cm.
From the top point of the vertical line, set aside 1 cm to the left and right and draw rounded lines of the fingertip. Draw with a smooth line (see drawing) the lower part of the part for the thumb through the bottom point of the drawing.
The length of the line should be the circumference of the thumb hole plus 2.1 cm.
From the horizontal line, set aside up the outer contour of the part 2.1 cm (b) to determine the location of the segment d / c.
On a horizontal line, set aside 1.5 cm to the left of the right side of the outer contour of the part.
From the end point of segment b (2.1 cm up the outer contour of the part from the horizontal) towards a point 1.5 cm away from the outer contour of the part, draw a line 2.2 cm long.
Medium finger details
Draw the middle parts for the fingers in accordance with the drawing. The base line for the fingers was equal to the width of the fingers in the drawing of the glove (2.4 cm).
From the material are cut out (for one glove) all the middle parts for the fingers shown in the drawing once.
Glove technology
Connect the parts manually or by machine in accordance with the markup (the seam allowance is 0.2 cm).
The connection of the part for the thumb with the part of the glove should be started at the slot of the hole and stitch the sections a, b, c, d of the part for the thumb with the sections a, b, c, d of the glove, respectively.
Then stitch the thumb piece into the thumb hole on the glove.
Stitch together the middle parts for the fingers at the base: the part for the little finger - with the first part for the ring finger, the second part for the ring finger - with the first part for the middle finger, the second part for the middle finger - with the part for the index finger.
Connect the interconnected middle parts for the fingers to the upper part of the glove.
Connect the lower part of the glove with the inserted part for the thumb to the upper part of the glove.
The outer sections of the parts of the glove are connected last.
Glove length standards
When determining the length of gloves, the number of loops / buttons of the fastener matters. Despite the fact that the loop and button fastening on gloves has almost completely sunk into oblivion due to the widespread use of elastic materials, the classic "button length" still defines the norm for the length of gloves. The length standard corresponds to the measured distance between the seam of the joint of the thumb piece and the upper edge of the glove. The unit of measure for the uncovered part of the hand is "French inch".
Let's start with the shortest gloves:
Two buttons: these gloves traditionally have a total length of 20-23 cm and end at the middle of the wrist, revealing the beauty of the forearm and fitting the hand. The hole on the inside of the wrist serves on the one hand as an eye-catcher, and on the other hand makes it easier to put on the glove. So-called palm-length gloves of this type can be worn all year round.
four buttons: glove 25-28 cm long, hiding most of the wrist. A successful compromise for a woman who wants to declare her elegance. These gloves look especially good under the cuffs of the jacket.
Six buttons: another compromise, quite exciting. It's less extravagant than the eight-button version, but it's an attractive length that will allow the wearer of the gloves to even glance at the watch - even though it's sometimes tricky! These gloves should be worn with bare hands or under a jacket.
Eight buttons: the glove reaches the middle of the forearm. These are traditional three-quarter gloves that cover the forearm by 14-15 inches. Although the return of these gloves to fashion is not as obvious as in models of other styles, but it is the length that simply radiates charm in Jackie Onassis ail.
Twelve buttons: the so-called queen of gloves, which reaches the elbow. Such gloves were worn by Audrey Hepburn and a whole horde of trendsetters.
Sixteen buttons: a classic 24" opera glove that ends exactly midway between the elbow and shoulder. The basic rule for opera gloves is: the shorter the sleeve, the longer the glove. Therefore, opera gloves should be worn with sleeveless, short-sleeved, strapless or strapless but sleeveless dresses, and with short-sleeved evening dresses.
Such an accessory to clothing as gloves has existed since ancient Egypt. Then they were worn in order to show their high position in society. It was believed that gloves are a symbol of power and wealth.
Why do you need hand clothes?
In today's world, everyone can wear gloves. Moreover, needlewomen who know how to sew gloves create interesting options for various types of this accessory.
There are a lot of varieties: ordinary, without fingers (the so-called mitts), long, wedding, boxing, surgical, and so on.
Ordinary ones are worn so that the hands do not freeze.
Mitts are convenient in that they protect the hands themselves from the cold and at the same time allow the fingers to hold something or perform any movements. That is, when exactly open fingers are needed (for example, it is convenient to press the touch screen of the phone in them).
Long - suitable for women as an evening accessory to the dress.
Surgical (sterile) - allow you to ensure the safety of the patient and medical staff.
Boxing - allow you to protect the hands of a boxer during fights.
How to sew gloves with your own hands
Each type of gloves has its own pattern. In order to find out how to sew gloves, you can turn to book sources, the Internet, or your beloved grandmother or mother. They know for sure!
The most important thing is to choose the right material from which sewn gloves will be created. The pattern is drawn on paper, then applied to the selected material. In addition to sewing, you can use other types of needlework. For example, knitting, crocheting and so on.
Consider several options for creating different types of gloves.
Beginning of work
In order to sew regular gloves, you need a stretchy material. If, due to lack of skill, the material was taken in a smaller size, then the stretchy fabric should be stretched to the desired size. And this will save the situation.
To measure the size of the future glove, you can choose two options. The first is to measure the girth of the palm, thumb, length from the tip of the middle finger to the wrist and the length of each finger. The second option (the easiest) is to put your hand on a sheet of paper and draw a contour in the shape of a hand. Get a stencil of the future glove.
The pattern of one glove consists of five parts. One is the outer part of the glove and the inner part with a hole for the thumb (from the fingers to the wrist). Three parts are finger wedges. The fifth part is the thumb.
When all the details of the pattern are ready, they should be sewn together.
First, the thumb is sewn from the wrong side. At the same time, we must not forget to retreat one and a half centimeters from the edge of the seam (so that the seam does not open later).
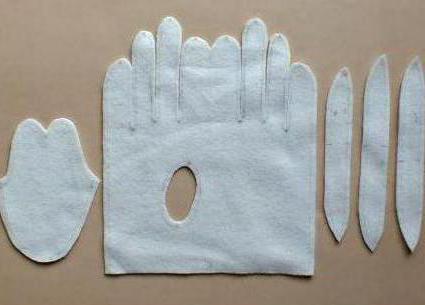
The next stage of work is the wedges of the fingers are sewn to the patterns of the inner part and the outer part of the glove. The most important thing is to carefully sew the wedges at the base of the fingers (otherwise a hole may form there). Next, the inner and outer parts are sewn together.
Most of the work has been done. It remains only to sew the finished thumb to the main hole in the inside of the glove.
The final touches in creating an interesting design of gloves are decorating them with fur, rhinestones, beads, beads. You can add thin straps made of leather material. Or flowers. You can make a wonderful volume embroidery stitch. In any case, it will be a unique masterpiece.
How to sew non-ordinary gloves?
From leather material you can sew a beautiful original accessory. For example, mitts.
They are suitable for young people, emphasizing their individuality and lifestyle. Usually they are worn by bikers, rockers and so on.

Mitts - you can make them from ordinary gloves. You cut off the unnecessary part of the fingers and, bending the edges inward, sew them together. This is the easiest way.
You can also make mitts using a pattern (just like gloves, you just need to take into account the dimensions without fingers). This method is more complicated, but interesting. A rich imagination will allow you to create a unique thing that the coolest biker or rocker can envy.
From beautiful openwork lace, you can sew wedding or evening gloves. They are long, graceful, and emphasize the femininity of the person wearing them.
Primary requirements
To learn how to sew gloves correctly and get the desired result, you must follow the basic requirements. First of all, choose the right material, threads and needles. It is also important to choose the correct dimensions of the pattern and in the process of work do not forget about the obligatory indent from the edge of the seam by one to one and a half centimeters. Success is guaranteed by accuracy, attentiveness, and the ability to combine colors correctly.
If you follow the rules, you can get a wonderful original product that others will envy.
From this article, we learned how to sew gloves with our own hands. Patterns after the completion of the creative process must be saved in a certain place. They can still come in handy, and more than once.

In addition, unique gloves created with your own hands can be presented as a gift to relatives and friends. Surely they will appreciate it.
Hello!!!
Very comfortable and cute accessory are mitts. They give us the freedom we need in the world of modern touchscreen gadgets. In addition, in mitts you can boast of well-groomed nails 🙂
Mitts come in a variety of designs, from wedding to sports.


I bring to your attention 3 ways how to make mitts.
First way. You can create wonderful mittens from leather gloves. Turn the gloves inside out and carefully cut off the fingers. We fold the edge and sew. We decorate with rivets, beads or rhinestones.


The second way. I think each of us has a sweater that is already out of fashion or just tired. Here we take it and cut off the sleeves of the length that you want your mittens. We try them on and cut a hole for the finger in the seam of the sleeve. We tuck the edges and process the hole for the finger. Decorate the mitts and you're done!


And finally, method 3! I suggest you sew mittens from fabric and for this we need a pattern. We measure the girth of the hand and the girth of the arm a little below the elbow. Or above the elbow if you want long mitts.
It is better to sew mitts from dense fabric, such as knitwear, denim or leather. The pattern is very simple.

We transfer the pattern to the fabric and cut out the details. Fold the two pieces right sides together and sew them together. We make a hole for the thumb and process all the edges.
I’ve already thought up how to sew an elastic band beautifully, and now from the bowels of the Internet:
Sewing ball gloves - step by step guide
So, the first thought: it is best to sew your first gloves from WELL-STRETCH fabric. When you become aces, you can sew from anything :)
Further. How to make a pattern? If you are sewing gloves on medium-sized ladies' hands, then an A4 sheet is enough for the pattern. Fold the sheet in half. Place your hand on this sheet so that the thumb is on the side of the fold
and trace it around the contour (I think many had fun with this in childhood). In this case, it is necessary that the fingers are not pressed against each other and are not spread apart. They should be in a free and natural position. In addition, everything is circled, with the exception of the thumb, which will be cut out separately. Next, mark on the fold point "A" - the upper base of the finger and point "B" - the lower base of the finger. 
After that, you can cut out the pattern without unbending the leaflet. At the same time, do not forget that the fold does not need to be cut. You just need to cut the pattern along the contour and cut an oval on ONE side of the pattern. The result should be this: 
Next, draw an oval equal to "AB" in height, and about half "AB" in width. 
Cut out the oval. 
Now the pattern can be transferred to the fabric. Do not forget that we have a RIGHT hand and a LEFT hand, that is, we need to cut out two parts in a mirror.
Separately, the thumb is cut out. The thumb pattern looks something like this: 
The "CFD" line should be the same length as the full length of the oval cut on the main piece of the pattern.
Further, since our fingers are not flat, but have a certain volume, then for the fingers it is necessary to cut out an additional ribbon (or several ribbons) for sewing them along the inner sides, where the fingers touch each other if they are pressed against each other. The width of the tape should be approximately 0.8 - 1.0 cm (but in general, it depends on the thickness of the fingers and the allowances for the seams, and beg according to the situation)
Now, the actual sewing. If you are cool and very good at sewing very small details on a typewriter, then you can sew everything on a typewriter with some kind of knitted stitch. I personally am not capable of such virtuosity, so I sew gloves by hand with a “back to the needle” seam.
It is convenient to start sewing with the little finger (although you can also use the index finger). If you start sewing from the little finger, then you must first sew PART of the side seam of the glove. 
I draw your attention to the fact that you should not immediately sew the entire side seam if you later plan to somehow decorate the edge of the glove (for example, sew lace to it)
You can sew on a single ribbon, or you can make separate ribbons (only three pieces for each glove) at the intervals between the fingers. It makes sense to make separate ribbons if the fingers are thin. In this case, it is desirable to reduce the ends of the ribbons to nothing at the ends of the fingers so that the fingertips of the glove do not turn out to be thick. If the fingers are quite large or just plump and even from the base to the tips, you can sew a single tape along the entire length from the little finger to the index finger. 

