Mk how to tie a beautiful ribbon bow. How beautiful to tie an elegant bow from a satin ribbon. How to make a ribbon bow for a regular hairpin
In needlework, it is impossible to do without making amazing crafts. To make them, they use elastic bands, flowers, a large and wide satin bow, etc. Ribbon bows are something that you can easily do with your own hands. These fluffy school ribbons made of nylon fabric are sure to decorate the hairstyles of young fashionistas.
Ribbon bows - this is something that you can easily do with your own hands
Sometimes the most beautiful things are the simplest. A voluminous bow made of satin ribbons is very easy to make, the main thing is to follow the instructions or look at MK.
Step-by-step instruction:
- It is necessary to prepare materials: tape, glue, wire and scissors. Even though there is no paper work here, the use of scissors is a must. Wire is not required.
- After selecting the ribbons, they should be cut. Thin ribbons do not make a beautiful bow hairpin. Do not cut it too much, the tape should be long enough. It is recommended to make a cut “with a margin” so that, if necessary, you can adjust the shape of the product.
- Now the material must be laid on a flat surface and both of its edges should be pulled to the middle. They are superimposed on each other in such a way that 2 loops and a tail are obtained.
- After that, the proportions of the bow need to be adjusted. It is important that at this stage the workpiece is symmetrical.
- Then the left loop is folded over to the right loop. A hole is formed in the center of the workpiece, the material must be turned out through it.
At the last stage, the bow is tightly tightened.
Gallery: new and unusual ribbon bows (25 photos)


DIY cute ribbon bows (video)
How to make a bow from ribbons or ribbons using the kanzashi technique
A kanzashi bow for a girl is easy to make even for beginner needleworkers.
Master class step by step:
- For such work, you will need not only a tape, but also a wire. Work begins with cutting off the required amount of tape and unfolding it on a flat surface.
- Then 2 loops are formed from the material. The two ends of the ribbon are folded in the middle, overlapping each other. To prevent the workpiece from falling apart, the center should be held with a finger.
- After that, you can use the wire. She needs to wrap the center of the bow. This has to be done very hard. To mask the wire, wrap the center with a thin strip of tape.
- Now a similar preparation is being made. The sequence of actions is the same.

A kanzashi bow is easy to make even for beginner needleworkers
The kanzashi bow is lush. Therefore, in order to achieve such a volume, it is necessary to impose a second blank on the first blank. The blanks are fastened with wire.
School bow made of nylon ribbons: master class
It is unrealistic to imagine a schoolgirl going to September 1 without a bow. But why buy such a thing when you can make it yourself?
So, the scheme of work:
- Work begins with cutting the nylon tape into 4 segments. Using a lighter, singe the ends of the segments.
- One piece of material is taken and gathered on a thread in the center. No need to make too large stitches, 0.5 cm is enough. Now the product is pulled together, forming a rose. This will be the pinnacle of the job.
- The second piece of material is folded in half along its fold. Thread stitching is being done. The product shrinks.
- To decorate a bow, you can use, in addition to nylon, a satin ribbon. She should decorate a rose bow from the center, making small loops. The satin material is fixed on the nylon with thread stitches.
- All tape ends must be melted. At this stage middle part work is ready.
- A piece of nylon thread is folded in half, and there the part of the material that is at the top falls down a little. The form is fixed with threads. It turns out a bow. It must be sewn onto the previous workpiece. Double bow for school is ready.

How to make a beautiful little bow from narrow satin ribbons?
Small bows are convenient to use as hairpins.
The work includes the following steps:
- To make such a work, you will need not only a ribbon, but also a fabric. It should be thin enough. The color of the fabric is delicate, bed, for example, light pink or beige.
- You need to think about how the bow will be fixed on the hair. For these purposes, you can use a hairpin.
- The ribbon is placed on a flat surface. It is necessary to form a standard bow in the form of a butterfly from it. To do this, the ends of the material are folded inward.
- In the middle, the work must be tied with wire or thread. To disguise the mount, you need to cut a thin strip of the same material and tie it around the center of the butterfly.

Small bows are convenient to use as hairpins
At the last stage, you need to attach the butterfly bow to the hairpin. Now it can be worn on the hair. beautiful decoration ready.
How to choose a ribbon to create a bow?
- First you need to determine what the bow is for. For example, if a craftswoman wants to make it for her first-grader daughter, then preference should be given to nylon material.
- The choice in favor of this or that tape should be made on the basis of its quality. You should not save on such material, because in order for the product to look beautiful and presentable, it is worth buying high-quality ribbons.
- Beginners are not recommended to use satin material in such work. Why? It's all about its slipperiness, it will be inconvenient for an inexperienced master to work with him.
- If a young fashionista wants to make a bow decoration for her hair, she can look for a ribbon with a pattern. This thing can be made as an accessory for a dress. For example, polka dot or striped ribbons are commercially available.
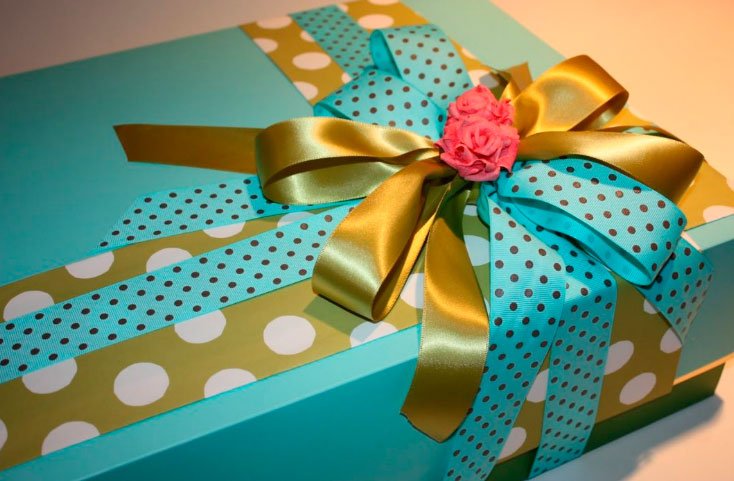
- If you need a ribbon to decorate gift wrapping, then you can find a material with wire on the edges. Using this tape is very convenient. With this material gift wrap will be decorated in the best possible way.
- Don't be afraid to experiment! This rule is universal even for beginners. Do not be afraid to use multi-colored materials, as well as materials of different quality, to create a bow. Each master is his own stylist.
- All knots that the master makes while working on creating a bow must be very tight. It is important to remember the following: if the craftswoman was able to tie a tight knot, then she can tie a bow from it by hand.
- Auxiliary materials such as wire and thread should be used when the material is not dense enough. In another case, it makes no sense to use them, since the product will perfectly fix itself.
- You always need to cut the ribbon "with a margin." For example, if to create a bow you need material 20 cm long, then it costs 25 cm to cut. These seemingly extra 5 cm are necessary to adjust the shape of the product.
- If glue is used in the work, then you can proceed to the next step only when it is completely dry.
- There are cases when the glue, even after drying, is visible on the material. To disguise it, tie that place with threads or a small piece of ribbon of the same color as the bow.
For those who have difficulty tying bows, it is recommended to use special devices for this. This will greatly facilitate the task of an inexperienced master.
A variety of accessories traditionally adorn girls' hair. But even as adults, it is difficult for us to refuse them. They refresh our handbags, hats and dresses, make the most everyday hairstyle festive. Beautiful bouquet looks even more elegant if you tie a small bow of tulle or organza on it. But that's not all. Beautiful packaging is very important for a gift. A paper bow, originally tied on the box, will emphasize the solemnity of the moment. In the store you can find any bows for girls, interesting hairpins.
Making a bow out of fabric with your own hands, you emphasize your originality.
It is not difficult to figure out how to make a bow from a ribbon with your own hands.
Any girl will be delighted if her mother makes her own hair ornament, decorates it with beads or beads, sequins or tulle. Before you make a bow out of fabric, you need to understand its purpose:
- small, made on a fork - for a small souvenir;
- satin ribbon bows - for girlish hairpins;
- lush, brightly decorated - for a children's holiday;
- paper - for gift wrapping;
- unobtrusive, elegant - for any dress;
- for interior decoration.
Before making beautiful bows from satin ribbon, you need to choose it correctly. Its color should be in harmony with the dress or hat. Explain how to make a satin ribbon bow traditional way, there is no need.
Let's try to make a beautiful multi-layered product from ribbons of different colors and widths tied together. Purchase material in 3-4 colors of different widths. The widest ribbon should be the longest, the narrowest the shortest. Trim the ends at an angle so they don't fray. Lay out the strips of fabric so that the bottom is the widest strip, the top is the narrowest. Tie them with a narrow strip, leaving long ends to strengthen the jewelry on a gift or hairpin. Add some beads.

You can make very elegant ribbon bows with your own hands, step-by-step instruction will help you with this. From a ribbon of small width, you can create an elegant and elegant accessory.
Follow these steps:
- Cut out a circle with a diameter of 2 centimeters from thick paper.
- Cut the tape into pieces 6-7 centimeters long.
- Using a glue gun, glue the end of one segment, glue the other end of the same segment after 5 mm.
- Place the end of the second segment between the glued ends of the first segment, place the second one after 5 mm.
- Glue several rows of such loops in this way, the last two rows may be smaller.
- The middle of the flower can be enlivened with rhinestones or beads.
Consider another method of how to tie a bow from a ribbon. To get this elegant openwork bow, you will need satin ribbon, glue, scissors and a stapler.

The tape must be cut into 4 parts different lengths, connect the ends of each segment with glue. Lay the loops in size and fasten in the center with another strip. Tie a knot nicely, leaving fairly long ends. This elegant decoration will look great on a gift.
With a fork
Sometimes a very tiny bow is needed to decorate a postcard, make tiny earrings, or dolls. Consider how to tie a bow on a fork.

You will need a thin ribbon 0.5 cm wide and 10 cm long, a table fork and scissors. How to make a bow on a fork is clear from the following diagram. The mini bow is very easy to make.

A more complex bow from a ribbon on a fork will take a little more time, but the technique for creating them is very simple, a master class is not needed.
Kanzashi technique
The term kanzashi means folding. Using this technique, you can make bows from ribbons folded in a certain way. It allows you to create amazing things, and the step-by-step instructions given here will help you make kanzashi bows with your own hands.

To make a bow for girls with your own hands, you will need:
- dark satin ribbon 5 cm wide;
- the same white 2.5 centimeters wide;
- the same dark 2.5 cm wide;
- threads of a suitable color;
- scissors, needle, glue;
- hair clip or elastic band.
Do-it-yourself hair bows are made as follows:
- Three pieces of 22.5 centimeters are cut from a wide dark ribbon, and three pieces 15.5 centimeters long are cut from white.
- We burn the edges with a lighter, fold the segments of the dark segments in half, unfold and fold the ends with a small allowance. We strengthen the thread to the middle.
- We do the same with the second segment, and superimpose it on the first, fix them. The third, also processed segment, is superimposed on top of the first two. We tighten the thread, tighten the bow, wrap it with a thread and sew it.
- We carry out all the same operations with a white ribbon, we get exactly the same bow, but it will be smaller in size.
- We glue a white bow on a dark one, wrap the middle of the product with a dark narrow ribbon, fix it well. If you planned to make an elastic band, then before tying the ribbon, lay the elastic there.
From rep ribbons
Before you make a bow from a satin or silk ribbon, make it from rep ribbons. Reps keeps its shape well, does not wrinkle.

You will need rep ribbons of different widths and patterns, a needle, thread, glue, an elastic band or a hairpin and all kinds of jewelry. Before making from ribbons with your own hands beautiful bow, decide on its size, the width of the rep ribbons depends on it.

Cut out a rectangular template from plywood, the smaller side of which is equal to the width of the bow. Make a cut in the center of the figure. We impose a tape on the template so that the ends are directed in different directions. How many curls do you want for a bow, how many turns are needed. The ends of the tape must be fastened. With a seam forward needle, sew the ribbon through the through hole in the template. Remove the template, tighten the thread.

Usually this decoration has several layers. You can decorate the core with beads, you can wrap it with a thin shiny braid. Tie it tight and the decoration is ready.
Paper decorations
You want to pack a gift beautifully, and the question arises of how to make a paper bow with your own hands. Paper decorations can be of different colors and sizes depending on what they are intended for. The simplest do-it-yourself bows can be made in a few minutes. By the way, they can decorate the Christmas tree.

Before you make a bow for a gift, draw what shape your product will have, cut it out. Glue the jumper between the parts with glue, bend the sheets in the middle until the edges match. Lubricate the center of the second part with glue, place the first part on top, aligning the centers. Wrap the pieces with a strip of tape and glue them together.

Handmade accessories will never go out of fashion. Needlewomen will always be interested in questions about how to decorate your hair and dress in an original way, how to make a small bow for a bracelet, elegant bows for your daughter to school, an unusual decoration for a handbag, how to make a bow out of rubber bands, how to decorate your home, make it cozy. Having mastered these skills, you can always add a twist to your outfit, decorate a gift beautifully, and make the interior of your home interesting.
Gathered for a visit, chose a gift, now you don’t know how to pack it? Then you are at the right place. In this article, we will look at how to make a ribbon bow for decorating gifts, and also tell you how you can make an exclusive present for every taste from a regular ribbon.
How to create a festive mood?
Nicely wrapped gift original decoration always creates a festive mood, and it doesn’t matter if you give it or gave such a present to you. It is a beautiful bow, which can be called a classic decoration technique, that “warms up” the fantasy, making you tremble in anticipation of a surprise. The originality of such an ornament lies in its versatility, since a ribbon bow can be made in different shapes or sizes, and today's market offers the widest selection colors, from plain to complex patterns. Such decorations can give the souvenir more solemnity. Initially, you need to pack a surprise in gift paper how to do it, read the article: well, we will teach you how to make a bow from a ribbon, most importantly, be patient and do not quit work after the first failure, because the wonderful grateful smile of the hero of the occasion, to which you are going to visit, deserves a little effort.
How to make a voluminous ribbon bow to decorate a gift?

To get a really voluminous bow, you need to give preference to cuts made of hard material. Having picked up the ribbon, we do the following:
- Having decided on the size of the bow (the longer the loops, the larger the bow will be), you need to make loops from the tape in 5–9 additions, laying them one on top of the other.
- Smooth out the resulting loops and carefully trim the edges, as indicated in the photo below. You should get almost triangles around the edges.
- Take the loops in the middle and part them on the sides so that the cut parts are in the center.
- Fasten the narrowest central part. You can do this:
- the same ribbon
- sew with threads;
- fasten with a stapler;
- twist with wire.
- Straighten the resulting half-loops, give them volume and a beautiful bow is ready!

How to make a fluffy ribbon bow? Video lesson
How to make a simple ribbon bow to decorate a gift?

You can make a strict version for a “male” present. It will look great both on the packaging and on the bottle of an expensive strong drink. And you can read more about souvenirs for the men's holiday in the article:. Let's get to work:
- Cut off a piece of wide ribbon of the desired size, fold, glue the edges with glue. Should be a ring.
- Flatten the resulting ring.
- Hide the joint under the same, but thinner cut.
- Gently glue the edges and a strict decoration is ready.

How to make a bow from a ribbon - a classic version
The classic version of the decoration is very simple in execution, while creating an excellent frame for any present.

With such a bow, both a book, a box of chocolates or a service, as well as ordinary wild flowers, will look great. Such a classic is performed according to the following steps:
- Take a long ribbon and fold it into two loops, as in the photo below. In each hand, there should be one addition.
- The loop that is on the left to start at the back, crossing two additions. It turns out a circle at the bottom.
- Pull the right loop through the formed circle, pull it off. The center should be in the middle.
- Straighten the loops - a beautiful bow is ready! If necessary, you can cut the lower ends to the desired shape (oblique, triangle, etc.).

Video tutorial: how to tie a classic-style ribbon bow to decorate a gift?
How to make a Dior bow from ribbon for decorating souvenirs?
The Dior bow is used not only in decorating gifts. With it, unforgettable decors for parties, weddings and other celebrations are created. By the way, take note of the rules of conduct at the table at such festivities. They are described in the article:.

To make such a bow, you need to follow these steps:
- Prepare four cuts, of different lengths.
- Roll each of them into a circle and fix with threads or glue.
- Fold the circles in ascending order one on top of the other.
- Tie the resulting design of ribbons in the center by inserting the strapping tape into the upper (smallest) circle, as in the photo below.
- Attach the structure.

How to make a ribbon bow on a fork?
Do you believe that you can tie a beautiful bow on a fork? Not? Then let's learn, we offer to try out two options for the execution of such an ornament.

Option No1
Let's try to solve the following equation: Ribbon + Fork = Original bow. To resolve, you need to do the following:
- Cut a narrow ribbon of the desired size. For convenience of work, it should be at least 18 cm.
- Conditionally divide it into a long and a short side. The short side will not be used.
- Pass the long part between 2-3 cloves of the fork used.
- And its end, bring up between the same teeth.
- After these steps, you should get a small loop. Don't tighten it just yet.
- Pass the rest of the long end through the loop inward again.
- Pull this end out and tighten the knot.
- Trim the long ends to the desired length, singe them with matches or a lighter.

OptionNo2
To get a beautiful bow in the form of a lush flower, you need to use two different ribbons:
- thin;
- wide nylon.
Execution steps:
- Insert a narrow ribbon crosswise into the center of the fork. It will be needed almost at the end of the work.
- Braid the fork teeth with a wide nylon cut, as shown in the photo below.
- Pull off the bindings with a thin ribbon, tie.
- Remove the workpiece, straighten.
- Scorch the edges with fire.

The decoration is delicate. It will ideally complement any souvenir intended for the beautiful half of humanity.
Video tutorial: how to make a ribbon bow on a fork
Photo ideas for decorating gifts with bows


Bows are an invariable attribute of a solemn hairstyle for any girl. And if earlier they were the same, and differed only in the pattern of the ribbon itself, today the choice of bows is quite wide. A bow can decorate a hairpin or hair band. A huge number of varieties can be made from the same satin ribbon. It's enough to arm yourself necessary tools and materials, as well as carefully study our master classes, which present step-by-step actions with photos.
Step-by-step instructions for making a satin ribbon bow
It is not difficult to make a bow from a satin ribbon with your own hands. A high-quality master class will turn any work into a real pleasure. Depending on the type of bow and the technology of its manufacture, different materials and tools. But most often scissors, satin ribbon, glue, needle, thread, ruler are used. The bow can be small, designed for decoration, or large and elegant, in the style of kanzashi. Bows can be attached to a headband, hairpin, or even paper gift box. In other words, there are many options for using satin ribbon bows.
Master class 1: a beautiful satin ribbon bow

To make such a bow with your own hands, you will need:
- several types of ribbons: satin, thin yellow, leopard, brown thin;
- cardboard box;
- elastic;
- matches;
- glue.

Master class on making a bow from a satin ribbon with your own hands:

Master class 2: satin ribbon hairpin bow
The next option for making a bow from a satin ribbon is more laborious, but appearance products confirms that the time spent pays off with a vengeance.

He will decorate any hairstyle. To make this version of the bow, you need to use:
- blue satin ribbon 5 and 2.5 cm wide;
- silver ribbon 3 mm wide;
- a circle of felt with a diameter of about 5.5 cm;
- a thread;
- needle;
- scissors;
- matches or a lighter;
- glue;
- hairpin.
The satin ribbon, whose width is 5 cm, must be cut into 6 pieces of 14 cm long, with a width of 2.5 cm - into 6 pieces of 10.5 cm. Then you need to divide the silver ribbon into 6 pieces of 15 cm long, as well as 6 pieces of 8 cm each.

The master class consists of the following:
- Fold six pieces of the widest satin ribbon in half. Collect them on a thread, and then pull off the petals, forming a flower. Fasten with thread.


- Similar actions must be done with segments of another blue tape.


- Glue a felt circle from the back edge of the flower. This will give him a more solid foundation. Then prepare pieces of silver ribbon. Fold them into the shape of ears and secure the ends with glue.

- Lay out the received "ears" from the silver ribbon around the large flower, as shown in the photo.

- Place a smaller flower on top. Fix it with glue on the main.

- Fold the remaining pieces of the silver ribbon in the form of ears.

- Try to stick them on the top flower.

In fact, the satin ribbon bow is ready. It remains only to paste in the middle of a pebble or other decoration. A hairpin can be attached to the back with a drop of glue.
Master class 3: a lush satin ribbon bow

To make this version of a satin ribbon bow, you should prepare:
- kapron tape 5 m long and 5 m wide;
- 2 needles;
- a thread;
- the tape itself.
Step by step with photo:
- Prepare the ribbon to make the first petal. To do this, fold one end into a triangle. The result is the inner side of the petal.

- Fold the triangle in half, and then fasten the corners so that a petal forms. How to do this is clearly visible in the photo.


- Then, in the same way, you need to make another petal.


- The resulting triangle must be folded with the tape in such a way that a large triangular figure is obtained.

- Next, fold the product in half. You need to make another side of the petal. The resulting triangles must be fixed at the corners with glue.

- Fold the ribbon again in the form of a triangle, then again in half. This will be the next petal of the flower. Repeat the same steps until the tape ends.


- At the lower and upper ends of the figures, connect the extreme petals.

- The upper and lower edges of the flower (middle) are fixed.

The resulting bow can be made even more beautiful by attaching a bead or button in the center. From below, you can sew an elastic band for hair or glue a hairpin.

Master class 3: satin ribbon gift bow
In previous master classes, options for making bows as a dye for an elastic band or hair clips were considered. But, as already mentioned, the scope of various bows is quite wide, so they are also used for other purposes. Alternatively, make a decoration for gift wrapping.

To make such a bow, you will need to follow these steps:
- Fold the satin ribbon into several rings, the diameter of which will correspond to the same parameter of the final bow.
- Smooth out the resulting loops, and then make diagonal cuts along the edges, as shown in the photo.
- Fold the loops again, but now the section of the cuts should fall into the center.
- Using ordinary wire or thin ribbon, fasten the bow in the middle. Then you need to straighten each loop so that the edges of the product look in different directions.
Thus, you get a magnificent bow, which will become a worthy decoration for any gift wrapping.
How to make such a variant of the bow is shown in the figure below.

Video: how to make a bow from a satin ribbon with your own hands
In the video you can see a simple but original version of making a bow from a satin ribbon.
Another simple version of a satin ribbon bow is presented in the following video.
The next video shows a more complex version of making a do-it-yourself bow from a satin ribbon. Despite the laboriousness of the process, the product turns out to be so beautiful that it is perfect as a decoration if you stick a hairpin or hair band to it.
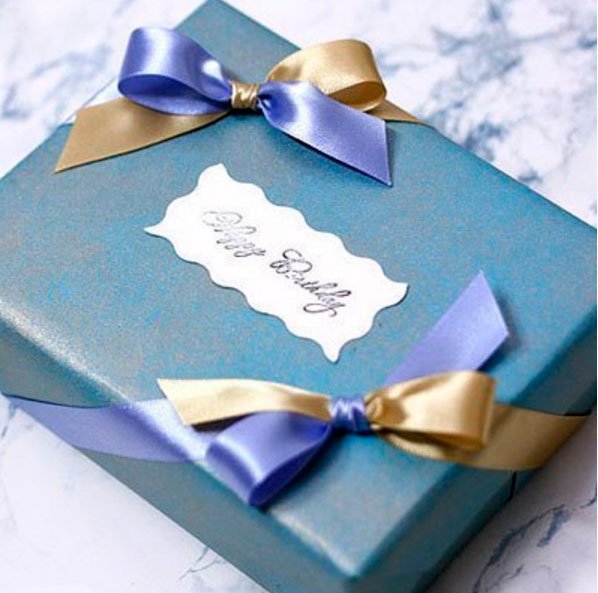
How to make a ribbon bow? Many people ask this question on the eve of Victory Day, weddings and other festive events. Such an elegant decoration can be attached to a hairpin, headband or bracelet, it can also be added to a dress, suit and belt. And it seems like a small item, but it instantly turns an everyday outfit into a festive one! With the help of our master classes, you will learn how to create bows from different ribbons with your own hands. It can be satin ribbons, St. George, rep, etc. This instruction contains 4 options for making this item in various ways.
This craft is perfect as a decoration for a hairpin, headband or bracelet. It can also be attached to the chest as a brooch or on the belt - in the form of an elegant buckle.
Materials and tools:
- ribbons 2.5 cm light pink and pale blue (you can use any colors that blend harmoniously with each other);
- ribbon 1-1.2 cm fuchsia - a small piece;
- silver rhinestone ribbon - about 15 cm;
- pearls with a diameter of 0.6 cm - 3 pieces;
- glue universal;
- tweezers;
- candle or lighter;
- ruler.
Step 1
Cut off from the tape light pink shade 2.5 cm wide 4 pieces 10 cm long.

Take 2 pieces and place them on top of each other front side up. Using fire, melt their ends on one side. Seal the melted edges with tweezers or your fingers.
Repeat on the other side.
Connect the other 2 pieces together in the same way.

Take one piece fastened in 2 ribbons. Place it with both ends facing you with the bottom left corner towards the bottom right corner.

Align the upper part of the segments and iron with your fingers so that they form a regular triangle.

Wrap the upper part with an arc with the top of the triangle to the corners joined together.

Insert thread into the needle. Sew the bottom of the work with as few stitches as possible.

When finished sewing, pull the thread towards you and pull everything together. Then tie a knot. Additional sew the end of the piece with a few stitches to make it hold on tight.
Repeat these steps with the rest of the doubled segment.


Using all-purpose glue, connect the ends of both parts together. Leave them for a while until the glue dries. This will be the top of the bow.

Step 2
Cut 4 pieces 10 cm long from the blue and Pink colour 2.5 cm wide. Melt their edges with a candle or a lighter.

Place the pink pieces on the blue pieces with their backs facing each other.
Insert thread into the needle. Fold the two connected segments with the ends towards each other. Sew along their bottom edge.

Next, fold the next two pieces in half. Sew along the bottom with the same needle. Pull the pieces together.
Add the rest of the double segments in the same way.

Pull the thread towards you and pull all the elements together. Additionally sew the middle of the work with a few stitches to make it more durable.

You made the bottom part.
Step 3
Place the top item on top of the bottom one. Align them nicely.
Cut a piece of 1-1.2 cm fuchsia ribbon about 7-8 cm long. Wrap this piece wrong side up in the middle of the craft. Cut off the excess.
Using fire, melt the ends of this piece and squeeze them with your fingers. Turn the resulting ring inside out, and move the line with the seam to the back side. So your middle will be neat on both sides.

Separate 2 pieces from the rhinestone tape along the length of the middle.

Glue them around the edges.

Attach a few pearls on top. Ready!

How to make a ribbon bow
This craft looks rather modest, since it is made of light brown grosgrain ribbon. Suitable as a decoration for a hairpin or elastic band. It can also be pinned on a dress of the corresponding color.

Using this technique, you can create products from the most various types ribbons (satin, silk, organza, brocade). Depending on the material, they will always look different.
What you need:
- rep tape 5 cm wide - 24 cm (rep tapes 4 and 2.5 cm wide are also suitable);
- a small piece of silver-colored brocade ribbon 1 cm wide;
- scissors;
- ruler.
Step 1
Cut the grosgrain ribbon 5 cm wide and 24 cm long into 2 equal parts. You should get 2 pieces of 12 cm.

Take any of the pieces and fold it in half. Run your fingers over the fold several times, forming a line in the middle.

Apply all purpose glue or hot glue in a straight line as close to the fold as possible on the left side.

Wrap the left edge in right side and place on the glue. Press down gently.

In the same way, glue the right edge of the segment to the middle.

Flip over to the other side.

Step 2
Place a dot of glue in the center.

Squeeze the craft exactly in the middle at the marked point. Wait until the glue dries.

Place a dot of glue on the back left, as close to the center dot as possible.

Fold the front side back in the middle. Glue it to the center at the marked point.

Repeat on the other side.

From the second piece of rep, make another bow.

Step 3
Connect the first part to the second at the center point.

Take a small piece of brocade 1 cm wide.

Wrap it around the center several times. Secure the end with glue on the back of the product. Ready!

How to make a bow "Spring"
This craft can be created in one color or in two colors. You can attach it to a hairpin, headband, bracelet, etc. You can also make it from a St. George ribbon by May 9th. It will come out just amazing!

What you need:
- silk ribbons of pink and olive shade 2.5 cm wide;
- a small piece of brocade ribbon 0.6 cm wide;
- thread, needle;
- universal glue or glue gun;
- ruler;
- pins;
- scissors.
Step 1
Cut 50cm from a 2.5cm roll of pink ribbon.

Fold this piece in half with the wrong side up. Iron the fold line well.

Also squeeze both ends of the tape in the middle with your fingers, wrong side up.

Wrap one end of the tape wrong side up to the middle line, exactly along the previously formed folds. Poke with a pin.

In the same way, fold the second edge of the tape to the middle. Poke with a pin.

Fold the piece in half. Iron the tops well.

Turn back. Flip.

Fold the left edge towards the center. Set it so that the point of intersection of the two lower tapes is flush with the top point of the ironed line. Poke with a pin.

Repeat on the other side.

Now take your needle and thread. Tie a knot. Sew the central part of the craft with small stitches. Don't cut the thread.

Pull the thread towards you and pull off the center of the craft. Additionally wrap it with a few turns. Fasten the thread and cut. You have made the top part.

Step 2
Cut 3 pieces 12 cm long each from 2.5 cm wide olive satin ribbon.

Take one piece and fold either end in half, wrong side up.

Departing from the top by 1.5 cm, cut a corner diagonally. Start from the middle, moving to the extreme points.

Repeat on the other side. Follow these guidelines carefully and your ribbons will be neatly and symmetrically cut.

Cut the rest of the pieces in the same way.

Now place all 3 pieces exactly on top of each other.

Take a needle and thread. Tie a knot. Sew the center of the pieces with one stitch, pinning them all together. Cut off the thread.

Now unfold the pieces. Arrange them so that their sides form rays, like a painted star.

Fasten the center part of the figure with a pin. Sew it with a needle and thread.

Pull the thread towards you. Pull off the center piece. Additionally, wrap it with several turns of thread.

You made the bottom part.
Step 3
Place the top on the bottom. Connect them together with a few turns of thread.

Cut off a small piece of brocade ribbon golden hue 0.6 cm wide. Melt its ends with a lighter.

Wrap this piece around the central part, periodically smearing it from the back with glue. Attach the end to the back of the craft.
Ready!

And if you make this bow from a ribbon of the same color, it will come out something like this.

How to make a bow brooch
This dainty item would look great as a brooch. It can also be attached to a hairpin or headband. And if you make it from a wide ribbon, you get a chic belt buckle!

What you need:
- ribbon 2.5 cm of the desired shade (we took pale blue);
- middle for kanzashi to match the tape;
- a small piece of felt to close the back;
- scissors;
- ruler;
- universal glue or glue gun;
- clothespins;
- lighter;
- thread and needle
Step 1
Cut 2.5 cm tape into 8 pieces 20 cm long each. Melt their edges with a candle or lighter.
Place one of the segments in front of you.

Bend it straight down the middle right side up. Smooth the fold line well with your fingers.

Move the line to a vertical position. On the left side above the fold line, put a drop of universal glue.

Wrap the top half of the segment in left side along the fold line, right side up.

Wrap the top of the craft down along the fold line. Make sure that the left side of the triangle formed in the upper part coincides with the left side of the lower segment.


Now wrap the bottom flap to the left. Adjust the top and bottom so that they are symmetrical.


Wrap the right corner to the left so that a little space is captured behind the corner line.

Now fold the left side under the corner to the end so that the end of the top corner is flush with the left edge of the part. If this is not observed, slightly straighten the part and fit it to the specified requirements.


Detail is ready! Secure it with a clothespin.

In the same mode, make parts from the remaining segments.

Step 2
Insert the thread into the needle. Tie a knot. Take one of the parts and remove the clothespin. Sew along the left side, starting at the corner at the top.

Now take the second piece. Insert it with a corner into the inner pocket on the top piece. Place the second piece so that its top is on the horizontal line of the middle of the first piece. Sew the second piece to the first.

Arrange the next two elements in the same way.

Leave about 5-6 centimeters of thread free. In the same technique, connect the remaining 4 elements to each other.

Now pull the thread towards you.

Pull everything as much as possible and connect it into a ring. Tie a knot.

Step 3
Now you need to hide the hole in the middle of the craft.
At the back close it with a small circle of felt.

In front, carefully glue the pretty center.

To complete the work on the reverse side, attach accessories - a brooch. Or any other desired accessories.

Below are videos from which you can learn how to make a ribbon bow in other ways.
Video instruction - how to make a ribbon bow