How to assemble paper models. Paper models in half an hour - reality or fiction? Fitting surfaces of plumage
Any novice modeler should know the basics of working with paper. The quality of the created paper models depends on this elementary knowledge.
All the following techniques need to be taught to children from a young age, so that at school they already do this without hesitation. Like any good habit, the basics of modeling need to be brought to automatism in the mind of the child. I'm not only talking about those children who want to do paper modeling, this applies to any child because it is with paper that any creativity and development of children begins! This activity not only contributes creative development, but also develops perseverance, accuracy, hand motility in the child. Let's move from theory to practice.
Workplace. Take care of a good, comfortable table and chair, lighting should fall from behind the left shoulder, use a table lamp if necessary. In order not to stain the table with glue, cover it with paper, film, or put a sheet of glass with sanded edges so as not to cut yourself.
Remember that the elbows of the hands should not lie on the glass - this is bad for the joints!
Paper- that's what we're working with. You should pay special attention to the quality of the paper, I like to work with good paper! Good and bad paper is like two cars, one Mercedes, and the second Zaporozhets, choose what you “ride” yourself :) For initial creativity and simple paper toys, it is best to use plain paper, for printing on a printer, A4 format such as “Snow Maiden ”, it has good qualities and is the whitest in relation to other brands. The density of such paper should be 80 g/m.
More complex models and toys are glued from thick paper or cardboard. Today, cardboard is of very poor quality and it is very difficult to find good sheets. A set of cardboard can be colored and white, from which cardboard you will glue the models, choose for yourself.
If you like heavy paper, then I advise you to purchase heavy paper for sketching. Please note that the sheets in the set are not bound along the edge with sticky glue, it is best when the sheets are simply folded without gluing. The weight of drafting paper can vary greatly between sets, so compare sheets from different sets when choosing and buy the whitest and thickest paper.
If you need super white and thick paper, then we are at your service. wide selection photo paper. On such paper, you can print color scans. From sheets of photo paper, the most beautiful and colorful models are obtained. For work, choose photo paper with a density of 200 g / m or more, sometimes photo paper is almost like thick cardboard. Depending on the future paper model, you can buy single-sided or double-sided photo paper - it's very convenient!

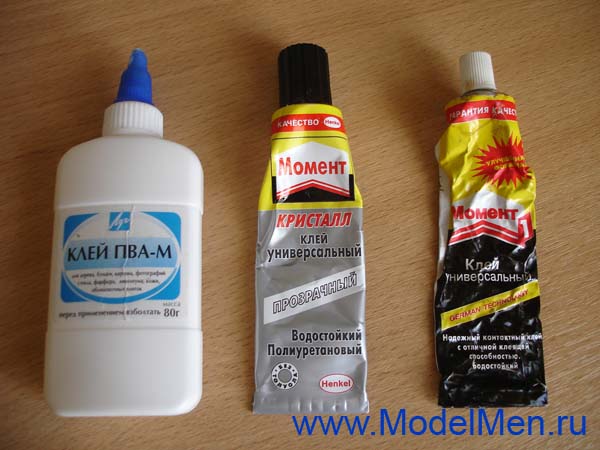
Stationery (silicate) glue is suitable for gluing plain paper, but I still advise using PVA glue, you will understand the difference when you try to glue both. It is possible to glue photographic paper with PVA glue, but it is better to use Moment glue. Remember, there are different adhesives on sale and cheap does not mean high-quality, which is why I bring you photos of what I use myself.
You can smear glue with a brush or squeeze it out of the tube directly onto the paper part and smear it with a strip of thick paper (use scraps). If you glue with the Moment, then ventilate the room, as the glue is very toxic!
Paper work. Paper modeling does not require a lot of knowledge and tools.
Main tools: pencil, knife, eraser, ruler, compasses, scissors.
The pencil is necessarily wooden, of medium hardness (letter designation on the pencil: TM, T, F), even with different markings pencils may not match the quality, choose carefully. A pencil sharpening knife should not be too long!
Remember that it is easier to cut yourself with a dull knife than a sharp one!
The eraser is necessarily large and soft so that it does not smear the pencil, but erases it!
A ruler, preferably metal, from 30 to 50 cm. Plastic rulers, even new ones, in general, almost all do not have a straight line. The compass must be rigid, without wobbly parts, the stylus or pencil must not move otherwise "a penny price" for such a compass!
Scissors can be of different sizes, the main thing is that they do not go tight and lie comfortably in the hand.
The most difficult thing in paper modeling is to draw the development of the model, and without the knowledge of drawing it will be difficult to do. If you do not like to develop models yourself, then you can take ready-made sweeps.
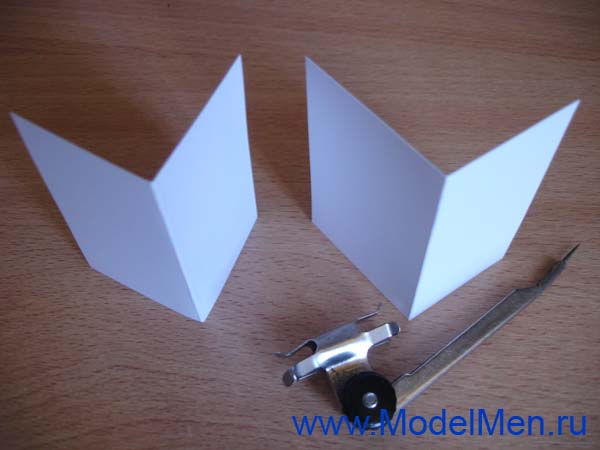
I will talk about a common technique for high-quality folding of paper so that the fold line is smooth and sharp. For example, I took two rectangles, I bent one with my hands without using any tools, the line turned out to be just disgusting, it is very difficult to bend the paper in this way along a straight drawn line. I will bend the second rectangle along the line made with a needle from a compass under a metal ruler. Many advise such actions to be done ballpoint pen, but it is difficult to find an empty rod and you still won’t make a line with a pen of sufficient quality, which is why I advise you to use a compass. Attention, you can cut through the paper with a needle, it is better if the needle is blunt, when you draw a line, bend the compass in the direction of movement, almost laying it on its side.

Look at the result, the fold on the left is terrible, but the fold on the right is very neat. Try to do this experiment yourself, you will see for yourself in my words.
Pencil work. Pay no less attention to this than to everything else, because the final work depends on the quality of pencil sharpening. Whether the parts will converge when gluing together or not depends on the pencil!
Sharpen your pencil sharply so that it draws a thin, crisp line. The point is not even in the quality and beauty of sharpening the "piece of wood", but in the sharpness of the stylus. Learn how to sharpen pencils with a knife or blade, but forget about the sharpener forever!
Be careful with cutting tools!

Now let's talk about cutting. You need sharp scissors to cut paper! Do not sharpen scissors by cutting sandpaper, the scissors will be sharpened, but at the same time you will scratch their inner side edges, they will cut inaccurately, they will tear the paper. Better ask someone who can sharpen scissors for help!
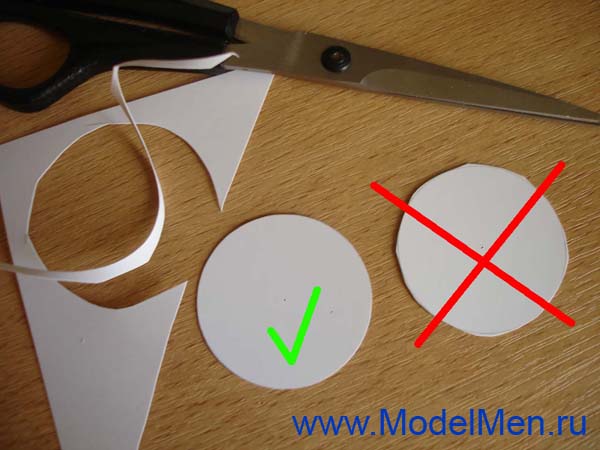
A difficult element to cut is the most ordinary circle. Children without skills cut out a polyhedron instead of a circle, you need to show and teach them how to do it right! First you need to cut the part around the line at a distance of 2-5 mm, so that nothing else interferes, then cut along the finishing line.
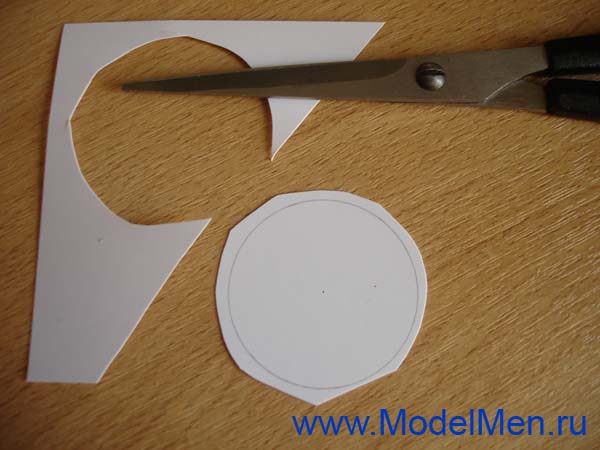
The cut circle should not have any corners, just a clean, straight line!
Often you have to cut out complex parts with small triangles for gluing (see photo). Before cutting out such a part, you must first go through all the folds with a compass, they are drawn with a dashed line. Next, cut off the excess paper along the tops of the triangles with scissors.

In any direction, make cuts along one side of the triangle to the fold line.
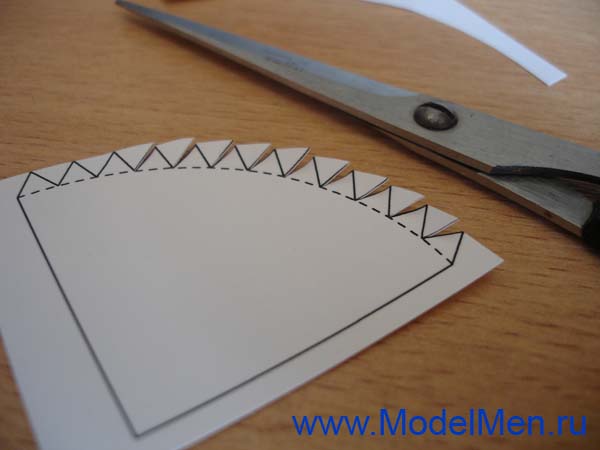
Then, on the reverse side of the triangle, make a second cut until the piece of paper itself falls off, you don’t need to tear it out of the corner with your hands! You will get a neat detail, and the corners are easy to bend thanks to a pre-drawn line with a compass needle.

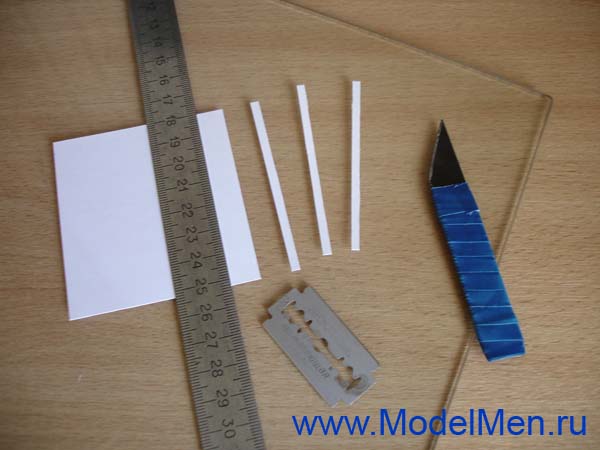
To cut strips long or short and save time, use a metal ruler and a sharp knife or blade. You need to cut on a sheet of plastic or glass, so as not to spoil the table! Firmly press the ruler, otherwise it may move, you will ruin the paper.
Often, in order to glue a cylinder, for example, a car wheel, you need to glue the paper around the circumference so that the paper does not resist, it can be bent with scissors or on the edge of the table. To do this, take the folded scissors in your right hand, into a fist, put a strip of paper on top and press it with your right thumb, now pull the strip of paper with your left hand so that the strip rubs against the edge of the scissors. The same can be done by stretching the strip on the edge of the table.

This concludes my acquaintance with the basics of paper modeling, if I didn’t tell you something in this article, I’ll tell you in others or you yourself will learn this in the process of work. And I wish you creative success and will be happy to look at your paper models, go to
The most accessible form of creativity is paper modeling. Adults are also involved in it, when developing models of buildings, and children at school in labor lessons, in “Skillful Hands” circles. When developing model scans, factories often use the same type of paper for both small and large parts, which is not correct, because it is convenient to make small ones from thin paper, and large ones from thick cardboard for their strength.
Materials and tools
To work on this model, you need to take tissue paper(thin tubes are convenient to make), sheets of paper, as in sketchbooks, paper for printing on a printer, whatman paper (for tools), ordinary cardboard and thick cardboard for the frame and all sorts of films for windows. For some models, you may also need wire of different thicknesses, threads, ordinary fishing line, slats, fabric.
The tools will also be different: a metal ruler, a knitting needle with a diameter of 2 mm, scissors and scissors, tweezers, wire cutters, a knife, an awl, a protractor, small awls, a skin. Paints are mainly used acrylic, varnish for such paints, nitro varnish, nitro thinner, epoxy resin, glue. This is not a complete list of tools, materials and paints for working on the model, in any case, before you start working, you need to carefully study and find everything you need, and only then start working. The model cutting itself can either be bought in a store or downloaded from the Internet.
It is better for novice modellers-designers to take something easy to start with, a boat, a boat, a minesweeper and do it yourself from start to finish. For those who just want to try their hand at modeling, you can do with the usual disassembly, for those who want to build an exact copy, you need to collect all the information, all proportions, including colors, photographs, characteristics. Do not be confused by the material with which you will work - paper, if you show an already made model and say that you built it yourself from paper, there will be no limit to strong surprise.
Assembling a paper ship model (example)
The manufacture of any model should begin with the case, because if you start with a trifle, then when your hands reach the main part, everything else can get lost and crumpled.
To work on the frame, it is worth taking not thick cardboard, but dense, so that it does not stick out and does not crumble during operation. On this cardboard we glue elements of the frame and other parts that require high density. After everything dries, carefully cut out with scissors, in some places you can help with an awl and a knife. In the event that it is necessary to make a cutout in the part, it must be remembered that the thickness of the cutout must exactly match the thickness of the cardboard in order to avoid deformation. The assembly of the frame, as a rule, begins with the deck, then the underwater part is assembled, and only after that the whole hull is assembled together. Then the rest of the details are assembled.
The next stage of assembly is the skin of the underwater part of the hull. It starts from bow to stern, you can start on both sides and finish in the middle. Work on appearance the surface part is a more responsible task, since there is no reinforcement here and it can easily bend. The skin is glued carefully, not fanatically pressing it to the body, otherwise no density of cardboard will save it from dents. For more experienced modelers, the body can additionally be pasted over with fiberglass, after sanding it and then soaking it with epoxy. After complete drying, the body must be primed and puttied, and repeatedly, the drying layers must be processed with sandpaper.
Coloring in paper modeling
Coloring the model can be done with a brush, or even better. You need to start painting from the bottom, since this is the main part on which the model stands on a stand. Be sure to check with the original and select the desired shade of paint. Do not forget about the waterline, it must be done after the painting of the hull is completed. Painting the deck and other details should be done last.
In this example, it can be seen that paper modeling not a very easy thing, but for beginners, you can limit yourself to simply assembling a model of a ship on paper, which is what children often do in labor lessons.
>> >> Paper modeling
Paper modeling can be classified as an occupation that will never cease to interest a person. Many orphanages of creativity necessarily organize design circles, because paper models not only provide an opportunity to get a new interesting figure or toy, but with their help you can improve your knowledge of physics and mathematics.
Tools for the job
To learn how to fold basic paper models, you will need simple tools like scissors, a utility knife, PVA glue, and a brush to apply it. Give preference to PVA construction glue - of all the varieties, it has the thickest consistency, it does not spoil the paper, making it wet and viscous, like a regular one.
Different models are made up of different types paper - from cigarette to thick cardboard. Beginners are advised to start with 200g/m2 watercolor paper for large pieces and 140-160g/m2 drawing paper for smaller pieces.
Separate details, such as masts, railings, small finishing elements, craftsmen create from polymer clay, gypsum, plasticine and self-hardening plastics. If you also supplement your work with stucco parts, stock up on various stacks, molds - like those used in ceramic floristry.
How to make a paper model
The workflow for creating a paper model follows a few simple steps. Before starting the process, the master determines which figure he wants to design. In fact, almost any product can be made from paper, but paper modeling often involves the following options:
- geometric figures, polyhedra with convex and concave corners;
- scaled copies of famous buildings;
- models of luxury cars;
- models of military equipment: tanks, armored vehicles, heavy guns;
- vehicles: planes, ships and submarines, trains.
Figurines of a person, animals, plants are constructed much less often than others. Once the product category is defined, the main part of the workflow begins.
Creating a Layout
Three-dimensional models of paper are made up of several large and small details - the schemes of elements must first be drawn on paper sheets of the desired color. Here a person cannot cope without understanding certain knowledge of geometry and the possibility of representing a three-dimensional image.
To make it easier for beginners to learn, many specialized magazines began to issue drawings of finished scans for a paper model, by gluing which you can get a figure.
You also need to cut the layout according to the rules. For example, a solid line along the contour indicates the place of the incision, the dotted line indicates the fold. But in each scheme, the designations are individual, so before cutting out, you need to read the explanations for the figure.
Assembly
After the drawings of the paper model are ready, the layout is glued and finishing work is done, if necessary.
To make the surface of the product realistic, craftsmen use different coatings: glossy varnishes, matting sprays, craquelure liquids, stains, etc.
Paper car models
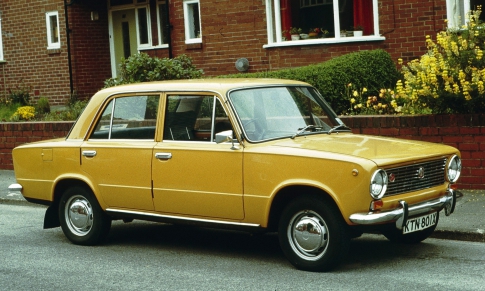
A beginner in paper modeling will enjoy this master class, which contains information on how to construct a well-known model of a VAZ 21011 sedan car in just half an hour.
Stock up on heavy drawing paper or coated sheet if the figurine is being made as a gift to a friend.
- On an A4 sheet using a color printer, print the finished scan of the paper model with your own hands. If you want to enlarge the scheme, make sure that the proportions of the length and width are preserved - changing the parameters may prevent the parts from joining correctly.

- Put a picture of a real car of this brand in front of you to use the picture as a guide when assembling. Bend the reamer in the right places.
- Give the blank the shape of a car to mark the gluing points for yourself. Only after that you can successively glue the white valves with glue and glue them to the necessary parts from the inside, fastening the parts of the machine to each other.
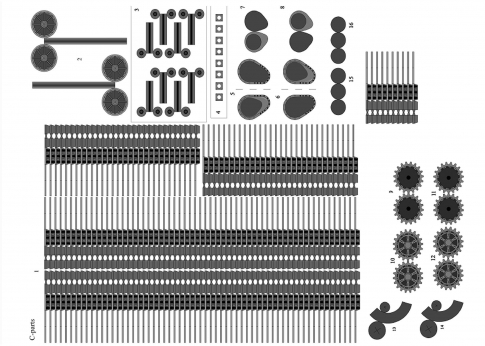
Please note that the tread strips need to be glued together, forming rings that will be attached to the wheels in order to get the most voluminous paper models.
paper tank models
The construction of military equipment out of paper is somewhat more difficult than the creation of civilian vehicles because the guns are made up of many small parts that form the body.
To see this, try to form a difficult, but very interesting model of the German Panther tank.

- On a thick A4 sheet, print out the drawings of the components of the tank using a color printer. Small details are best cut out of thin cardboard so as not to bend narrow curled elements.

- Cut out the pieces with sharp scissors to make the job easier.

- It is better to carry out gluing in blocks - separately connect the parts of the hull, propulsion system and turret, and then fasten large elements to each other.
To glue the parts of the tank in the correct order, follow this video tutorial when assembling.
Sometimes the joints are connected with small errors, due to which white paper stripes appear on the model. You can get rid of them with felt-tip pens or pencils similar to the color of the armor.
paper airplane models
If you already have some skills in building paper figures, you will surely enjoy building a paper and cardboard model of the Tu-104 passenger aircraft.

- Print out the aircraft drawings on thick paper.

- Stick the elements of the inner frame of the product on thin cardboard - they are marked with red numbers.
- Details marked with a cross - frames or frame - are transferred to cardboard using a compass. In this case, you can calculate the radius of the circle by placing the compass needle in the middle of the cross, and the pencil on the circle. Patterns of paper frames must be glued to these cardboard blanks.
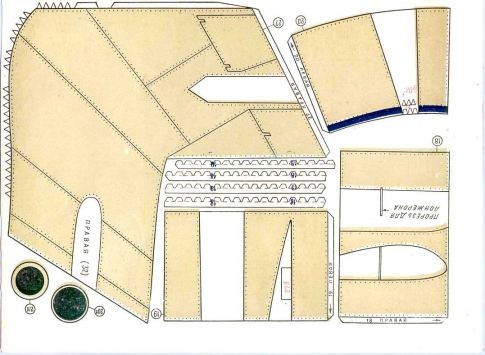
- After developing the frame, start creating the fuselage, or hull aircraft. Note that, unlike previous products, fuselage sections #1-8 do not have white fixing flaps. They are interconnected by special ribbons, represented on the patterns by the corresponding numbers in blue.

- The frames are glued into the joints between the fuselage sections.

- While the glue in the aircraft body dries, glue the tail parts together.
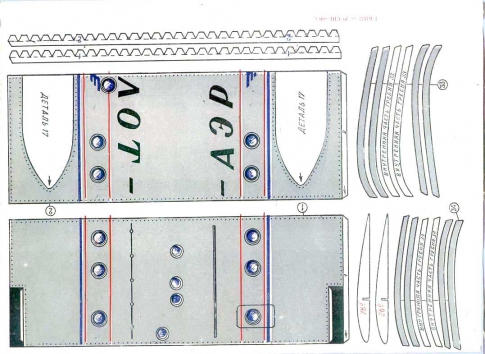
- The engines of the apparatus are assembled like a fuselage.

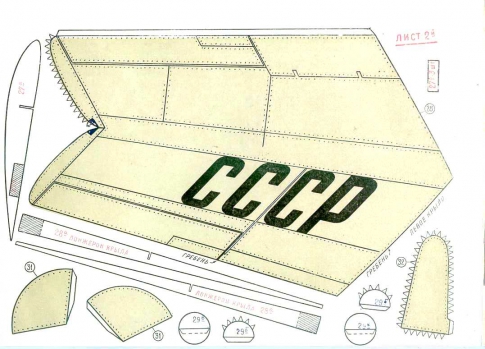
- Next, wings are formed using cardboard and paper.

- Connect the parts of the hull, wings, bow and cockpit together.

- The chassis assembly takes place in several stages - the wheels and their components are initially formed, after which the chassis is glued to the wings in a specially designated place.

- You can also use the pattern to cut out a wooden chassis - it will be stronger and last longer than paper and cardboard.

In order to avoid bends and creases on the body and tail, stuff the parts with cotton during the assembly process. Decorate the plane as desired with decoupage sprays and paints.
More simple model you can make a paper airplane with your own hands, focusing on this video.
Take it, tell your friends!
Read also on our website:
show more
It is very widespread as a type of active recreation, hobby activities, labor education and training.
Creating Models
Model making
Most people who are fond of modeling begin their studies by making models from ready-made patterns or even from sets of finished parts. This makes it possible to gradually get acquainted with the most common and proven modeling techniques and solutions, master them and, on the basis of this, if you have the desire and ability, try to create varieties of well-known, and then completely your own models.
To make models from standard sets, you need to master the basics of reading a drawing. Assembling the model requires and trains a certain determination, perseverance, and attentiveness. At the same time, the natural alternation of coordinated movements of the hands and mind prevents local overstrain and the associated loss of interest in learning, etc. (which is typical for "ordinary" purely theoretical study).
Many well-known designers and engineers in the future began their acquaintance with science and technology from modeling circles. Among them are academicians A. S. Yakovlev, S. P. Korolev and others. In automotive and aviation engineering, it is a common practice to first create models of future technology and only then make a full-size object.
Paper used
Paper of various types is used: from tissue paper to thick Whatman paper. With one-sided or two-sided coloring, one-color or more complex. Many models come as ready-made kits with printed patterns (parts) that you just need to cut and glue. But you can also assemble the model yourself.
At the moment, the list of materials for modeling has grown a lot. There are good quality papers of various weights. From 90 to 300 g/m.
Directions of modeling
You can make a model of almost any object or creature out of paper, but most often models are created:
- buildings and other architectural structures (for example, bridges);
- ships, planes, helicopters, and other military and civilian equipment,
- geometric bodies (mostly symmetrical: Platonic and Archimedean solids, star-shaped polyhedra)
- paper images (models) of people, animals, plants, insects, dolls, robots, fairy-tale characters, etc. are made somewhat less frequently.
At the same time, hobbies significantly depend on personal interests, gender, age, natural and cultural-informational environment. So, among girls, the interest in modeling military aircraft and warships is usually noticeably inferior to the manufacture of models of dolls, flowers, beautiful polyhedrons, paper parquets, etc.
Buildings are popular, most likely because they are the easiest to create a set of patterns and are very well embodied in paper, and also because architecture has taken a paramount place in human life, where architects modeled a building from paper, and then embodied it in stone or other materials. But models of airplanes, ships and other equipment are also popular, no less than models of buildings for most modellers, and buildings complement the space when creating dioramas in conjunction with technical models.
Planar and volume modeling
Paper models are flat (contour) and voluminous.
- The contour model is a side view of the modeled object, equipped with a stand to make the model stable. This is technologically the simplest kind of models.
- A three-dimensional model is a three-dimensional copy of an object. A flat paper pattern is folded in straight lines, as well as into cones and cylinders. Surfaces of double curvature are obtained using putty, papier-mâché technique, the use of individual parts made of wood and plastic [ ] .
History
Many researchers of this issue believe that paper modeling is the most ancient way of modeling, but this is not entirely true. The very first "models" began to be made by primitive tribes, using improvised materials wood, stone, clay and sand. Paper appeared much later, and initially it was so expensive that it was used only for its intended purpose - for writing texts. The time of the appearance of the first paper is still controversial in the scientific world, some researchers associate the moment of its appearance with the second century BC, since something similar to paper was found in the second century BC in one of the tombs of China. Other scientists give later dates, II-VI centuries AD. At the same time, all researchers of this issue agree that paper came to us from the East from China, Korea, and Central Asia. It is believed that the first paper-making workshop was built in Samarkand by captured Chinese in the 7th century. In Europe, paper appeared much later in the 11th-12th centuries. The history of the emergence and development of paper production goes hand in hand with the history of paper modeling.
The first paper models appeared in France in the 15th century, along with the advent of serial printing technology. The first pictures were cut out in the form of squares and pasted on cubes to teach children. At about the same time, artists began to create such a type of portrait creation as cutting out the customer's profile from paper treated in a special way. Later, this direction in art was called "vytsinanka", and the cut profiles were called "vytsinanka". Eminent artists did not shy away from him, for example, - Ilya Repin. It did not require such consumables as paints and canvas and was widely spread among the people. Today, in Moscow, on the old Arbat, you can meet street craftsmen who offer to cut out the profile of anyone who wants it in two or three minutes.
- Stationery knife - included in the set
- Paper scissors - almost any will do
- Metal ruler - included
- Tube of glue - included
- Reamer cutting surface
- Reamer - included in the kit
- A few hours of your time
As a cutting surface, you can use, for example, a piece of old linoleum, glass, or a clean kitchen cutting board.
Assembly order
Reamer cutting
Cut out all the details of the sweep along the contour (the contour is indicated by a solid line). If you cut the paper with a utility knife along the ruler, the finished model will look neater than if you use scissors. The fact is that by turning the scissors, you can accidentally wrinkle the paper at the intersection of the lines.
Fold preparation
Gently push the paper along the dotted and dash-dotted lines with the blunt side of the clerical knife blade so that the paper bends better in these places.
The dashed-dotted line means folding the edges of the paper away from itself (for convenience, diverging arrows are shown on the development), the dotted line stands where the edges of the paper should be bent towards itself (this movement is indicated by converging arrows).
After you have pressed the paper along the lines, bend it. In some places, the bonding tabs (indicated in grey) would be difficult to bend if they were the correct size. Therefore, they are a little more than necessary. Before gluing, it is better to cut off the excess parts. The protrusions with such extra parts are painted gray in two shades. The lighter part should remain, and the darker part should be cut off.
gluing
The lined side of the paper is the inside of the finished model. On the development, the same numbers indicate the edges that must be glued together. For ease of gluing, there are protrusions for gluing (indicated in gray). It is best to assemble the development in the order of numbering - first, the edges with the numbers "1", then "2", etc. are glued.