Socks knitted on 2 knitting needles for beginners. Children's socks on two knitting needles without a single seam. Knitting a sock foot on two knitting needles
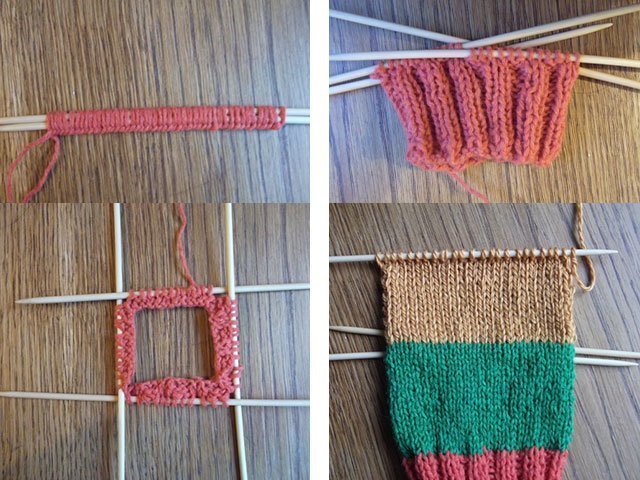
To tie socks on two needles can be done with a very simple technique. Since only two knitting needles are used in the work, it is easier to knit socks, so we recommend learning to knit socks in this master class for those who only learn to knit. The elastic band softly fits the leg, for decoration when knitting a sock, make colored stripes on the cuff and around the foot. First, the upper part of the sock is knitted, then the sole, and finally a seam is made from the heel to the top of the cuff.
For knitting one pair of socks, you will need 150-200 grams of yarn of medium thickness, knitting needles No. 3.
Description of knitting socks on two knitting needles:
For a sock on the 39th leg size, dial 61 loops on the knitting needle. Work the cuff of the sock in 1x1 Rib, alternating 1 knit and 1 purl stitch. In the following rows, knit the pattern according to the pattern, i.e. over the front loop, perform the front loop, and over the purl - purl. Always remove the first loop of the row as a front one so that a looped edge forms along the edge.

Knit the cuff to a height of 12 cm, for colored stripes, include a thread of a different color in the work, at regular intervals.
Having connected the cuff of the sock, mark the central 31st loop. In the next row, knit 5 new loops from the selected loop. If the selected loop is purl, then knit from it purl, yarn over, purl, yarn over, purl, then knit a row of loops according to the elastic pattern. Turning the work over and reaching the new 5 loops, knit them including in the pattern 1 p.p., p.p., p.p., p.p., p.p., then continue to knit the row to the end with an elastic band.

If the marked loop is front, then knit 1 person.p., nakida, 1 person.p., nakida, 1 person.p. from it. In the next row, turn the new 5 loops into the pattern and knit p.p., p.p., p.p., p.p., p.p. and further along the row with an elastic band.

From the added 5 loops, mark the central 3rd loop, a new addition is made from it through the row. Knit the upper part of the sock, making from the central loop the addition of new 5 loops through the row.


When knitting with additions, a wedge is formed in the center, which from the end of the cuff in length should be equal to the length of the foot along the top from the leg to the toes.

In total, it was necessary to connect 14 rows with additions.

The upper part of the sock is ready, now knit the sole, which is also done in garter stitch, for this you need to knit only the front loops in each row.

For the sole select the central 20 loops. In the first row of knitting the sole of the sock from the beginning of the row, knit the side part and the central 19 loops, knit the 20th loop together with the loop of the next side part with one front loop.

*Turn the work, remove the 1st loop, knit 18 front loops, knit the 20th loop together with the loop from the side of the front loop. Repeat from *.

In the photo, for clarity, the central 20 loops and loops of the side parts are divided into three knitting needles and the 4th knitting needle is used in the work. However, it is easier to knit the sole of the sock on two knitting needles, knitting only the central 20 loops and in each row decreasing, together with the 20th loop, a loop from one or the other side part.
Yarn: 50% wool, 50% acrylic, thickness 250 m / 100 g. Yarn consumption: 70 g. Tools: knitting needles No. 2.5 for elastic and No. 3 for main knitting, knitting needle. Patterns: front surface, elastic band 1x1. Knitting density: front surface 2.2 loops in 1 cm. Size: 37 (24)
We bring to your attention an easy way to knit socks on two knitting needles. The socks fit well and are comfortable to wear. This model of socks has a square (straight) heel. Such a heel allows you to tie socks to any instep of the foot: from low to high. Beginning knitters love to knit socks on two knitting needles, as this method is simple and does not require much experience. Nevertheless, if you took the knitting needles in your hands for the first time, we recommend that you look at where the basics of knitting are shown.
Video on knitting socks on two knitting needles without a seam at the end of this page.
Loop calculation
To calculate the loops, you will need the following measurements: foot length and. The girth of the foot in the metatarsus (beams) can be determined by the calculation method: it is equal to the length of the foot minus 1 cm for a wide leg or minus 2 cm for a narrow leg.
Note: you can also use the size charts for knitting socks: children's sizes, adult sizes.
The number of stitches you need to cast on is equal to the girth of the foot in the metatarsus, multiplied by , divided by 2 (because we first knit half the sock). We get: (23 x 2.2): 2 = 25.
Progress
Cast on 25 stitches and knit cuff the desired width (11 cm) with an elastic band 1x1.
Further move on to knitting heels. We knit the heel with front stitch. The height of the heel is on average 1/4 of the length of the foot. Heel height can also be determined as follows: the number of rows should be equal to the number of loops on the needle minus 2 if the number is even and minus 3 if the number is odd. We get: 25 - 3 = 22 rows. We knit 21 rows with front stitch, and in the 22nd row we begin to knit heel cup.
Mentally divide the loops by 3. We get 8 - 9 - 8 loops. If there is 1 loop left, we attach it to the middle part. If 2 - one to the side parts. Starting from the 22nd row, we decrease the loops. We knit 8 loops of the first part, then 8 loops of the second (middle) part, and we knit the 9th loop of the second part together with the loop of the third (side) part of the wrong loop. We turn the work to the front side. We remove the first loop, we knit 8 loops of the middle part, and we knit the 9th loop together with the loop of the side part of the front. We turn the work again, remove the first loop, knit 8 loops of the middle part and knit the 9th loop together with the loop of the side part of the wrong side. And so on, we knit only the loops of the middle part, attaching the loops of the side parts, until we join them all. There should be 9 stitches left on the needle.
Now start knitting the middle lower part of the sock.
After knitting the heel, the number of loops turned out to be more than the calculated one. Excess loops should be cut. The area where we cut the loops is called the instep wedge.
Knitting pattern for instep wedge universal
1 row:

First row of the middle lower part of the sock
2 row:
3, 5, 7 row:
4, 6, 8 row:
Thus, we reduced the loops on the instep wedge by knitting 2 loops together at the end of each row and the estimated number of loops remained on the needle - 25.
Note: if you have a high instep, you can knit in front of two rows with decreases, 2 additional rows without decreases. This way you will provide more freedom in the area of the instep of the foot. At the same time, the height of the rise can be adjusted: you can knit 2 additional rows only before the first decrease, before the first and second, or before all three.
Wedge knitting pattern for high instep
1 row: we raise the loops of the left side from the edge loops (11 loops). You can pick up the edge loops by both walls or by one wall facing the front side.
2 row: knit with purl stitches. Raise the loops (11 loops) of the right side of the heel.
3, 7, 11 row: facial loops;
4, 8, 12 row: purl loops;
5, 9, 13 row: at the end of the row in front of the edge loop, we knit 2 loops together with the front one with a slope to the left;
6, 10, 14 row: at the end of the row in front of the edge loop, we knit 2 loops together from the wrong side.
We continue to knit the middle lower part of the sock to the toe. You can try on a sock and knit to the end of the little finger. It can be determined by calculation: the toe is approximately equal to the length of the heel cup. Subtract from the length of the foot (24) the length of the toe and the length of the cup (5 + 5 = 10), we get that the middle part is 14 cm or 44 rows.

Next, we knit a toe. We decrease the loops in the same way as on the instep wedge, knitting 2 loops together in front of the hem at the end of each row. When 1/3 of the loops (9) remain on the needle, we begin to knit the upper part of the toe, at the same time attaching the edge loops of the lower part. In the front rows from the edge loop of the lower part we knit the front loop, in the wrong side - the wrong one. We pick up the wall of the edge loop facing the wrong side. We do not remove the first loop of the row, as usual, but we knit the front one in the front rows and the wrong one in the wrong ones. This first loop should be knitted tighter. By knitting the hem, the loops of the upper part of the toe are added. So we add loops until the estimated number of loops (25) is on the needle.

We also knit the upper middle part of the sock, lifting the loops from the edge ones, but in order to keep the number of loops calculated, at the end of each row we decrease the loops in the same way as before, knitting 2 loops together at the end of each row.
Important: the corner loop should be knitted behind both walls so that the hole does not turn out to be too large.
Well, do you think that it would be nice to knit warm cozy socks, but the classic five-needle method scares you? Smart tips recommend learning a simple and quick way to knit socks on 2 knitting needles. First, we will tell you about the process itself in principle. And if you apply your imagination, your socks will delight not only you, but all your loved ones with the result.
Read this article:
Threads, knitting needles, measurements, samples
Before starting our simple, but such an exciting lesson, take the yarn from which you are going to do the work, knitting needles and knit a 10 by 10 cm sample. Call it what you want. Many people neglect this moment, and then, when they finish the work almost to the end, or at least half, they realize that they made a mistake with the calculations.
Flatten the resulting square by slightly stretching it diagonally and aligning it on the sides. Attach a ruler and determine how many loops there are per 1 cm and how many rows. Write it down so you don't forget.
Now measure your foot. We need measurements:
- half circumference of the ankle;
- foot length;
- cuff height.
Set of loops
To knit socks on 2 knitting needles, we must dial the number of loops equal to half the circumference of the lower leg.
For example, if the circumference of the lower leg is 20 cm, half -10 cm. Multiply 10 by the number of loops in 1 cm, determined from the sample. If there are 2 loops in 1 cm, then this is 20 loops. For a snug fit, discard 2 loops. It will turn out 18. Therefore, according to my calculations, I need to dial 18 loops, which I do.
Scheme and principle of knitting a sock on 2 knitting needles

- Beginning of knitting, elastic.
- Back of toe to heel
- Heel.
- Sole.
- Mysok.
- The front of the sock.
- Elastic band, the end of knitting.
If you are knitting for the first time, use colored threads to separate the heel and toe, as in our case in the diagram.
Assembly of the toe

First, the heel and toe are sewn from the wrong side, and then the entire sock along the side seams.
Description of work
1. Rows 1 - 4: back of cuff in 1 on 1 ribbing
2. The back of the sock
Row 5: knit all stitches
Row 6: all loops are purl
Rows 7 - 34: repeat as 5 and 6
3. Heel
color change (optional)
Row 35: Slip 1 hem, knit 2 together behind back walls, knit 14 knit, knit 2 together knit behind front walls, 1 edge and purl.
Row 36 and all even: Purl all sts.
Row 37 and all odd ones are done at the beginning and at the end of the decrease by 2 together, as in the 35th row, until 2 loops remain in the center, a total of 6 loops on the needle.
43 row - start at the beginning and at the end of the row add 1 loop. In the front rows, we knit after the hem and before the hem at the end of 1 loop 2, without making a crochet so that there are no holes. To do this, we knit the front loop behind the back wall and without removing it from the left knitting needle - once again the front loop behind the front wall.
44 and purl all even rows.
We knit the heel until the initial number of loops is on the knitting needle. (20)
4. Outsole.
Color change (optional) knit exactly to the little finger with the front surface.
We have this part occupies 40 rows.
5. Toe, part for fingers.
Color change (optional)
We knit exactly like a heel.
6. Front of the leg
Color change (optional)
We knit exactly to the cuff with the front stitch. This is approximately 60 rows.
7. Front cuff
Color change (optional)
Elastic band 1 to 1 4 rows and close the loops.
Attention. All calculations are approximate. They depend on the size of the foot, the thickness of the yarn, the number of knitting needles and the individual handwriting of the knitter. In each case, adjust according to your data.
Do not sew the sock until you have knitted the second one. This will make it easier to navigate.
If you want to please your family and friends with knitted socks that will warm them in cold weather, reminding you of your love and care, our photo and video tutorials will help you figure out this difficult matter. We invite you to learn from scratch and consider in detail how to knit correctly for adults (male and female) and children.
So, how to knit (step by step for beginners) socks using two, five and circular knitting needles.
Detailed master class "how to knit socks with knitting needles" (photo in stages)
If you learn the basics, in the future you will not be afraid of beautiful products with a jacquard pattern, unusual in the patchwork style, new models with braids, very cool with ornaments, etc.
Knitting socks on 5 needles
This technique involves knitting a product without a single seam. The socks are knitted in a spiral, as a result of which they lie perfectly on the leg.

Popular articles:
Socks on five knitting needles are knitted on top of the sock to the toe in a circular knit, loops are picked up on four knitting needles, the fifth is working.
The number of loops is calculated based on the circumference of the leg. We take two measurements of the leg:
1st - lifting circle; centimeter measure the foot from the heel to the rise on an inclined plane.
2nd - leg circumference; measured at the foot, at the thinnest point of the leg, above the bone.
Then we determine the average circumference: add the instep and leg circumferences and divide the resulting figure by 2. For example, the instep circumference is 31 cm, the leg circumference is 21 cm; we get 31 + 21 \u003d 52, 52: 2 \u003d 26 cm. For this number of centimeters, we calculate the set of loops. It is advisable to round the resulting number of loops to a number divisible by 4, so that it is convenient to knit on 4 knitting needles.
We collect the required number of loops, distribute them on 4 knitting needles and knit an elastic band in a circular knit. Usually an elastic band is 5-6 cm, but you can knit less - if desired. Then we knit 7-8 cm with front viscous to the heel. We knit the heel on two knitting needles from half of the loops, and leave the other half on unused knitting needles. On two knitting needles we knit a fabric with a front knitting of 5.5 - 6 cm, this is the height of the heel. Depending on the instep of the leg, it may be less, but starting from the 35th leg size, this is a constant value.
Then, to give the heel a shape, we make the descent of the heel: we divide all the loops into three parts. If there are extra loops, then we attach them to the central part (if the number of loops is not divisible by 3). We will knit the loops of the central part further, and the loops of the side parts (they will form the sides of the heel) are gradually attached to the loops of the central part.

We start the descent of the loops from the wrong side to finish it from the front. We knit two-thirds of the loops from the wrong side, then 2 loops together - the last loop from the central part and the first loop from the third part - we knit them together from the wrong side. After that, we turn the knitting and knit on the front side of the heel, while at the turn we remove the first loop without knitting.
We knit the front ones, knit the last loop of the central part and the first loop of the first part together with a broach (remove the first loop, knit the second one with the front one, then transfer the removed loop to the knitted one). We turn the knitting again, remove the first loop without knitting, etc.

Continue knitting until all side loops are closed. Now we pick up loops from the side of the heel, from each second row we pick up 1 loop + 1 loop additionally, i.e. from 2 rows we collect 3 loops. We turn to circular knitting, we take into work the loops from the left knitting needles, the newly typed loops from the side parts of the heel and the loops of the central part of the heel. Knit one row in knit stitch. Then, in each 2nd circular row, for a better fit of the heel, we knit the 3rd and 2nd loop from the end of the 1st knitting needle together with the front loop and the 2nd and 3rd loop of the 4th knitting needle together with a broach.

We repeat the decrease until the initial number of loops (cast on to start knitting the product) is reached. Next, we knit the foot with facial viscous in a circle to the bone of the thumb or to the end of the little finger. Then we knit the toe of the sock. We decrease the loops as follows: in each 2nd row, we knit the 3rd and 2nd loops from the end of the 1st and 3rd knitting needles together with facial loops, and the 2nd and 3rd loops of the 2nd and 4th we knit the knitting needles together with a broach. When half of the loops remain on the knitting needles, we perform such decreases in each circular row until 4 loops remain. We tighten them with a thread and fix them.
Using two knitting needles (the easiest way)
On five knitting needles, you have already learned how to knit the simplest model, so we move on to knitting on 2 knitting needles (you can use circular knitting needles). The knitting of such a model allows you to make patterns of any complexity, but many are confused by the seam. But if you manage to finish beautifully and connect the seams correctly, the seam will be invisible visually and to the touch.

To start knitting, we calculate the number of loops based on the circumference of the leg.

For example, we take 48 loops, we collect them + 2 edge loops (a total of 50 loops) on 2 knitting needles, we knit a straight fabric 5-6 cm with an elastic band, then with the front stitch or a selected pattern of 7-8 cm. We start knitting the heel: the number of loops (without edge loops) divide into 4 parts, it turns out 12 loops. We will knit the heel on two middle parts. We knit 12 + 12 + 12 loops (three parts), turn the work and knit 12 + 12 loops (two middle parts). Again we turn the work and knit 12 + 11 loops.

Again we turn the work and knit 11 + 11 loops, etc. That is, in each row we knit 1 loop less (we make shortened rows) until we have 8 loops left in the work. Now we will begin to increase the number of working loops, knitting the previously removed loop in each row. So that there are no holes in knitting, we do this: we put a side loop on the left knitting needle, and we knit this worn loop and the next one together with the front one. Those. the number of working loops will increase by 1.

Then we turn the knitting, remove the first loop, then purl 8, raise the side loop on the left knitting needle and knit 2 loops together with the wrong one. And so on, until all loops (12 + 12) are in work.
Now start knitting a toe. Again we divide the loops into 4 parts - 12 + 12 + 12 + 12. We decrease the loops as follows: in each 2nd row, we knit the 3rd and 2nd loops from the end of the first and third parts together with facial loops, and we knit the 2nd and 3rd loops of the second and fourth parts together with a broach. When half of the loops remain on the knitting needles, we perform such decreases in each row until 6 loops remain.
We tighten them with a thread, we sew the sock with the same thread. The seam is obtained along the top of the sock.
Video tutorials with step by step description
The most interesting MK with a detailed description of the whole process.
Knitting socks on 5 needles video for beginners
Women's slippers
Men's socks (detailed) instructions
Openwork knitted socks with a pattern
Booties with braids for the little ones
Original sneakers for boys
It's very simple knitting socks on two knitting needles for beginners needlewomen. The cold season is coming, many grandmothers and mothers take up knitting needles to impose warm socks on their loved ones. many will like the fact that the sequence of knitting the sock parts is very simple and does not require stitching. First, the back of the sock is knitted from the cuff to the heel, after knitting the heel, knit the sole to the toe, after knitting the toe, the upper part is knitted to the cuff, while in the process of knitting it is connected to the sole.
Type on one knitting needle half the loops for knitting the cuff of the sock. The number of loops is calculated from the density of knitting, which depends on the thickness of the thread and the number of knitting needles, as well as from the measurements taken for the desired sock size.
Knit cuff elastic band 1x1 (1 front loop, 1 purl loop) to a height of 7 cm. Then another 8 cm with front stitch. The connected part is the back of the sock from the cuff to the tip of the heel.

For knitting the heel Continue dec on each RS row, knit 2 sts together after the 1st selvedge and before the last st in the row.

When the number of loops on the needle is halved, start making additions. To do this, at the end of each row, cast on a loop from the edge of the resulting bevel of the heel. Insert the needle behind the outer loop of the fabric, grab the working thread and pull a new loop onto the knitting needle.

When the needle has the same number of stitches as at the beginning, stop picking up stitches. The knitted heel looks like a wedge.


The toe of the sock is knitted just like the heel. Dec in each RS row, working 2 stitches together after the 1st edge stitch and before the last stitch in the row. When the number of loops is halved, start adding loops, picking up 1 loop from the edge of the resulting bevel at the end of each row.


Once the needle has the same number of stitches as at the beginning, continue to knit the top of the sock, picking up stitches at the end of each row from the edge of the sole. But at the same time, turning the work at the beginning of each new row, knit the first two loops together according to the pattern - front or back, so that you have the same number of loops on the knitting needles.