Decoupage of champagne for the new year. Decoupage of bottles in different versions (photo) We decorate a glass bottle with napkins
The essence of this creative process is to cut out various figures and decorate them with a variety of objects. Decoupage of bottles for beginners step by step with a photo clearly shows this whole fascinating process. You can decorate not only bottles, this technique is often used to decorate dishes, vases, kitchen utensils, furniture, and in general everything that catches your eye. Decoupage of bottles is often performed for the holidays or as a gift for various celebrations.
The most popular decoupage of bottles with napkins.
The paper has good adhesive properties, and it can be glued to almost any surface. Napkins - the material is very thin, and the presence of various colors and patterns on them allows imagination to run wild.
Before starting work, you must prepare all the necessary materials. The most important thing is to find a suitable bottle, it should be flat with smooth curves. Napkins should be three-layer, various magazine clippings will also come in handy. Acetone is suitable as a degreasing agent. It is necessary to glue all decoupage elements on PVA glue.

Decoupage bottles master class step by step:
- First of all, you need to prepare the bottle for decoupage, for this you need to get rid of the glued labels. You can do this by soaking the bottle in soapy water.
- After cleaning from labels and glue, it is necessary to degrease its surface with acetone or an alcohol-containing composition.
- The next step is priming the surface.
- After priming, it is necessary to cover with acrylic paint in an even layer and allow to dry.
- With a foam sponge, darken part of the bottle or its entire surface with acrylic paints.
- Now comes the decoupage process itself. Cut out a pattern from a napkin and separate it by removing the top layer with a pattern.
- On the bottle, in the place of gluing the picture, apply glue, and attach the picture, gently smear the glue on top with a brush.
- The final step will be the application of a layer of acrylic lacquer, and if the application is performed in several layers, then the decorated product can be washed.
In fact, there is nothing complicated in napkin decoupage, it is important to perform all actions carefully. This craft can be used to decorate the interior or present for a celebration.
Decoupage bottles for beginners step by step with eggshell
No less popular is the decoupage of a bottle with eggshells. The method practically does not differ from napkin decoupage. The bottles look very original; you can also decorate vases, dishes or other items with eggshells.
Decoupage for beginners step by step eggshell bottles:
- It is necessary to prepare materials: a bottle, egg shells, PVA glue, napkins, acetone, foam rubber sponges and brushes;
- Degrease the bottle washed from the labels with acetone;
- Apply a primer or acrylic paint in an even layer;
- Apply the base color with a sponge and allow to dry;
- Cut out the drawings you like from the napkin, and separate the top layer;
- Transfer the image to the bottle, and coat with glue;
- The egg shell must be prepared, washed, cleaned and dried thoroughly;
- Grind the shell to the desired pieces;
- Lubricate the surface with glue and lay out the shell mosaic with tweezers;
- After complete drying, the shell must be painted with a piece of foam rubber;
- To complete the decoupage, the bottle should be varnished in several layers.
Lubricate the picture with glue, you should act carefully. The finished product is able to decorate any interior. Also, such a bottle can be presented or put on a festive table.
Fabric decoupage of bottles for beginners
You can beautifully decorate the bottle using different fabric shreds, and the thinner the fabric, the more elegant the decoupage folds will be.

Fabric decoupage of bottles for beginners is best done in combination with napkins:
- The first step is to prepare all the necessary materials: a bottle, chintz fabric, scissors, PVA glue, three-layer napkins, brushes and acrylic paints.
- The bottle must be thoroughly cleaned of labels and glue, this can be done by soaking it in soapy water.
- It is important to degrease the surface with acetone or alcohol.
- The next step is to think over the decoupage composition.
- The selected napkin pattern must be carefully cut off from the canvas.
- The drawing of the napkin must be attached to the product, and mark its edges with a marker.
- Chintz must be cut in random order in the form of strips.
- Strips of fabric must be soaked in glue diluted with water in a ratio of 3:1, i.e. the consistency of the glue should not be very thick, but not liquid. If the adhesive is initially quite liquid, then it is not necessary to dilute it with water.
- The fabric soaked with glue should be squeezed out a little and randomly glued onto the bottle, bypassing the area intended for the napkin.
- The bottle, pasted over with a cloth, should be thoroughly dried at room temperature.
- After drying, the fabric part must be painted with acrylic paint.
- After the paint has dried, you can start gluing the picture from the napkin, for this the napkin must be divided.
- Spread the bottle with glue, and attach the image, then very carefully smear the surface of the napkin with glue.
The final step will be finishing staining with the desired shade of the fabric area and further application of acrylic varnish.
Lacquer can be covered in several layers to create a more resistant to moisture surface.
You can decorate with fabric in another way. Cut a piece of fabric into small pieces and glue without wrinkling. Further decoupage can be done with any decorative trifles, for example, beads, rhinestones or shells.
Craquelure: bottle decoupage step by step
There is another very interesting decoupage technique, in which the paint layer cracks, and it is called craquelure. To achieve this effect, a special varnish is used, which cracks after drying. Craquelure decoupage can be one-step or two-step, both of these types are simple and quite doable with your own hands.

Craquelure bottle decoupage - step by step instructions:
- The prepared surface of the bottle must be degreased;
- Paint the container in several layers with paint darker than the main drawing and let dry;
- Then apply craquelure varnish in an even layer, and allow the varnish to dry a little;
- Then another coat of paint follows, which is applied with a sponge, at this stage cracks become visible;
- While the composition dries, it is necessary to prepare a napkin, the pattern must be carefully torn off from the napkin, and the top layer should be separated;
- Glue the napkin to the bottle with PVA glue, and brush the pattern on top with a brush very carefully so as not to tear;
- The last step will be varnishing the surface with acrylic varnish in 3 layers.
A bottle decorated in this way has a decorative, artificially aged look. Craquelure decoupage is relevant for interior decoration, made in various classical styles. Not only bottles can be decorated with craquelure, watches made in this style look very interesting. Often, plates, vases, wooden utensils and many other items are decorated with craquelure.
Bottle decoupage lessons for beginners: decorated with toilet paper
You can decorate the bottle with the most unusual materials, one of them is toilet paper. Of course, this material is very specific, however, in the completed work, no one will even guess about its use.

Decoupage lessons for beginners bottles decorated with toilet paper:
- This method requires all the same materials as in napkin decoupage, and some toilet paper;
- It is necessary to clean and degrease the surface of the bottle;
- The surface must be primed and painted;
- Glue the motif of the napkin and smear it with a brush;
- The part of the bottle free from the napkin must also be well smeared with glue;
- Small pieces of toilet paper are draped over the surface of the bottle in random order and left to dry completely;
- Before you paint a layer of toilet paper, you need to varnish the picture;
- Paint toilet paper with acrylic paint;
- Coat the finished composition with varnish.
Decoupage bottles for beginners step by step (video)
Ready decoupage does not give out the materials of its manufacture. The bottle looks very elegant and can decorate a festive table or the interior of an apartment.
When, after the next holiday, you cannot throw away the bottle because the shape of the vessel is very interesting, it means that the sense of beauty has defeated the arguments of reason or there is already an idea for decoration.
Your soul needs a creative act - decorating bottles with your own hands.
At your service there is always a master class in the society of a master or an Internet version of the work process. Ideas for decoration can be seen on forums where needlewomen share their achievements. A simple way to decorate is decoupage with a photo. After processing, a picture, photograph or postcard is glued onto the bottle. There are many techniques and master classes where bottles are decorated with twine, salt, leather, ribbons and even tights.

We paint the bottle
In order to feel the taste for decoration, simple manipulations with the object are enough. Do-it-yourself elementary decor of glass containers is done with the help of paint. A transparent object can be painted inside or outside.
For internal coloring, pour acrylic paint into the bottle using a syringe without a needle and rotate the bottle to achieve a dense internal coating.

As an interesting idea, you can paint the inside of the container in several colors. To do this, each color layer should not cover the entire surface, but only a part. The colored decor of the bottle adds mood to the interior.

Outside, the bottle is painted with a sponge or brush. Pre-treat the vessel with alcohol and apply acrylic paint with tangential movements. Buy a few toners for white acrylic paint or use gouache - mixing colored toners with a white base, get the right shades and make a colorful bottle decor.

Painted bottle - the basis for decor
You can quickly decorate a bottle of interesting shape with your own hands with ribbons and lace. Make a small bow out of ribbons, sew them on a lace base, add a brooch, beads and put on the neck of the vessel - an exclusive decor item is ready!

A bright and sparkling effect is achieved with improvised materials, for example, salt. Treat the prepared bottle from the outside with glue and sprinkle with salt with large crystals, carefully place on a flat surface until completely dry. It is appropriate to decorate an object with salt for a winter interior or a New Year themed one.
If a solid layer of salt seems boring or you need to decorate several areas with salt, then glue only those places where sparkling is needed and cover with salt. A master class on this topic will help in mastering the technique.

More about decor
Even just by painting the bottle with your own hands, you can achieve an incredible effect of silver or gold gloss, shimmering with the lights of a New Year's fairy tale, sparkling carnival or vintage treasure.

To get a stylish effect of gold / silver plating on a future art object, it must be prepared. Preparing glass for subsequent decoration with your own hands, at the initial stage, is the same for any method of painting: the object should be washed, dried, degreased and treated with a universal primer.

The prepared glass vessel can be painted. For these purposes, automotive paint in a can is suitable. It should be sprayed at a distance of 15 centimeters from the object, outdoors or on a balcony.
If you don't have a spray can, get gold/silver acrylic paint from hobby stores or a hardware store. Use a sponge to apply. It should be painted with point (plugging) movements, leaving a trace on the surface, and not a strip, the surface will turn out to be even, without streaks.
Gold, like silver, is colored, i.e. has several shades, which makes working with these paints exciting.

You can add decor in several ways. For example, wrap the thick part of the container with lace, securing it with a glue gun. Or partially wrap with twine, colored threads, beads. Stick on hearts or ribbons. Decorating bottles is a fun activity, and you can use all the materials at hand for every idea.
Decoupage of bottles with napkins (master class)
A popular technique for decorating bottles is decoupage. Visit a decoupage master class and you will appreciate the technique in full.
Simple manipulations with napkins, decoupage cards or printed pictures allow you to get a charming decorative item of exclusive design.

The easiest way to decorate an object is to paste a cut-out picture. To get a taste for handmade, visit a master class on the technique of interest and find ideas. Prepare the container as mentioned above, choose the plot you like (from a postcard, magazine, decoupage card), cut it out and stick it on the surface. Add accessories, brooches, beads, ribbons by gluing them with your own hands using a glue gun. Sometimes this is enough.

Decorating bottles with a more fundamental approach requires preparation, a master class will always come in handy. For the technique in the classic version, a colored layer of a napkin is used. That is, only a layer with a pattern is required from a three-layer napkin, the class of the napkin is also important - it must be with a bright pattern.
For work you will need:
- decoration object;
- universal soil;
- acrylic paint white and colored;
- toners or artistic gouache;
- acrylic lacquer (art or construction);
- brushes, sponge for plugging;
- patterned napkin.

Stages of the master class:
- Prepare a glass container (wash, degrease, prime).

- Paint the bottle to be decorated with white acrylic in two layers by tamponing with a sponge. Dry after each application.

- From a napkin, cut out a pattern with nail scissors or tear along the contour. If the drawing is on a white background, you can deviate from the contour, the white part of the napkin will merge with the background on the subject.

- White color is not always suitable for your idea and therefore any other color can be applied on a white surface. If you are new to decoupage, use light, creamy shades to add color. With a dark background for napkins, more work is required. Dry the surface.

- Attach the drawing with a colorful layer up and apply acrylic glue on top of it with a brush (acrylic varnish can be used), try to avoid wrinkles and bubbles. You must act quickly and carefully. Dry.

- When you have glued all the drawings, you can proceed to the final design. Decoupage of bottles is completed by applying three layers of varnish with drying. With fine sandpaper, it is necessary to sand the surface and cover with a final layer of varnish. DIY bottle decoration is complete!

Not only decoupage
Having mastered the simple decoupage of bottles with napkins, you always want more. The smooth surface of the bottle does not give a texture, with the help of which a more interesting effect is achieved. You can create an interesting surface with tights or stockings. A master class on this type of decor can be found on the Internet.

To do this, cut off one part from a pair of tights, soak it with a mixture of PVA glue and water (proportion 1 to 1) and put it on the bottle. Lay out coattails, waves, any texture.
Instead of tights, you can use decoupage with a cloth, the procedures for materials and techniques are similar.

Leave a few places flat to stick the napkin on. Dry completely, prime with a special compound or acrylic paint. Now you can decoupage bottles, tint, embody your ideas or leave it as it is.

Another way to get texture: wrap the bottle with threads, colored threads for sewing of different thicknesses are quite suitable. Colored thread decoration is also quickly obtained when using cotton yarn for knitting.
Using alternately threads of different colors, you can get a very stylish decor item, fix the threads with PVA glue. The decor of the bottles with twine, threads should be varnished and used as a vase, or you can prime, paint and stick napkins.

Leather for decor
Decorating bottles with leather is one of the most beautiful opportunities to recycle leftover leather or outdated jackets, boot tops and get an interior item for home decoration. You can decorate any glass surface with leather. To work, you need glue like "Moment", tweezers, scissors and a knife, as well as imagination.

To make folds, pieces of leather need to be soft. A detailed master class can be found on the Global Web. Spread a bottle and a piece of leather with glue, attach the skin to the surface and form folds.
Leather is a little more difficult to work with than decoupage of bottles with a cloth, but folds are also formed directly on a glass bottle.

The formed decor must be given time for final drying and, if desired, additionally painted, gilded, glued other elements - it all depends on the idea.
In the design for a piggy bank, coins are suitable, for a gift wine container, a beautifully made dense cork will not hurt, it is also trimmed with leather.

Do not throw away empty beautiful bottles, with their help you will create a unique art object for your home with your own hands. And it doesn’t matter if it’s decoupage bottle decor, leather trim or dyeing, uniqueness and creativity are the most important things in decorating.
Video gallery
Recently, the technique of direct and reverse decoupage has gained particular popularity among needlework lovers. Its essence lies in gluing in a special way on various surfaces cut out of paper, leather, fabric or wood drawings, patterns. With the help of decoupage, craftswomen make amazingly beautiful, original crafts that can decorate the interior of a house or become a gift. How to master this technique? It is easy to decoupage bottles with tights, the master class of which is given below. Try yourself in this technique, and you will get a lot of pleasant emotions!
Rules for decorating bottles using decoupage technique
Your children will be delighted if you allow them to participate with you in creating unique handicrafts. These pleasant moments will remain in the memory of the kids and bring you both a lot of joy. Different materials are suitable for crafts: fabric, women's tights, shells, seashells, toilet paper, napkins, lace, photographs and more.
And glue, primer, oil, paints, varnish will help to prepare the surface, fix and give the necessary shape and background to the decoupage elements. Using this technology, you can decorate a bottle of champagne, wine, cognac, martini, a plastic or clay flower pot, a vase, a glass jar. If you are going to make crafts for the first time using this technique, then in order to avoid some mistakes, check out a few decoupage rules.
Decorative products made using this technology should turn out to be as contrasting and bright as possible. It is important to choose a plain surface for sticking pictures and decorate it with bright, color-saturated elements. To create an original decoration for the interior, any bottle is suitable. When making this craft, consider the following recommendations:
- For decoupage, take a container of a simple shape, because it will not be easy to work with a non-standard one.
- If napkins are used in decoupage, then a pattern is first cut out of them, and then the top layer is separated and then glued.
- For gluing fragments to the surface, it is best to use decoupage glue. However, instead of it, ordinary PVA, diluted with water, is suitable.
- The drawings are glued to the surface of the object smeared with glue and leveled to avoid the formation of wrinkles.
- When the bottle processed using this technique dries, it is opened with a special decoupage varnish.
- After finishing the work, the crafts, if desired, are tinted with acrylic paint, decorated with ribbons, beads, shells, sparkles, bows.
Step-by-step master classes on decoupage bottles with nylon tights
Before starting decoupage work, the bottle is prepared. To do this, it is soaked in warm water and then cleaned of stickers, dirt, glue residue. The washed glass surface is degreased with alcohol. This step must be done, because otherwise the layers applied to the glass will not last long. Next, use acrylic varnish. They cover the surface or elements of the bottle.
Decorating a bottle of champagne "Lady in a Hat" with your own hands
It is easy to make the interior of your apartment more original with the help of an unusual, stylish decor. A hand-made craft in the house will look especially impressive, arouse admiration for family members and guests. To make your own decoupage of bottles with tights according to the Lady in a Hat master class, you will need the following tools and materials:
- a bottle of champagne, a cap from it;
- PVA glue;
- tights;
- scissors;
- glue "Titan";
- canning lid;
- peas;
- spray paint brown, golden color.
Craft manufacturing technology:
- Cut off stockings from pantyhose.
- Soak the nylon parts with PVA glue.
- Put on the stockings prepared in step 2 on a glass container from the bottom up.
- Make a beautiful drapery on tights, dressed on a decorated container, dry.
- Get a canning lid. Put on a small piece of stocking soaked in glue, tie the ends of the nylon fabric at the top of its wrapped element.
- Bend the edges of the hat-cap up, dry.
- From the remnants of the stocking, cut 6 strips, gather each on one side with a thread and a needle and form roses, soak them with glue, and dry.
- When all the blank elements dry out, then it is necessary to glue the “flowers” on the hat and the middle of the bottle with “Titanium”.
- On the top of the glass container, as well as on the “neck” of the dress, stick peas in the form of earrings, beads.
- Glue the champagne cap on the bottom of the "hat".
- Paint all elements, visible parts of the bottle with brown, and then with golden paint.
Decoration of a festive bottle with tights and napkins
If you show imagination and apply the decoupage technique, then unnecessary things can easily turn into an elegant and unusually beautiful decor. So, an ordinary glass bottle and nylon tights, napkins will simply transform into an exclusive stylish decoration of the table, interior, a stunning wedding, New Year's gift, a present to parents for the birth of a child or a beloved man. The instructions below will help you make decoupage. The following items are needed to make it:
- glass bottle;
- PVA glue;
- kapron tights;
- acrylic paint;
- napkins with an interesting floral pattern or lace motif;
- watercolor paints or spray paint.

Instruction step by step:
- Clean and treat the surface of the bottle with alcohol.
- Soak stockings with glue.
- Put the stocking on the bottom of the glass surface and give the material a relief, turn off the upper edge of the fabric a little for a three-dimensional look on the neck, and make the window where the picture will be pasted smooth.
- Dry the product and cover it with acrylic paint. Dry.
- Cut out a pattern from a stencil from a napkin, separate the top layer and stick it on a glass surface. Dry.
- Paint the surface of the glass container with an aerosol can, except for its part with a picture. Dry.
- Decorate the bottle with decor (butterflies, beads, rhinestones).
How to decoupage a bottle of pleated tights
It is easy to colorfully decorate any glass bottle using the full type decoupage technique. For this fit any nylon tights. This material, dipped in glue, drapes beautifully on a glass container. What form to give to the capron depends on the ideas and imagination of the needlewoman. The surface decorated with this material is painted in any color. Decoupage of bottles with pantyhose according to the master class described below will help turn an ordinary glass container into a beautiful decor item. For its manufacture you need:
- tights;
- glue;
- dye.

Instruction:
- We prepare a glass container by washing and degreasing it.
- We cut off the stockings from pantyhose, keep it in glue, wring it out and put it in folds on the bottle.
- We dry the glued elements for several days, paint with paint.
- We decorate with bright elements, varnish.
Video tutorial for beginners on decoupage on a bottle using tights
Anyone can make a beautiful decorative bottle from tights, because it is not difficult and very interesting. In order for a beginner to avoid possible mistakes when performing decoupage, you must first watch a master class on this technique from a real professional. In the video below you will see all the stages of creating an amazing decor using a bottle and ordinary women's tights. Be sure to try to do this craft yourself at home, so that later you can decorate your home with an exclusive thing.
Decoupage of bottles with cloth. Master class with photo.
Razumova Valentina Nikolaevna, teacher at the Shukhobod kindergarten, Shukhobod village, Cherepovets district.
Description: in this master class, we will consider decoupage on glass with a cloth and napkins in different styles. With the help of step-by-step photographs and detailed explanations, those who wish will be able to independently decoupage the bottles and get an original hand-made vase. The material is intended for all, without exception, creative people who are interested in making crafts using decoupage technique or who want to master it. A master class can also be taken as a basis for teachers to practice a needlework circle with high school students and, simplifying it a bit, with older preschoolers in kindergarten.
Purpose: vase, interior decoration, exhibition copy, work for a competition or a charity event.
Target: making original crafts from a glass bottle using the technique of napkin decoupage and decoupage with a cloth.
Tasks:
* introduce various ways of decorating a bottle;
* develop creativity, the ability to work with various materials and tools;
* to form the ability to "give a second life" to objects that are usually thrown away, to turn them into exclusive crafts created by one's own hands.
The simplest and, at first glance, unsightly objects can be transformed with the help of decoupage.
Decoupage technique is a kind of needlework, which involves decorating various objects with paper clippings, napkins and other materials. They are applied to the surface using varnish and glue. And at the end, the product is covered with several layers of acrylic varnish in order to protect the image. With the help of decoupage, you can make beautiful and original crafts with your own hands. They will decorate your home. The most famous and popular is napkin decoupage. But this technique has many options. Today we will decorate the product with a cloth.
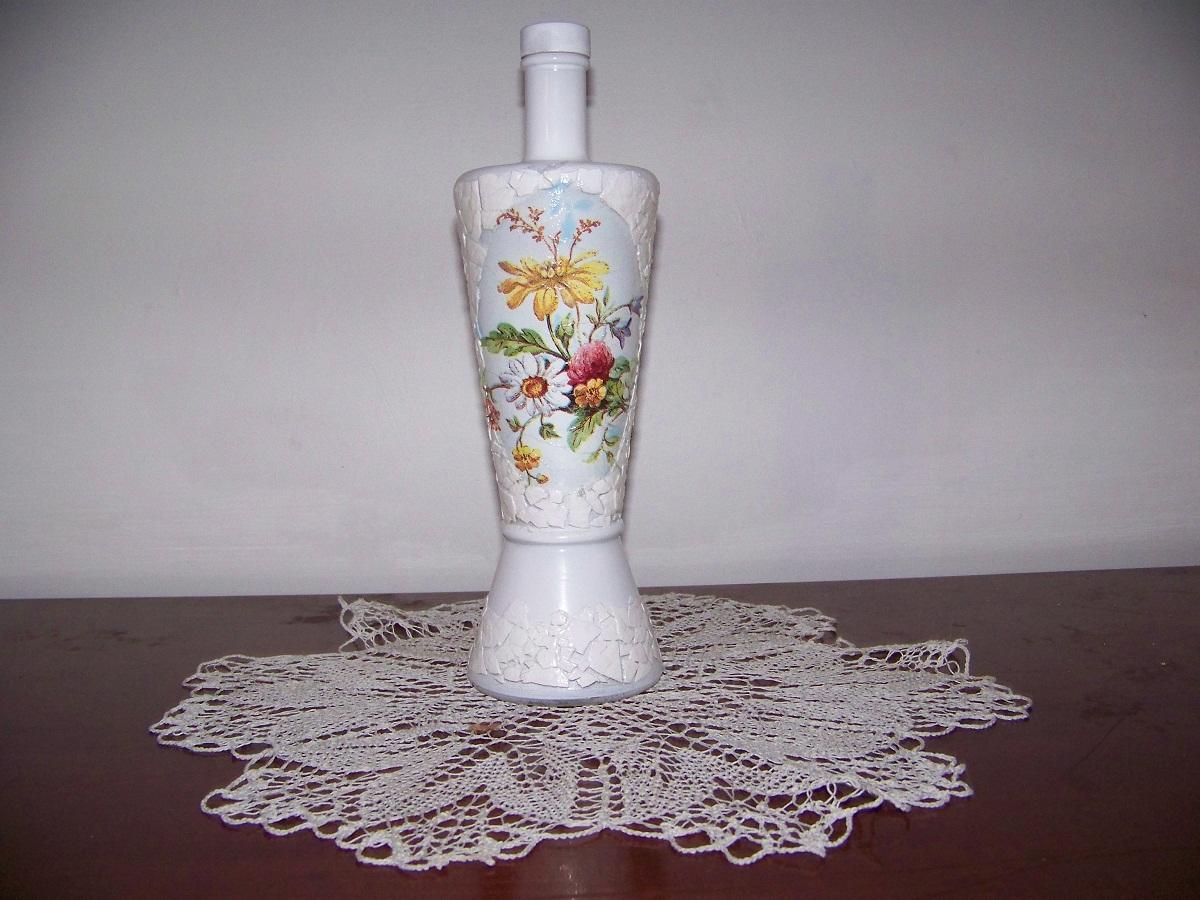
Option number 1 "Pink vase"

In this variant, we use a combination of napkin decoupage with cloth decoupage.
Materials and tools:
* beautifully shaped glass bottle;
* acrylic paint: white and pink;
* acrylic lacquer;
* fabric: chintz;
* scissors;
* PVA glue;
* paper napkin with a pattern;
* foam sponge, sponge for coloring;
* brush: bristle number 12;
* deep bowl for glue;
* stained glass paint (optional);
* White marker.


The first stage of work on the product is cleaning the bottle from inscriptions and stickers, degreasing the surface. I have a bottle of champagne today. You can remove the labels by soaking the bottle in water, then scrubbing them with a hard washcloth. Traces of glue are well removed with acetone or any solvent.
After drying the bottle, we begin to think about the future composition. I picked up just such a paper napkin with the image of roses.

Carefully cut off the pattern along the edge.

Next, we apply a fragment of a napkin to the bottle and circle around the edge with a marker, indicating the place for gluing the pattern.


For now, set the napkin aside.
Let's start gluing the bottle with a cloth. We prepare the strips - we cut the chintz arbitrarily. It is better to use an old, rather thin fabric (the thinner the fabric, the more elegant the folds will turn out). The drawing is not important here. It will then be painted over.

Soak a strip of fabric in PVA glue. To do this, it is better to pour it into a fairly deep bowl. The glue should not be very thick. If necessary, dilute it with water.

Slightly wring out the fabric and begin to stick it on the bottle, forming folds. We do it all arbitrarily, the way we like it. The area where the drawing will be, does not need to be pasted over with a cloth.
I got this result.


We leave the product to dry. This process is quite lengthy. So that will require patience.
After drying, our bottle must be painted with white acrylic paint. To do this, we use both a brush and a sponge. With a brush, carefully paint over the folds of the fabric. They hardened and after staining will gain even greater strength. Sponge is used to paint even surfaces. Repeat coloring if necessary. Glass should not shine through.


We wait for the paint to dry, and proceed to sticking the picture torn from the napkin. Do not forget to remove the two extra layers, you only need the top one with the image.

We coat with PVA glue the area where we will stick the napkin. We place an image with roses on top.


We smear over the drawing with a brush with glue from the middle to the edges, smoothing the image, trying not to tear the napkin. Consider different angles of the resulting product.


Take pink acrylic paint. You can bring the shade we need by taking white paint and color tint or gouache. We apply pink paint with a sponge, not painting over carefully, but only passing over the folds of the fabric. We apply the paint on the sponge with a brush, not very thickly, the sponge should be semi-dry.


If desired, you can apply more stained glass shine on top, as I planned at first. But I like the result. Therefore, I leave it as it is.
We apply several layers of acrylic varnish with intermediate drying (2-3 layers).
The vase is ready. Let's look at it from different angles.


I really like how flowers look in a vase.


Option number 2

We decorate a vase using decoupage technique with a cloth.
Materials and tools:
* glass bottle of juice;
* flaps of fabric (chintz) with a beautiful pattern;
* acrylic lacquer;
* brush: bristle number 12;
* scissors;
* materials for decoration: braid "bindweed" of silver and blue shades, glue "Moment" transparent;

Having cleaned the juice bottle and degreased its surface, we get to work.
Cut the fabric into small pieces. Approximately like this.

We begin to stick patches on the bottle. We use acrylic varnish for this purpose (you can also use PVA glue). We apply varnish on a small area of the glass surface.

We place a flap of fabric on the varnish. We also apply varnish from above, pressing the fabric, removing air from under it, smoothing it.

In the same way, we proceed further, gluing the shreds in random order.

Fill the entire surface of the bottle. The resulting result.

I decided to decorate the joints of the flaps with a beautiful braid of suitable shades.

First, glue the silver braid on the neck of the bottle. You can use any strong, preferably transparent glue. I have Moment.

Glue the bottom edge of the vase in the same way.


We glue the first patch with braid along the contour.

We proceed in the same way.

We select the braid arbitrarily as fantasy and imagination suggest.

The resulting result.

We cover the entire surface again with acrylic varnish.

After drying, the vase is ready.

We can put flowers and decorate the interior.
Furniture) by gluing images cut out of paper or fabric onto them is becoming increasingly popular. With the help of this technique, artistic painting is imitated, and the more accurately and imperceptibly the application is made, the higher the level of the master. Decoupage is a very interesting and affordable activity even for beginners. In fact, using a simple set of tools and devices, you can turn an ordinary thing into a real work of art in the shortest possible time. Decoupage of bottles with a cloth is one of the ways to make an unusual gift or turn a bottle into a piece of furniture. Let's dedicate today's master class to decorating bottles with fabric using decoupage technique. A bottle of champagne decorated with fabric will be a wonderful gift.
We will need:
- cotton fabric;
- acrylic paints;
- acrylic primer;
- acrylic lacquer;
- putty;
- golden acrylic paint;
- a suitable picture on a napkin or printed on a printer.
We start decorating the bottle with a cloth
- Let's prepare the bottle for further work: remove the labels, wash thoroughly and degrease. You can degrease the bottle with alcohol or glass cleaner. Degreasing must be approached very responsibly, because in places where traces of fat remain, the paint will lie unevenly.
- We cover the cleaned bottle with acrylic primer using a foam rubber sponge. Leave the bottle to dry for 8-10 hours. Drying time can be shortened by using a conventional hair dryer to dry the bottle. In this case, the bottle will be ready for further work in 30-45 minutes.
- Using acrylic varnish, glue the selected image. The image can be carefully cut along the contour with scissors or torn out with your hands if the background matches the color of the paint. Before gluing the picture, you need to wet it with water and remove the bottom layer of paper, and disassemble the napkin into layers.
- We cover the bottle with paint in the background color of the image. It is convenient to do this with a foam rubber sponge or dishwashing sponge. Let the paint dry and apply a matte acrylic varnish on top.
- We proceed directly to the process of draping the bottle with a cloth. Fabric for decoration should be taken natural, preferably cotton (large handkerchief, old T-shirt, towel, etc.). We try on how the fabric will look on the bottle, mark the folds.
- The next step is to impregnate the fabric with glue. To do this, pour PVA glue into the container, dilute it with water, mix in a little putty and paint. Wet the fabric in this mixture, evenly distributing the glue over the fabric.
- We wring out the fabric and carefully wrap the bottle around it. The design on the bottle must remain open. We leave the bottle decorated with fabric until completely dry - for about a day.
- We carefully cover the completely dried bottle with acrylic paint, trying to completely paint over all the folds. After drying, cover with acrylic varnish on top.
- After the varnish has dried, we proceed to gilding our bottle. To do this, use golden acrylic paint. With light movements, we apply paint to the folds and bottom of the bottle.
- We cover the bottle with a layer of acrylic varnish and set aside until completely dry. As a result, we get an unusually designed do-it-yourself bottle, made using the technique of decorating with a cloth (photo 12).


