We knit a crochet blanket for newborns. The scheme is simple. Crochet blanket for discharge for newborns: schemes. Children's openwork crochet plaid. Multi-colored crochet square plaid
A baby blanket is a functional and irreplaceable thing in a family where a newborn lives. Such a blanket will come in handy at home in a crib, in a stroller on the street, at discharge or at a clinic appointment. And when the baby grows out of the blanket, you can use the product as a play mat. If mom or grandmother has mastered knitting, then you can try to make a blanket with your own hands using a hook.
Children's blankets from motives
Beautiful and unusual models are obtained from motifs (squares). In addition, it is difficult for beginner craftswomen to crochet a large voluminous thing, it is much easier to make several small motifs and combine them into a single canvas.
Plaid for a newborn in the technique of "Grandma's Square"
The product is good in that it is not necessary for him to buy many skeins of new yarn, you can use the balls that are left over from past work. The more different colors, the brighter and more interesting the model will turn out.
Such a beautiful and bright plaid will decorate any nursery.
materials
- Threads of different colors, but of the same thickness and fiber structure - 1800 g (for a blanket with dimensions of 110 cm x 130 cm). For a newborn, you can make the model smaller, but it’s better to work hard and knit a blanket “for growth” so that the baby has enough for more than one year.
- Crochet hook No. 3.5-4.
- Sewing needle, scissors.
How to knit "Grandma's Square"
Knitting patterns can be used differently, but for beginners it is better to take simple motives that will definitely not cause difficulties.

Scheme "Grandma's Square"
Description
Work begins with an air loop (they will need 4).


The next row is knitted from 5 tbsp. double crochet +2 tbsp. with a crochet in the air. loop of the first row + 2 air. loops + 2 tbsp. with a crochet in the second air. loop + 2 st with a crochet. We knit a combination 4 times.


To connect knitting and make the seam invisible, you need to use a sewing needle.

The first square is ready.

All subsequent squares are knitted in the same way. For a blanket with dimensions of 110 cm x 130 cm, you will need 221 pieces.

To connect the squares to each other, this method is used
When all the blanks are sewn together, the plaid can be considered ready.

Here is such a fun blanket turned out for the baby
For knitting, you can also use this simple pattern:

Grandma's square (option 2)
According to this scheme, the following squares are obtained:

Crocheted children's multi-colored plaid from squares
The model fits even easier than from the motives of "Grandma's Square". A diagram is not required. Squares of the desired size are knitted simply with single crochets. For a blanket with dimensions of 125 cm x 125 cm, you will need 100 pieces. squares with a side of 12.5 cm.

Another bright version of the blanket for the baby
materials
- Miscellaneous yarn - 1500 g.
- Hook number 4.
Note: If the yarn is not uniform in thickness, then you need to focus on the length and width of the square, the number of loops may be different. Also, the hook number may need to be different for thin and thick yarn.
Description
- First knit squares. The quantity can be as in the master class; if you need a plaid more or less, then the number of motives changes.
- Then you need to connect the squares with each other with a hook or needle in any usual way.

In this case, we used this method of crocheting the squares
The plaid is ready!

Such a colorful thing is perfect as a gift not only for the birth of a baby, but also for older children.
Original blanket for a newborn in the technique of "woven fabric"
The size of the plaid can be varied by adding squares or changing the width and height of the motif.

Stunningly beautiful thing for a little princess, which can be crocheted
materials
- Yarn of different colors, but the same structure - 1500 g.
- Hook number 3.
- Hook No. 6.5-7.
- Sewing needle.
Description
1. The basis of the product is 9 or more squares that are knitted with a loin mesh pattern. The pattern is simple and is done with double crochets, alternating with air loops. At the beginning of each row, 3 air are made. lifting loops. You will need to knit 9 squares with a width of 40 cm for a product with dimensions of approximately 125 cm x 125 cm.

The basis of the work is squares from the "fillet grid"
2. To imitate a woven fabric, you will need to pass threads or cords knitted from air through the holes in the base of a contrasting color. loops. The length of the cords depends on the selected pattern, it is better to measure the pattern in advance, pin the cords with pins.

Outlining the future drawing
3. When drawing, the beginning of the thread or cord must be secured with a sewing needle.

It is better to fasten the cord with threads of the color of the base
4. It is convenient to pass the cord with a large crochet hook. The end of the cord is also fixed with a needle.

Decorating a grid square with a cord
5. So you need to decorate all the squares. It is better to choose a different drawing - it will be more interesting. Cord colors should be bright.

Finished "woven" motif (option 1)

Option 2

Option 3
6. Finished squares can be connected in any way, for example, with connecting posts.
7. To make the plaid look elegant, it is good to tie with a shell pattern. The strapping starts from the corner of the canvas (single crochet, three loops are skipped, eight stitches with two crochets come from 4 loops, the pattern is repeated the required number of times).

Baby blanket is ready! For a boy, it is better to choose cool colors for decorative cords.
Openwork knitted blanket for a newborn
Making such a blanket will require great skill from the needlewoman, but the result will exceed all expectations. Yarn calculations are given for a blanket with dimensions of 92 cm x 114 cm.

2. Now you need to supplement the main canvas with a border where the tape will be threaded. The border is performed according to the following description:
3. When the main fabric with a border for decorative tape is ready, you can start tying. The binding will be performed according to the scheme in the form of beautiful fans, so that the pattern echoes the main knitting motif. It should come out 7 fans long and 6 wide, plus one fan at the corners.
4. A ribbon is inserted into the holes of the border, a neat bow can be tied on one of the corners.

A beautiful plaid for an extract is ready!
You can knit an original children's blanket not only with a crochet, but also with knitting needles. .
There is a need for a thousand little things, often obligatory things that cannot be done without, and sometimes just cute accessories that make caring for a baby more comfortable. Such pleasant things include baby blankets.
A blanket for a newborn is easy to crochet, and a beginner needlewoman, barely familiar with the basics of knitting, can also handle this work. After all, a blanket for a baby is just a square of 100 by 100 centimeters, where there is no complex pattern and numerous calculations.
The length of the side of the plaid can vary from 80 to 120 centimeters. And, of course, a children's blanket does not have to be strictly square. It can be made, for example, exactly to the size of the baby blanket that you are used to.
A blanket for a baby can be used in a variety of situations - it has more functions than a baby blanket: wrap a baby in a blanket, take it with you for a walk to cover the baby in, cover the child in or use the blanket as a bedspread.
Such a knitted little thing can be not only very cute, but also practical.
We bring to the attention of craftswomen two blankets for newborns: a very simple, but dense and practical, and a more sophisticated blanket, with a more complex pattern, but no less soft and comfortable.
 For yellow ( photo 1) or striped ( photo 2) for a blanket measuring 80 by 100 centimeters, you will need 350-500 grams of yarn, depending on the quality and thickness of the thread.
Crochet No. 3.5 tie the original chain in 145 air loops. You may need 160 or 140 stitches for your yarn and hook. To find out exactly how many loops you need in the initial chain, and how much yarn you need for the whole product, you need to knit a sample of approximately 12 by 12 centimeters.
So you can make calculations for the entire blanket. Do not be lazy to make an imposition and make simple calculations - this is much faster than getting “wrong” in the end and dissolving an almost finished product. At the same time, get acquainted with the pattern, and find out the nuances of the transition between the rows - this is the only way the finished product will turn out perfect and will be the right size.
The first row is knitted as follows: 1 double crochet in the 3rd loop from the hook, then 1 double crochet in each loop of the chain to the end of the row. Turn work.
The second row and all subsequent ones: 2 air loops to lift the row and again to the end of the row with double crochets.
It is not necessary to make the blanket solid, you can alternate narrow or wide stripes, changing the color of the yarn every 2-8 rows. If you alternate two colors, then the thread can be pulled along the edge of the blanket. This will give additional rigidity to the edge of the blanket. If you use a lot of colors, then it is better to fix and cut the thread. Tie the edge of the finished plaid with a row of single crochets, and then with a “crustacean step”, when the single crochets are knitted from left to right, as if “backing away” back. At first, knitting in such a way is unusual, but the result is worth it: the edge is tight, does not stretch and looks great. Do not forget to carefully fasten the threads and hide their ends, because the durability and appearance of the product depend on this.
Crochet products can always be decorated with contrasting silk ribbons by passing the ribbon “dotted” along a row of double crochets. Ribbon trim is not only relevant among needlewomen, but also looks very gentle on children's things.
Do you remember how you started your knitting career? Right. With a blanket for a doll. Now the doll is alive, and she needs a bigger blanket.
This throw is made in a more complex knit, but looks very sophisticated while remaining dense and warm. When knitting a blanket with leaves, you can alternate from two to five colors of yarn - the thing will come out impressive.
Below is a selection of step-by-step photos and the only verbal description of the pattern that the plaid is connected on the Internet. The blanket is double sided.
 The number of loops for this pattern should be a multiple of eight. For a sample, you can knit a chain of 48 or 64 loops. Next, to lift the row, we knit 2 air loops, in the next 3 loops we knit 1 double crochet, skip one loop of the chain, while doing one air loop, and in the next 7 loops of the chain we knit 7 double crochets. Again, we skip one loop of the chain, instead we make an air loop, and then - 7 double crochets in a row. And so we repeat until the end of the row. ( photo 3)
 In the 2nd row, we need to leave already 3 yarns (cells), into which we will then knit a leaflet of a contrasting color. To do this, we knit 2 air loops to lift the row, immediately skip the loop and knit 1 double crochet into the next, 1 air loop, 1 double crochet through the loop, 1 air loop, 3 double crochets in a row in each loop of the previous row. Then we knit to the end of the row: 1 air, 1 double crochet through 1 loop of the first row, 1 air, 1 double crochet through 1 loop, 1 air, 3 double crochets in a row in each loop. ( photo 4)
 The 3rd row is extremely simple: we need to knit a row of double crochets through one loop of the 2nd row, separating them with air loops. That is, 2 air loops for lifting, 1 double crochet, 1 air, 1 double crochet through 1 loop of the 2nd row - and so we alternate to the end of the row. Make sure that the columns are strictly one above the other. We do not need a “checkerboard”, but a clear geometric blank for knitting a leaflet with contrasting yarn. ( photo 5)
Now is the time to change the color of the yarn. Rows 4 to 7 are worked in a different color.
 The 4th row is the most complex and painstaking of the entire pattern. 2 air loops to lift the row, 3 double crochets into the loops of the 3rd row and knit the leaflet itself. Before us is a triangle of cells formed by air loops of the previous rows. We will use five cells along the perimeter of this triangle for a leaflet, two cells in the center (in the 2nd and 3rd row) will remain unused, they will be covered by the middle of the leaflet.
From each cell of the triangle, we will have to pull the thread twice to make the leaf convex and soft. You can try to pull out one loop from each cell - it's easier, but the pattern will be flat. We crochet the thread from the first cell of the 3rd row and (attention!) make a crochet on the hook.
 It is impossible to pull the loop twice from the same cell if you do not fasten the thread - the yarn on the hook will act as such a fixer. As an option, a half-knitted loop or half-column is allowed, when the loop pulled out of the cell is not knitted to the end, leaving the very first thread of the loop unused on the hook. ( photo 6)
After that, we dive for the thread into the same cell a second time. We tighten the threads to the desired length, monitoring the uniformity of tension. We perform the same sequence of operations with the cells of the 2nd, 1st, and again the 2nd and 3rd rows. Only five rays of a leaflet should turn out. If the yarn is multi-layered, you can draw one loop from each cell - then there is no need for an intermediate crochet or semi-knit loop.
 Now you have a lot of loose loops on your hook ( photo 7). Gently and slowly pull the thread through all the loops at once, pulling the base of the leaflet. ( photo 8) Knit 3 double crochets in the loops of the 3rd row - and again proceed to the leaflet.
 We continue to knit the next three rows with the same yarn, completely repeating the 1st, 2nd and 3rd rows described above. Then we change the yarn and knit the next row of leaves. ( photo 9)
 With the right knitting with a successful selection of colors, you will get an incredibly beautiful and practical blanket that will delight the baby and you for several years. ( photo 10)
Both of the described products are dense blankets that will stay “in shape” for a long time and will not deteriorate after the first wash, which often happens with thin delicate things.
The birth of a child is an important and very joyful event in the life of parents. A baby blanket is a must have for your baby. Today in stores you can find a large number of knitted blankets for newborns, but a hand-knitted blanket will keep and give the baby all the love and awe of his mother.
Even those people who are just starting to try their hand at knitting will cope with this task. Of course, you will need perseverance, as well as the desire to make everything perfect - in this case, the results will not disappoint you.

Peculiarities
Most of the time just born babies spend in the crib. Plaids and blankets for newborns should provide not only comfort, but also the safety of the baby, his sound and healthy sleep. When planning to start knitting, it is worth studying the features of these products:
- The skin of a newborn baby is sensitive and only getting used to the outside world. To avoid not only discomfort, but also injuries, soft materials should be preferred.
- Children's bedding needs to be cleaned and washed more often than normal. The blanket should retain its qualities for a long time.


- Hygroscopicity. The blanket should allow the necessary moisture and air to pass through, while maintaining the required amount of heat. This is especially important for active children who can wrap themselves in a blanket with their heads at night.
- There is no need to spend time and energy on making a large blanket. The product will be constantly "lost", partially revealing the baby.
For walks, a small blanket is suitable - a practical option that does not take up much space in the stroller.


Material selection
Not all yarn, in the name of which the word "children" is present, complies with the standards. It should be understood that products for newborns must be of very high quality. When choosing a material, one should start from the composition of the yarn and the properties of its threads:
- A suitable option for a warm blanket is wool. It will keep the baby warm and will last as long as possible. The softest and most wearable material is cashmere. If the blanket is a gift, you should find out what material it is made of. Merino wool is well suited for children's products.
- Children's acrylic will become less expensive. This yarn has synthetics in its composition, but (unlike wool) does not lead to allergic reactions in babies.


- Linen or cotton, silk, bamboo are suitable as a summer option. This yarn is natural and is more likely to not irritate baby's velvety skin. A duvet made from these materials is easy to machine wash, and you don’t have to worry that with frequent washing it will stretch and lose its quality.
- Mixed yarns are an interesting choice. These are cotton and acrylic, silk-wool, silk and cotton and other options. Yarns containing silk fibers allow things to maintain quality for a long time.
- The color of the yarn depends on personal preferences, the imagination of the craftswoman herself. However, experts noted that a baby blanket in pastel colors has a sleep-tuning effect. Bright products with an abundance of patterns cause activity and are well suited for baby games.


How to make with knitting needles and crochet?
Blanket for a newborn baby, size - 80 × 100 cm. You will need the following:
- Hook number 3.5.
- Yarn from 300 to 550, taking into account knitting, density and quality of the material used.
This option is the easiest to perform and even beginners can do it. First you need to make a test, a sample is suitable - a square measuring 14 × 14 cm. It is necessary to determine how many loops you get in 1 cm in height and width. As a result, you should collect so many loops to get a row 100 cm long.

In the first row, a double crochet is wound into the 4th loop (from the hook), after which one double crochet is typed into each subsequent loop of the chain of the row - to the very end.
The subsequent ones are performed as follows: at the very beginning, 3 loops are made to raise the row, then, following the example of the first row, double crochet columns. The edge, already without using a crochet, is tied with columns, which are then displayed from left to right. The result is a fairly neat edge, while tightly holding the shape.
It is possible to use decor for different tastes: a combination of multi-colored stripes, alternation of rows of different widths, “checkerboard” (multi-colored squares).
A blanket measuring 90 × 90 cm. For work, prepare:
- Needles number 3.
- Schemes of any openwork patterns.
- Yarn from 300 to 500 g (approximately 6 skeins).
196 loops are assembled with knitting needles, knitting goes on the front side (starting from the 12th row, knit already according to the prepared pattern). Two lines are obtained, located horizontally, followed by two lines vertically, from the edges they are knitted with the front surface of 10 loops.
30 holes are knitted vertically from the outer edges in a line, then along new horizontal ones (they are located strictly symmetrically). Everything ends with a facial stitch of 14 rows. The loops are dropped, and the edges of the blanket are tied with a column.


Plaid "of stars", size - 70 × 80 cm. In the process of work, you will need the following:
- Needles number 3.
- Yarn, 250-300 g.
- Patterns with stars.
According to the pattern scheme, it is necessary to knit 20 hexagons (for one, 6 loops are cast on the knitting needles and knitted in the following order - edge, then front loop, yarn over and edge again). So you need to do 32 rows. Next, 20 loops are cast on from the edges (there are 40 on the knitting needles). The row continues to purl.
The next master class will teach you how to knit a children's plaid "from stars".
Woolen blanket, size - 55 × 75 cm. For work you will need:
- Hook number 5.
- 250 g of yarn (mohair, acrylic and wool).
- Needles number 6.
- Schemes of patterns with descriptions.
Knitting is done in three patterns, they are arranged in any order (6 squares in length and 5 in width). Squares are knitted according to the pattern, then 60 loops are knitted with knitting needles. The first and final two loops are made in garter stitch - before and after the hem loops.
In the middle, you need to knit squares of 28 rows. Having connected 24 rows, arrange the figures as follows: 2, 3, 1 (patterns shift in each line). At the end, everything is closed with a garter stitch. Using a hook, the edges give strength and a neat look.


Blanket for babies, size - 55 × 70 cm (knitting diagonally). In the process, you will need the following:
- Yarn, 300-350 g.
- Needles number 4.
- Hook number 3.
This method is one of the simplest. 4 P. are typed on the knitting needles, everything is knitted LG. From each edge it is necessary to add until there are 160 P. on the knitting needles (using a crochet). When you reach the required amount, knit 3 loops before and after the yarn over, knit up to 4 loops. Crochet around the end. In the passages obtained from the yarn, at your own discretion, you can thread the ribbon and tie it with a bow.


Ideas for using patterns
A handmade blanket for babies is a practical and beautiful thing. Openwork options are most often found on blankets for children. They amaze with the number and variety of performance techniques. Openwork will look very nice with offset loops, as well as braids. Wavy or zigzag patterns will give the baby blanket tenderness and lightness.
Pictures related to children's themes (whether they are cartoon characters, fairy tales, or just cute little animals) can be obtained by combining purl and facial loops.
On the Internet you can find many such schemes. Such a blanket will appeal to an older baby.


For a newborn, it would be more appropriate to prepare a blanket with a small toy, sewing it to the very edge of the product. So the child will not only keep warm, but also have fun. Options can be very different. The main thing is to show imagination.


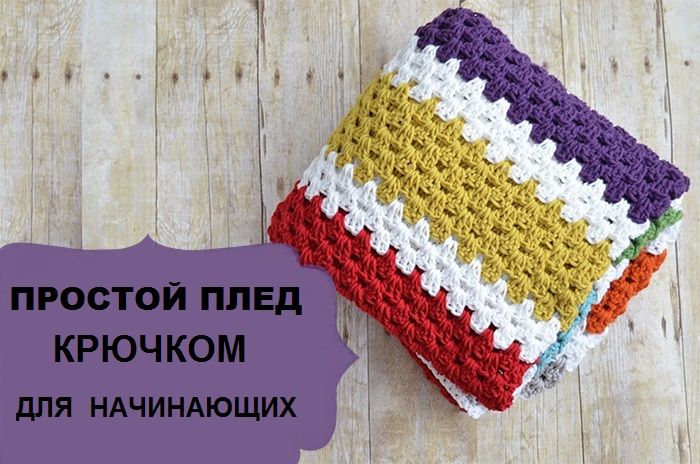
Today in our master class - a charming crochet blanket for beginner craftswomen. This soft and cozy bedspread knits quite simply. And for those needlewomen who are just taking their first steps in this type of needlework, we have prepared a knitting pattern and a step-by-step description with a photo to facilitate the work.
Tools and materials Time: 48 hours Difficulty: 4/10
- crochet hook 6.0 mm;
- about 1490-1500 meters of worsted yarn in several colors;
- a darning needle to hide the ends;
- scissors.
A warm crochet blanket and a cup of delicious tea are the best remedy for any stress! Treat your household with a simple and beautiful blanket, knitted by you with your own hands! Do not hesitate, they will appreciate your work!
For this workshop, we used cotton yarn in white, red, brick, turquoise, light green, purple and gray shades. In general, everything that was in our house in the remnants. You, in turn, can use whatever threads you have in your stash and the colors you like!
Abbreviations:
- c.p. - air loop;
- CCH - double crochet;
- conn. st - connecting column;
- RLS - single crochet;
- p.p. - lifting loop;
- () - indicates the number of loops;
- * - indicates the number of rapports / repetitions.
Size of the finished blanket: approximately 100 x 112 cm.
Notes:
- All stitches are worked through both stitches unless otherwise noted.
- The dimensions of the finished blanket are approximate. They won't be accurate. The final size will vary depending on how tight or loose you crochet.

Step by step description with photo
So, let's get to work. In this plaid, the simple pattern is more than offset by the bright colors of the threads.
Step 1: tie the base
Start: 130 air loops.
Row 1: 2 dc in 4th st from hook, *skip 2 sts, 3 dc in next st**. Repeat from * to ** until the end of the row. Turn. (129)
Row 2: ch 3, *3 dc between the next groups of 3-dc from the previous row**. Repeat from * to ** to end of row, 1 dc in sts, turn. (129)
Row 3: ch 3, 2 dc in the space between the 1st dc and 3rd dc of the group from the previous row, *3 dc in the space between adjacent 3-dc groups from the previous row**. Repeat from * to ** until end of row, 3 dc in space between last 3-dc groups and p.p., turn (129)
Row 4-71: repeat Rows 2-3.
Row 72: repeat Row 2.
For this bedspread, we knitted 6 rows in one color, 3 rows in white and continued to weave a colored pattern, alternating different colors and white in between. However, you can choose the colors and thread patterns you want. Since we knitted this plaid for beginners for ourselves, we used all the colors that we had available at home.
Step 2: Add trim
Connect the white yarn with comp. Art. in the last stitch of row 72.

Master class completed. Agree, this crochet blanket is ideal for beginner craftswomen! We hope you are satisfied with the results of your work. And if you have any questions or suggestions, write to us below in the comments. We wish you good luck!
Some craftswomen prefer to crochet large items only, since the peculiarity of this method allows you to achieve beautiful openwork patterns on blankets, and thin, almost jewelry work is very to the liking of lovers of creating beautiful things from details.
Crocheted blankets will perfectly warm adults and the smallest children, the main thing is to choose the right yarn. Another important function of plaids is to decorate the home and create the right mood. All this directly depends on the shape and method of crocheting, which we will examine in detail in this article.
Crochet a plaid with diagrams and descriptions
There are a huge variety of crochet blankets, as well as knitting styles for these warming bedspreads. Even the simplest patterns look interesting on rugs and are always associated with the stepfather's house, warmth and care.
But you won’t surprise experienced needlewomen with simple patterns; interesting openwork motifs have been invented for them, patchwork-style blankets of incredible complexity and beauty, thin and delicate bedspreads for newborns, over which it is so interesting to pore over. In this type of needlework, there is work for every interest and request. But let's start learning from the basics - the simplest patterns and patterns for crocheting plaids.
Master class for beginners
In any business, you need to start somewhere in order to learn. And to learn how to crochet a plaid - a master class for beginners is ideal. Such a blanket, completely made in the style of "grandmother's square", will please both adults and children. Consider how it is knitted using the example of step-by-step instructions.
Popular articles:
Tools:
- Yarn (in this case, bright green, yellow and brown);
- Hook;
- Needle.
Abbreviations for the knitting pattern:
- VP - air loop;
- RLS - single crochet;
- SSN - double crochet;
- SS - connecting column.
Progress with step-by-step photos:
You need to start knitting with the main color of the blanket. We close six loops in the ring, then we make three VPs and knit two more CCHs into the ring. We make two VPs (photo 1). After that, we crochet three CCHs into a ring and make two VPs. We repeat two more times, as a result of which a square is knitted (photo 2).

After that, we make three VPs (this is the first CCH) and in the corner in the arch we will perform three CCHs, two VPs and again three CCHs (photo 1). This is what we will knit in the remaining arches. We will finish the last with two CCH and SS (remember that the first column at the very beginning was knitted in the form of three VPs) (photo 2).

We knit a new row of the square and make three VPs from the arch in which we have the hook. We knit two CCHs into it. Next we move on to the corner. And we knit everything in it that was knitted in the previous row: three CCHs, two VPs and three CCHs (photo 1). In the next arch we knit just three CCHs. And so in a circle (photo 2).

In the corners you will always need to knit the same thing. And in the arches that are on the sides of the square, we always knit just three CCHs. As a result it turns out the so-called grandmother's square. We knit several rows for the desired size of the blanket. And, completing the grandmother's square, we will change the color of the thread to yellow (photo 1). Knit two rows in yellow. And another row in green. And then we will make the binding of the edges. In one arch we will knit seven CCHs, in the other one RLS. And so we alternate the strapping throughout the blanket (photo 2). Finish tying in green. We will make three VPs and knit one sc in each loop (photo 3).

Plaid decoration
To decorate this simple, but no doubt cute plaid, you can crochet a small decorative element, for example, a butterfly. This is how it can be created:
- We knit five VP and close in a ring. Next, we knit three VP and one more CCH. We make two VPs. And two more SSNs. In total, we need to knit eight times like this. That is, we get sixteen CCH.
- We pass to the arch from the VP. SS We knit three VPs and here we perform two SSNs. We perform three VPs and under the same chain we knit three CCHs. So we knit under all the arches from the VP.
- Now attach the brown yarn. Under the chain of the VP, we knit six CCH. We make one VP and here we perform six more CCHs. Skip the bottom three dc and knit sc.
- And in the next chain we knit everything the same as we knitted before.
- We tie our butterfly with yellow yarn. We knit one sc in six underlying loops and one sc under the VP. We make a pico of three VPs. And so we tie the whole butterfly.
- We fold it in half and fix it with a chain of brown VP. Now it can be sewn to one of the corners of the finished plaid.

How to knit a baby blanket with a simple pattern
Very often, people resort to knitting only to create a crochet children's blanket with an original pattern for their baby. Many try to crochet a plaid with a pattern and color that will not look like any other plaid. And this is a completely doable task, because when you make a crochet blanket, you will definitely get an interesting and beautiful product, even if it is made with the simplest pattern - for example, embossed columns.

Tools:
- 8 skeins of 50 g of wool mixture or white bulk synthetic yarn (A);
- 8 skeins of 50 g of wool mixture or blue bulk synthetic yarn (B);
- hook number 3.5.
Knitting density: 20 loops x 11 rows = 10 x 10 cm (embossed columns).
Size: 75 x 100 cm.
Main pattern
The embossed crochet stitch is knitted like this: we make a yarn over, insert the hook (from front to back) under the stitch (leg) of the previous row, pull out the loop, grab the thread and pull it through the first 2 loops on the hook. Yarn over again and pull through the remaining 2 loops.
Work progress and knitting pattern

With white yarn we knit an initial chain of 145 VP.
Base range: 1 dc in 3 chs from the hook, 1 dc in each ch to the end, 144 loops are knitted. 1st row: 2 VP for lifting, * relief. Art. around the loop of the previous row, dc in the dc of the previous row, repeat from * to the last loop, 1 relief. Art. around the loop of the previous row.
We turn the work around.
Next, we knit according to the scheme of 7 rows. Cut the thread (A). We knit the thread (B) according to the scheme of 8 rows. Cut the thread (B). Next, knit according to the pattern of 8 rows of thread (A). Repeat the stripes until 96 cm is knitted.
strapping
To tie the edge of the finished product, use the thread of color (B).
1st-4th rows(wrong side): 1 VP, RLS to the end of the row. In the corners of the finished product, knit 3 sc in the sc of the previous row.
Then knit 1 row in a crab step (SC is knitted from left to right, not right to left) around the entire outer edge of the product.
Finish knitting PBN (half crochet) in the 1st sc. Fasten the thread.
From soft yarn for a newborn
A very responsible job is to crochet a blanket for a newborn. A warm blanket for a baby should be gentle, warming and always beautiful. The airiness and delicacy of the yarn for the newborn will give the product a special look that young parents will remember for a lifetime, because they will remember the crumbs during discharge from the hospital in this blanket, created by caring hands. This blanket is suitable for both girls and boys. It can be used both at home and for walking with a stroller.

Tools:
- 325 g of white yarn for knitting children's clothes;
- hook number 3.5.
Knitting density: one motive = 4.1 x 3.8 cm (fantasy pattern in the central part).
Work progress and knitting pattern
central part
knitted as follows: a chain of 171 loops is dialed and 73 rows are made with a fantasy pattern in accordance with the diagram and explanations for the symbols accompanying it. 
strapping
At the end of the 73rd row, without cutting the thread, knit the 6th circle. rows with shells (2 CCH (double crochet), 3 VP (air loops), 2 CCH), performing additions in each corner, as shown in the diagram. Replace the last 2 VPs of the 1st and 2nd round. rows 1 dc (semi double crochet), knitted in the 3rd of 3 VPs, replacing the 1st dc. Close the 3rd - 6th circle. rows 1 SS (connecting column) in the 3rd VP from the beginning, and move forward, knitting additional. SS on the arch of the 1st shell.
After that, knit 4 circles. a row of arches of 6 loops without additions and decreases, 1 circle. a row of simple shells (1 SSN, 5 VP, 1 SSN), separated by arches of 5 loops. Run fans of 13 dc in each simple shell. Replace the last 3 VPs of the 7th - 9th circle. rows of 1 CCH, knitted on the 1st RLS, and 4 last VP of the 10th circle. row - 1 C2H, close the 11th and 12th circle. rows like 3rd round. row, and perform another SS in the 1st arch at the end of the 11th circle. row. Finish 1 lap. next to the “crawl step” pattern, as stated in the explanation, close 1 SS in the 1st RLS and cut off the thread.

Openwork from motives
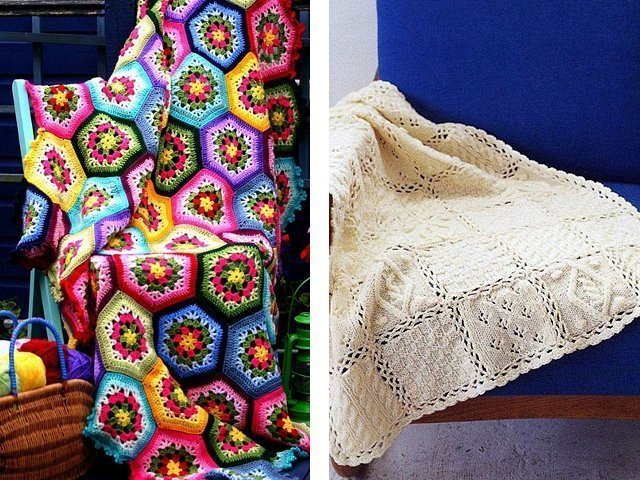
Lovers of beautiful designer things will like an openwork plaid of crochet motifs, which is exciting and interesting to work on. The result is a very beautiful product that will decorate a sofa in the living room or a bed in the bedroom, while warming and giving warmth on cold evenings. For example, you can knit a blanket of large floral motifs, which then need to be combined into a single whole.

Tools:
- Novita Isoveli yarn (75% wool, 25% polyamide, 65m/50g) - 2300g yellow-green (334) or Novita Napko yarn (50% cotton, 50% acrylic, 104m/100g) - 1800g blue (013);
- hook number 5-6.
Finished product dimensions: Isoveli yarn plaid -140 x 210 cm; Napco yarn plaid -110 x 180 cm.
Knitting density: the diameter of one motif is 17 cm.
Progress and schemes
The plaid consists of separately connected full and half motifs. For a complete motive, dial a chain of 6 VPs, close it in a SS ring. 1st row - cast on 3 ch lifts, knit 1 dc, 2 ch, * 2 dc, 2 ch * in the center of the ring, repeat * - * 4 more times, close the sl-st row. Next, knit according to scheme 1 from the 2nd to the 5th rows. Cut the thread and fasten off. Knit 104 motifs with Isoveli thread or 67 motifs with Napko thread.

For a half motif, dial a chain of 4VP, lock into a SS ring. 1st row - VP, 2 CCH, 2 VP, 2 CCH. Next, knit in straight and reverse rows according to scheme 2 from the 2nd to the 5th rows. Cut the thread and fasten off. Tie 8 such motifs with Isoveli thread or 6 motifs with Hanko thread.
Assembly
Lightly steam each motif. Connect the motifs to each other in accordance with scheme 3 (motifs from Hanko yarn are highlighted in gray). For the Isovely yarn plaid, crochet the fringe. To do this, cut the threads 45 cm long, fold them into 3 pieces and tie around the edges. Run 7 brushes for each motif.

Knitted plaid from squares
A very fashionable phenomenon that designers and housewives with taste love - crochet plaid from squares. There are a huge number of crochet patterns for a wide variety of geometric patterns for a patchwork product, most of which look very interesting in their hodgepodge of colors and patterns, while others are elegant in one color but made with different complex motifs. Such a playful and uplifting plaid will look good not only in the nursery, but also in the living room, and in an armchair on the balcony. In addition, you can give it to friends or relatives - let them also rejoice.
Consider here such a plaid of squares, which is easy to knit according to step-by-step instructions.

Tools:
- yarn - 200 g dark blue SMC BRAVO;
- 100 g each of beige, orange, red, lilac, green, blue, brown, yellow and pistachio SMC BRAVO yarn;
- hook number 3.
Main pattern - square
Link a chain of 6 VPs and close it into a ring with 1 SS. Knit a circle. rows. Every circle. the row starts with 3 VP lifting and ends with 1 SS in the VP lifting of the previous row. Attention! 2 CCH + 2 VP + 2 CCH are indicated in the instructions as a group of CCH.
1st circle. row: 3 dc, 2 ch, * 4 dc, 2 ch, repeat from * 2 more times.
2nd circle. row: 3 CCH, in an arch of 2 VPs, tie a group of CCHs, * 4 CCHs, in an arch of 2 VPs, tie a group of CCHs, repeat from * 2 more times.
3rd circle. row: 5 CCH, in an arch of 2 VPs, tie a group of CCHs, * 8 CCHs, in an arch of 2 VPs, tie a group of CCHs, repeat from * 2 more times, 2 CCHs.
4th circle. row: 7 CCH, in an arch of 2 VPs, tie a group of CCHs, * 12 CCHs, in an arch of 2 VPs, tie a group of CCHs, repeat from * 2 more times, 4 CCHs.
5th round. row: 9 CCH, in an arch of 2 VPs, tie a group of CCHs, * 16 CCHs, in an arch of 2 VPs, tie a group of CCHs, repeat from * 2 more times, 6 CCHs.
6th round. row: 11 CCH, in an arch of 2 VPs, tie a group of CCHs, * 20 CCHs, in an arch of 2 VPs, tie a group of CCHs, repeat from * 2 more times, 8 CCHs.
7th round. row: 13 CCH, in an arch of 2 VPs, tie a group of CCHs, * 24 CCHs, in an arch of 2 VPs, tie a group of CCHs, repeat from * 2 more times, 10 CCHs.
8th round. row: 15 CCH, in an arch of 2 VPs, tie a group of CCHs, * 28 CCHs, in an arch of 2 VPs, tie a group of CCHs, repeat from * 2 more times, 12 CCHs.
9th round. row: 17 CCH, in an arch of 2 VPs, tie a group of CCHs, * 32 CCHs, in an arch of 2 VPs, tie a group of CCHs, repeat from * 2 more times, 14 CCHs.
10th round. row: 19 CCH, in an arch of 2 VPs, tie a group of CCHs, * 36 CCHs, in an arch of 2 VPs, tie a group of CCHs, repeat from * 2 more times, 16 CCHs.
11th round. row: 21 CCH, in an arch of 2 VPs, tie a group of CCHs, * 40 CCHs, in an arch of 2 VPs, tie a group of CCHs, repeat from * 2 more times, 18 CCHs.
12th round. row: 23 CCH, in an arch of 2 VPs, tie a group of CCHs, * 44 CCHs, in an arch of 2 VPs, tie a group of CCHs, repeat from * 2 more times, 20 CCHs.
Cut and fasten the thread.
Assembly of motifs in a plaid
Knit 54 multi-colored squares. Connect the edges of the squares to each other by completing the faces. side 1 row RLS with a dark blue thread. For the blanket, collect 6 x 9 squares in the desired order.
Make a circle around the perimeter of the blanket. a row of dark blue thread border. Every circle. the row starts with 3 ch lifts instead of 1 dc (or 2 ch lifts instead of 1 sc) and ends with 1 sl-st in the last ch of the rise of the previous row. Attach the thread to the beginning of the corner square and knit as follows.
1st circle. row: ** 2 dc, * 4 ch, skip 2 sts of the base, 4 dc, repeat from *, before the next corner, tie 4 ch, skip 2 sts of the base, 2 dc, then tie the group of dc into the arch of 2 ch of the previous row, repeat from ** on each side of the bedspread.
2nd circle. row: work 1 sl-st in the next loop, ** 4 dc, * 4 ch, skip 4 sts of the base, 4 dc, repeat from *, before the next corner, tie 4 ch, skip 4 sts of the base, tie the group of dc into the arch from 2 ch of the previous row , ch 4, skip 4 base sts, repeat from **.
3rd circle. row: ** 1 dc, 4 ch, * 4 dc, 4 ch, skip 4 sts of the base, repeat from *, before the next corner, tie 4 ch, skip 2 sts of the base, tie the dc group into an arch from 2 ch of the previous row, 4 ch, Skip 2 base sts, 3 dc, repeat from *.
4th circle. row: ** 1 sc, * 4 dc, 4 sc, repeat from *, 4 dc, 2 sc, 4 dc into the arch from the 2 ch of the previous row, 2 sc, 4 dc, 3 sc, repeat from **. Cut and fasten the thread.
Video lesson
It's always a good idea for beginner needlewomen to preview a few video tutorials on how to work with a hook, especially when it comes to such an important task as a blanket for a newborn baby.
Video “plaid for a newborn crochet”: