DIY flower box. How to decorate a finished box? DIY jewelry box from the box
Every woman at home has a box, a box, a jar in which jewelry, jewelry, cosmetics, and so on are stored. The most common items for storing small items are caskets. They are made of wood, cardboard, glass, metal. Now you can buy a lot in the store, but there are many people who love to create, decorate objects with their own hands. If you decide to decorate your box, make it original and unique, our master class will help you. The decor technique is the simplest, most accessible and understandable. You do not need to have a special skill to decorate the box with your own hands and add charm to it.


If a piece of vinyl wallpaper remains after the repair, you can use it to decorate a wooden or cardboard box. Our master class will tell you how to decorate a simple thing with your own hands, using textured wallpaper, and give the surface a metallic effect. Let's say you have such a roll of wallpaper left. Wallpaper can be of any color, our task is to paint the paper to match the color of the metal.

For work you will need:
- A piece of wallpaper or textured paper.
- Construction glue PVA.
- Paper towels.
- Acrylic paints: black, copper, red, silver, green, dark gold.
- Coating varnish.

To decorate the box with your own hands, you need to take a roll of wallpaper or textured paper, attach it to the box and cut off a piece with an allowance for the sides.

You can only decorate the lid of the box without touching the side walls. You can decorate both the lid and the sides. Who likes it better. To glue the lid, smear the back of the paper with a brush or sponge. We take PVA glue and dilute it a little with water. You need to spread so thickly that the paper is well saturated with glue and swells. We leave the paper aside for a while until it swells completely. Then glue it on the surface of the box. We press it well with a sponge or with our own hands to the surface. Make sure there are no wrinkles or bubbles.

Next, let the glue dry and only then paint the box and give it the look of metal, aged by time. In order to apply paint to the surface, disposable paper towels soaked in water are used. We need the paint to lie unevenly and in irregular islands. First, cover the surface of the box with black acrylic paint. We have it in a spray can, but it can also be in a bank.

Dry and then cover with red acrylic paint.

Add silver paint after the previous one has dried.

We muffle red silver with bronze color.


At the end of the master class, we make a varnish coating on the resulting product. Varnish can be any: matte or glossy, aerosol or plain. You can also make a vase decor, you will get a kit.


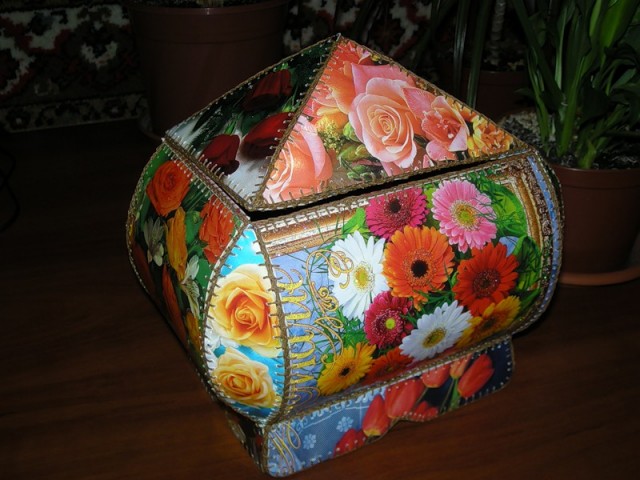
In this master class, we combined several techniques for decorating a box with our own hands. Let's try to mix styles, textures and techniques. The main theme of this master class is the imitation of fabric using painting. Since not everyone can draw well, we decided to use a stencil here.
The stencil drawing is attached, you can choose any one you like.
The master class is simple, even a beginner can handle it.

For work you will need:
- Casket or box.
- acrylic primer.
- Acrylic paints.
- Tassels.
- Stencil.
- Masking tape.
- Sandpaper.
- Everything that can be useful for decoration: cord, ribbons, lace, braid, and so on.
If the box or blank is made of wood, you may need to sand it with sandpaper and varnish it. So we will protect the workpiece from swelling.

We are waiting for it to dry and cover with acrylic primer.

Dry and sand. Seal the top and bottom corners with masking tape.

We paint all sides of the box with any light acrylic paint. Thus, we make the bottom layer under the imitation of fabric.

We paint with a brush in a horizontal direction, apply the paint evenly and evenly. Next, let the workpiece dry, sand it with sandpaper and varnish it. We mix our light paint with the same beige tone darker.

The paint should not be too thick, so be sure to soak the brush in water and wring it out. We apply it on the side part with horizontal strokes.

Then we take a sponge or brush and draw along the surface in a horizontal direction.

That is, we need to make an imitation of the fabric. This will be one direction of our "fabric". Here is what should happen after processing with a sponge or brush:

We needed a layer of varnish so that the paint did not soak into the surface of the product. If not for the varnish, then we would not have received such a textured surface. We also act with all the side surfaces of the box: paint and erase the paint with a sponge or brush. It will be great if you apply varnish on top. We are waiting for the product to dry, we collect the same paint on a wet brush and paint the side parts, but already vertically. We erase the paint with a sponge vertically. As a result, we should get a "fabric".

We dry and lightly process the side parts of the product with sandpaper. Choosing a stencil for our pattern. Let's say this is a drawing with a rose.


We seal with tape the places that are not needed for decoration. We place the stencil on the side of the product.

Choose colors for the pattern. In this master class, it is yellow, burgundy, light green and dark green. We collect paint on a brush or sponge and apply it to the stencil. There should not be a lot of paint so that it does not flow under the template. Your brush should be semi-dry. Do not rush, if the first time it turned out not bright, you can walk with a brush again. We remove the stencil, wait for the paint to dry. Flip the stencil over to the other side. Flowers should be arranged randomly. Coloring the stencil.

This is what the side looks like. There should be no empty spaces, instead we draw leaves on the main background. We fill the empty space with small leaves.


Next, sand the sides after the surface dries. To complete the work, you can cover the sides of the product with several layers of varnish. It's time for the lid. Glue strips of masking tape to the sides of the lid. We paint the cover in the same order as the sides. First, a light color, under the "fabric", we varnish. Then the “fabric” itself: paint with a brush horizontally, then vertically.

We dry the lid, lay out the stencil on it in different directions. Apply yellow and light green paint. All empty spaces are filled with small sheets. We apply the stencil again, paint over the roses with a burgundy color, the leaves with dark green. Sand with a brush horizontally and vertically after drying. We admire our work and apply varnish in 2-3 layers.

We decorate the bottom of the box and the sides at our discretion. In this master class, the sides of the lid are painted yellow, a cord is glued with a glue gun. Below is a velvet ribbon glued with Moment glue. Glued wooden legs. It will be beautiful if you attach a strip of lace or gold braid, cord, and so on.

The decor of the box is a boundless scope for your imagination. All this beauty can be done by hand. Not all boxes have an elegant design and are suitable for decorating the interior. But if desired, this can be easily corrected. Anyone who has a little free time, patience and inspiration can make a thing exclusive.
You can decorate with anything: buttons, paper flowers, lace, polymer clay, beads, glass, coins, shells, and so on. Perhaps you have jewelry that you don’t wear, but you don’t raise your hand to throw it away: it will also come in handy for decoration. The photo shows a variety of decor items for storage. We hope that these ideas and master classes will be useful to you in your work.

Proper and convenient storage of jewelry is an important matter. Of course, all chains, bracelets, rings and earrings can be placed in a large jewelry box and taken out as needed. True, this is terribly inconvenient, because they all cling to each other, get confused. And some even manage to get lost among others so that after six months their owner rejoices at the jewelry, as if she saw it for the first time.
So isn't it better to keep accessories close at hand and in plain sight? Very convenient for such purposes, you can do it yourself. As a basis, you can take any box or even your usual box-chest. But we will make the separators ourselves. To do this, we need an old towel and a piece of pretty fabric (you can use an unnecessary neckerchief, velvet will also look great).
How to make a box?
Cut the towel into pieces. Their width should correspond to the width of the base. We twist the pieces of towel into tubes, as shown in the photo. If they do not hold well, you can additionally fasten them with a thread. We put the resulting tubes in a box and cover with a beautiful cloth (by the way, you can use not a cloth, but a dense corrugated paper or any other thin and durable material). Now it remains only to put the separators. You can use wire or wooden skewers (it all depends on what kind of material you have chosen as a coating.


Who doesn't like being surrounded beautiful things that please the eye, create mood and comfort? If there is a woman in the house (and not one!), the warehouse is actively replenished with cute trinkets, for children and adults, for which you need to look for a secluded place.
A little patience and imagination - and you can make an exclusive box yourself. And even if it differs from those donated from the store, nevertheless, it will compete with them, because in handmade it is a piece of your soul and the embodiment of individuality.
Shoe boxes, glasses and teapots are scattered throughout the house. Like rubbish, but it's a pity to throw it away. How to turn old boxes into fashionable boxes, the master class "Do-it-yourself jewelry box out of the box" will tell.
Our version of the box has different levels difficulties. The easiest way is to take a small shoe box, paste over it according to the above scheme with a material dear to your heart (even with beautiful wallpaper) and limit yourself to this. If the box is white (you can paint it) or without a picture, you can paste over it with pictures cut out from magazines (it’s good if the scissors are curly, or you can carefully tear off the picture) and put memorable tickets, booklets and everything that is dear to your heart after a vacation or some event. This box is perfect for needlework or first aid kit. You can make inserts from another box to make it easier to find the right little thing, and jewelry is better preserved in such pockets. Well, if inspiration also tells you options for decorating the box, feel free to bring them to life. We offer a do-it-yourself casket master class with shoe box decoration.
Jewelry box out of the box
Tools and materials

Step-by-step instruction
We prepare the basis

Sewing the inside first

Jewelry mounts
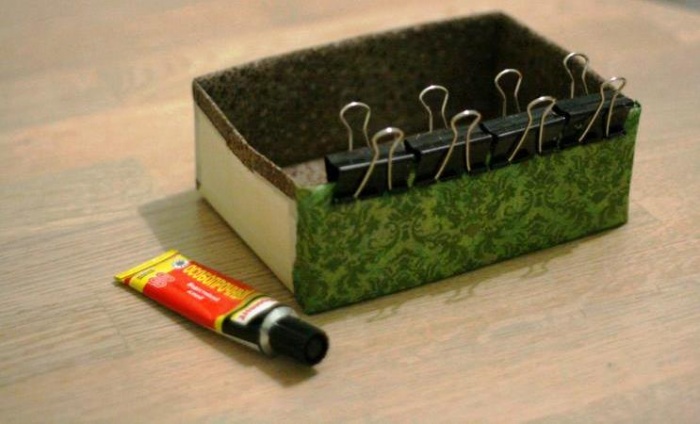
You can stop at this stage of the do-it-yourself jewelry box master class and store all the treasures there together. For those who love the German order, we will make fastenings. In one tray we glue sponges, from which we first carefully remove the hard base. We apply glue to the bottom of the tray and glue the sponges. You can’t press it hard - the sponge soaked in glue becomes stiff, looks unaesthetic and sticks worse.
In the second tray we glue the "accordion" for decorations, for which we cut out a rectangle from cardboard, paste it over with a cloth and fix the partitions. Since the junction of the "accordion" with the liner is small, it is better to fix it with superglue so that it immediately sticks. Hold the edge until completely dry. You can make partitions over the entire area, you can leave part of it free. The grooves can be shaped into a cylinder during the drying process for easy storage of rings. 
On the lid of the box of braid, you can make holders for hairpins, invisible. We measure out two strips of braid of the same length, slightly more than the length of the box. On the lid we make slots along the edges and insert the braid there. We stretch the ends to the top of the lid and fix with glue.
The same braid can be attached to the folding side of the box. It is convenient to work with a stapler here.
The most crucial moment is the lining of the top of the box

Box of postcards
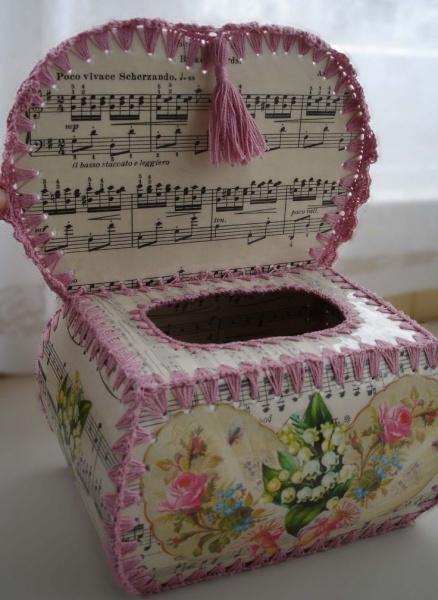
 This do-it-yourself master class of caskets from postcards is probably familiar to everyone, “who cares…” - which of the Soviet girls did not sew original caskets from postcards for all sorts of little things? Now postcards have replaced virtual messages, so if you can’t find material to work with from old postcards, you can pick up suitable pictures on the Internet, print them out and stick them on cardboard. You can buy and modern postcards. Such a box can be made with children - it is accessible and interesting.
Tools and materials
- old postcards of a suitable theme;
- a needle with a large eye;
- embroidery threads.
Step-by-step instruction

Another original version of the box with your own hands is a master class on the video “Box from the book”.
The box is a wonderful thing in which you can store various little things. Not only is it functional, but it also brings some charm to the design of your room. In this case, you do not have to go to the store and buy a suitable box. It can be made independently from improvised means. This DIY jewelry box will be a great addition to your home.
In this article, we will look at what a box can be made of with our own hands, and how exactly.
Box of postcards
Simple but beautiful box. For work you will need:
- postcards, 13 pcs.;
- scissors;
- needle and thread;
- pencil and ruler;
- textile;
- cardboard.
And now consider a step-by-step way to bring everything to life:
- Take 4 whole postcards and sew them around the edges with a buttonhole stitch.
- Take the other 4 cards and cut triangles out of them. Make a square out of 1 other. Sew all 5 blanks again with buttonhole stitch.
- Take cardboard and cut out 5 identical squares from it, the width of which is identical to the width of the postcard, and sheathe them with fabric.
- Now, using a needle and thread, connect the sheathed sheets of cardboard so that you get a box with a bottom and four walls.
- Take 4 whole postcards that you sheathed at the beginning, attach them to the top and bottom of the box on each side, bending the postcard in an arc.
- From triangles and 1 square, make a box for the finished design.
- To close the sides of the box, make a stencil and cut out the sides from the remaining four postcards. Sew them with buttonholes too.
- It remains to sew the sides and the cover. To ensure that the lid closes and opens normally, sheathe only one side.
Now the product from postcards with your own hands is ready.
Do-it-yourself wooden box
The most common option for self made- this is a tree. The material is affordable, beautiful and easy to process. Such a box with your own hands will be a great gift for a friend or family. You do not need special tools and expensive materials.

Plywood, 4-6 mm thick, will serve as the basis. It is important that it is dry. For work you will need:
- jigsaw (can be manual);
- nail files for a jigsaw;
- hammer;
- hacksaw for wood;
- different files;
- sandpaper;
- pencil, ruler, tape measure;
- varnish, paint and swabs.
The first thing you need to do is draw the drawings. One of these is provided below if you can't make your own.

Now you need to compactly place all the details on plywood, adhering to the dimensions. To make things easier, use templates. And finally, cut out all the details with a jigsaw. Having all the components on hand, it is easy to combine them into one beautiful box.

Do-it-yourself plywood box is ready. Such a wooden gift, made by yourself, will please everyone.
DIY cardboard box
Pretty simple and economical option. Here's what you'll need to get started:

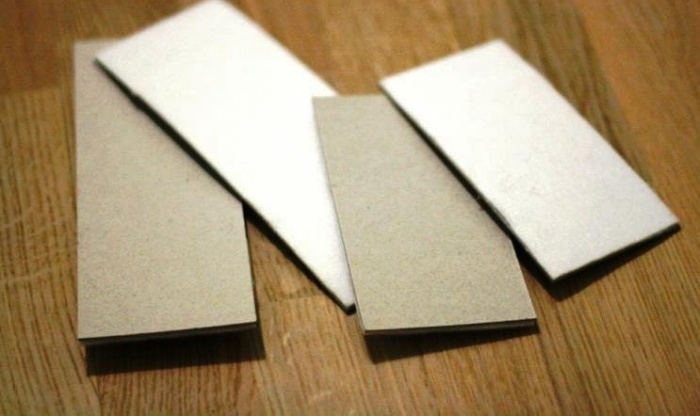
As for the tools, the set is standard: a knife, scissors, a pencil and a ruler, a clip, needles and threads. First, you need to properly cut the cardboard. The photo shows how to do it. Light paper is thin, and dark paper is thick.

Note! An unnecessary detail is indicated by a cross.
So, you see 6 types of paper. Let's figure it out;
- The first four parts (No. 1) are 7 × 13 cm in size. These are cardboard and paper.
- The next four parts (No. 2), 7 × 19 cm in size.
- Under No. 3 paper blank, 7 × 19 cm in size.
- This is a cardboard blank 7 × 20 cm.
- Under No. 5, two blanks 13 × 19 cm.
- And the last two blanks are 14 × 20 cm.
This will be a great DIY craft box. Here step-by-step instruction for its construction.
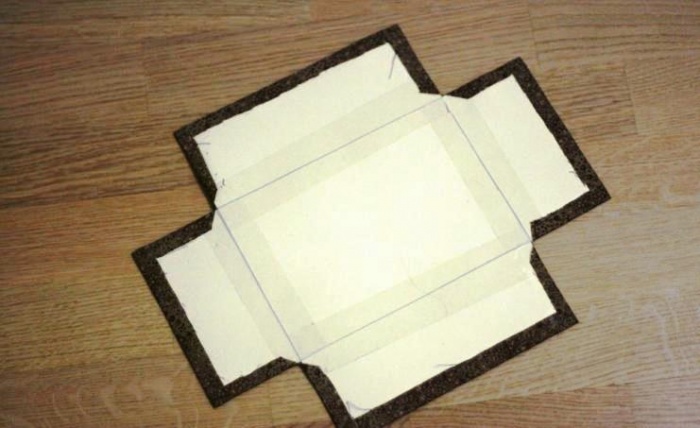
Take all parts #4 and #6, and stick an identical piece of fleece on them.

Lay the blank on the fabric and cut out a rectangle, leaving a margin of 2-3 cm on each side.

Bend and carefully seal the edges, as shown in the photo. You will have to do this often.


Secure the design with paper tape.

It remains to cut all around the edges.

Put the workpiece on the fabric and carry out all the same manipulations as with the first part.
For reliability, you can sew lines where there will be a bend.

It remains to bend it inward and fix it with tape.
The base is ready, you can put it aside and take the rest of the cardboard parts. Duplicate them with fleece.
As always, cover the whole thing with fabric. But, please note that long strips on the short side do not need to be bent.
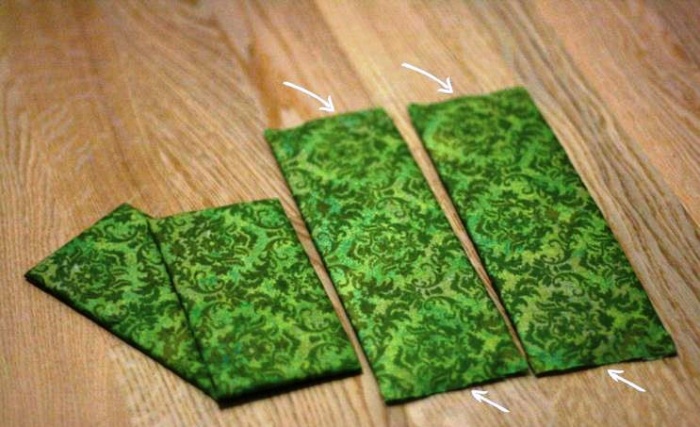
Now glue the 4 pieces on the sides of the box. First long, then short.
You can set aside the finished box. Take workpiece number 3. Cover it with fabric. This time you need to fit the short sides, and leave the long ones as they are.
Despite the fact that shop windows offer a large number of jewelry boxes made of various materials, the desire to make it with your own hands does not disappear. After all, this is not only a tribute to one’s talent and skill, but also the desire to have original item that no one can find. In addition, it is of great importance that a hand-made box will have exactly the size that is so necessary to place all the jewelry.
The box is made by hand in two stages:
1) Creation of the box itself from improvised materials;
The material for it can be scotch rings, wooden blocks or baguette trimmings, old newspapers, shoe boxes, and other improvised materials.
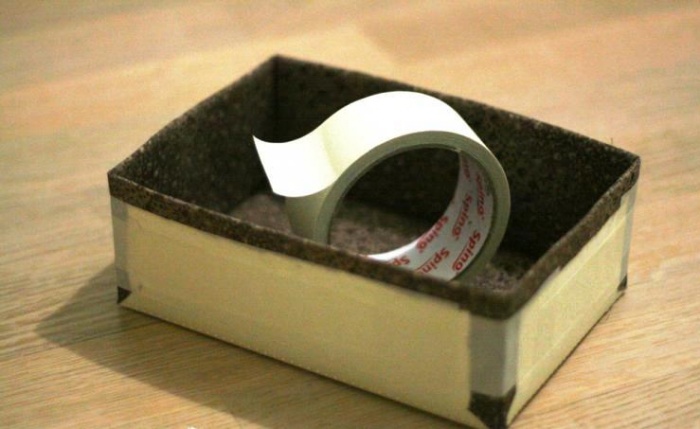
Tape reel box If a small box is enough for jewelry, then you can make it from a paper tape reel. The size of the finished product will correspond to its diameter and height. For work you will need: For the bottom and lid of the future box, you need to make cardboard blanks. It is enough to attach the reel to a sheet of cardboard and circle with a pencil. We circle the resulting circles with another circle, the diameter of which is 3-4 centimeters larger than the previous one. These are the future rays with which the circles will be glued to the bobbin. Don't make them too wide. The narrower they are, the more accurately the bottom will stick. The end result looks like this: For the lid, you will need to cut a strip, slightly longer than the volume of the reel and half its height wide. In order for the lid to fit well, not to be too large, you need to wrap the future box with a strip and glue its edges. When the side of the lid is dry, you need to glue the top to it in the same way as was done with the reel. To strengthen the rigidity of the bottom and the lid, you can glue one more layer of cardboard inside, cut along the inner diameter of the reel. The finished box is decorated with your own hands using the decoupage technique, it can be painted with acrylic paints and varnished or glued over the entire surface with a self-adhesive film with a pattern that imitates natural material: wood, stone. The manufacture of such a box is more laborious than in the previous version, but it will also serve much longer than paper. For work you will need: pencil, ruler; Having decided on the size of the box, you need to cut out two blanks from the plank, equal to its length and width. At the end of each, it is necessary to make a 45-degree bevel with a knife so that the walls fit nicely. The depth of the bevel is equal to the width of the plank. Before gluing the side parts, you need to make sure that the bevels fit snugly, without gaps. Otherwise, they must be adjusted with coarse sandpaper. The sides are glued together gradually. After each subsequent gluing, it is necessary to check the internal angle between them. It must be equal to 90. Otherwise, the result may be any shape, but not an even rectangle. There are two bottom options: if the finished product will be pasted over with paper or cloth, then the blank for the bottom is taken equal to the size of the box and glued so that its side parts are visible; Wooden box covered with paper if a jewelry box with your own hands is covered only with varnish or paint, then it will look more beautiful when the bottom is hidden inside it. For this, a blank is taken, in length and width smaller than the size of the box by two thicknesses of the plank. For example: with a box size of 10x10 cm and a wall thickness of 1 cm, the bottom should be taken 8x8 cm. Lacquered wooden box The manufacture of the cover can also be in two versions: cut the workpiece and install it on the hinges. The best option for attaching the lid is a piece of piano loop, the length of which is a couple of centimeters shorter than the length of the box. All ends of the boards visible on the finished product must be carefully processed with sandpaper; glue the lid to the box and, after drying, carefully cut it off with an electric jigsaw, retreating down the body by one and a half to two centimeters. A wooden jewelry box is decorated with all known methods: varnishing, painting, decoupage, pasting with oracal, fabric, leather. Luxurious baguette box Boxes made of a baguette, a material for picture frames, look chic and rich. It is made of wood or plastic. Plastic is soft, can be cut and processed no worse than wood. You can buy a baguette in art salons, having previously determined how long the blank is needed. The principle of manufacturing such caskets is identical to working with wooden blanks. Papier-mâché box What is papier-mâché, how to work with it, we know from the school bench. The advantage of this material lies in the variety of forms of the finished product. It is enough just to find the original blank of the required shape to create an original box. For work you will need: Do-it-yourself papier-mâché box The base must be covered with petroleum jelly or cream, so that later you can easily remove the papier-mâché. The first layer of thinly torn paper must be wetted and covered with the entire surface of the base. Paper for the second and each subsequent layer is carefully smeared with glue. You need to make sure that there are no missed sections. It is convenient to alternate, for example, layers of newspaper and white paper. The better the paper is impregnated with glue, the stronger the papier-mâché will turn out. The number of layers is optional. After complete drying, the blank of the box must be removed from the mold and prepared for decoration. If it is a painting with paints, then it must be coated with an acrylic primer. In addition to painting, a do-it-yourself box can be decorated with beads, ribbons, buttons, figurines made of plastic or salt dough. Chinese papier-mâché box If the basis for papier-mâché was a round object, the lid was created together with the box, then it is necessary to remove it carefully, having previously drawn a cut line with a pencil. If the layout was created without a lid, then after removing it from the base, you need to align the edges with scissors. The lid is attached to the box before being treated with a primer. Holes for the connecting cord can be made with a paper punch. Decorated box with their own hands is opened with varnish. It is better to use an acrylic-based varnish purchased at an art salon. Artists cover their canvases with this varnish to avoid contamination and fading of paint. For work you will need: Cut out the sides of the future box of arbitrary shape from cardboard. Sew or glue decorative fabric to them on both sides, leaving a small allowance for the seams. A bamboo napkin can also be decorated with a fabric on the side that will be inside the box. The sides can be sewn or glued to the napkin, leaving some part free. The clasp can be made in the form of an eyelet and a button, or you can purchase a magnetic clasp at an accessories store. So that the jewelry box does not get dirty and has a neat appearance for a long time, it is better to open it with acrylic varnish. Below are photos of jewelry boxes made using different decoration techniques. For lovers of rigor and minimalism in everything, it is enough to make the box monophonic, covering it with paint and protective varnish.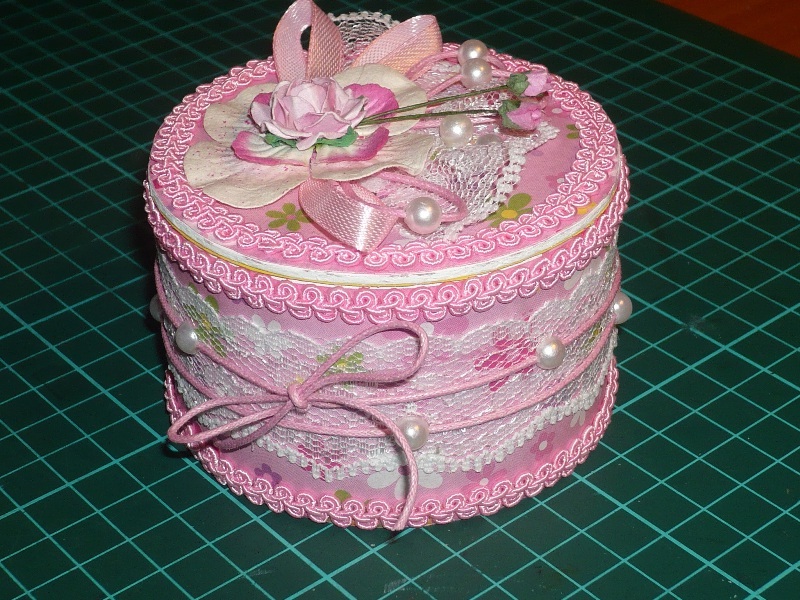
reel freed from adhesive tape;
thick cardboard;
pencil;
scissors;
glue (preferably PVA).
Before gluing the bottom to the bobbin, it is necessary to draw along the fold line with a non-sharp object, you can use the edge of tweezers or a metal ruler. This will help to gently bend them. To hide the petals on the side, you need to stick a cardboard tape over them, corresponding in length and width to the side of the reel.DIY wooden jewelry box
a long plank 10 millimeters thick, 10 centimeters wide, made of soft wood: pine, alder, linden;
a plate for the bottom and lid, its width is equal to the width of the finished product;
hand saw with fine teeth or electric jigsaw;
knife;
sandpaper;
PVA glue (it is better to take construction) or carpentry "Moment".Do-it-yourself box from a baguette
DIY jewelry box made of papier-mâché
newspapers or thin office paper;
vaseline or any cream;
scissors, brushes;
PVA glue or wallpaper.DIY box from a bamboo napkin
bamboo napkin;
thread with a needle, PVA glue;
scissors, cardboard, fabric for decoration;
magnetic clasp.Several ways to decorate boxes