Symbol of the year from a plastic bottle. Crafts for the new year from bottles. Yellow crepe paper pig
Wonderful is coming winter holiday- New Year 2020. It's time to decorate your house for his arrival so that Santa Claus on his magic sleigh does not pass by and leaves good gifts under our Christmas tree. It is very interesting to decorate the Christmas tree and rooms with handmade toys for the holiday. The very process of their manufacture is fascinating, however, like any creativity. Such crafts can be made from the most simple materials, for example, from plastic bottles. From ordinary plastic bottles, you can make a lot of interesting and beautiful things that will successfully replace store counterparts. Our today's story is dedicated to the 7 best and original crafts from plastic bottles for the New Year 2020, which will be held under the sign of the White Metal Rat. Let's look at them in detail in our article.
Christmas tree
An unusual Christmas tree can be made from simple plastic bottles. It is important to collect the necessary materials for this craft and follow the master class step by step.
This will require:
- Plastic bottles;
- Scotch;
- Sandpaper (cardboard);
- Scissors.
Progress:
- The bottom and neck of the bottle should be removed, and then a straight pipe will turn out. Then you should prepare blanks from twigs. They must be of different sizes so that the Christmas tree turns out to be cone-shaped.
- Then plastic bottles need to be cut lengthwise into 3 parts so that subsequent tiers are less than the previous ones. On each blank, you need to make needles, and for this they are cut into thin strips, but not completely. In order for the Christmas tree to stand steadily, it is advisable to use the bottom of one of the bottles as a stand.
- A sheet of cardboard must be rolled up into a tube and installed in the neck of the bottle. You can secure it with tape. Now each tier of branches needs to be fixed on the tree. You can put a toy on top or come up with something else. To make the Christmas tree fluffy, the needles should be cut thinner. Usually blue or transparent bottles are used for this. That's all, our craft is ready!
Christmas balls
You can decorate your Christmas tree with handmade toys. In work, it is important to follow all the steps step by step, and then you will get wonderful products.
This will require:
- Plastic bottle;
- Glue;
- Rain;
- Any shiny jewelry.

Progress:
- The paper needs to be wrapped around the bottle: this will help mark blanks on it. It is necessary to cut 4 rings 1 cm wide. Then the rings must be fastened together according to the “crosswise” principle and secured with glue. The result should be a ball of plastic strips. You need to choose beautiful threads or rain so that the toy can be used for the Christmas tree.
- To decorate the resulting blanks, it is better to use foil, beads, beads, etc. A small ball can be placed inside such a ball. In this craft, you can fantasize as much as you like. For children, this will be a very interesting activity.
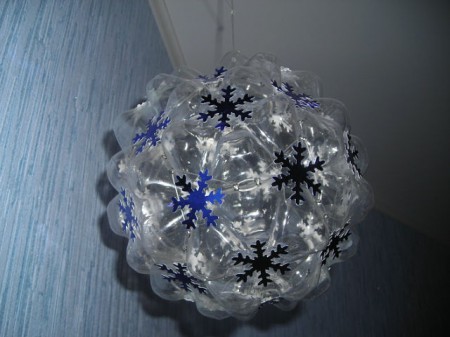
Snowflakes from plastic bottles

To expand the range of crafts from plastic bottles for the New Year 2020, you can also make snowflakes from the bottoms of bottles as a Christmas tree decoration. This process will be possible for beginners in this creative business.
For work you will need:
- Scissors;
- Acrylic paints of white, blue, golden, silvery colors - to choose from;
- Plastic bottles, preferably blue;
- Paint brush;
- Wire;
- Pliers.
Progress:
- We take plastic bottles and cut the bottom as low as possible to the base with a clerical knife or scissors, leaving only the corrugated part.
- After the bottoms are ready, we take up the painting of our future snowflakes. Depending on the desired pattern, we select the thickness of the brush, and then proceed to the artistry. As drawings, you can use various ornaments that come to your mind. This also applies to the choice of color of paints with which you will decorate your New Year's product.
- When your snowflake has turned into a beautifully painted masterpiece, let it dry and use wire and pliers to make little ear for thread. Fasten it to the snowflake and pull the thread into this ring.
Well, ours is ready. christmas toy for a Christmas decoration that you now have the right to be proud of. A do-it-yourself snowflake can serve as a worthy decoration not only for your home, but also kindergarten if you have Small child, and also act as an exhibit at the exhibition at the school of New Year's products.
Penguins from plastic bottles

original christmas decoration your house for the New Year 2020 can become penguins from plastic bottles, which should be placed in rooms and under the Christmas tree as a decor. Such a craft will delight all your relatives and guests, and especially children. Without spending a lot of time, you will create a real masterpiece of art with your own hands, which will cause a lot of positive emotions and sincere smiles in your household.
For work you will need:
- Plastic bottles (one toy takes two bottles);
- Scissors;
- Acrylic paints - white, black, red and others;
- brushes;
- Small colored shreds for a scarf;
- Buboes or bows for hats;
- Glue.
Progress:
- We take a bottle and cut off the upper part almost completely or in half to get the body of a penguin. The head is already made from another bottle and also from the bottom, but the workpiece should be slightly smaller.
- We connect both blanks, inserting the upper part, which is smaller, into the lower, which is larger.
- After you have built the body of the penguin, proceed to its coloring. Take acrylic paints and apply gently on a plastic product, imitating the color of a penguin, as shown in the photo. Use more bright colors, because the brighter your New Year's penguin turns out, the warmer and more fun the smiles of your family will be.
- When your penguin looks realistic, you can tie a small scarf around his neck, and attach a bubo or bow to the cap with glue.
Here is such a cartoon miracle you got!
Video tutorial on making penguins from plastic bottles
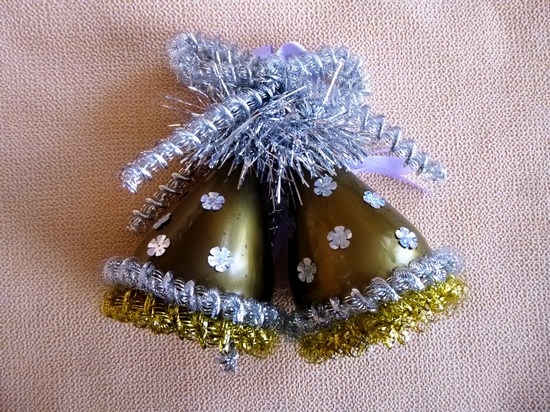
golden bells

Golden bells will look original on the New Year tree. Such work is carried out very quickly and is suitable for kindergarten.
This will require:
- Plastic bottles;
- Acrylic paint, if desired, fabrics, tapes and accessories can be used instead of acrylic paint.
Progress:
- For work, you should take bottles of 0.5 liters each, but more is possible if the tree is very large. The bottom of the bottle should be cut off. To get the bell petals, you need to cut the edge of the bottle in the form of a zigzag. Since the resulting edges will be sharp, care must be taken.
- The petals of our crafts need to be made pointed, and with a knife you can give them a shape. To make holes for the rope, you need to heat the knitting needle and make holes. You can do this job with scissors, but be very careful. At the end of the work, the bells should be painted, and they will dry within an hour. To give the products a New Year's look, they need to be decorated with tinsel, garlands or sparkles. The instruction is simple, and you can do the work in your sequence.
Plastic bottle candlesticks

This will require:
- Plastic bottles;
- Scissors;
- glue gun;
- Universal glue.
Progress:
- With your own hands, you can make a wonderful candlestick for the holiday. You can use bottles of different colors. Containers must be cut in half. The edges of the part that remains with the bottom should be cut into strips, not reaching 4 cm. The strips can be of different widths. The resulting container will be a stand for a candle.
- Strips of plastic should be melted over the candle. Then, using a glue gun, you need to attach a candle in foil. The space near the candle can be decorated with beads or pebbles. So the candlestick will have a small weight, our craft is ready.
Video master class on making candlesticks
Cone
You can make original cones with your own hands, this plastic bottle craft will perfectly decorate your Christmas tree and home for the New Year 2020.
This will require:
- Plastic bottles;
- Scissors;

Progress:
- From a plastic bottle, you need to create squares, after which their corners should be rounded. The result will be products, like chamomile. After that, you need to process the edges of the petals with a candle so that they fall down.
- All details must be strung on a thread in descending order. Between them you need to insert a bead. Then you need to make a sprig of spruce and fix it on the cone. The product is ready to create a festive atmosphere.
Content
And we are here for you, as always, with our interesting and original ideas. New Year's crafts. This time we will create crafts from plastic bottles. First, do not forget that plastic decomposes for more than 100 years, so we must use it to the maximum in order to do less harm to nature.
Secondly, these crafts will not require too much cash injections from you. Thirdly, a lot of interesting gizmos can be made from this improvised material. In our article you will find figurines, a garland, a piggy bank, Christmas decorations and many other crafts from plastic bottles.

Christmas figurines from plastic bottles
These crafts for the New Year from bottles are very easy to create. Here is the set of required items:
- plastic container;
- scissors and stationery knife;
- paints, brushes;
- textile;
- Knitting;
- felt;
- glue gun.
For example, you can make charming penguins. To do this, you need to cut the workpiece in half, and cut off the bottom for the hat. Next, they need to be painted like penguins, glue the parts with a glue gun and decorate the figures with textiles.

A little tip - instead of a glue gun, you can use tape, which you just paint over later.

Use acrylic paints, they fit better on plastic.

From this simple and affordable material, you can also make bright and beautiful apples that can be placed under the Christmas tree or decorate the kitchen with them. By the way, the decor is suitable not only for the New Year, but also for other holidays.

For a child, you can make a toy - a horse on a stick. If you improvise, you can also create a dog, because this is a symbol of the upcoming 2018. And the color is yellow! So use more yellow when creating your wonderful crafts.
Christmas tree decorations from plastic bottles
If a lot of the material we need has accumulated in the house, and you already don’t know where to put it, then our advice to you is to be creative! Let this container be creative! From the bases you can make wonderful snowflakes. They only need to be slightly decorated and attached with a rope so that they can be hung. Use a thin brush to apply the pattern. From such blanks, you can create a whole garland or wreath on the door.

Crafts for the New Year from bottles are both original and not expensive.
But such bells are obtained from the tops:
A whole ball can be created from the bases of the bottles. Details can be painted, or can be used in its original form:

Crafts from plastic bottles for the New Year is an opportunity to give a second chance to old things, an opportunity to join the culture of recycling things, sorting garbage. Thus, we are consciously approaching the use of resources, and besides, you can always call yourself an artist of trash art, and this, by the way, is a very fashionable movement these days. In general, such needlework is good on all fronts!
And the next Christmas balls made of strips, which are decorated with various beads, paints, ribbons and other decor:

snow globes
Another cool idea is to use plastic bottles to make Christmas snow globes. What we need:
- flat plastic bottles;
- acrylic paints, brushes;
- sequins;
- decorative figurines;
- glue;
- foam or artificial snow;
- sequins, beads.
First, you need to cut off the top and bottom of the bottle so that one tube remains. We need to cut a circle from the foam plastic according to the diameter of the pipe, on which we will attach our decorative details.
Then, having smeared the sides of the foam plastic with glue, it must be glued to the main part of the composition, placing it inside the scenery.
The top and bottom of the pipe can be decorated with cut-off parts of the bottle, gluing them with a glue gun and decorating with artificial snow and ribbons. Crafts from plastic bottles are ready! Inside, you can also pour sequins, sequins and beads.
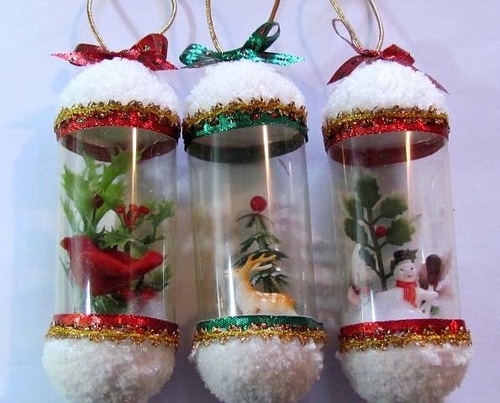
You can, on the contrary, use only the top and bottom to create a kind of New Year's snow globe.

Cones from plastic bottles
Another decor option is when plastic is used to create a cone. It is better to use brown blanks right away.
From your material you need to cut something like daisies and string them on a string. Make blanks of different sizes to end up with a bump. Fir branches can be cut from a green bottle.

Wreath of plastic bottles
To do this, we need the bottoms of plastic bottles, wire, a bow and other decorations.

Details can be painted in gold to give the craft a pomposity and completeness, as well as to disguise the material from which the wreath is made.

Candlestick for the New Year
One of the New Year's attributes is a candle. Well, we can make very good candlesticks.

The next candlestick is made of two components, decorated with coffee beans, but, most importantly, it is a beautiful decorative candle.

By the way, do not forget that you can use not only bottles from mineral water or sweet water, but also from yogurt, kefir and other products.

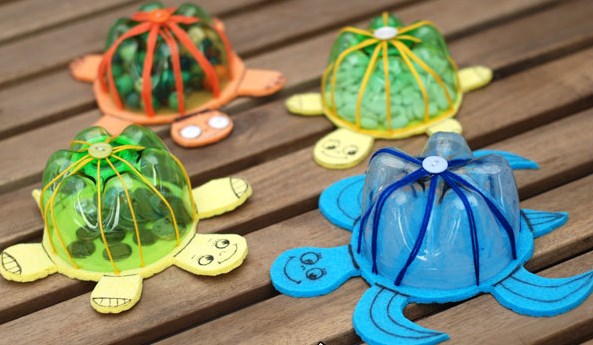
Souvenirs for the New Year
Something comic and funny can be prepared for guests or kids. For example, make a piggy bank out of a plastic bottle. And what? Very original too! It will turn out to make a dog piggy bank - it will be even better!

Use acrylic paints or spray paints, felt parts, fabric, beads and various other decor for decoration. But from such funny turtles, children will definitely be delighted. For the base, use thin kitchen sponges or foamiran. We have already described how to work with this material in our articles.
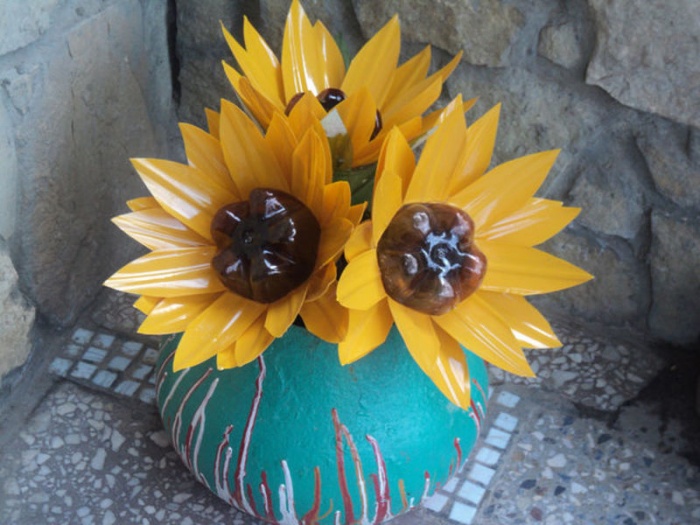
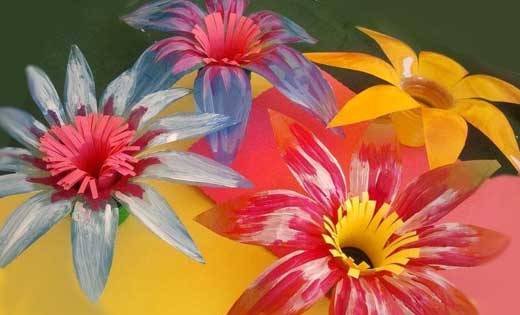
How about a whole bed of tulips in the middle of winter? Such a composition can decorate a summer cottage or a courtyard of a private house. Guests from the first time will definitely not understand that these beautiful flowers Made from ordinary plastic bottles. As they say, crafts from plastic bottles for the New Year are a manifestation of imagination and ingenuity.

And a few more options for completely non-winter colors performed by the simplest and most affordable material at hand:
Plastic bottle cup
If you want to stand out from the crowd, have a special attribute, or you need to have a goblet in accordance with the costume, then it can be very easily made from the material known to us. By the way, read our articles where we tell you how to make crafts for the New Year from a bottle of champagne - this can also come in handy. So here's the cup:

Luxurious, right? And, at first glance, you can’t tell at all what it is made of, and at the second - too!
The design of a future goblet for wine or as an award might look something like this:
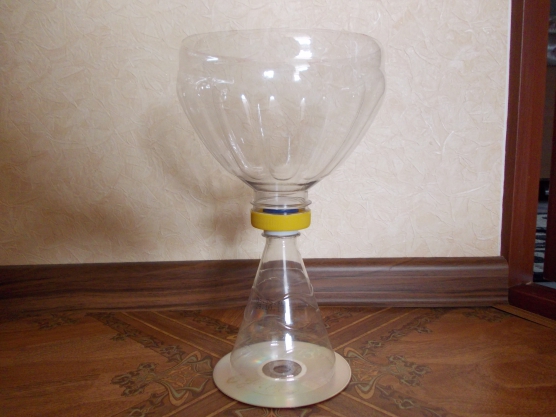
Or like this:

We love to tell you about different unusual crafts, about the materials from which you can make amazing things and which are in almost every home. All this in order for you to find a moment for creativity, for relaxation, for your hobby. Slow down time around you, let, as they say, the whole world wait while you create beautiful things. And finally - crafts for the New Year from bottles video master class:
See how you can create a fun garland that can be hung in the kitchen or children's room, or wherever you like.
Post Views: 1 290
The symbol of 2019 - the Yellow Earth Pig (Boar) can be easily made with your own hands. A small souvenir will bring good luck and prosperity to your loved ones in the new year. You can make a popular step by step new year gift one of the proposed master classes. A particularly valuable and sincere surprise will be a pig made by the diligent hands of a child. A children's masterpiece can be presented to a close relative or friend, brought to a kindergarten or school.
For simple jobs different bases are applied with their own hands. Patterns and accurate lists of materials help to calculate the consumption of fabric (felt), paper, and additional elements. We offer master classes for kindergarten and school with step by step photos varying degrees of complexity. Piggy from painted cotton pads - perfect option for the smallest children. There is no need for an exact pattern or a sharp needle. Even a two-year-old kid can work with a brush under the guidance of a mother or a kindergarten teacher. An adult can only cut out the elements of the pig and help glue the painted parts. Pig out corrugated paper or from a bottle is also suitable for teaching creativity to the baby, provided that cutting the plastic frame of the bottle or using hot glue is not trusted by children.

Plasticine is a material for young children, but the symbol of 2019, a funny pig, can be supplemented with more complex details. A neatly molded piggy is suitable for participating in competitions at school. In the middle grades of the school, the child will already be able to manually sew a pig out of felt or make fabric blanks. At this age, many children begin to crochet, and interest in simple paper applications disappears altogether. In comparison with pigs knitted according to the instructions, the symbol of 2019, the Yellow Pig (Boar) made of kapron, created by oneself, is aerobatics. The painstaking technique of creating a piggy face can only be understood and mastered by a high school student or an adult. Select the best option hobby for home leisure or original idea symbol of 2019 from fabric, bottles, paper and other materials for school or kindergarten.
Funny pig (symbol of 2019) crochet - make a pig with synthetic winterizer filler
Similar to the precise preparation of fabric parts according to sewing patterns, one must strictly observe the mathematical account for crocheting toys. Given the large selection of master classes in knitted toys, you need to start with simple options. Before the New Year, there is a reason to learn how to crochet a pig in honor of the symbol of 2019, so that you can give a finished souvenir to a girlfriend at school, mom or grandmother. A master class with step-by-step photos of the symbol of the year for adult housewives will seem no less entertaining. The original crochet pig (symbol of 2019) is very popular with young children, although it is too early to learn the basics of such a hobby in kindergarten. The rules for crocheting in a circle can be studied on any special online resource. Step-by-step photos will only show in general terms the principle of creation knitted toys with a simple hook.

- light pink acrylic yarn (50 g/200 m)
- scissors
- hook ("troika")
- gypsy needle
- large black eye beads
- synthetic winterizer or cotton wool
- marker (pin)
- light thread (for the mouth)
Instruction with step by step photos

Master class for the school: how to sew the symbol of 2019 according to the pattern - the Yellow Pig (Boar) with your own hands from fabric (on a typewriter)
Creation soft toys based on ready-made patterns using a sewing machine will not take much time. A cute symbol of 2019 - the Yellow Pig (Boar), created from fabric with your own hands at home or at labor lessons at school, will become perfect gift. You do not have to spend time on calculations or measurements for the manufacture of piggy. All details can be repeated exactly as in step-by-step photos. Since piggy elements are sewn both on a typewriter and manually, a fabric master class is not suitable for a kindergarten level. This version of the symbol of 2019 made of fabric in the form of a Yellow Earth Pig (Boar), where you need to operate the machine with your own hands and sew small details to the body, is suitable only for an “adult” child.

List of materials for the master class
- dense fabric light Pink colour for head, ears, legs and hands
- any cotton fabric for the body (soft toy costume)
- decorative ribbon
- sewing machine
- scissors
- light pink (or beige) sewing thread, needle
- pink button for piglet
- large black beads - 2 pcs
Instruction with step by step photos

Do-it-yourself yellow Pig (Boar) for school from felt - make a symbol of 2019 using a light pattern
Learning to sew is easiest on felt. The material does not bulge and does not spread. Unlike paper, a souvenir made from felt will last for a long time. For these reasons, felt workshops are ideal for kindergarten and school. If in kindergarten the details of a pig made of felt are glued together, then at school they are already learning how to sew them on. The symbol of 2019 proposed in our master class - the Yellow Pig (Boar) made of felt with your own hands is suitable not only for labor development at school, but also for making souvenirs by adult craftswomen. A pig or a yellow boar can become a key chain, a magnet, a favorite toy with which the baby goes to kindergarten, or a Christmas tree decoration. The pattern can be enlarged in proportions if you want to make a big symbol of the year 2019 for a school or kindergarten with your own hands. We advise you to pre-sew a lot of symbols of 2019 in the form of a Yellow Earth Pig from felt, so that all your loved ones have enough. Useful step-by-step photos will speed up the creative process.

List of materials for the master class
- synthetic winterizer
- hot pink acrylic thread and needle
- toy eyes - 1 pair
- pink and yellow felt
- scissors
- black marker (felt pen)
- drawn patterns
- pink ribbon 0.5 cm thick

Instruction with step by step photos
- Cut out 2 pieces on paper. You can carefully redraw the templates by attaching a sheet of paper to the monitor, or print a photo on a printer.

- Circle the large paper template on yellow felt 2 times, and the small one on pink.

- Finish the oval by hand with an overlock stitch. Try to make stitches of the same height with uniform indents. Marker put 2 points.

- Between the two yellow details of the pig, put a small portion of the padding polyester. Sew around the edge with overlock stitching.

- Attach the patch to the body with hot glue. Glue on the eyes and a miniature ribbon bow. The hand-made symbol of 2019 - the Yellow Earth Pig (Boar) in the form of a kind animal can be presented or left in your home under the New Year tree.

Yellow Pig (Boar) from cotton pads for kindergarten - the easiest do-it-yourself craft
Why not make the first crafts in the classroom in kindergarten not from paper, but from soft circles? One of the most common workshop ideas is to use cotton pads as the main material. You can find many examples of step-by-step photos and videos of caterpillars, ladybugs, flowers and different animals that the smallest children like so much. Such ideas will take root well in the classroom in kindergartens. You can prepare the Yellow Pig (Boar) symbol of 2019 in kindergarten with your own hands from cotton pads as a gift or just take the baby interesting idea at home. If such a piglet is too simple for the school, then in the kindergarten the work will definitely be considered very original. You don't need a pattern or paper templates. Preparing to work on a pig is too easy even for the kindergarten level. In 15 minutes, you can prepare the symbol of 2019, the image of the Yellow Pig, with your own hands from cotton pads. An interesting idea is to place a pig as a symbol of the year on the front of a handmade children's postcard.

List of materials for the master class
- cotton pads - 2 pcs
- scissors
- gouache pink and white
- tassel
- black fabric

Instruction with step by step photos

Unusual do-it-yourself plastic bottle pig for kindergarten or school (quick craft in 15 minutes)
Educational and educational programs in kindergartens and schools are not always diverse in creative pursuits. Thanks ready step by step instructions you can arrange interesting experiments at home with completely unexpected materials. From regular bottle you will get a fashionable transparent piggy bank, a new beautiful decor in the courtyard of a kindergarten, or just a stylish little thing in the form of a pig. To make a pig from a plastic bottle with your own hands, the following are step-by-step tips. You can print ready-made templates for ears, eyes and outfit or redraw them. The strip that will wrap around the body of the toy can be replaced with yellow paper as a sign of the coming year. Then the craft will become a real symbol of the year. With a non-standard fiction for the year of the Yellow Pig (Boar), the child will definitely surprise everyone at school or in kindergarten. Numerous videos on the Internet suggest using painted crafts in the garden or in the yard to decorate flower beds. According to step-by-step photos, do-it-yourself pig from a plastic bottle is done in literally 15-25 minutes.

List of materials for the master class
- 1.5 liter plastic bottle (preferably with a pink cap)
- 4 caps from other bottles of the same color (white, black, or pink)
- printout of templates
- big scissors
- hot glue gun
- scotch

Instruction with step by step photos
- Cut out colored paper templates.

- Cut the bottle so as to get rid of the middle part and make a shorter blank from the two remaining halves.

- Insert the halves one into one, as in the photo. They can even be glued with adhesive tape, since the seam will not be visible.

- Glue the individual parts of the pig's ears, and then attach them to the body with hot glue.

- Glue the piggy eyes on. Glue the caps symmetrically on the lower base of the pig with your own hands. If you want to make a piggy bank symbol of the year - just make an incision on the back of the case.

Craft Pig from pantyhose with your own hands, a master class with step-by-step photos for beginners
In order to create a pig with maximum resemblance to a real animal, it is recommended to use a light flesh-colored nylon. If you manage to master simple instructions according to step-by-step photos, then a do-it-yourself pig made of tights (a master class for beginners) will seem very easy to you. Unlike working with plasticine or paper, or sewing according to a strict pattern, here the shape of the finished pig largely depends on manual dexterity. Make a pig out of tights with your own hands according to the simple recommendations of the master class and stick it on a magnet. Get piggy for the refrigerator. Many videos and step-by-step photos on the Internet offer different variants additions toy symbols of the year. You can stick plastic signs, food or inscriptions to the finished soft pig with your own hands. A beautiful pig on a pin instead of a magnet will show off on a children's backpack for school. The toy head can also become the basis for a puppet theater character at school or kindergarten.

List of materials for the master class
- plastic eyes for toys - 1 pair (you can draw and cut out of paper)
- pink watercolor and brush
- light beige thread and needle
- synthetic winterizer
- plastic parts (sandwich and glass)
- magnet
- scissors
- strong adhesive for the magnet (like silicone)
Instruction with step by step photos

Do-it-yourself piggy from plasticine for the New Year 2019, children's crafts
The most malleable material for creativity is plasticine. In kindergarten, it is difficult to imagine exhibitions without figurines made from this material. Even at home, you will get an original do-it-yourself pig for the New Year 2019 from plasticine, if you add a little imagination and diversify the craft. From plasticine, you can sculpt not only the pig itself, but also the scenery. Make a piggy with your own hands for this New Year 2019 from plasticine right on the eve of the celebration or practice in master classes and videos right now. A cool piglet can be taken to kindergarten or school to show to peers.
List of materials for the master class
- multi-colored plasticine (beige, pink, black, brown, green, yellow and blue)
- plastic spatulas and other tools for working with plasticine (optional)
- working surface
- board, sheet of paper or cardboard for presentation
Instruction with step by step photos

Do-it-yourself yellow pig (Boar) from corrugated paper, the easiest master class
Craft, in the creation of which even 3-year-old children can participate, is a yellow pig-boar made of corrugated paper, which is glued together from two large parts. In a kindergarten, it is better to make such pigs (hogs) out of paper using simple PVA glue or entrust the gluing to the teacher. At school, older children can easily cope with corrugated paper. Step-by-step photos show how you can make the most elementary image of a pig with your own hands. The color yellow was chosen to highlight the arrival of 2019, the Year of the Earth Pig. The attribute of the New Year should bring good luck to those who receive such gifts under the Christmas tree. The easiest part of the crepe paper yellow pig tutorial can be done by even a small child. You just need to wind the same strips in a circle one after the other. Since the easiest workshops are selected for kindergarten, you can complicate the task by watching the video. From paper of different colors, you can create complex designs for exhibitions and competitions at school. Such easy crafts without paper patterns, by the way, can be done at school even at breaks.

List of materials for the master class
- piece of corrugated paper - 30 x 50 cm
- plastic eyes for toys - 1 pair
- hot glue gun
- small piece of black paper
- scissors

Instruction with step by step photos
- Cut strips 1 cm thick. In this case, the paper must be cut along and across the corrugated lines. Otherwise, the pressed surfaces will not cling.

- Roll the strips around. Their number depends on what size you want to get the pig. In this case, the diameter finished product- 8-9 cm. Leave one strip intact, and glue the free edge.

- Fix one end of the last ribbon on the circle with glue. Wind it up until there is a free edge about 10 cm long. At this distance, fix the tape with a drop of glue. Make a bend in the form of an eye with an indent on the circumference up to 1 cm and glue it again. Make the second ear in the same way and glue the free edge.

- Cut strips 6-7 cm thick for a nickel. Roll and secure with glue.

- Cut out two small peas from black paper. Glue them on the patch, and then glue the small part onto the large one. Add eyes and you're done.

The symbol of 2019 will be the Pig. Before the New Year, schools and kindergartens often hold competitions for the best themed crafts, for this I want to make something unusual and original. There are many step-by-step master classes here - how to make a pig craft with your own hands with step-by-step photos and videos.
The pig is a sincere old woman, she is courteous, kind and extremely scrupulous. She can be entrusted with any innermost secret, she will never give or divulge the secrets entrusted to her. She is honest, will never lie, even for her own good, she is simple and vulnerable. But she is not so weak as good-natured. According to the Chinese horoscope, the boar is a symbol of pleasure, innocence, passion and fertility. The year of the pig will be successful and favorable for everyone!
For this holiday, you can make a bunch of crafts with your own hands. holiday gift it can be absolutely anyone, but it would be better if it contains the symbol of the year - a pig. Decide in advance what you want to do for the coming year. The gift should be pleasant, beautiful and useful. But whatever one may say, every person likes to receive a gift made by himself.
Here are the current ideas:
- Sew or tie small copies of the pigs.
- Make a postcard with a pig and be sure to write a congratulation in it - a great gift for a colleague and just as an addition to the main present.
- Make pigs into soft toys.
- From a plastic bottle you can make a piggy bank in the form of a pig.
- You can also make pillows for a sofa, chairs and even for a car. Cute piglets will warm and delight those to whom you give them.
Even though the piglets are pink and cute, they love to measure puddles and mess around in the mud. Often the delicate color of their skin is hidden under a thick brown layer of earth or clay. In this lesson, we will make a pink pig that swims in a swamp. Let's start the lesson with the selection of material, then knead the mass in our hands, roll up the appropriate parts and assemble them into a single product.
Modeling is a useful and exciting activity that is aimed at developing mental abilities child in the same way as drawing or creating applications from paper.

You may need such a figure if you are creating a farm, playing an exciting game of playing animal sounds, putting on a play about three pigs. In any case, creating animals with your own hands is always exciting.
What you need for work:
- The main material is pink plasticine;
- Brown plasticine;
- Chestnut or acorn - will help save weight;
- Toothpick - fixing the head and torso.
For work, we can take 1 block of plasticine to get a miniature figure. An acorn or chestnut will save weight. These fruits have a rounded shape, so you can disguise such a frame inside the body. In any case, we will have to show a fat creature, because all the piglets are very well-fed, so the extra volume of the body will not hurt.

From the prepared pink plasticine you need to make: the torso (prepare an acorn or chestnut and a large cake for it), legs, head and tail. Cut the bar into pieces and knead each separately in your hands if you have a dense, not wax, plasticine.

Stick a pink cake on the acorn, place between the palms and smooth, roll out the surface. Next, you need to make a ball-head, attach using a toothpick. But the matter is complicated by the dense material that we placed inside the torso.
You will have to first make a hole in the stomach, then to insert a piece of toothpick into it. Also make small fragments that will allow you to copy the appearance of the planned pet: ears, piglet, tail.

Glue a wide patch on the ball. Push the dents twice. Glue a little above the eyes, and cut out the mouth a little below.

Connect the head to the body with a toothpick. Glue the ears to the head, lowering the cakes down. Glue the tail on the back and twist it into a spiral. The figurine already looks like a pig.

Make legs. There is no need to do each separately. You can form simple rectangular parts, cut along the tip of a toothpick, then glue two hooves to each blank.

Attach the legs to the body. Also make a large brown plasticine cake - this will be a swamp where we will place our cute pig. She will enjoy bathing in the sun.

The inhabitant of the farm - the plasticine pig is ready. She does not grunt, does not run away, does not ask for food - it is just a toy that is very similar to a real animal. Perhaps this is one of those three famous pigs who outsmarted the evil wolf.


In this master class, we will make just such a pig from an ordinary plastic bottle.

It is better to choose a bottle with a pink cap. But you can paint any cover with pink acrylic paint.

Cut out the middle of the bottle - we need to shorten it.


We connect the upper and lower parts, if desired, you can fix them with glue.

- four leg covers;
- printed ears and eyes.

You can print our sketch in A4 format. 
We cut out all the elements, also do not forget to cut out a strip for the tail.

Using hot glue, fix the ears, eyes and pink jumpsuit.

We attach the legs.

Our glamorous pig is ready!


Here is such a fluffy and soft pig made of knitting threads.

We need:
- woolen threads;
- pink chenille wire;
- felt;
- button;
- ready-made eyes;
- cardboard.
We cut out two rings from cardboard: an outer circle with a diameter of 7 cm, an inner circle of 5 cm.

We cut the yarn 1-1.5 meters long into 5-6 threads. 
We put two rings together and start wrapping them with yarn.


We wind until the hole closes.

The last circles can be dragged with sticks.

Then cut the yarn along the outer edge with sharp scissors.


Slightly push the rings apart, wrap the middle with a thread and tie.


It remains only to remove the rings and shake the pompom.

We make legs, a tail from chenille wire and glue it.


I didn't have the right size pink button for the piglet's snout, so I painted the matching button with pink nail polish.


All this is glued to our pom-pom.


Soft pig is ready!


It took me half a skein of standard yarn.


Origami bookmark
Many parents and all educators devote a lot of time and attention to the development fine motor skills children. Why do it? By developing fine motor skills, you also develop the brain, that is, attention, thinking and memory. And how to do it?
For the development of children's fine motor skills, special techniques have been created and many books have been written. But even without knowing all this, you can come up with something new, interesting and useful for your child every day.

For example, you can make an unusual bookmark for books in the form of a pig using the origami technique. In itself, this unique ancient technique already designed to develop fingers and pens, as well as attention.

Materials needed to make bookmarks:
- colored paper pink double-sided;
- scissors;
- Ruler and pencil;
- glue;
- button.
First, we need to build a square with a side of 12-15 cm using a ruler and a pencil.

Carefully cut it out and fold it diagonally once.

Now you need to fold the two corners to the fold, as shown in the photo.


We fold the side corners and wrap them in the resulting envelope. The corner blank is ready. Now let's start bringing it to life.

We will make a pig out of the resulting corner, so we need to cut out ears from the same pink paper. Piglet will serve us pink big button. Eyes can be taken ready for toys, but you can also draw, and then cut them out.

Gently glue the button, eyes and ears. It turned out a funny, cheerful pig that will store the page and you can easily find it.

And what will it be original gift for dad or grandma! All the more valuable because it was made by children's hands.


Each of us has pencils and pens. Especially in children. And so that they are all in one place and not lost, we will crochet a cute pencil box in the form of a pig. This pencil holder is perfect for a child's room. In addition, it will not be difficult to tie it.

For knitting pencil holders we need:
- light pink, dark pink and black yarn;
- hook;
- needle;
- a little synthetic winterizer;
- cup.
We start by knitting the bottom of the pencil case. We knit a circle of double crochets. Knit with light pink yarn.
Let's make a sliding loop and knit twelve columns into it. Starting from the second row, we will make increases. In one row in each loop, in the other through the loop, in the next through three loops and so on. We knit a circle according to the size of the bottom of the glass, which will be the basis of the pencil holder. We have the bottom ready. It is better to take a heavy glass for the base so that the pencil holder stands firmly and does not fall.

And now we need to slightly raise our next row. To do this, we knit a row behind the back walls of the loops and do not make any more increases. We start knitting the walls.

We knit rows until our knitted cup hides the base. So we tied an ordinary glass.

Let's knit a snout. We knit it with dark pink yarn. Let's make two loops and knit six single crochets into one. From the second row we will make increases. In one row in each loop and in the other row through the loop.
Then we will knit a row behind the back walls of the loops and we will knit another row with single crochets.

Now we will tie the piglet's ears. We knit them with dark pink yarn.
We will make four air loops and in the initial loop we will perform two double crochets. We knit four reversal rows. And in each of them we make an increase in the first and last column.
With light pink yarn we tie each ear with single crochets.

We knit the eyes with black yarn. In a sliding loop, we will make ten half-columns with a crochet and tighten the loop.

On the patch we embroider minks with black yarn. We sew a patch to the middle of our knitted cup, filling it a little with padding polyester.
And sew the ears on the sides, folding their wide part in half. To sew the ears evenly, you can find the middle and count the same number of columns in two directions.

Then sew on the eyes.

It remains only to embroider a smile. We also embroider it with black yarn.
Crocheted pencil in the form of a pig is ready!

How to crochet booties
How to knit such charming booties in the form of piglets for your baby with step-by-step photos, see here.


Do-it-yourself application from foamiran "Piglet"
You will get a little pink pig if you repeat this interesting lesson. Naturally, it is intended for children, they are the big fans of papermaking. The figurine will turn out to be unique, because you need to make it exclusively from circles. In order to somehow diversify the work, we will replace the paper with foamiran - an unfamiliar material with a unique soft texture. It will be even more interesting to work with him.
If you have a pink sheet, then it is perfect for a little pink pig, if not, then take paper or foamiran at your discretion. Circles will become details for crafts, this shape will reproduce the fact that the pig is chubby.

To perform the application in the form of a piglet, prepare:
- pink foamiran;
- blue cardboard;
- compass;
- scissors;
- glue;
- white paper coin;
- black marker.
How to make an application in the form of a pig with your own hands step by step.
Blue cardboard will become a canvas for an interesting foamiran application. The pink leaf will later become a pig, you need to cut out a sufficient number of circles from it right size. This is the minimum amount of materials that will be used.

Cut out 3 large and 1 small circle from pink foamiran. The small circle will become the head, one of the large ones will become the body of the pet. Leave them unchanged. Cut the remaining two large circles in half. While you need 3 semicircles to simulate the legs, the hind legs will visually merge, so the second one can be omitted.

Glue a large whole circle in the center - this is the body of the piglet, you need to position it so that all other parts of the body fit on the prepared sheet. Directly to the round body, join one half of the circle - the leg, push the other leg forward a little. But make these 2 parts on the same level. Thus, the front legs will already be in place.

Glue a small circle on top of the two semicircles - this will be the head of the animal. At the back, add a leg, turning the part with the convex side towards the head.

Now you need to use the remaining half from the third large circle. At the second stage of work, we cut 2 of them in half, but only 3 halves were used for the legs. So, the last fragment will be used to make the ears and tail. Cut off 3 segments. Thus, the initially prepared parts will be triangular.
Glue the ears to the head, lower the tips down and fasten with glue. Glue one more segment at the back in the form of a tail, bend it a few times to show an imitation of a hook. The foamiran figurine is already ready. Now you can make a muzzle. Stick a white paper coin in front - a patch, draw black dots. Also make 2 slits - eyes. That's all the manipulation of materials.

The pig turned out to be very positive, this children's craft will appeal to all kids, because it is easy to perform and bright.

By the same principle, you can perform completely different familiar or exotic animals. Experiments are always interesting and useful for the development of children.

How to make another one, see such an application here


How to make a do-it-yourself chestnut pig
Of course, pigs are most often depicted as pink, and chestnuts are brown material. We have 2 ways - to mask the chestnuts under a thin layer of pink plasticine or use the pink mass only fragmentarily, gluing additional parts of the figure.

This tutorial details how to make a pet out of natural material. This craft is easy to do, so kindergarten kids will master it. See how to do it here.
Each child asks mom or dad to buy him a Kinder surprise, not so much to taste delicious chocolate, but to see what kind of toy is hidden inside. Did you know that you can make a toy from a Kinder Surprise capsule with your own hands? Children will be happy to get to work.
Thus, they will experience triple pleasure: they will taste their favorite sweet, be surprised and rejoice at the surprise they find inside, and also have an interesting time with exciting creativity. with step by step photos here.


Do-it-yourself piggy bank video lesson
Do-it-yourself yellow pig out of paper
Bookmarks are always welcome. Absolutely everyone uses them, whether they are adults - they always like to read at night, whether they are teenagers who go to school and use textbooks, whether they are children to whom parents read interesting and instructive stories. Thus, the bookmark can become a symbolic handmade gift for the New Year. And it represents the head of a pig. You won't find an easier option. Step by step master class here
For decoration New Year's table you can make such a pig from a lemon.


The yellow pig is the symbol of 2019
People born in the year of the Pig are usually successful in business. Representatives of this sign are energetic, quirky and straightforward. They are serious about their business and can go to great lengths to fulfill their desires. Moral and material satisfaction fully characterize the Year of the Pig. But some people can live this year carefree without much money. They do not notice aggression and betrayal in others.
In the year of the Boar, the brave and strong people, which in any situation go ahead. Boars are hardworking and smart, but at the same time they believe in deception, often confusing it with the truth. Boars prefer to follow the straight path, they are simple and open people who can find mutual language with the society around them.
The pig is a great player. She has a competitive spirit that she usually doesn't show to outsiders. Often she does not believe in herself. Often a bunch of questions revolve in her head, for example, about how she should do the right thing in this or that case. This is a very sincere person, he will easily conquer any person with his open and honest thoughts and actions.
The pig sees only good qualities in the surrounding people. She will not even think that among her close people there may be enemies. She wants to believe that only kind and honest people live in the world. Often she is disappointed in people because of her good-natured attitude. For someone who has ruined his reputation in her face, it is almost impossible to become her friend again.
The simplest and cutest do-it-yourself kapron pig
Recently, I was visiting a friend of mine. Elena has been doing needlework for a very long time, and it is from her that I often borrow amazing ideas for creativity. Everything that the girl comes up with, she tries to immediately implement.
So this Saturday, she showed me some of her findings, which can be a great help when preparation for the new year and Christmas. After all, it is not at all necessary to spend a lot of money on purchased decor, when it is quite possible to make it yourself from improvised materials.
Christmas crafts from plastic bottles
Editorial "So simple!" prepared for you an unusual master class on how how to make a christmas bell from a cola bottle. Easier than ever and at no extra cost!

You will need
- PVA glue
- linen thread
- packing tape
- plastic bottle

Manufacturing

I also invite you to check out a few more ideas New Year's decor , which can be made from waste plastic bottles.

And we also have a wonderful master class for you on how to create a caramel with the help of plastic bottles, colored packaging garlands and LED flashlights. On the eve of the New Year, do not be too lazy to make such an ornament. It will come in handy more than once, tested on my own experience!
As you can see, even ordinary plastic bottles can be an excellent material for creativity. Especially on the nose of the New Year, which means that you need to create something new and get rid of the old. And these ideas will just help you get rid of the old, while creating an original and beautiful holiday decor.