What toys can be made from a disk. Do-it-yourself unique crafts from disks - interesting ideas, step-by-step master classes, photo examples. Master class with children: a fish from a CD
- Creating decor items requires minimal effort, and in the process of making tools, only scissors, fishing line, wire, cardboard sheets, glue and a drill are additionally needed. To decorate finished things, beads, colored and wrapping, foil, bright fabrics, beads, nail polish and glitter.
- Crafts from car rims, with seeming simplicity, require certain skills in working with tools and physical endurance. Considerable weight and large dimensions provide for the presence of a working area, and when creating interior and decor items, electrical appliances, plywood sheets, glass, wires and light bulbs may be needed.

You should realistically assess your strengths and not try to immediately implement an intricate project. It is better to start from simple to complex, then the creative process will not become a test and will bring satisfaction from the result.

The second life of the rim
Since the invention of the wheel, life has changed forever. Car rims are rarely considered as a material for decoration. After the end of their service life, they gather dust in garages, in summer cottages or are sent to the trash. A real home craftsman knows that there are no unnecessary things on the farm, and old disks from a car can come in handy.

Ideas for giving
Summer cottages for many serve as a place of rest and in warm weather become a center of attraction for friends and family members. You can decorate the territory and create functional garden interior items using old rims.

- Bonfire. Wheels from a car are made of durable metal that tolerates temperature fluctuations well. By overlaying the old wheel with natural stone or brick, you can create a hearth for cooking barbecue, pilaf and your favorite homemade dishes on the fire. It is better to strengthen the facing material with mortar, then the fire pit will be durable and reliable. With welding skills, men can make an additional canopy to keep out the rain and a grill stand with hooks.
- Flowerbed. Flowering plants give joy and are beautiful in themselves, but you can make an original flower garden for them from an old car disk. Fantasy will help decorate the flower bed. Broken multi-colored glass, pieces of decorative stone, marble chips and similar materials will come in handy, which can be fixed with mounting glue, and sharp corners can be polished with a grinder or sandpaper.

If there are a large number of discs, you can make an original pond fence by reinforcing the structure with cement and filling the gaps with decorative stone.

Home Ideas
A coffee table made from a car disk will definitely become a unique design solution. The solid metal base goes well with glass, stone, solid wood countertops.

The material for the manufacture of the table must be well cleaned and polished to a shine. Reinforce the tabletop with mounting adhesive. The table can be stationary or mobile if the legs are equipped with wheels for furniture.

Garage Ideas
Motorists spend a lot of free time in the garage, so it makes sense to spend some of it on landscaping. Car discs can be a great organizer for storing tools, and those who know a lot about electrics will love the idea of creating an original lamp.

For the lampshade of the chandelier, it is better to take alloy wheels to reduce the load on the ceiling and protect yourself from injury.

Recycling CDs
Computer or music discs become unusable over time and can no longer be used for their intended purpose. But from them you can make a lot of interesting things for the house, decorate the cottage and create a festive mood with their help.

Home decor
Cute little things in the home interior are pleasing to the eye and help to create coziness, and they require very little time and skill to make.

- Picture frame. Albums with old pictures help to keep memories, but I want to give the brightest photo a decent frame. By cutting out a frame from cardboard and decorating it with fragments of a CD, reinforcing the pieces with glue, you can create a collage of photos dear to your heart. If you repeat the pattern for decorating the mirror, then the interior will take on a finished look. In the process of creating, it is important to adhere to the technique. All cracks between the fragments should be covered with decorative plaster and varnished on top.
- Original pot. An ordinary planter or a ceramic pot can easily be turned into a bright interior detail. To do this, it can be decorated with disk pieces, laying out an arbitrary pattern, laying horizontal or straight lines, or completely covering the initial product with fragments.

Home craftsmen create curtains, chandeliers, original screens from disks and give old furniture a second life with the help of disks. The main thing is not to be afraid to show imagination.

garden decoration
The simplest option for using discs in the garden is to create curtains. You can fasten round computer blanks with fishing line, and the location can be arbitrary. For a garden gazebo, you can make an original roof. First you need to choose the base material - plywood or chipboard sheet is suitable. With the help of glue, the discs are attached to the base, creating a semblance of scales or shells.

New Year ideas
Favorite family holiday is a great opportunity for creativity. Carnival costumes and decorations for the Christmas tree, candlesticks, lamps - there are a lot of options for using CDs.

- Toys. Kids will love the process of making Christmas decorations that come out bright and shiny. For decoration, plastic or glass balls are suitable, which need to be decorated with pieces of a cut disk. It is better to fasten small parts with glue, and if desired ready product can be covered colorless varnish.
- Disco ball. A ball spinning under the ceiling, reflecting light on all sides, is an undoubted attribute of festive fun. You can create a design from fragments of a computer or music disk, and when the light is on, the room will be filled with glare and bright rays.

With the help of adults, children can make original candlesticks, decorate carnival costume and make a bright lamp out of disks.

This is just a small part of the ideas for creating crafts from disks. By showing imagination and creatively approaching the decorating process, you can come up with a lot of original solutions and create unique things at minimal cost.
Art constantly requires new forms. Today, paintings in classic frames may seem too old-fashioned for modern interior solutions. Use pop art techniques, finding beauty in the familiar. Make a three-dimensional composition from CD boxes.
The emergence of new storage media has negated the benefits of CDs. Today, music can be listened to online, or recorded on devices that take up much less space. Therefore, discs are often sent to the scrap. Plastic boxes from them too. But you can use them by making wall decorations.

Take out the cover of the disc. Usually it is a piece of glossy paper or a small book. This sheet will be used as a template.

Print an image that will fit the size of multiple covers stacked together.

Mark the squares on the back of the picture, according to the size of the cover.

It is convenient to use a long ruler.

Cut the image into squares. Use a sharp cutter, or very sharp tailor's scissors with straight blades.

Place each piece in a CD box.

Attach Velcro or pieces of double-sided tape to the second part.

Using a large ruler, mark out the section of the wall on which the picture will be attached. Construct two perpendicular axes.

Start gluing the elements of the image.

Between rows, leave a distance equal to the space on the side of the disk.

You can use part of one of the boxes as a stencil.

Collect the entire image. Any photo will look spectacular in this design.
cpykami.ru
What can be done from disks? Crafts from CD (photo)
Surely every house has already accumulated a fair amount old CDs. All sorts of outdated programs, uninteresting movies and simply unreadable discs (scratched, unformatted and out of order). But at the same time, they are so shiny, of the correct round shape, that it is simply a pity to throw them away. So what can make from cds?


Pavel Polyakov offers a simple option that anyone can do, regardless of age and financial situation. This is about coaster for a cup from coffee beans. It will keep your furniture from thermal overheating and fill the house with a pleasant smell of coffee beans.
For this craft, it will come in handy for us - a beautiful and clean CD or DVD disc, any glue for plastic or leather, about 50 grams of coffee beans and a little patience.
So, about all the steps in turn.
1. We take a disc and apply glue to it, about one third of the disc. No more is needed, as the glue dries quickly, and we must compact the grains very well into the glue. Glue must be applied in a fairly thick layer.
2. We wait about a minute and rub the glue on the surface of the disc.

3. We pour out the grains and begin to quickly stick them to the disk, leveling and creating a composition of grains.
4. We repeat these procedures on the surface of the entire disk, I remind you that you need to take your time - pour glue on no more than a third of the disk, wait about a minute and press the grains strongly.

As a result, we get such a disc, quite beautiful and pleasantly smelling.

And together with a cup of coffee, he looks like this.

From the problems with operation, it became clear that the grains in the center of the disk must be laid very evenly, otherwise the cup staggers and there is a risk of turning it over. So I immediately removed the grains from the center of the disk, under this particular cup. And the cup immediately acquired increased stability, and the product acquired a finished look!
 This is such a beauty!
As an addition, along the edge of the disk, you can lay out a border of dried rose hips or beautiful shells. You just need to be smart.
Another video tutorial about similar coasters, but decorated with plastic flowers:
There are many on the Internet various solutions what can be done from disks, as a rule, they are divided into two groups:
- Discs are just decorated(pasted, sheathed, tied) sometimes to such an extent that it is not even clear why a CD is needed at the base, that is, it is the same ordinary element as a flat round piece made of any other material.
In crafts is done focus on the mirror surface of the disk, then the effect is more interesting.
We also have several interesting master classes on the site:
Doll stand

Victoria Golden. Lamp from disks "Fairytale bird".

Craft from the discs "Bear cub".

Crocodile from disks:

Vase of Yulia Eliseeva's discs:

Clock from records and CDs:

More works sent to our contest "Crafts from plastic":


Herringbone from disks:

Works of the competition "Second life of things":


Like the product and want to order the same from the author? Write to us here.
Promo code - podelkidoma - for a 10% discount!
More interesting:
See also:
Tags: Crafts from waste material
podelki-doma.ru
Crafts from cd and dvd discs with your own hands, for home, photo ideas
Almost every person has a couple of unnecessary CDs, DWDs, CDs that are simply scratched, stale and no longer needed. Do not rush to throw them away, because you can make useful crafts for the home from them, such as: a napkin holder, a photo frame, a candlestick, a hot stand, a pincushion, and even children's crafts like fish and smeshariki. In this article, we will look at how to make crafts for the home from old CDs, DWDs, CDs with our own hands.
Disc napkin holder

You will need: three discs, glue gun, scissors, decoration elements (beads, beads, ribbons) ...
Master Class
- Take two discs, cut 25% off each disc in a straight line.
- Take a whole disk, which will be the base of the napkin holder.
- Glue the cut discs on both sides to the base so that they are holders.
- Wait for complete drying.
- Decorate to your liking.
Frame for a photo from a disk

You will need: disk, photo, threads, glue, decoration elements (beads, beads, ribbons) …
Master Class
- Make a decoration from threads or ribbons by folding them several times.
- Glue the decoration to the disk.
- Cut out the photo in the shape of a disk.
- Glue to disk.
- Decorate as you wish and hang wherever you want.
Consider another option for creating a photo frame from disks!
Photo frame from disk fragments

You will need: 2 discs, glue, black stained glass paint with a thin tip, thick cardboard, scissors.
Master Class
- Cut out the cardboard frame to the size you want.
- Cut the disks into pieces.
- Glue the disc pieces to the frame, leaving small gaps.
- Color in the gaps.
Candlestick made of disk and shells

You will need: disk, shells, pebbles, glue gun or glue moment.
Master Class
- Take the disk.
- Glue shells and pebbles to the shiny side of the disk.
- Leave a place for a candle in the center.
Stand for hot disc

You will need: disk, synthetic winterizer, fabric, scissors, double-sided tape.
Master Class
- Cut out a circle from the padding polyester in the shape of a disk.
- Cut out a circle of fabric 1.5 times the size of the disk.
- Put the padding polyester circle on the disk.
- Attach double-sided tape around the edges of the fabric circle.
- Wrap a disk with padding polyester with a fabric circle, fix the edges of the fabric on the reverse side.
Stand for hot from a disk using decoupage technique

Decoupage is a method of decorating objects.
You will need: disk, napkin with a pattern, scissors, PVA glue, varnish, flex sheet (so that the stand does not slip on the table).
Master Class

Disc needle bed

You will need: disk, a glass of yogurt-ryazhenka-sour cream, thread with a needle, ribbon, fabric, synthetic winterizer.
Master Class

Fish from the disk

You will need: disk, colored cardboard, scissors, glue, felt-tip pens, plasticine.
Master Class

Smeshariki from disks

You will need: discs, colored cardboard, PVA glue or double-sided tape, a simple pencil, scissors, felt-tip pens.
Master Class
- Draw ears, eyes, mouth, teeth, nose, legs and handles on colored cardboard.
- Circle the contours of the details with felt-tip pens.
- Cut out the details.
- Glue to disk.
Crafts from discs will not only become an original decor for your home, but will also be practical to use!
svoimirukamy.com
What can be done from CD packaging?
In this video, the authors of the TV show Crazy Hands will talk about what can be done from unnecessary packaging from CDs. Many users of computer equipment probably already have a lot of unnecessary rubbish at home, including such boxes from disks. Each of these boxes can be given a new function. It is proposed to use them for the manufacture of containers for products and other things.

Using a hacksaw, you first need to cut off the protrusion at the bottom of the case. By the way, for this it is not necessary to use a hacksaw, because it will take very little work. Therefore, you can use just a hacksaw blade.
The hole that was created after removing the protrusion is great for attaching a convenient handle to the resulting food container. This container is ideal for doctor's sausage.
In this way, you can prepare several containers and combine them into one battery. In order to be able to take the entire battery at once with one grip, there is an idea. Make a small hole at the bottom. After that, we take the second container, which already has a hole as a result of the alteration. We connect them with a screw, washers and nuts do not tighten tightly.
Now let's see what happened. The bottom of the manufactured container will be the lid of the next container. If you do the same with the next section, you get a multi-storey container for different products, fishing gear and more.
Photo frames from CD boxes
The simplest thing that can be made from CD boxes is, of course, photo frames. They can be hung on the wall or placed on a table or shelf. So that they do not look everyday, you can decorate the contours of the “frames” by making an application or painting, for example, with stained glass paints.
From these boxes you can make lamps, again, I would paint them for beauty.
In the household of gardeners, boxes can be useful for creating a kind of "greenhouse".
It is also an excellent material for making various organizers, for sewing, for example, or for stationery items. You can sort and store recipes, notes, and so on with them.


A lamp made from disc packages
From old and unnecessary plastic boxes from CDs, DVDs, you can make a nice night light or lamp:

Or this chandelier:

An original and stylish table lamp or night light, but be sure to use low-voltage or LED bulbs in them.

izobreteniya.net
120 photo ideas and master classes from the pros!
Most people have a large amount of unwanted or unusable CDs in their home.

You can just throw them away. But it is better to use them to create various crafts and interesting gizmos. In this article we will tell you what fakes you can make from discs with your own hands.

Roofing
If a lot of CDs have accumulated, then they can be used as an original sparkling roofing. To do this, at the beginning, the disks are attached to plywood sheets, and they, in turn, are attached to the roof. Approximately one hundred disks are needed per 1 m² of coverage.

They need to be attached as follows: 1st row - end-to-end, the next - in a checkerboard pattern, blocking the disc holes of the 1st row. Small nails or self-tapping screws can be used as fasteners.

Come up with a drawing, following which you will begin to make a roof. If you have little material, then they can only lay out a visor.

Fakes from disks for the garden
British artist B. Monroe, known all over the world for his light installations, decorated his garden area with stylized water lilies from CDs.

It took him 65,000 CDs to create this work of art. You can take the idea of Monroe as a basis and make such miniature lilies for decorating your own garden.

The discs can be used for the tail of a homemade peacock. They are attached to the metal frame of the tail with a wire.

Also, cute fish can turn out from disks. To make one thing, you need to have only a couple of disks and multi-colored cardboard or a sheet of plastic.

The latter go for the manufacture of fins, tail and fish mouth. The cut out elements should be placed between the discs and carefully glued.

The disk caterpillar looks unusual and interesting. For it, you will need several discs fastened together with screws. The legs can be made of rubber, plastic, plywood, and threads can be used for the mouth, eyes and hair. This craft is attached to the fence with wire.

Another option for using discs is the creation of street lighting fixtures.

Crafts from disks for children
Interesting ideas for children's crafts from disks will be useful to educators, teachers elementary school, moms and dads.

The disk can be used to create beautiful postcard in the form of a fish. Even three-year-old kids can do this craft. They can easily cope with it under the supervision of their parents. In addition to the disk, you will need PVA glue, scissors, plasticine, markers and multi-colored cardboard.

The fins, tail, and mouth cut out of cardboard must be carefully glued onto a CD, on which plasticine must then be applied using the indentation technique. The next step is to make the eyes.

For this we use cardboard. After fixing the eyes on the fish, you can make eyelashes from plasticine. The tail and fins are used to write congratulations.

From damaged CDs with the help of glue, multi-colored cardboard and colored paper, you can make Smeshariki, popular heroes of the cartoon of the same name.

For beauty, the contours of figures, eyes, mouths can be circled with a marker. These decorations are easily attached to the wall or cabinet with glue or double-sided adhesive tape.

Interesting gizmos from disks for the home
From disks you can create original curtains that do not require washing. The following materials are needed: discs, paper clips, drill.

Small holes are drilled at the edges of the discs with a drill; paper clips are used to connect them to each other. The number of disks, the size and shape of the curtain depend on your imagination.

The holders of the curtains in the bathroom, made of unnecessary discs, will look great.

The discs can also be used to create unusual and interesting kanzashi tiebacks. And you can fix them with Chinese chopsticks.

To make a pickup, it is necessary to cut a circle of a smaller diameter from the disk. Wrap the resulting ring with satin or silk ribbons. As a decoration, you can use flowers made from ribbons, below are photos of crafts from disks.

You can make candlesticks, caskets, coasters, needle cases and much more from disks. Therefore, you should not rush to get rid of obsolete CDs. With their help, sometimes you can create truly unique things.

Photo crafts from disks


datahomes.com
Bookshelf made of DVD boxes by Andrey Volkov
You will need: boxes from under DVD, bolts with nuts, paint,
board, drill.
1.
First of all, you need to connect 5 boxes of DVDs
nuts and bolts. We drill through the entire block in the corners with a drill.
Pay Attention: the discs must be folded in such a way that
top and bottom bottoms of boxes with mounts for DVD turned out to be free! These
parts do not need to be drilled!
2.
The first block is ready - for the manufacture of the shelf you will need
another one the same. Discs of two free elements with fasteners can not be
take out.
Andrey Volkov: « Firstly, it is beautiful. And secondly,
technical progress may fail, and we will again have to use
DVD player.
3.
Blocks for the shelf should turn out with two "wings" -
lapels on which it will be attached to the wall. The shelf itself will be
pine board. So that it is not too boring, it needs to be painted.
4. We fix the painted board with self-tapping screws.
5.
The shelf is ready - it remains to fix it on the wall.
www.peredelka.tv
Disk Crafts: Top 25 Original Ideas
crafts from plastic bottles we considered (and probably used something), we were surprised at crafts from tin cans and planned to do something of our own on the go, and today we have crafts from disks next in line. Old discs - once they seemed almost magical ... To some extent they remain magical, but in a completely different sense - now they need to be given attention and a little skill to turn them into various crafts and little things - functional and / or funny.
Functional and useful crafts from disks
Coasters made from old CDs
Just paint old CDs or make a complex heat-insulating structure? It all depends on the destination. By reference to the source, you can roughly understand what the essence of the technological process is in both cases.

Source
The best New Year and Christmas books for children

Source
Candlestick from an old CD
From an old disc, you can make a very avant-garde little thing to put a traditional candle - a candlestick in a house or in the country, which is rarely superfluous.

Source
Crafts from disks: do-it-yourself vase
Such a cute vase does not require much effort, but it can become a nice decorative element.

Source
Lamps from discs
With the help of the interior, you can say a lot about yourself. It is unlikely that such a lamp will decorate Barbie's room, right?

Source
Mosaic frame from old disks for a photo or picture
A strong thing, like a CD, is not easy to break. Unless there is a worthy goal. 🙂

Source
Mirror from an old CD
In the room of Thumbelina (or another girl), a small mirror may well come in handy: for beauty and sunbeams.
Source
Disk Jewelry Stand
Do you have a lot of earrings and are they all mixed up in a jewelry box? Then this idea is for you - each earring can be carefully hung in its place on such a jewelry stand.

Source
Decorative crafts from discs
Holiday CD Decorations (New Year, Birthday, Before Party)
Making such crafts for the holiday can be not only exciting, but also a developing process. With brilliant results!

Source

Source

Source
Clock from an old CD
Even if such a watch does not run, it will always remind you that there is time. Or not?

Source

What can be made from disks with children?
Funny and uncomplicated - probably, the crafts from the disks collected below are combined according to these features. The main thing is to start tinkering, and, out of nowhere, a lot of ideas will come, and the results can be played together! And smile, looking at them - too.
Various creatures from CDs

Source

Source


Source

Source

Source

Source

Source
Decorative box of discs

Source
Photo frame with magnet
This craft is offered as a gift for Mother's Day, and you can make it together with your child.

And here is the idea of a whole photo album from old CDs:

Source
Wind chime or reflector
Wind music can be hung in the country or in a country house. After all, children love to follow the sunbeams so much, and here you can also hang a bell that will ring in the wind.
We will send the material to you by e-mail
Some part with pity once beloved CDs. Men are reluctant to give away rims from automobile wheels. In order not to have to part with your favorite things, the editors of the site found a lot of ideas on how to make simple and beautiful crafts from disks.
Many no longer use CDs or DVDs. But why throw away something that might be useful?
Beauty is near and created with your own hands. It is enough to take a disk, scissors and ... imagination. From this material you can build an excellent designer lamp, panels, wall clocks. Car rims serve as a kind or harsh men's garages.
DIY crafts from computer disks
For many, an interesting technique for working with CD-blanks has become a discovery. They are easily divided into two halves, each of which is perfectly cut with scissors into small pieces. But with these brilliant mosaics you can already do interesting crafts: decorate any , decorate , veneer .

| Illustration | Action Description |
|---|---|
 | We will prepare three pieces of plywood, a threaded rod, a light bulb with a cartridge, a cord with a switch and a plug, washers and nuts. |
 | We circle the disks on a piece of plywood and cut them out with a jigsaw. |
 | In one circle, drill a hole for the cartridge and insert it inside. |
 | Let's make a hole for the wire. |
 | We connect three circles, the one with the wire will be in the middle. We drill three holes at equal distances from each other. |
 | It remains to make identical holes in the stack of discs. We string them on three pins inserted into the base. |
Frames for photos and mirrors from discs
What else can be done from old CDs for the home? We offer to build a beautiful frame for or photos. The work process is simple: glue is applied to the base (ready-made flat mirror frame or cardboard) and pieces from the blank are laid. You can cut them into squares or choose an arbitrary shape.


Do-it-yourself clock from discs
The clock in the house can also be made by hand. To do this, you will need an unnecessary DVD-blank, a decoupage napkin or rice paper, a wide synthetic brush, hands and a clockwork, craquelure varnish.
| Illustration | Action Description |
|---|---|
 | Lubricate the surface with craquelure varnish, after wetting the brush in water and wringing it out. |
 | As soon as the varnish is a little dry, apply acrylic paint. Both layers will be ready for further work in 2 hours. |
 | The drawing is torn out by hand. |
 | We apply PVA to the surface with a brush, lay out the drawing and coat it with glue on top. |
 | After we glued the sequins as numbers, we are assembling the clockwork. |

What can be done for the kitchen from old CDs
The kitchen is a special place. Housewives spend a lot of time there. In order to make the time more fun, you can make a few crafts for the kitchen with your own hands. It can be flowers from disks, panels, a lamp, a mosaic on, furniture decoration.


Decor kitchen furniture: original and easy


Related article:
What crafts for children can be made from disks with your own hands
Plunging into the world of childhood is useful for many: to see how a child's eyes sparkle with pleasure and the knowledge that he did everything himself! It is precisely such positive emotions that are easy to get when working with DVD discs: a child can handle the decor with minimal help from adults.


Related article:
This decor is especially popular when creating objects in vintage style. In the article we will consider detailed photo instructions decoupage: furniture, on glass from napkins, on a box.
Crafts from disks by May 9
Crafts for the holiday of May 9 are reduced to the design of the disk space with thematic elements and symbols.

As a basis, take a clean blank. Using PVA glue, an application of colored paper, cardboard or satin ribbons will be glued to it. In order for the panel to hang, an awl heated over a gas burner pierces a hole from the edge of the blank. A rope or ribbon is inserted before the creation of the application.

If you use paper instead satin ribbons, then it is also worth studying the MK for creating flowers from satin ribbons. It is undesirable to touch the finished work until the glue has completely dried.
How can you use old discs to make three-dimensional figures
From blanks you can build amazing three-dimensional figures. This work is more difficult than the previous ones, since many pieces are required, cut into elongated triangles and stripes. They are all attached to the base with Titanium Ceiling Tile Adhesive. Anything is taken as a basis, up to plastic bottles or unnecessary plastic toys.


DIY crafts from old car rims with instructions for making and photo examples
Here you may need the help of a man - we attract dads, husbands, grandfathers. It is not only decorative, but also practical. Let's try to make an original place for a fire and a table.
Crafts from rims for the garden
Instructions for creating a campfire site are shown in the photo below. It will take less than a day to build such a structure.

To create a fire, stamping is ideal: both holes for an air duct, and enough space for both firewood and coals. If desired, two such disks can be welded together by welding 4 legs to them - the design will serve as an excellent brazier for a cauldron.
Article
Most people have a large amount of unwanted or unusable CDs in their home.
You can just throw them away. But it is better to use them to create various crafts and interesting gizmos. In this article we will tell you what fakes you can make from discs with your own hands.

Roofing
If a lot of CDs have accumulated, then they can be used as an original sparkling roofing. To do this, at the beginning, the disks are attached to plywood sheets, and they, in turn, are attached to the roof. Approximately one hundred disks are needed per 1 m² of coverage.

They need to be attached as follows: 1st row - end-to-end, the next - in a checkerboard pattern, blocking the disc holes of the 1st row. Small nails or self-tapping screws can be used as fasteners.

Come up with a drawing, following which you will begin to make a roof. If you have little material, then they can only lay out a visor.

Fakes from disks for the garden
British artist B. Monroe, known all over the world for his light installations, decorated his garden area with stylized water lilies from CDs.

It took him 65,000 CDs to create this work of art. You can take the idea of Monroe as a basis and make such miniature lilies for decorating your own garden.

The discs can be used for the tail of a homemade peacock. They are attached to the metal frame of the tail with a wire.

Also, cute fish can turn out from disks. To make one thing, you need to have only a couple of disks and multi-colored cardboard or a sheet of plastic.

The latter go for the manufacture of fins, tail and fish mouth. The cut out elements should be placed between the discs and carefully glued.

The disk caterpillar looks unusual and interesting. For it, you will need several discs fastened together with screws. The legs can be made of rubber, plastic, plywood, and threads can be used for the mouth, eyes and hair. This craft is attached to the fence with wire.

Another option for using discs is the creation of street lighting fixtures.

Crafts from disks for children
Interesting ideas for children's crafts from disks will be useful to educators, elementary school teachers, moms and dads.

The disk can be used to create a beautiful postcard in the form of a fish. Even three-year-old kids can do this craft. They can easily cope with it under the supervision of their parents. In addition to the disk, you will need PVA glue, scissors, plasticine, markers and multi-colored cardboard.

The fins, tail, and mouth cut out of cardboard must be carefully glued onto a CD, on which plasticine must then be applied using the indentation technique. The next step is to make the eyes.

For this we use cardboard. After fixing the eyes on the fish, you can make eyelashes from plasticine. The tail and fins are used to write congratulations.

From damaged CDs with the help of glue, multi-colored cardboard and colored paper, you can make Smeshariki, popular heroes of the cartoon of the same name.

For beauty, the contours of figures, eyes, mouths can be circled with a marker. These decorations are easily attached to the wall or cabinet with glue or double-sided adhesive tape.

From disks you can create original curtains that do not require washing. The following materials are needed: discs, paper clips, drill.

Small holes are drilled at the edges of the discs with a drill; paper clips are used to connect them to each other. The number of disks, the size and shape of the curtain depend on your imagination.

The holders of the curtains in the bathroom, made of unnecessary discs, will look great.

The discs can also be used to create unusual and interesting kanzashi tiebacks. And you can fix them with Chinese chopsticks.

To make a pickup, it is necessary to cut a circle of a smaller diameter from the disk. Wrap the resulting ring with satin or silk ribbons. As a decoration, you can use flowers made from ribbons, below are photos of crafts from disks.

You can make candlesticks, caskets, coasters, needle cases and much more from disks. Therefore, you should not rush to get rid of obsolete CDs. With their help, sometimes you can create truly unique things.

Photo crafts from disks


datahomes.com
For music lovers: DIY crafts from CDs for home and summer cottages (65 photos)

If you have old CDs at home, do not rush to throw them away. Scratched or ruined CDs and DVDs can be made into wonderful crafts that will serve you for many years to come as original home decor pieces. A similar craft can also be presented to your loved ones as a gift for any holiday, because beautiful candlesticks, caskets, vases, photo frames, paintings self made for interior decoration bring much more positive emotions and are always appreciated than ready-made options bought in stores.
 What can be done from CDs with your own hands photo
 Crafts for home from CDs
Most often, CDs are used for simple crafts for the home. For example, it is very easy to make a small table lamp out of them, a clock - table or wall. With children, you can make wall hangings or Christmas tree decorations from old music discs. If there are a lot of disks, original curtains are obtained from them. And these are just some of the crafts for the home that you can make from old and already unnecessary disks, so don't rush to throw them away.
 Crafts from CDs for home photo
 Crafts for giving from CDs
CD discs are an excellent material for crafts for giving - durable, not afraid of rain and snow, easy to use. So, if you have leftover discs, you can make garden decorations out of them. The easiest option is a tree or a windmill - all you need is discs and wooden or plastic rods.
 Tree from CD disks for decorating a dacha
 You can also make large flat figures from CDs for your dacha - it can be a violin, a trumpet or some other musical instruments, arrows, hearts, circles and any other simple shapes, if you don’t know how to do something complicated yet, birds and animals, for example, beautiful flamingos, and other crafts in this style:
Or, if you have a lot of unnecessary disks, you can come up with something completely creative. For example, one music fan unknown to me completely decorated the facade of his house with CDs:
 We decorate the cottage with CDs
 Volumetric figures from CDs
For lovers of complex crafts that look like works of art, I can suggest trying to make these original ones from CDs three-dimensional figures- a cat, a dragon, a bird, or it may be something close to you. In this case, not whole disks are already used, into pieces cut from them, and making such figures is not so easy, but look what you can get:
Watches from CDs
The clock is not only a device with which we determine the exact time, but also serve as an excellent way to decorate the interior. That is why crafts from aged CDs in the form of wall or table clocks are always relevant and in demand. Such watches can be the main accent in the interior or complement the overall idea and composition.
To make a clock from a CD, you will need a clockwork with hands from an old alarm clock, a glue gun, numbers and elements to decorate the clock, and the disc itself. The clock shaft is inserted into the hole in the middle of the disc and the clock mechanism is fixed to the disc from the reverse side with a glue gun. Next, the arrows are strung, the numbers are glued to the dial. Depending on whether it is a wall clock or a table clock, a hook or a clock stand is glued on the back side. If you want to make a larger clock, they can also be glued to a beautiful pano.
Plafonds and lamps from CDs
It can be both table lamps and lamps, as well as pendant lampshades and even entire ceiling chandeliers. The original design solution and unusual lighting in the room will be provided. You can make such unusual decor elements in a variety of ways.
 Original lighting fixtures from CDs
 So, for example, you can get a great table lamp, chandelier or night light by:
- Gluing disks together edge to edge in the form of a polyhedral figure, gluing it to an additional disk-stand, after inserting a light bulb or christmas garlands.
- Having made holes in each disk along the edges at 5 points at equal distances from each other, and fastening the disks at these points with wire, you get a wonderful ceiling.
- If you use wire and a metal frame, you can even make a ceiling chandelier.
- You can also paste over with disks an ordinary and initially unremarkable ceiling.
- Another interesting way is to grind the discs into small pieces and make a mosaic out of them on the ceiling.
- You can even make a shiny disco-style ball mosaic.
Curtains from CDs
To build such peculiar curtains, it is necessary to make holes parallel to each other on both sides of the disk and then fasten the disks together with wire or metal rings. Further, the links of the disks fastened together are fixed on a cornice or a wooden crossbar. Such unusual curtains will perfectly harmonize with the interior of a pop art or disco room with a stereo system and karaoke.
Crafts for the kitchen from CDs
Every housewife will like handmade coasters for hot dishes from CDs, dishes for cereals and pots for indoor plants, decorated with beautiful shiny mosaics, napkin holders made of discs, as well as all kinds of wall paintings and panels. All these items together will help create a bright original interior design.
Decorate the walls with CDs
If the wallpaper in any part of the room has deteriorated or is simply boring, you should not rush to re-paste them and start a global repair. You can make a small adjustment - paste over a section of the wall with CDs. It looks very impressive and plus visually increases the space. In the same way, you can update the ceiling.
 Unusual way decorate the wall and visually expand the space with CDs
 Connoisseurs of stylish solutions can make an unusual wall composition, as in the photo.
 Stylish decorative composition for wall decoration
 DIY crafts from CDs - photo
The main thing is that such decorations, figurines and crafts look beautiful and appropriate. Therefore, before you start decorating the interior with crafts from CDs, it is necessary to think over all the details and trifles in advance so that everything looks aesthetically pleasing and harmonious. And I suggest you look at the photos of crafts from CDs that have already been made by someone.
comments powered by HyperCommentsdecorwind.ru
Do-it-yourself decorations from discs for home and garden

The era of CDs has passed, but not everyone is in a hurry to part with the acquired good. Many people prefer to make various decorations from discs, which can not only give a festive look to a house or cottage, but also have a chance to come in handy in everyday life.
 Decorative mosaic from discs
 Now in many apartments you can find a considerable number of CDs that the owners no longer need, but the hand does not rise to get rid of them.
 Disc mirror frame
 Throwing away unnecessary discs, even those that have been scratched and worn out, is not worth it in any case, since they can become an excellent decoration.
 Disc curtain
 Working with discs is very easy. They already have the correct round shape, and only occasionally does it change to give the product the desired look. At the same time, cutting CDs is easy, and they stick perfectly to almost any surface.
 Disc necklace
 Drives in the room and in the kitchen
This material will be very useful if there is a need to give a more pleasant appearance some pieces of furniture. For example, you can decorate an old mirror with disks, or make a very beautiful photo frame.
 Owl from disks
 To create jewelry from discs with your own hands, you will need a large number of CDs, scissors, paints, glue and cardboard of high density. You will also need a clear coat. First of all, we make a frame out of cardboard desired shape according to the size of a mirror or photograph.
 Beautiful home decorations
 We cut the disks into different parts so that we get triangles, squares and rhombuses. Then we take the glue and attach the resulting elements to the frame so that they are at a distance of about one to two millimeters from each other.
 Disk home decoration
 It will turn out a kind of mosaic of iridescent details. After the glue dries, you need to take black paint or ink and go through the places where the elements of the disks are joined. Then the frame is varnished and mounted on the wall along with a photograph or a mirror. It turns out very original.
 Disc fridge magnets
 You can add a similar decor with other elements. For example, if a glass door leads into a room, it can also be laid out with a mosaic. Here you can not paint over the joints, but simply varnish everything - so the door will appear lighter. It is important in this case to take only double-sided discs, as they will be visible from both sides of the glass.
 Unusual clock from discs
 You can decorate the walls with disks on which various pictures will be drawn. To do this, take a few old discs and carefully paint over the shiny side with ink. After complete drying, you need to draw lines of the future picture over the black canvas. Then you need to walk on them with a sharp object.
 Lamps from discs
 It can be a thick needle, a special scraper, or a small and sharp knife. It turns out very beautiful when iridescent lines appear on a black matte background, depicting birds, flowers or some abstraction. You can make several such impromptu paintings and hang them all over the wall.
 Disc vases
 The kitchen, too, should not be deprived of attention. Here you can make a casing for the working area from the disks. It looks very original, and in terms of its functionality, such a solution is practically not inferior to ceramic tiles. In this case, you need to work in the same way as when decorating doors and mirrors.
 Decoration of disks and beads
 To begin with, we cut the discs, and then stick them on a previously prepared surface. Here you can use any color that suits the design of the kitchen to paint over the joints. After complete drying of all elements, it is necessary to walk over them several times with transparent varnish.
 Disc curtains
 Discs and useful things for the home
Throwing away such good as CDs is not worth it in any case. They can be useful for creating very interesting things. For example, they can be used as a hot plate. Here the disk will play the role of a base, on top of which a bright fabric case is put on. Such a product is sewn very quickly, and it is difficult to underestimate the benefits of it.
Hot pads play big role, as they save the table from exposure to excess heat. If they were not previously used by the owner of the house, the surface of the piece of furniture where hot dishes are placed could be badly damaged. However, this is not a reason to despair, and even more so to throw out the table. You can just cover it with a tablecloth, but this is far from the most interesting solution.
 Disk table decoration
 It will be much more original to make a table decoration from disks. To do this, we need glue, a large old disks, clear varnish, scissors and plasticine.
 Crafts from disks
 First of all, we cut the material for the mosaic. We do this according to the standard scheme, that is, in the form of squares, rhombuses and triangles. Then all this is very carefully laid out on the surface of the table and glued.
 Door decoration with discs
 Next, along the edges of the table, we make bumpers from plasticine or any other suitable material. Fill the table with clear varnish so that its surface is even. Before performing such a task, you must first check the position of the table by level.
 Disc pen holder
 It is important that the varnish completely covers all the discs and covers them with a thin layer. Otherwise, the surface will be uneven, and for such a piece of furniture this is a huge minus. After the varnish has completely dried, the sides must be carefully removed. So you can make a decoration with table disks not only in the form of a mosaic, but also in whole circles. It looks very interesting if the discs are laid out in an original way.
 Disk candlestick
 Important! Decorations are far from all the benefits that can be derived from using discs to transform a home.
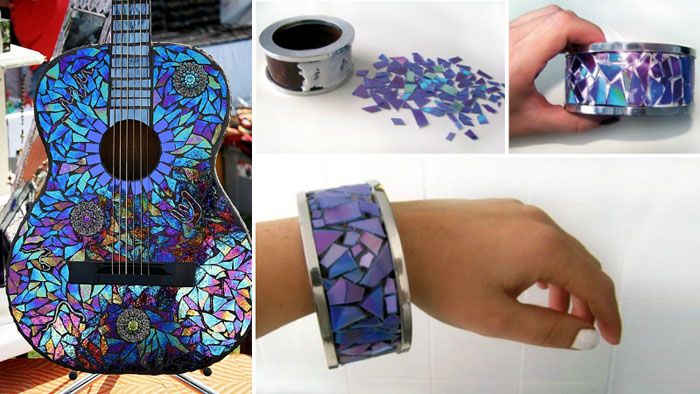
 Disc bracelet
 For example, a fashionista can create a very convenient earring holder from such material. To do this, we need a couple of discs and a smoothly crafted rod, which can be made, for example, from an ordinary but neatly crafted tree branch, which can be found in any park. It is important that the thickness of the rod matches the diameter of the hole in the middle of the disc.
 Box of discs
 One of the CDs will be the base, that is, the bottom part, and the second will be the holder itself. On the second disk we make small holes at a distance of a centimeter from each other. Then we put this circle on the top of the rod, and attach the second disk to the bottom of the stick. It can be varnished if desired.
 Decorating the bag with disks
 The rod must be taken of such a length that it fits in size even to the longest earrings. After the jewelry holder is ready, you can safely hang earrings on it, threading them into pre-prepared holes.
 Photo frame from discs
 How to decorate the local area with disks?
Advice! Discs can be used not only for decorating a living space, but also for creating comfort in the yard and garden.
 Sculpture from old tires and rims
 as the most a simple example you can take your favorite crafts from used tires. They look good on their own, but if you pair them with CDs, you get a much better look. For example, a peacock can be cut out of car rubber, and its tail can be made from discs. To do this, you need to take a large number of double-sided CDs and glue them together so that you get a triangle. To do this, you need to choose a quality adhesive that will withstand difficult weather conditions. You need to glue the discs with an overlap.
 Disk bird
 If you connect several disks together and attach them to a fence or to a wall, you get a caterpillar. Also, discs can be painted with white, red and black paint to get ladybug. After the finished "insects" are seated on bushes and trees.
 flower pot decoration
 Festive disc decorations
With a little imagination, you can create disc decorations for any holiday. The decorations from the discs will be especially relevant for the New Year. For example, if you just stick on the wall paper snowflake, it is likely to be pale and inconspicuous. By pre-attaching it to the disk, you can radically change the situation.
 Christmas tree decoration from disk
 With such disc decorations, the wall will immediately sparkle with bright colors. Such decorations are well suited not only for home, but also for decorating an assembly hall and a group in kindergarten. From disks decorated with snowflakes, you can lay out a whole Christmas tree or a festive inscription on the wall. It looks very nice.
 Christmas decorations from discs
 On a note! Discs can be decorated with ordinary christmas ball.
If at home there are some of the simplest balls without any decorations, they can be given a brighter and more festive look. To work, you will need a Christmas ball, a CD and glue. We cut the disk into small pieces, and then glue the resulting elements onto the base in the form of a mosaic. Such a ball will shimmer very beautifully and become original decoration from disks for the Christmas tree.
 New Year's decor from unnecessary disks
 Old discs, which no one will definitely review, should not just be kept in the house. They must be used, as a relic of the past can significantly transform your home, make it modern and beautiful. You can make excellent decorations from disks for the garden, home, as well as simple gizmos that can slightly simplify and decorate everyday life.
 Disk ball
 koffkindom.ru
Excellent crafts from disks for giving with your own hands
- Mosaic wall decoration
- Cutting tools different types disks
- Fixing elements
- Other uses for garden discs
- Crafts for home in the country
Crafts from disks for giving with your own hands are very simple and easy to do. Especially given that the development modern technologies led to the absolute absence of the ability to use the discs in any other way than as a craft.

From old CDs, you can make a magnificent wall mosaic that, in the light, will shimmer with all the colors of the rainbow.
Even in the most developed countries, discs are still not accepted for recycling. So, just by throwing them away, you will cause damage to the environment. The possibility of avoiding this, of course, is most relevant for each person. In this regard, the reuse of garden discs is gaining increased popularity and remains in demand.
They can be useful if you want your cottage to be decorated with a mosaic created on the wall. When light falls on it, it will create beautiful colorful shimmers and reflections that will change depending on where you stand in relation to it. The reflective properties of the discs will draw more light into the space, minimizing the need for artificial light during the day.
The era of digital technology is developing at a crazy pace! Once upon a time, CDs were considered the best information carriers, but now they are gathering dust somewhere in the garage or in boxes on the mezzanine. But some unknown force still does not allow us to get rid of them. It's probably all because of their attractive, shiny surface. If you can't say goodbye to this beauty in any way, we will share 9 really worthwhile craft ideas from old CDs for the garden and cottages, which you can do with your own hands.
1. Coasters for hot
Let's start our master class with a description the simplest crafts, namely, coasters for hot cups or a kettle. This is a necessary thing in the household, especially when you consider how quickly a plastic tablecloth melts under the action of a hot one. But for many, it is she who protects the surface. Options making coasters several. Depending on the amount of free time and the availability of materials, everyone will find an option to their liking.
- The simplest coasters they just look like painted rims. Some will want to color the plate on both sides, some will leave the shiny side untouched - the choice is yours. For these purposes, the most suitable. You can apply a thick layer of paint on the surface, and then use a toothpick to “scratch” any pattern. Excess paint can be easily removed, and beautiful shiny lines will remain in front of you. You can immediately apply the ornament with freehand paints or use a stencil. After complete drying, you can safely put on the stand hot dishes. You can protect the paint layer with two balls of acrylic varnish.

- The stand will be more dense and heat-resistant if you stick small sea pebbles, glass beads or decorative pebbles on it. interesting way decorations - solid coffee beans. Such cute and beautiful items will make tea drinking more enjoyable. You can attach the decor with superglue or with a heat gun. It is recommended to open the surface with varnish.

- More painstaking way - braiding discs multi-colored threads. To do this, the base is first weaved. A thread is pulled through the central hole and a small number of turns are made, about 5-7. Thus the surface is divided into equal sectors. Now select the desired color and thread the thread in a circle. One step under the main thread, the other above it, and so on in turn. Reminds me of basket weaving. Your "cobweb" should be filled completely. You can change the colors of the threads by tying their ends. For a more even pattern, you need to pull the threads tightly and adjust them so that they form even circles. The edges of the threads at the end of the work are attached with glue and hidden. If you don’t want to weave in a circle, just thread the thread through the center until you cover the entire surface.

- A way for real needlewomen - sheathing old scratched rims beautiful cloth. To do this, you will need not only pieces of interesting matter, but also thick cardboard or synthetic winterizer. From any of these materials, you need to cut two disk-sized circles for each coaster. After cutting, spread glue on both sides of the disk and fix the resulting circles. This will help the fabric not slip during subsequent work and make the coaster thicker. Now you need to cut out two larger pieces from the material chosen for decoration with an allowance of about 0.5 cm per seam. Attach the fabric, carefully look so that the edges protrude evenly beyond the diameter of the disk. Using a few pins, chip off the workpiece. Now manually sew the edges. If you know how to crochet, you can braid a circle around the perimeter with a thin thread and add a little lace. If not, don't worry, the seam will help hide the decorative piping. After finishing work, it just needs to be carefully glued to the end of the stand with hot glue. You can make a small buttonhole. Use it to hang coasters on the wall near the kitchen table.

These are useful and cute little things that can turn out if you show a little imagination and perseverance.
2. Scarecrow for birds
All gardeners and summer residents know how annoying birds can be, which strive to spoil the crop. Previously, in order to scare them away in the middle of the garden, they installed a large scarecrow in flying clothes and a bucket or pumpkin instead of a head. Agree, such a character can seriously frighten small children or neighbors. We suggest you make a more modern model of a scarecrow that will fascinate with its beauty and scare away birds with bright highlights. You can determine the shape, height and other parameters based on your own needs. Principle of operation is to impose about a dozen discs on the base, for example, on an old shovel holder or on a worthless rake.

3. Hanging seed organizer
Where do you store seeds purchased for planting season? Probably in some kind of box, tied with a rubber band. Not the most convenient option. And after the seeds are sown, where do you put the packaging? Many put it on a stick and insert it into the ground at the beginning of the garden, so that in case of a successful shoot and a rich harvest, remember the plant variety and buy the same one in next year. The option is not bad, but the scorching sun and rains quickly make the bright packaging unrecognizable. So that you can remember exactly what grows and where, we suggest you make an organizer. For this we would need:
- Large piece of fabric;
- Lots of little patches;
- Lots of discs
- hot glue;
- Thick paper.
Idea is to create a diagram of your garden with pockets, which will indicate the planting area of a particular vegetable, and they will place a package of seeds. In this way, you can remember not only the variety, but also record the date of planting. This basic technology can be supplemented or simplified as you like, the main thing is to understand principle:

Your organizer is ready. You can simplify the design and connect the pockets together with fabric ribbons, and then hang them on a wooden plank.
4. Disco ball
Who said that the summer cottage was created only for exhausting planting and harvesting? Sometimes you need to relax and create a perky mood for yourself. Evening gatherings can turn into a small party, which will become more colorful with a disco ball. It is very easy to make it. There are several options:

Now it remains to take care only of the light source and incendiary music.
5. Decorate flower vases
Many garden plots are decorated with large flower pots and hanging flowerpots. Why not make them more colorful and unusual. For this you would need:
- A large number of CDs;
- Sharp scissors;
- Super glue;
- Paint gun;
essence The method consists in pasting the surface of the pot with pieces of discs. If you approach the issue more creatively, you can pre-paint the surface of the disc with multi-colored felt-tip pens, let them dry and get a translucent colored material for creativity. After giving the discs the desired colors, you need to cut them into fragments. You can keep the proportions and choose the correct geometric shapes, or you can cut into arbitrary pieces. Both options will end up looking nice. Just the selection of suitable "puzzles" for arbitrary cutting will take a little more time. Flowerpot surface must be clean, dry and free of grease.
- Spread a small area with glue and start placing the details. You can even arrange them in a certain sequence and end up with a characteristic pattern.
- When the work is finished, you need to let the glue dry.
- You will have noticeable gaps that need to be covered with paint. The best way to do this is with a pistol.

6. Decorative curtain
This is not a window tulle, but a curtain that can perform the function of zoning both inside the country house and on.  Just imagine how much more comfortable the area where the country house is located will become if you fence it off from several sides with an unusual curtain. For us to work would need:
- Lots of CDs;
- Packing paper clips;
- Drill;
- Fine drill;
- Wooden plank.
To begin with, you need to decide on size future curtains. After that, think about pattern. This can be done most quickly by laying out the discs directly on the floor. You can place them one under the other in ordinary stripes, more beautiful way- arrange them with an offset, in a checkerboard pattern. Based on the layout method, mark the places for the mounting holes. It is enough to do this on disks from the first and second strips. Knowing their number, you can quickly navigate the next steps.

In such a simple way, you can build entire partitions, make them motionless, additionally fixing the lower edge and equip entire recreation areas. And if you weave thin garlands into the gaps between the disks, you get something unimaginable! 
7. Coffee table from discs
From what just do not make countertops for craftsmen! And we offer not only to decorate the table, but also to try do full-fledged frame from old discs and remnants of chipboard or other wood-based materials. To implement the countertop decor option, we need the same tools as for decorating flowerpots. And the technology will be identical. Fragments of discs or blanks in the whole form are glued onto the prepared surface, as you like best, and then the gaps are filled and varnished.  More hard way let's take a closer look. For us to work you will need:
- A large number of disks;
- Something that can serve as a countertop - wooden boards, durable plastic, leftover chipboard, etc.
- Round wooden rods - 4 pcs.
- Hacksaw.
The last item is necessary for the legs of the future table, so it is better that the pieces of wood are even and high, and their diameter does not exaggerate the diameter of the central hole of the disks. Let's start with the legs. Remember, there was a children's toy in the form of a pyramid of multi-colored plastic bagels of different colors and diameters, which were put on a stick on a stand? This is the stand you need to build.

For more functionality, you can do additional shelf some distance under the tabletop. Then half of the discs are strung on the rod, then the shelf, then the remaining half. The diameter of the hole in the shelf should correspond as closely as possible to the diameter of the rod so that it does not “walk” and does not move. This design will also be more rigid and roomy. Decorate the tabletop can be most different ways. You can lay out a mosaic as we suggested above, or you can cut out a part in the middle, fix plywood or transparent plexiglass from below, place a couple of beautiful disks in a niche and cover everything with plexiglass from above.
8. Restoring old chairs
There is nothing surprising in the fact that it usually gets after it has lost its attractive appearance and there is no longer a place for it in the apartment, and the hand does not rise to throw it away. inhale new life in old chairs will help our impossibly simple, but effective restoration method. The result will surprise not only you and your guests, but will also help complement the unusual table from the paragraph above. So we you will need:
- Old scary chair - unlimited;
- Lots of CDs;
- Sharp scissors;
- Beautiful paper napkins with patterns or a glossy magazine;
- PVA glue;
- Grout for seams;
- Sandpaper;
It will take about 50 discs to restore one standard size chair. We will step back from the mirror surface, and try to create something that will look like the old one. To do this, we need to get rid of the mirror coating.
- Using fine-grained sandpaper, you need to erase the foil and rinse more transparently than plastic under water.
- Select the drawing you like from the pages of a magazine or other sources, you can use the usual colored paper. Use what you like and fit.
- Spread a decent layer of PVA glue on the surface of the disc and stick it to the selected page. This must be done with all disks, so there will also be a lot of images.

- When the glue dries, cut off the excess paper;
- Cut the disc into small squares 1.5 x 1.5 cm. Why such a small size? Everything is very simple. The seats of old chairs are often deformed and have a dent in the middle. If you make the details larger, they simply cannot fit snugly against the curved surface and accurately follow its contour. Thus, after some time, the squares will simply disappear, since there will be a void under them.
- For the convenience of further work, you can decompose the squares by color or by image style into disposable cups. So it will be much easier to follow the order and lay out the drawing.
- Before pasting, the surface of the chair must be wiped with sandpaper, remove dust residues and degrease.
- Start sticking squares on PVA or any other glue, moving from the outer contour in a circle.

- In order for the chair to look more harmonious, paste over the back with mosaics;
- Leave the chair until the glue is completely dry;
- It's time to fill in the gaps between the tiles. For this, ordinary construction putty is suitable. Choose the color of your choice.
- Apply putty to the mosaic and spread with a rubber spatula, carefully filling the joints;
- Without waiting for it to dry completely, remove the excess with a damp cloth. It is very important to do this immediately, otherwise difficulties may arise later;

- After the grout has completely dried, hide the back and seat with acrylic varnish. It is better to apply two layers. This will prolong the life of the decorative surface.

Our new unusual chair is ready. Keep in mind that you don't have to limit yourself to these recommendations. In the same way, you can paint the legs of the chair, or just paint them with paint.
9. Protection from rain and sun - a roof made of CDs
And finally, the most practical way use of old CDs - the arrangement of the roof! Of course, no one means the roof of the house, although ... with due effort, anything is possible. Consider a smaller scale application area- e.g. roofing, garden swing, small, for a car or outbuilding. According to our calculations, it will take about 120 CDs to cover 1 square meter of surface. Thanks to a special method of their installation, which resembles laying technology, each subsequent disk will half overlap the previous one.  Thus, the surface that will be located under the discs will be completely protected from hit by rain or melt water. Let's get started for preparatory and installation work:
- In each disc, it is required to drill a hole, the size of which will allow the leg of a nail or self-tapping screw to pass freely into it. You need to do this in the place indicated in the picture.

- You can try to drill several discs at once. This will greatly speed up the workflow, most importantly, do not forget to securely fix the entire stack;
- Now you need to decide which side you will be stacking discs. If you place the blanks with the shiny side up, they will reflect the sun's rays, which will extend the life of such a coating and help make the room under the roof cooler. But on the other hand, endless sunbeams can annoy not only you, but also the neighbors, which will lead to trouble. By placing the discs with the shiny side down, you can lay out various patterns from the images on the front, which also looks very attractive;

- Decided? Then it will start fasten discs to the roof. Use whatever works best for you. Of course, the application will greatly speed up the work.
- Before starting installation, draw horizontal lines that will serve as a guide and will not deviate from straightness;
- Get started with bottom edge, after all, each subsequent one will go on top of the previous one.
- Be sure to ensure that the central holes of the discs also overlap, otherwise it makes no sense to equip a roof that has many holes at all.

- Thus, it is necessary to move up until the entire surface is completely covered.
We can confidently say that such a roof will be able to withstand the rays of the scorching sun and heavy rainfall. 