How to weave satin ribbons. We weave bracelets from ribbons and beads with our own hands - diagrams, step-by-step descriptions of the progress of work and videos. Charming ribbon embroidery
How to make a hair band with your own hands
Usually, the idea of making a hair tie with your own hands comes to mind for those who have too thick and / or heavy hair, and commercially available specimens hold their hair for literally 20 minutes, no more. For myself, I solved this problem back in school, when, using the knowledge of macrame, I began to make elastic bands for myself that did not fail and securely held the braid or tail in its place.
I will teach you how to make a hair band with your own hands, even if macrame is an empty phrase for you. Anyone can weave such a rubber band. Teach your daughter to weave such elastic bands, and she will be happy to weave beautiful jewelry for hair and be proud of this skill in front of girlfriends. By the way, this work is developing very well fine motor skills which is optional, but nice. In the first photo, you saw that you can weave such elastic bands from colored elastic bands - they are beautiful in themselves.
You can weave an elastic band from a simple, black or white one, and then tie or sheathe it (I will tell you how to do this in other material). And another option is to add an elastic band with a ribbon bow. But this is all later, and now we weave the gum itself.
So, we need:
2.5 m of regular gum (I buy skeins of 10 m and weave 4 gum at once);
needle and thread suitable color;
eye pins;
a pillow or something to which you can pin an elastic band during work (for me it is a soft back of a chair).
Step 1. Fold the rubber band in half and cut. We will get 2 elastic bands of 1.25 m each.

Step 2. We fold each elastic band in half, put them one on top of the other and pierce in the center with a pin, pinning the elastic bands to the pillow for work (I used to use ordinary sofa cushions). What you should end up with is shown in the photo below.

Step 3. Mentally number the rubber bands: 1st, 2nd, 3rd, 4th (clockwise). Now we work like this: we put the first gum on the second, the second on the third, the third on the fourth. We pass the tip of the fourth elastic band into the loop that the first elastic band formed. Then we tighten all the elastic bands (see 2 photos below).


Please note: the gum should not wrinkle! Those. it should be tightened tightly and neatly, but should not wrinkle and change its ribbon shape.
Step 4. We continue to weave: the first to the second, the second to the third, the third to the fourth, the fourth to the loop of the first, everything is as in the previous step. And then again and again. You will notice that your hair tie seems to twist in one direction. That's the way it should be.
When the gum is over, this is what you get:

Nuance: if you plan to sheathe an elastic band on top, it’s better to do it right now - sew a “pipe” from a strip of fabric and thread our column of hand-woven hair ties into it. If you do not want to sheathe, then proceed to the next step.
Step 5. We take a needle and thread in our hands and sew our protruding ponytails so that the elastic band does not bloom. When the “tails” are well fixed, we take the braided column by the ends and, pressing them together, we sew them around the perimeter. Here is what you get as an output:

Do-it-yourself hair band - ready, and you can already try it on.
Wisenteta specially for the site MyZaya.ru
SOURCE http://www.moyazaya.ru/
Many people like weaving from ribbons. Probably, the point is the simplicity of creating baubles and their unobtrusive appearance, reminiscent of the end of the last century, when such baubles were popular, and many liked to weave them with their own hands. In this article, you are invited to try out weaving from ribbons yourself. Weaving patterns are simple, but even without them everything is clear. And what child would not be interested in joining in the creation of baubles from ribbons with their own hands?
Bracelets
Weaving bracelets from ribbons is not difficult, the main thing is to be careful when working with scissors and needles. Decoration from ribbons or braid can be weaved step by step with your own hands at home - a master class or step-by-step instructions that are easy to find on the Internet will help you do everything correctly and without errors.
Bracelet of four satin ribbons
Weaving such a bauble is very easy. It will look fashionable and stylish on both women and men.
You will need:

How to do:

The bracelet is ready!
Bracelet with pearls
This is a very feminine bracelet that will suit both evening dress, and to an elegant trouser suit.
You will need:
- a strip of satin about 50.5 cm long;
- pearls or beads;
- elastic lace;
- needle with a large eye (depending on the thickness of the lace).
How to do:

Done, ready to wear!
Gallery: weaving from ribbons (25 photos)


Chokers
Weaving ribbons around the neck will be easy even for beginners.
Ribbon choker
DIY bauble for stylish girls.
You will need:

How to do:
- Measure your neck and cut a piece of fabric that length, adding a centimeter.
- If you decide to use the flower as a decoration, then tie the stem in a knot at the base of the flower, and remove the excess with scissors.
- Lay the strip of fabric as it will lie on the neck, attach the Velcro to the ends. Important : Velcro with soft loops should be directed towards the neck, and Velcro with hooks - from the neck. This way you avoid skin irritation.
- Use a glue gun to attach the decoration to the ribbon.
Done, now you can give the bauble to someone or wear it yourself.
Baubles with chain clasp
Such baubles were worn in the nineties.
You will need:
- a third of a meter of velvet about 23 mm wide;
- a clasp and a piece of chain from an old and / or torn chain;
- needle and thread;
- decoration-pendant with a metal eyelet.
How to do:

Other do-it-yourself ribbon gizmos
ribbon flower
These baubles are easy for beginners to weave and can be used as hair accessories (they are especially loved by little girls) and also as brooches (they will appeal to an elegant older woman).
You will need:

How to do:

Fenichka is ready!
Bookmark for books from a tape
Craft for bibliophiles. The bookmark is very easy to use. No more curled sheets and random small items in your favorite books!
You will need:
- beautiful button;
- dense fabric tape;
- scrunchy;
- needle and thread or sewing machine.
How to do:

Bookmark is ready to use.
Baubles are an interesting accessory that came to us from antiquity. Weaving baubles invented by Indian tribes many centuries ago. Previously, this decoration was given a special role, it was made in the main traditions individually for each tribe. The well-known hippie subculture, as they were also called "flower children", gave wrist bracelets a second life.
They have invested in these bracelets not only cult traditions, but also their soul. Bringing a bauble as a gift for them meant expressing their deep feelings for a person. Both before and now, floss, various ribbons and cords remain the most popular materials for their manufacture.
Baubles from satin ribbons video
This decoration symbolizes friendship, unity, love and freedom. In ancient times, baubles were a great substitute wedding rings, they were put on the finger of their chosen ones as a sign of love and devotion.
Baubles weave different combinations colors. If now it is more like an accessory and a tribute to fashion, then for the people of past centuries, the color definition was much more important. The red and white bauble spoke of free love, which was typical of the hippie culture. Also, by the color of the bracelets, it was possible to determine not only the age of the wearer of the bracelet, but also his position in society. Various colors distinguished themselves by people who belong to a certain rank or community.

AT modern world more and more often you can meet young people who adorn their wrists with bracelets made from ribbons. This means that the fashion weaving baubles returns. Most of the younger generation have a desire to weave baubles not only for themselves, but also for close friends.
Someone just looks at these jewelry and admires their diversity, while someone is really interested in the technique of creating bracelets. make beautiful and fashion accessory pretty simple. Many techniques and schemes allow fantasy to roam to unimaginable limits, however, there are basics that are not so difficult to comprehend. You can learn how to weave baubles from ribbons using a simple example.
For making simple baubles you need to take two tapes, each length is not less than one meter. Colors are better to choose not only those that look good with each other and stand out. You can take a blue ribbon and cream. In width for the first weave, it is better to take tapes of more than one centimeter.

Weaving baubles
We take the prepared ribbons, put one on top of the other and tie a knot as close to the edge as possible. As a result, you should have a loop obtained from a knot, the free edges of the tape must be directed inside the ribbon.


Now we make a blue loop and thread a cream loop into it, tighten the last one.
Then we do the same, only in the reverse order: thread the blue one into the cream loop and carefully tighten it. You should continue weaving until the bauble acquires the required length.

1. Choose colors for your future decoration with great responsibility. This is not just a bracelet, but jewelry that came to us from antiquity, which carries a certain deep meaning.
2. Do not overtighten the loops of the baubles. It is better to leave them slightly weakened, so they will have a more embossed and pronounced look.
3. For greater convenience, in the initial stages of weaving, help yourself with a small pin. It will allow you to avoid unwanted slipping of tapes from the loops.
DIY bracelets can be created from a variety of different materials: thread, beads, plastic, as well as from ribbons. Such decorations look beautiful and always in place. In addition to ribbons, beads can also be present in such bracelets, which makes them even more elegant. In this article we will try to figure out how to weave handmade bracelets from ribbons.


Weave bracelets from ribbons and beads
Basically, all baubles of this type are woven in the form of a braid, and learning this technique is not difficult at all. In order to learn how to make bracelets from ribbons with your own hands, the master class below will not be superfluous. For work, you only need fantasy and ribbons. The only condition: the ribbons must be 0.5 cm wide and three times longer than the estimated length of the bracelet.
Take two ribbons in contrasting colors, or those shades that go well with each other. Tie them together with a knot, while leaving the tips of 5 cm each - this is for the ties.

Bend each ribbon into a loop close to the knot.

Pass a loop of pink ribbon through the green loop.

Now fold the loop from the green ribbon again and thread it through the pink one.


Pull up the pink ribbon so that it tightly wraps around the green one. And then make a pink loop.


Now loop through Pink colour into green. Continue to make the bracelet in the same way until you reach the length you need. After that, tie the remaining ends of the threads in a knot, that's all, the product is ready.


In the form of a tourniquet
Of course, with all the variety of weaving techniques, the question arises, what kind of bracelets can be made from ribbons other than the standard version? There is another option for weaving - a tourniquet of ribbons.
In order to make such a decoration, we will also need two ribbons 0.5 cm wide and 2 m long each.
Take a white ribbon and put a blue one on top of it so that you get a cross. All sides of this cross must be equal. In the middle, attach both ribbons with a pin to the pillow, this is necessary so that they do not twist.


Now transfer the blue ribbon number 1 to the white ribbon number 2. Now lift the same ribbon number 2 and place it on top of the ribbons of blue color under numbers 1 and 3. Now put the blue tape number 3 on top of tape 2 and pass it under tape 4.


Now pull the strings and tighten the knot, in the end you will get 4 small squares.

All other rows are woven in the same way, you just need to lay out the ribbons as prescribed earlier. Weave until the bracelet is the desired length.

Everything is ready, now you just need to pass two more ribbons for ties under the white ribbon at the beginning of the bracelet.

with beads
Well, you should not forget about additional elements of decoration when it comes to such fennecs, these can be chains, rhinestones and beads.


So, to create one of the bracelets presented above, namely from ribbons and beads, you will need:
- Beads.
- Choose a satin ribbon, shade and width depending on the beads.
- Needle and line.
There is nothing complicated in creating such an ornament, and it can be made in a very short time. Take the tape and make a loop at a distance of 15 - 20 cm from the edge. Now take your needle and line and pierce the loop, securing the line with a good knot.


Take a bead and thread a needle with fishing line through it.

Now make another loop and add the next bead. Continue until the bracelet is the desired length.


You can fasten the fishing line, for this, after the last bead, make a loop and thread a needle with a fishing line through it, secure with a knot. Tie the ribbon itself in the same way in a knot, as close as possible to the last bead.

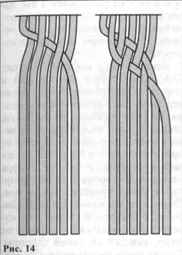
Alas, we don’t have patterns specifically for weaving baubles from ribbons, but there are samples for creating bracelets from leather strips, and they are the best fit.
Four-row braid:


Pigtail with teeth:
Chinese knot:

Round lace:
Weave of five or more strips:

From center to edges:

Braiding around the rope:


Bracelets that are woven from ribbons, as well as from threads, are called baubles. They are made not only from two ribbons, there are also more of them. Below is a video on the main types of such art.
I do not claim to be an expert in this area, my article is more for beginners. I will try to tell you about all the nuances of this needlework and teach you several techniques for creating flowers from ribbons.

The uniqueness and simplicity of this needlework
If you look at photographs of flowers from ribbons, beauty and sophistication flower arrangements, then this skill will seem incredibly difficult. I hasten to please you, this is not so.
The flower you have conceived will always work out, of course, depending on the experience and skills gained, the end result will be different.

Artificial flowers are made from various materials, knit, weave from macrame, mold from polymer clay All these methods require talent and special skills.

In our case, it will suffice to carefully study step by step instructions for beginners, how to make flowers from ribbons and you will succeed.

I will say a few words about the strength of products made of nylon tapes. It all depends on the functionality of the future product, if the flowers decorate the interior, then special reliability is not necessary here, but if the flower decorates a children's headband or headband, then you need to try to make a very high-quality thing.
Methods for making flowers from ribbons
I want to tell and show you some basic ways to create flowers from ribbons. Having mastered this simple science, you can create any kind of flowers.

My advice to you, try to make any fantasy copy using one of the techniques, and you will feel all the nuances of the method you have chosen and master it faster.
Preparation for needlework
- Any ribbon you like in different colors and sizes
- Needles and threads
- sharp scissors
- glue gun
- Tweezers
- Centers for flowers or beads, sequins
- Floral sleeve (or tube to thicken the stem).

Also prepare a desktop with a table lamp.
Kanzashi
With the kanzashi technique, my acquaintance with flowers from satin ribbons began. This technique came to us from Japan, kanzashi are decorated with hairpins or hairpins.

Girls' hairstyles bloom with chic flowers, thanks to such hairpins. Due to the fashion for kanzashi, more and more needlewomen are mastering this completely simple technique.

In addition to the prepared materials mentioned above, take a ruler, pattern chalk and a candle for singeing the tips.

Three types of leaves are used in kanzashi: round, long and sharp.
- First, cut a 5 cm wide satin ribbon into squares, naturally the same.
- We take a square and fold the corners to each other, as shown in the photo and lower the extreme corners to the lower central corner.
- Then we wind the side corners back and clamp with tweezers.
- The lower cut, if necessary, is cut off and melted over the candle.
- Thus, a round petal is obtained, of which several pieces need to be made.
- We collect the finished petals on a thread, fold them into a flower and glue them to the base, attach a bead to the middle with a glue gun.

Congratulations on your first kanzashi flower!

I present to you a few video tutorials on how to make flowers from ribbons.

Creating a more lush flower.
Note!


Creating double petals using the kanzashi technique, from which the cutest butterflies and beautiful snowflakes are obtained.
melted petals
Another way to create flowers from ribbons is melted petals. This method is good for making large flower arrangements, for example, I made a basket of roses.

However, there are some nuances here:
- Not all ribbons are well suited for such colors;
- Melted petals do not look as neat as kanzashi;
- It may not work right away, you need to “fill your hand”.

A more suitable material for creating these colors is nylon ribbons.

Manufacturing instructions.
- We make a pattern in the shape of a half heart, as shown in the photo;
- Next, cut out the petals of 7 large pieces, 7 medium pieces and the same number of small ones;
- The edges of each petal you cut are melted over the candle, after such processing the petals become voluminous;
- We collect the petals on a thread in a checkerboard pattern, with a slight overlap, then the flower will be lush;
- We attach beads to the core.
- The flower is ready.

Note!


Charming ribbon embroidery
Yes, they also embroider with ribbons! In embroidery, ribbons of different widths are used, which, with proper drapery, creates volume and beauty of the embroidered picture.

This technique is good for several reasons:
- Quick result;
- Ribbon embroidery looks very rich and is appreciated among lovers;
- Not complicated schemes, if desired, everyone can do it.

I have prepared several master classes, watch and learn.

Now they sell a lot of kits for embroidery with ribbons, such kits are very good for beginner needlewomen, there is a pattern, a canvas, a set of ribbons, threads and everything that is used to create a picture.

If you want exclusive work, you can draw up schemes, choose colors and textures yourself.
Note!


Photo of flowers from ribbons with your own hands


