Jumpsuit made from alize softie. Jumpsuit made of plush yarn Krokha Nazar. Fluffy hippopotamus from Alize Softy, master class
Here are my threads, coral and milky colors, and tools, I highly recommend using markers, since otherwise we won’t be able to see where our raglan line is on this thread.
I will knit with needles No. 3, on a knitted pattern in 20 loops I have 10 cm, which means 2 loops per 1 cm.
I will knit for size 68 (from 3 to 6 months).
Here are several tables with sizes, the only thing I’ll immediately make is a disclaimer: all sizes are based on the diaper allowance, so if I shorten the legs by 2-3 cm without shortening the overall length of the overalls.


For my size, the neck girth is 22.5, but for the neckline we add about 3 to 7 cm to this value (depending on how wide the neck you want to get), so I will do the calculations at 26 cm.
26*2=52 loops.
I leave one loop per raglan, so (52-4)/3=16
so on the back we will have 16 loops for each sleeve, 8 loops
leave 3 cm on the bar * 2 = 6 loops
so on each shelf we take (16-6) / 2 = 5 loops
As a result, I dial 58 loops, I will knit the bar right away.

More information about the calculation of loops for raglan can be found here. http://www.stranamam.ru/post/4841218
I will cast on an auxiliary thread, which I will then unravel and use the resulting loops to knit a collar or hood.
First rowwe knit all facial, put markers separating raglan lines.
Second rowwe knit all the purl except for the loops of the straps, we always knit them with facial ones. Also, starting from the second row, I will knit a sprout, I will do this using shortened rows, you can read more about how to do this here http://www.stranamam.ru/post/7301753/
We knit:6 strap loops, 5p. shelves, 1p raglan, 8p. sleeve, 1p. raglan, 16p. back, 1p. raglan, 8p sleeve, 1p raglan, 4 front loops, 5th wrap and turn knitting
Third row.Here we will already make increases on both sides of the raglan line, I will make them from broaches.
increase with a slant to the right: insert the left knitting needle from back to front under the broach between the loops and knit it with the knitting needle behind the front wall
increase with a slant to the left: insert the left knitting needle from front to back under the broach between the loops and knit it knit behind the back wall
Here's a video on how to do it
We knit:4p. shelves, an increase from a broach, 1p raglan, an increase from a broach, 8p. sleeve, increase from broach, 1p. raglan, increase from broach, 16p. back, increase from broach, 1p. raglan, increase from broach, 8p sleeve, increase from broach 1p raglan, increase from broach, 4 front loops, wrap the 5th and turn the knitting.
Fourth rowpurl without increments, we will wrap through one loop
We knit:5p. shelves, 1p raglan, 10p. sleeve, 1p. raglan, 18p. back, 1p. raglan, 10p sleeve, 1p raglan, 3 front loops, wrap the 4th and turn the knitting
Fifth row facial
We knit:3p. shelves, an increase from a broach, 1p raglan, an increase from a broach, 10p. sleeve, increase from broach, 1p. raglan, increase from broach, 18p. back, increase from broach, 1p. raglan, increase from broach, 10p sleeve, increase from broach 1p raglan, increase from broach, 3 front loops, wrap the 4th and turn the knitting.
Sixth row purl
We knit:4p. shelves, 1p raglan, 12p. sleeve, 1p. raglan, 20p. back, 1p. raglan, 12p sleeve, 1p raglan, 2 front loops, wrap the 3rd and turn the knitting
Seventh row facial
We knit:2p. shelves, an increase from a broach, 1p raglan, an increase from a broach, 12p. sleeve, increase from broach, 1p. raglan, increase from broach, 20p. back, increase from broach, 1p. raglan, increase from broach, 12p sleeve, increase from broach 1p raglan, increase from broach, 2 front loops, wrap the 3rd and turn the knitting.
Eighth row purl
We knit:3p. shelves, 1p raglan, 14p. sleeve, 1p. raglan, 22p. back, 1p. raglan, 14p sleeve, 1p raglan, 1 front loops, wrap the 2nd and turn the knitting
Ninth row facial
We knit:1p. shelves, increase from broach, 1p raglan, increase from broach, 14p. sleeve, increase from broach, 1p. raglan, increase from broach, 22p. back, increase from broach, 1p. raglan, increase from broach, 14p sleeve, increase from broach 1p raglan, increase from broach, 1 front loop, wrap the 2nd and turn the knitting.
Tenth row purl
We knit:2p. shelves, 1p raglan, 16p. sleeve, 1p. raglan, 24p. back, 1p. raglan, 16p sleeve, 1p raglan, wrap the 1st loop of the front and turn the knitting
Eleventh row facial
We knit:increase from broach, 1p raglan, increase from broach, 16p. sleeve, increase from broach, 1p. raglan, increase from broach, 24p. back, increase from broach, 1p. raglan, increase from broach, 16p sleeve, increase from broach, 1p raglan, increase from broach, wrap the 1st loop of the front and turn the knitting
Twelfth row purl
We knit:knitting all the loops with wrapped stitches, not forgetting that they need to be knitted with wrapped thread so that there is no hole, not forgetting that the last 6 rows are our placket which we always knit with knit stitches
Thirteenth row facial
We knit:all the loops are increased along the raglan line, knitting the wrapped loops on the other side, do not forget that the last 6 loops at the beginning and at the end we have a placket and we always knit them with knit stitches, we do this so that the edge does not wrap later.
This is what I got after knitting these rows.

In total, I have 106 stitches on the knitting needle (6p slats, 11p fronts, 1p raglan, 20p sleeve, 1p raglan, 28p backs, 1p raglan, 20p sleeve, 1p raglan, 11p fronts, 6p slats)
In the 14th row, on one of the plackets we make holes for buttons, knitting the 3rd and 4th loops together and making a yarn over. I will make the next hole at a distance of 5 cm.
We knit the next rows, making increases only in the front rows along the raglan line, to the length we need, in my case the armhole height is 12 cm.
Don’t forget that when we knit a bar of a different color, when changing colors, the threads need to be twisted together so that the parts are one, so on the wrong side we form a dotted path.


I make the next button hole in the 31st row and in the next every 17th row (i.e. then 48 65 82, etc.)
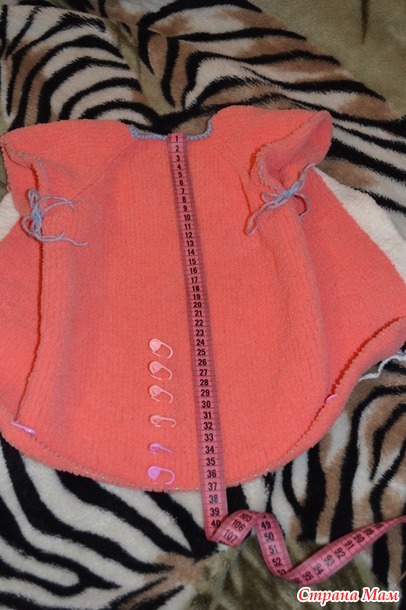
I knitted 53 rows, but in 51 and 53, without making any increases, the back was already wide, I got 13 cm (1 cm more than in the table, this is necessary so that the sleeve sits a little loosely)
Since in the table there is only the height of the armhole, I measure it in the middle of the back.
Then I knit the loops of the front, remove the loops of the raglan line and sleeves with an additional thread, knit the loops of the back, the loops of the raglan and the second sleeve, remove them again with an additional thread and knit the loops remaining on the knitting needle
This is what I got

Next we knit the main part, I will not make any increases since my back width is already 30 cm.
The total length of the overalls for my size is 58 cm. The step height (from the bottom of the legs to the crotch) is 20, but as I already said, I’m also making an allowance for diapers, so my step height will be 18 cm, which means that from the neck to the crotch along the back we should have be 58-18=40 cm, 3 cm from the bottom I will tie the fronts together so I knit the back height 37 cm.
While the girls were knitting the first ball, they came across 2 knots, but they weren’t very neat, so they had to tie them up, that’s what I’m talking about. there is a wonderful way of tying threads, for these there is no better way to think of it, the knots come out neat and are then not visible at all in the fabric, you can see more details here http://www.stranamam.ru/post/6644763/
At the moment I have 20 cm knitted along the back, I’ll get ahead a little and describe how I will knit further, photo reports will come later. At a distance of 25 cm, I will begin to knit additional rows on the back, after all, we should have more space on the butt than in the front. Although you don't have to do this.
I will do this by knitting shortened rows, for this I put markers on the side seam line, knit the front and back, wrap the loop in front of the marker, turn the knitting, knit the back loops to the second marker, wrap the loop in front of the markers, turn the knitting and knit all the loops together with wrapped. And I will do this every 2 cm, so I will have an additional 12 rows knitted on the back in 6 places.
This is what I got, the additional knitted rows are marked with markers.
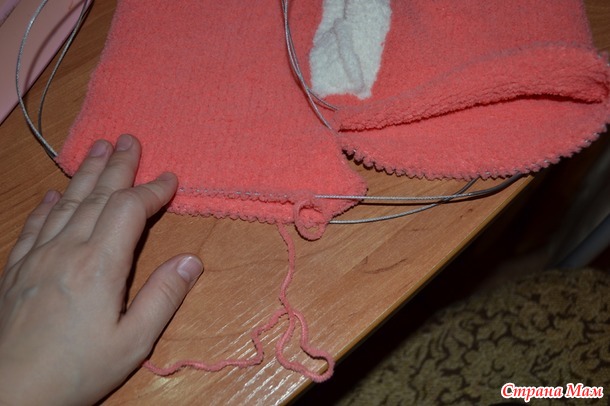
Now I need to connect everything and knit it in the round; if you don’t knit a bar like me right away, you will need to cast on additional loops. And I will need to combine the loops of both slats, I remove one of the slats onto an additional knitting needle and knit 2 loops each (from one and the other slats), I do this by inserting the knitting needle into 2 loops simultaneously (on the main and on the additional knitting needle). In the end I got it like this

it is clear that both planks are connected
We knit further another 3 cm and the length is 40 cm, then we will divide the loops in half, so that the loops of the strap are on different sides, we remove one half with additional knitting needles, a pin or a string, as is convenient. Previously, I always just divided the loops in half and simply decreased or closed a few loops and simply knitted the trouser legs, but now I decided that it was time to learn how to knit a gusset, and I really liked this one http://www.stranamam.ru/post/6087280/ Thank you very much to the author, very simple and convenient.
To knit a gusset, I cast on 12 stitches between the legs (this is 6 cm, just right for my size).
We knit the first row of all stitches in the round. In the second row, we begin to decrease the added loops in this way - 2 loops together. (one loop from the trouser leg, the second from the cast-on), we knit the faces. cast on loops, except the last one, knit it together with a loop from the pant leg.
track. We knit a row without decreases, then again a row with decreases, and so we alternate until the cast-on loops run out.
This is what I got, the resulting triangle is of course almost invisible, the peculiarities of the yarn

but in this photo it’s clearer
In total, I knitted 4 cm, the total length of my trouser leg is 18 cm, of which I will knit 4 cm with an elastic band, I have 10 cm left to knit. The width of the trouser leg turned out to be 15 cm, at the bottom I want to get 12 cm, which means I will need remove 3 cm * 2 = 6 loops. I will make one of the decreases immediately and we need to distribute the remaining five over the remaining 10 cm, which means every 2 cm I will knit two loops together on each side of the inner seam of the trouser leg (that is, we will decrease 2 loops every 2 cm ). Then I will knit 4 cm with an elastic band.
We knit the second leg in the same way as the first, only we cast on additional loops using those already cast on earlier.
These are the pants I got

I note that the softie does not hold the elastic band at all. That's why I knitted a spandex thread into the cuff.
Next, I take hold of the sleeves, lift the set aside loops on one sleeve and so that there is no hole under the armpit, I lift 4 more loops there.
Then we look at the table, the sleeve length is 20 cm, the shoulder length is 5.5, which means that from the neck we need to knit a sleeve with a length of 26.5 cm, of which I will leave 4 cm for the cuff and take into account that we have already knitted 13 cm, leaving 26.5- 4-13=9.5. In the first row I will make one decrease along the seam line (underarm), the next 2 rows I will knit without decreases, and in 4 I will again decrease 2 loops, 2 more rows without decreases and again decrease 2 loops. Next I will make 6 more decreases, distributing them over the remaining 9 cm, making each decrease every 1.5 cm.
In total, my sleeve width in front of the cuffs was 9 cm.
Here my sleeves are tied

In this photo you can see that there is no hole under the arm, which means you won’t have to sew anything up, which I really don’t like.

The last thing I have left is the collar; I won’t knit the hood since there are no threads left for it (there were only 4 balls). To do this, I unravel our auxiliary thread, at the same time transfer the loops to the knitting needles (I’ll take knitting needles half a size smaller), knit with a 3 cm elastic band, then close our loops and voila, my jumpsuit is ready and without a single seam.

Today 4.07 I start the second jumpsuit, here are my threads

I will knit with a hood, but I haven’t decided whether it’s better to start knitting with a hood or knitting a hood from the collar. Therefore, I will start this way and that way and see what I like best and leave it that way, I will describe both options. I’ll also say right away that I’ll be knitting with a lock, so I’ll knit without a placket and I plan to knit along the edges with a hollow elastic band (I’ll think about that later), and the lock will go along one of the legs.
So I'm starting with the first option., I'll start with the hood. Let's start with calculations, according to the table of hats for my age, the height of the cap is 16 cm, add a few more centimeters (4-5, the older the child, the higher his neck) for the neck and a couple of centimeters so that the hood is a little loose. In total, I will knit to a height of 22 cm. Next, we will determine the depth of the hood, using the same table we look at the diameter of the bottom of the cap; for me it is 14 cm, and this will be our depth of the hood. If I’m doing something wrong, be sure to correct me, after all, I’m counting on the hood first and have no one to try it on.
By the way, here's a table of hat sizes

So for the hood I need to cast on 88 loops, this is our height multiplied by 2, since the hood is folded in half, and again multiplied by 2, since I have 2 loops in 1 cm. Initially I wanted to knit the first 3 cm with a hollow elastic band so that the lace could be inserted, but the width of the hollow elastic band, if you cast on 2 times as many loops, it turns out to be larger, I have never had this before, probably the peculiarities of the yarn, so I decided to bend the edge to create a cavity for the lace . You don’t have to do this, but simply tie it with a 3 cm elastic band.
So we cast on our 88 loops on an additional thread and knit 5-6 cm.
So I knitted 20 rows, it turned out to be 5 cm, I thought that was enough

Then I dismissed the extra. thread placing loops on additional. knitting needle and knit 2 loops together (one from the main knitting needle, one from the additional one), I do this by simultaneously inserting the knitting needle into two loops


And then we knit until we have 14 cm (I make an adjustment to knit 12 cm), then we divide our loops into 3 parts, in the middle I leave 26 loops and on the sides we have 31 loops. I mark with markers, but inside the markers I leave not 26 but 24 loops since I will knit the outer ones alternately with the remaining ones at the edges.

That is, I knit the front row, reach the second marker and knit the next 2 loops after the marker together, then turn the knitting and knit the purl row (without knitting to the end of the row), reach the first marker and knit the next 2 loops after it, turn the knitting again and knit so until 1 loop remains at the edges of the marker.


We raise the loops along the edges of the hood; if there are more of them than needed for the neck, then in the first row you need to reduce them. Having knitted one or two rows, we begin to knit a sprout and raglan.
Now I will try the second version of the hood. I will use this http://www.stranamam.ru/post/9917213/.
To do this, I cast on 52 loops on an additional thread and knit a sprout and a little raglan, then I close the loops so that the knitting needles do not interfere with me and unravel the cast-on thread along the neckline. Since I will be making a cavity for the lace, in the next two rows along the edges I will add 4 loops, then I will fold the edge and sole it.
From the 4th row, I will knit 6 short rows along the edges of the hood. We knit the first 17 loops, wrap the 18th, unfold the work, and purl the 17 loops in the opposite direction. Then we knit 13 loops with facial loops, wrap the 14th, unfold the work again, knit back. Then we also knit 10 loops, wrap the 11th, knit back. We knit the row to the end, and do the same on the other side.
We knit in a height of 15 cm, then we divide the loops into 3 parts, into 19 22 and 19 loops, select the central 20 loops and knit, making decreases along the edges of the central 20 loops, as in the first version of the hood. We close the loops, tuck the edge and sew it.
I didn’t like the second option at all, it turned out very small, you need to either make a little increase before knitting the hood, or increase the neckline, according to my fittings for my friend’s six-month-old daughter, the depth of the hood should be at least 18 cm. I couldn’t take a photo, my son got there and dismissed.
I will continue to knit with a hood according to the first option, I liked this hood better, I’ll just make it a little smaller, it turned out a little too big, it turned out for ages from 6 to 9 months.
Well, I finally finished knitting the second jumpsuit.
As promised, I’ll tell you all the differences from the first one, except for the hood and zipper instead of buttons, the only difference is that I put the fastener down one of the legs. To do this, I first knitted the left leg as in the first overalls, and I knitted the second leg not in a circle, but in turning rows, observing the same decreases as in the left leg. This is what I got

Knit baby jumpsuitWe offer 3-6 months in our master class, in which the baby will be comfortable on a walk or on cool days. The overalls are knitted from soft fluffy yarn Alize Baby Soft (100% micropolyester), the knitted fabric is very soft and gentle, like foam.
To knit a jumpsuit you will need 4 skeins of yarn, 50 grams each, containing 115 meters of thread; circular knitting needles No. 3.5.
This fluffy yarn makes the knit almost invisible, like a sweatshirt, so knitting complex patterns is useless. For knitting the overalls, only garter stitch is used, in which only knit stitches are knitted into the front and back rows, knit stitches are knitted on the front side in stockinette stitch, and purl loops are knitted on the back side. The cuffs on the pants and sleeves are knitted with 1x1 rib, 1 knit stitch and 1 purl stitch according to the pattern.
The jumpsuit is knitted from the bottom up. First, the legs are knitted separately.
For trouser leg Cast on 38 stitches individually, work 4 cm in 1x1 Rib. Then continue with garter stitch, to widen the leg in the 1st and then in every 5th row, add 1 stitch after the first edge stitch. Note the places of additions in order to count the rows.
After 16 cm from the elastic for the crotch on both sides, bind off 4 loops, in the next row 2 loops and 1 loop each. Set aside the remaining leg loops.

Knit the second leg in the same way as the first. Transfer the stitches from both legs to circular needles and continue knitting in circular rows using stockinette stitch. To increase the back part, through two circular rows on the back part, knit back and forth shortened rows on the back loops. Work 6 short rows.

After 4-5 cm from the garter stitch, divide the stitches in the center of the front part and continue to knit in stockinette stitch in straight and reverse rows.

Knit the body of the overalls to a length of 20-23 cm. Then divide the loops into three parts - the right, left front and back. Knit each part separately, making decreases for raglan.
Knit the back, making decreases at the beginning of each row, on the front side knitting the first two loops together with the front one, on the wrong side - the first two loops together with the wrong side. When the number of loops is halved and the armhole height becomes 11-12 cm, set aside the remaining loops.
Knit shelves, making decreases across the row from the sleeve side, knitting the first two loops together. Having knitted the shelves to the height of the back loops of the shelves, also set aside.

Now tie sleeves. Cast on 34 loops, for the cuff, tie 4 cm with a 1x1 elastic band. Continue knitting the sleeve in garter stitch, making an increase at the beginning in the 1st row, continue to add a loop at the beginning of the row after the edge in every 5th row, and 10 cm from the beginning in every 7th row. Having knitted the sleeve to a height of 21 cm, start making decreases for the raglan. To do this, at the beginning of each row, knit 2 stitches together. When 10 loops remain and the raglan lines are the same length as on the shelves and back, set aside the remaining loops.

Knit the second sleeve in the same way.
On circular knitting needles, re-slip the loops of the fronts, sleeves and back, placing the loops of one and the second sleeve between the loops of the fronts and back. Next, for the collar strap, tie 2 cm with a 1x1 elastic band and close all the loops.

I took a description of the first toy that came across and knit faster! Already in the third row, it became clear that knitting from Alize Softy was not at all easy.
- Firstly, the thread stretches, you need to constantly adjust the tension.
- Secondly, the loops are not visible at all. You think there should definitely be 1 loop here, you knit a row, and at the end you end up with a couple of extra stitches. You loosen - you knit, accurately counting each loop.
- Thirdly, if you need to knit according to a pattern, then the edges of the parts are unclear due to the fluffiness of the yarn and are difficult to see.
Well, if you have tightened the loop and finished knitting, then it is impossible to find this final loop to unravel the part.
- interesting selection for the site!!!
- An introductory article to amigurumi knitting. Basic techniques and simple toys.
For those who have not yet learned how to tame fluffy yarn, such as Alize Softy, we are writing this article.
Be sure to count the loops in each row, as well as the number of rows themselves! For convenience, use a row counter or keep notes. Because then it is very difficult to calculate how many rows you have tied.

- When knitting, use markers! Without markers, it is very difficult to tie even a small part of a toy or clothing. It is the markers, i.e. there should be a lot of them:
- at the beginning of the row;
- in the middle of the row;
- at reference points;
- along the lines of additions or decreases;
- every 10 loops, for example.

Alize Softy yarn is very pleasant, inexpensive and rewarding; if you make friends with it, you can create many beautiful things!
Review of Alize Softy yarn
The price of one skein is approximately 70-80 rubles in stores in our city. It’s up to you to decide which hook to choose, it all depends on your knitting skills and density. I use hook number 3.5 for Alize Softy if I knit in one thread without adding smooth yarn.
The weight of one skein is 50 grams and for a bolero for a 6-7 year old girl it took me a little more than 2 skeins. Those. the price is very inexpensive. I really had to sweat a little, because... It was difficult not to make a mistake the first time and knit two identical armholes and sleeve caps. But the child really liked the bolero from Alize Softy.
Meter 115 m per 50 g, composition 100% micropolyester. Unlike Adelia Sofia, the yarn is thinner and softer.
What can be knitted from Alize Softy
First of all, very soft toys are knitted from Alize Softy. It looks especially good when combined with smooth regular yarn. There are several brown shades that are great for crocheting bears. Mint and pink shades are very delicate. You can also knit children's blouses, blankets, elegant vests, etc. Here are several examples of products from Alize Softy with and without descriptions.

Hello! My name is Tatyana. For the New Year I came up with this fluffy sheep. Already made a lot of them. Everyone asks for a diagram or description. So I decided to make Master Class for knitting this toy.

New Year Bear-Klaus. Work by Ekaterina Aleshina. Yarn “Alize Lanagold” (colors: red, black, white, yellow). Yarn “Softy Alize” is white. Hook No. 1.5. Sintepon filler. Bead eyes. You can also use any other yarn of suitable colors. Crochet bear, description sc - single crochet. HEAD: Knitting

To knit a toy you will need: ALIZE “Softy” yarn (100% micropolyester; 50g - 115m), white - 15g, red - 22g, pink - 11g. Knitted in one thread. Height - 30 cm (with ears). Hook No. 3. Description of the toy Legs and body. 1r
Hat - earflaps crochet

Threads Alize lanagold brown 100g (240m), BABY Alize Softy 50g (115m) - blue fluffy. Hook No. 4. Knitting description: Knitted in the round, starting with 2 ch. closing in a circle. then knit 6 sc in the round [=

Baktus with ties measuring 120 cm x 58 cm. Knitted from Lanoso baby alpaca 100% wool and Alize softy, hook 4. Yarn consumption: 2 skeins of 50 g/200 m main and 50 g softy. Knitting pattern
The bears are crocheted, height 24 cm. The bears are crocheted according to the same description.
Necessary materials:
- Yarn ALIZE Softy, color 119 (gray sky), one skein was enough for me.
- Yarn ALIZE Softy, color 55 (white), for the face.
- YarnArt JEANS, color 33 (blue) for embroidering seams and nose.
- Gray felt for patches.
- Filling (sintepon, padding polyester or holofiber).
- Hook No. 2.5.
- Beads for eyes (I have about 5 mm).
- Long needle for thread fastening.
Fluffy hippopotamus from Alize Softy, master class!
We will need:
- Alize Softy yarn (for those who want to knit in two threads - about two skeins or a little less, in one thread - less than one skein)
- or any plush yarn;
- yarn of a different color if you want to knit a girl;
- hook 3.5 (or the one that is convenient for you);
- sewn eyes;
- thread for embroidery of eyebrows;
- marker to mark the beginning of a row.

Crochet kit made from plush yarn for discharge. We start knitting with a blanket. We knit according to the pattern to the desired size. For me it is 85 by 85 centimeters. I knitted the blanket itself from Alize Softi yarn, crochet number 4. Then knit
Age 3-6 months.
Wool I knit with:
"Baby" blue 6 skeins of 50g and Alise Baby Softy white 2 skeins of 50g for sleeves and hood.
To decorate the “paws” I also used wool and blue acrylic.

Knitting pattern:
Back and front details
Start with booties and knit as one piece.
For the foot of the left booties on knitting needles No. 3.5, dial 37 loops and tie 1 row of faces. Mark loops No. 2 and No. 20 and knit faces. stitch, on both sides of the intended loops, performing 1 yarn over 3 times in each 2nd row = 49 loops. Then knit without adding 14 rows of faces. satin stitch Slip the first 23 stitches and the last 15 stitches onto a auxiliary needle and knit the remaining 11 stitches for the toe in garter stitch, knitting the last loop of the toe in each row with the first loop from the auxiliary needle 7 times. Resume all 35 stitches and work 6 rows in 1 x 1 Rib.
For the trouser leg, continue knitting with knitting needles No. 4 in garter stitch. After 17 cm, postpone knitting.
Knit the right bootie in the same way, marking out loops No. 18 and No. 36 for increases. For the toe, leave the first 15 loops and the last 23 loops on the auxiliary needle. Knit the pants in the same way.
On faces On the knitting side, combine the loops as follows: cast on 10 loops, slip 35 loops on the right leg, cast on 10 loops, slip 35 loops on the left leg and cast on 10 loops = 100 loops.
Continue knitting in garter stitch. After 20 cm from the beginning of the edge, divide the knitting as follows: 27 loops for the right front, 46 loops for the back and 27 loops for the left front.
Continue knitting 27 stitches on the right front, decreasing 1 stitch in every 2nd row for the armhole 14 times.
At the same time, to cut the neckline, 7 cm from the beginning of the armhole, first close 9 loops, then in every 2nd row 1 time 2 loops and 2 times 1 loop.
Knit the left front of the overalls symmetrically. Resume knitting 46 back loops, decreasing on both sides for the armholes in each 2nd row 14 times, 1 loop. Cast off the remaining 18 stitches and finish knitting at a distance of 47 cm from the booties.
This is what I have now. This knitted booties with trouser legs and moved on to continuous knitting of the front and back.
On knitting needles No. 3.5, cast on 25 loops and knit 8 rows with 1 x 1 rib. Continue knitting with knitting needles No. 4 in garter stitch, evenly adding 8 loops in the 1st row = 33 loops. To roll up the sleeves at a height of 16 cm, decrease 1 loop on both sides in each row 14 times and bind off the remaining 5 loops at a total height of about 26 cm.
Gathering + hood
Sew seams and sew into sleeve armholes. Along the edge of the neckline for the hood, using knitting needles No. 3.5, pick up stitches, leaving 8 loops of each front free and knit 6 rows with 1 x 1 rib. Continue knitting with knitting needles No. 4 in garter stitch. After 21 cm from the elastic, close all the loops. Sew the hood seam. Make 4 holes on the fastener bar of the left shelf for buttons (overcast 1 loop): the first - about 3 cm from the beginning of the edge and the last - about 1 cm from the top edge, distribute the rest evenly. Sew on buttons. Make a pompom and sew it to the hood.


Knitting density: 10 x 10 cm = 17 loops x 29 rows.
Since I will be making it with a zipper, I don’t need to make holes, I’ll just sew on a lock. As for the pompom, I still think it will most likely be without it. 

Since the question about knitting booties has arisen more than once, I’ll describe how I knitted booties, although without photos:
For the foot of the left booties on knitting needles No. 3.5, dial 37 loops and tie 1 row of faces. Mark loops No. 2 and No. 20 and knit faces. stitch, on the intended loops, performing in each 2nd row 3 times 1 increase = 43 loops. Then knit without adding 14 rows of faces. satin stitch My increase is as follows: from the marked loop I pulled out one new loop behind the back wall, and another one behind the front. Slip the first 20 stitches and the last 12 stitches onto the auxiliary needle and knit the remaining 11 loops for the toe in garter stitch, knitting the last loop of the toe in each row with the first loop from the auxiliary needle 7 times. That is, we divide 43 loops into three knitting needles: 20 + 11 + 12. We knit on the middle one, where there are 11 loops in garter stitch, and, having reached the end of the row, we knit the last loop of the row together with the loop on the adjacent knitting needle. And so 4 times or 8 decreases (on the left and right sides of the middle knitting needle). We should only have 35 loops left. From this point we knit as written in the pattern.
Note about shelves:
My zipper will not be open, but will be covered on top by a shelf strip. The result can already be seen below. And if someone wants a regular open zipper (i.e., one that is sewn to the strips of the shelves butt to joint), then the strips need to be knitted less: at the stage of connecting the legs and moving to the shelves with the back, we cast on fewer loops for the strips on the sides. I think it’s necessary instead of 10 pet. dial 5. Then you will get a joint into a joint without overlap.
Initially, it was planned that the overalls would be made with threads of the same color - blue, but there were not enough threads, so I had to buy another yarn. So you will get a combined jumpsuit (what a funny play on words): the sleeves and hood will be made of a more delicate white Alise Baby Softy bun. But I also think it will be good. You will get the feeling that a white blouse is peeking out of the blue overalls.
After 20cm I separated 27st. right shelf, and put the rest on an auxiliary knitting needle. I'm starting to knit the right front.

Finished the right shelf. I knit the left one in the same way.


Finished the shelves and back. I hid all the threads. I decided to connect the seams on the base of the overalls first, since I don’t need to do anything else with this part. Then I'll start working on the sleeves.
There wasn't enough crumbs for the back. I had to start adding Softy from Alize. But in the end it turns out beautifully.

On the back I knitted it in white with a double thread, since the threads are different in thickness.
I have now started knitting sleeves. I knitted a trial piece from a single thread of Softy. It turns out thinner than from crumbs. And the knitting density is 10 cm - 19 loops. I'll try to knit one sleeve now with a single thread and see if it makes a big difference. To do this, based on calculations, I cast on not 33 loops, but 37. I decided to knit without an elastic band, with fold-over mittens. Below we discussed the best way to make mittens. I haven't found any ready-made diagrams yet. So far I have settled on the option of knitting it separately and sewing it to the sleeve.


I knit a sleeve in stockinette stitch (knit 1 row, purl 1 row, etc.), as I looked at it - I like it better. And the scarf turns out to be a little ribbed.
Here for comparison:

I ended up with this sleeve:


I decided to knit in one thread. I will not bind. It turned out very tender and warm. In two - it will be rougher.

More details:
I knitted the mittens, which consist of the sleeve itself and the mitten.

I sewed the mitten to the sleeve on one side, decorated it, and will also make a button with a loop so that the mitten can be fastened on the unsewn side (otherwise it will constantly pull away from the sleeve):


I also decorated the feet: 

And thus I combined the two colors I used.
The next step is the zipper:
First, we sew the right half of the zipper to the right placket, but not edge to edge, but with an indent: 
Then we sew the left half of the zipper to the left placket, also indented:


Jumpsuit knitted They knit for young children, for toddlers, as a rule. Thanks to the knitted overalls, the mother can be sure that the child will not get caught anywhere, nothing will fall off, or get dirty anywhere. In addition, a knitted jumpsuit makes it easier and faster to dress a child in order to get ready for a walk. There are different variations and names of overalls. Some people call knitted overalls bodysuit, sandpiper. Overalls for children are knitted not only with knitting needles, but also with crochet. A combination of techniques is common.
A knitted jumpsuit looks good when combined with other products - booties, socks, hats.. Send a photo of the finished jumpsuit, a knitting pattern and a description.
Animal overalls
Another popular way to use onesies is to knit onesies for dogs (mostly, although there is nothing stopping you from knitting onesies for cats). Dog onesies will not only help your friend feel comfortable outside (especially if the animal is strictly domestic), but these products are simply fun. Remember that picture with the dog in a shark jumpsuit :) This opens up a whole lot of room for creative hands.