Do-it-yourself crochet rug from old things. Do-it-yourself rugs from old things. Pompom products
If you have gathered a lot of things that you no longer wear, I know where you can use them - make a rug from old things with your own hands! Here I will tell you in detail how it can be done: I will describe several techniques and attach photos. This idea seemed very interesting to me, since it is a pity to throw away old clothes, and giving them a second life in this way is quite pleasant and joyful.
So, the first technique that I would like to describe is the so-called "grandmother's" crochet patchwork rug. My grandmother had a lot of them. They can serve as bedding or as a chair cover.
It is made very simply: long strips are cut out of clothes, rolled into a ball and knitted with a thick crochet with ordinary single crochets.


If you sort the resulting "yarn" by color, you can create simple patterns on the product.
If you do not know how to crochet, then you can create a fluffy rug from old clothes.

For this we need:
- Base - mesh (for example, construction);
- Small scraps of clothing (20-30 cm in length, depending on the desired size of the weed);
- Hook;
- Scissors.
Everything is simple here. A piece of fabric is folded in half, pushed into the mesh cell and secured with a knot. Thus, the entire grid is filled.

It turns out a very soft and at the same time unusual rug. Here you can also experiment with colors.

If you still want to create a product in the style of "grandmother's", while not knowing how to crochet, you can use another method. One of them is a braided rug: an ordinary pigtail is woven from pieces of cut fabric.


Here's what happens.


Another option for creating such an interior element is the method using the usual hula hoop. First, with the help of strips of fabric, a cobweb is created, as it were, on a circle. Further in a circle, starting from the center, cut pieces of fabric are threaded into this cobweb. That's the way.


As you can see, making rugs with your own hands is not so difficult, while using old things, new useful accessories for the interior are created.
Photos taken from various sources on the Internet. Thanks to the authors of the photo for the ideas.
Good afternoon And again about rugs.
You can also crochet a rug for beginner needlewomen according to patterns from Japanese craftswomen, which are especially beautiful and at the same time very simple to perform.
How to crochet a square rug
Square rugs can also be knitted according to the principle of rectangular in reverse rows. But square rugs connected from the center in a circle look more interesting. They can be done  single crochet under the front wall of the loop or double crochet - as you like.
To get a square in each row, you need to increase in four corners as follows: two columns, two air loops, two columns.
In each next row in the corners, the hook should be inserted under the air loops.
In the same way, you can knit both a pentagon and a hexagon: divide the loops into the desired equal number and knit, making increments in the corners.
Octagonal crochet rug
I propose for example the scheme of an octagonal rug .


Crocheting a rug for beginners is not difficult at all, isn't it?
Crocheted rugs are not only a glorious good tradition of our grandmothers, but also a rapidly developing trend in modern room decoration. Do not underestimate round knitted rugs and consider them a relic of the past. Today it is one of the most popular items that many knitters are rushing to bring to life.
What materials are suitable for knitting rugs
Rugs, rugs, and rugs come in a wide variety of shapes and configurations, but this article will focus on how to crochet a round rug for beginners. This activity is not difficult, although it requires certain investments: time, attention and materials.
What is suitable for the manufacture of such a product:
Techniques that are used to make rugs
It is worth deciding on the technique to be applied in advance, as this will significantly affect the choice of materials. You also need to plan the dimensions of the canvas before crocheting a round rug. For beginners, it is better to choose a small product.
You can tie the rug like this:
- Simple circular expanding rows.
- With laying a volumetric cord inside the row.
- Openwork pattern.
Any of these methods opens up great opportunities for creative natures. Since there are no hard and fast rules, you can safely improvise.
The simplest rug
Using jute twine is the fastest way to make rugs.

Here you can use almost any scheme of a circular fragment: solid or openwork.

The latter always look more attractive. They are a little more difficult to manufacture, but the effort paid off.
Semicircular carpet
Knowing how to crochet a round rug for beginners can come in handy for making semi-circular rugs as well.

Such specific products are extremely convenient for placement on steps or near the door. Of course, they should not be laid under the front door, otherwise they will quickly become unusable, but in a room such as a bedroom, they are in the right place.
To knit such a rug, you will need a thick thread or twine. You can work according to the scheme, which is above.
Sequencing:
- The beginning is a chain of air loops (VP) in the amount of 7 pieces, plus 3 VP for lifting.
- Further, 2 (CCH) are performed in each loop, only 1 CCH in the first, since the lifting loops play the role of the second.
- For the second row, you will also need 3 VPs to lift. Next, in the dc of the previous row, 1 dc and 1 VP are knitted, repeat this sequence until the end of the row.
- 3 VP, a magnificent column of three loops with a crochet (PS) and 1 VP, repeat to the end of the row, except for lifting loops.
- 3 VP, 1 CCH is performed in the upper part of the PS, the same as in the VP.
To continue knitting, alternate the fourth and fifth rows. The canvas is increased to the desired size and strapping is performed: 3 CCH with a common base, pico of 3 VPs, 3 CCH in the same base loop. It turns out pointed "bushes". You can skip this step if you wish. Then the rug will turn out with a smooth edge.
The described method is suitable for making a round rug: it is enough to double the number of loops and columns, starting from the first row.
Knitting with lining
A unique and very interesting technique can be great for those who want to know how to crochet a round rug for beginners. This method allows you to create quite dense rugs. Each of their rows is characterized by increased density due to the fact that a cord or jute twine is laid inside it.

Working in this technique is as easy as shelling pears: from the beginning of the first row, bring the cord to the knitting and wind the hook behind it before grabbing the thread to form a single crochet (RLS). To prevent the lining from showing through, you need to use a thicker thread on the front side of the knitting product. This is worth thinking about before crocheting a round rug. For beginners, the pattern of such a rug may be the simplest: for example, the third motif in the first row in the figure with round patterns. Rows alternate here, in which additions are made (at 12 points) with rows of even knitting. You can apply the expansion method, in which additions are made in each row, but at six points.
How to crochet a round rug for beginners from rags
First of all, you should make sure that such a product does not look old-fashioned and dull. It is better to use the material of one color or several, but similar in tone.

Excessively variegated colors invariably evoke an association with grandmother's knitting from the remnants of various shreds.
The secret to how to crochet a round rug for beginners from rags is to carefully connect their edges. The photo shows that the ends of the textile strip are superimposed on each other and sewn with a blind seam. You can also just tie the edges and leave the ponytails inside out, but this method is not very aesthetic.
Knitting rugs is performed with large hooks. The best recognized wood and bamboo. They are lightweight and durable. As a rule, you have to use a tool no less than No. 6, No. 8 or even No. 12.
All these methods are suitable for making a home rug. Using unfamiliar methods and materials may require training and experimentation. For example, testing the knitting method with lining before crocheting a round rug for beginners. The photo depicts only the simplest linear method, but you can also diversify knitting: perform some rows by tying a cord, leave others flat. If you use a thread of different thicknesses, you can achieve an impressive relief of the canvas.
However, in any case, it should be remembered that the rug is designed to be walked on. This means that it should be comfortable and completely exclude the possibility of falling. The leg can catch on volumetric patterns or large holes, so such elements should be used carefully and moderately.
Finally crocheted a rug in the hallway from rags. I am not an active knitter. But I so wanted to attach things that no one needs now. I regret throwing away. But I knitted a rug and rejoice like a child. Very nice and cozy now in our hallway.
In it, enjoy!
I will not hide, weighed down by other worries, I knitted for a long time. Started in the summer. In her free time at the dacha, she cut strips from unnecessary things and wound them into balls. having no experience. I cut strips of 2-3 cm, depending on the fabric.

By late autumn, I had a whole basket of balls with strips of fabric for knitting a conceived patchwork rug

Trial square for a crochet rug
A trial square for a crocheted rag rug seemed rough to me. I divided the strips in half again and knitted a new square. The result made me happy. The dimensions of the square turned out to be the standard size of a patchwork block - 32x32 cm. It turned out that this size goes well with the floor tiles in our corridor. Everything grew together and I started knitting squares. Some stripes ended earlier than I would like. I had to pick other, similar colors. And in some I added a thread of yarn of the desired color in order to fit at least approximately the first sample. And I succeeded!
In the process of work, I realized that cutting strips in a circle was not convenient. The seams are unraveling. It is better to cut strips from cut pieces back and forth.
To make it even more important, I made a video
Tied squares. For watching the evening series, it turns out to connect one square.
It turned out that there are several options for their connection to each other. Since even the mistakes are more visible in the photo, I did just that - I photographed different layouts of squares for the rug.
If you are interested, see the photos in our group
We will send the material to you by e-mail
It is no longer fashionable to go and buy something at home: now manual labor is appreciated. For those who want to update the decor of the room and buy a brand new rug, the editors of the site suggest not to spend money, but to make a do-it-yourself rug from old things.
Weaving can be done in several ways.
What kind of rugs can be made, and, most importantly, from what? The main material with which it is easy and pleasant to work is old T-shirts.

Craftsmen got the hang of crocheting a rug from old T-shirts using a hula hoop as a base, using a base mesh.It's a simple matter: collect more T-shirts of the desired color. This is not difficult to do, since there will always be a few things that are no longer worn. Or maybe friends will find a warehouse of old T-shirts.
Is it possible to crochet a rug from old things, and how to do it?
On an autumn evening, you can have a good time doing a soothing activity - knitting. And if you combine this process with making a rug for your favorite room, it becomes doubly pleasant and interesting.
What is useful for crocheting rugs from old things
Before announcing the list of items with which you can start knitting, let's take care of the presence of yarn. Our yarn is not simple, but ... T-shirt.

Preparing yarn: ruthlessly cutting through old T-shirts.First, the seam is cut from the bottom, then a strip of about 2 cm is cut from the side seam to the opposite, but not completely, and not reaching 3 cm to the edge. It is necessary to cut the entire fabric in this way to the armhole line.
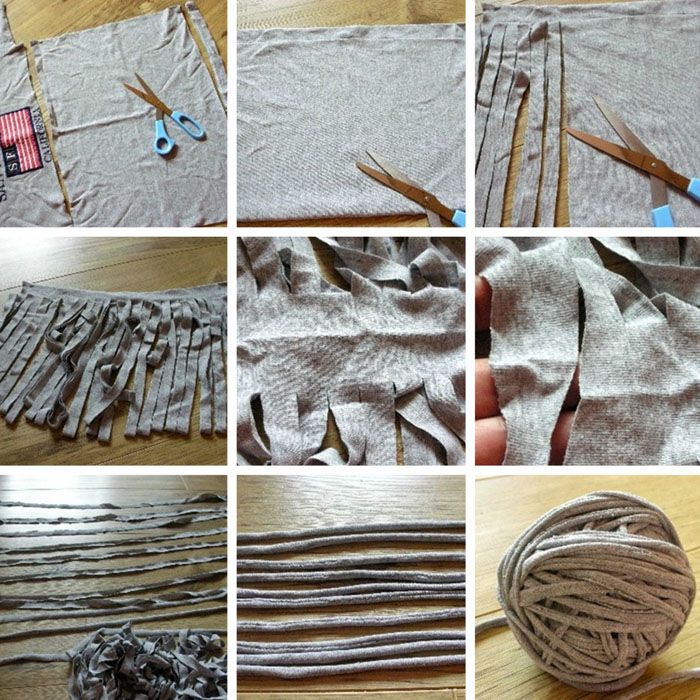
| Illustration | Action Description |
|---|---|
 | T-shirts are cut into long ribbons about 5 cm wide. For convenience, it is better to wind the ribbons into balls. |
 | Having fixed three strips in any way, they begin to weave an ordinary braid. As soon as the strip ends, it is either sewn on or a new one is tied. You should get a long, long braid. |
 | The round shape is made by simply twisting the pigtail around its center. Neighboring rows are sewn manually or on a typewriter. |
 | If desired, you can make an oval shape, and choose a zigzag stitch and a needle for knitwear. |
Advice! At each turn, you should not pull the pigtail too tight, it can give a curvature in the finished product.
Let's make a rug from shreds with our own hands?
Remember how in childhood they loved to play with shreds, or just cut paper or fabric? You can again plunge into childhood, and even with benefit: you can make great things for the home out of scraps. For example, it can be patchwork rugs from old jeans, or a fluffy shaggy product that will decorate the floor and please the legs.

What do you need to work
The process will require a dense base (it is better to take burlap), a lot of shreds from old things, threads, a needle, fabric glue, adhesive tape.
How to sew?
To sew a carpet from old things with your own hands, they first spend time cutting pieces of fabric, T-shirts, knitted pants.

The first row of shreds is laid out on the canvas, placed parallel to the edge of the base. One edge of the row is fixed with adhesive tape, and in the center it is sewn on a typewriter with a regular seam. The next row of shreds is laid out close to the first, in the same way fixing the entire edge of the laid strips with tape and sewing in the middle on a typewriter.
Laying out each row, the previous ones are thrown aside.

The carpet gets its own personality through the selection of colors, the length of the patches and the frequency of laying out the rows.
How to make a do-it-yourself rug from old things on a grid
If you really want a beautiful fluffy rug, but you don’t have a sewing machine, you can use either a building net or a soft bath rug as a basis.

Making your own hands on a grid rug from old things step by step
Armed with a mesh, crochet, shreds and scissors, they get to work. If there is an idea associated with the pattern, then marks are made on the grid with a marker of the desired color. In this case, begin to tie the strips according to the color markings.

If you sew patches on a typewriter, they will stretch out, it will be more convenient to work off


The essence of the work is clear: the grid is alternately filled with strips of fabric, tied on the front side.
Making a do-it-yourself rug from old belts: photos and diagrams
How to make a rug out of belts with your own hands, if there are plenty of them?


It will take about 12 leather belts to make such a rug. Taking genuine leather or leatherette is a master's business. To work, you need a perforator for leather or an awl, twine.

Along the edges of the straps, you need to make holes in increments of 2-3 cm and retreat about 0.5 cm from the edge. Belts are sewn with twine in random order. Instead of a rope, metal staples are sometimes used.
How to make a rug out of wine corks
Almost everyone drinks wine, and corks, unlike bottles, are not thrown away, but folded for no reason. Here, to make it clear, we propose to make an excellent durable rug out of cork stocks.


Since bacteria cannot grow on such material, this is a chic option for the bathroom. In addition, it is an additional massage for tired legs.
In order to make such a massage rug, they take 160-180 wine corks, glue, a base (you can take a ready-made rubber rug, thin plastic), a knife, coarse-grained sandpaper, and a cutting board.
The plugs are washed with warm water, preferably with the addition of soap. If they are stained with red wine, it is best to soak them in bleach water for a few hours.Clean corks are cut exactly in the middle into two parts with a knife and a board. Sandpaper is needed to align the cuts.
Advice! It is better to cut the cork in a vertical position.
