Amigurumi starfish crochet patterns and description. How to knit a star on five needles in one evening. New Year's star: video mk for beginners
For knitting stars shown in photo 1, on a sliding loop you need to dial 5 tbsp. single crochet and close the row with a connecting post.
Scheme 1. Knitted on 5 loops of the base circle.
Photo 2 shows asterisks with very long thin rays. This type of starfish is also found in nature.

Photo 2. Starfish with thin rays tied on 5 loops of the base circle.
For knitting nautical stars shown in photo 2, we, as in the previous case, on a sliding loop we collect 5 tbsp. single crochet, close in a ring connecting column and we knit 5 rays of an asterisk on each of the 5 loops of the previous row, with the only difference being that the ray in this case is longer and is 11 in. p. See diagram 2.

Scheme 2. A starfish with thin rays, connected on 5 loops of a base circle.
In photo 3 we see the classic starfish a little bigger size, connected on 10 loops of the base circle.

Photo 3. Slightly larger starfish, knitted on 10 loops of a base circle.
IN starfish shown in photo 3, for each ray there are 2 loops of the last row of the base circle. That is, in the last circle of the middle of the asterisk there should be 10 loops, which we will go to according to the description below.
Recruiting for sliding loop 5 st. without a crochet, close the circle with a connecting loop and knit the second row in 2 tbsp. without nak. in each loop of the previous row (do not forget to make 1 ch at the beginning of the 2nd row), in this way we get 10 loops, on which we already knit the rays of our new asterisk (see diagram 3). In this pattern, the beginning of knitting star rays located at point A.

Scheme 3. Starfish, connected on 10 loops of the base circle.
Let's try to connect asterisk more bigger size (see photo 4).

Photo 4. Starfish, connected on 15 loops of the base circle.
At stars, shown in photo 4, for each ray there are 3 loops of the base circle of the previous row.Obviously, for this, in the last row of the base circle of our future asterisks there should be 15 loops. This number of loops can be reached as follows:
1 circle - on sliding loop we collect 3 tbsp. without nak. and connect the beginning and end of the circle connecting post (as in previous cases, only the number of loops is different);
2 circle - 1 c. p.p., 6 tbsp. without nak. (i.e., 2 tbsp. without nak. In each loop of the previous row), conn. a loop;
3 circle - 1 c. p.p., 12 tbsp. without nak. (i.e., 2 tbsp. without nak. In each loop before), at the end of the row, we connect the beginning and end of the connection. column;
4 circle - 1 c. p.p., 15 tbsp. without nak. (i.e., 2 tbsp. Without nak. In each 4th loop of the front row, so we added 3 loops missing up to 15), at the end of the row - connection. column.
Knitting like this base circle : the middle of our future starfish , we will get the 15 loops we need in the last row. Now we can start knitting 5 star rays according to the diagram below 4.

Scheme 4. Starfish, connected on 15 loops of the base circle.
Finally, let's connect embossed voluminous starfish crochet (see photo 5).

Photo 5. Relief volumetric starfish.
Photo 5 shows embossed starfish crochet, which is very close to the original, thanks to the spikes along the edge and in the center of each of the five rays.
The general principle of crocheting this asterisk is the same as all of the above.
However, for knitting spikes in the center of each beam, it is necessary that the beam itself be wider and have, as it were, a pronounced axis of symmetry. Therefore, if in previous cases, when knitting a star beam, we tied a chain of air loops on one side, using ever higher columns (see diagrams 1-4), then in the latter case we will tie a chain of air loops on both sides.
Stage 1 - we knit a flat base of a five-pointed star, using the description of the knitting of the middle and the knitting pattern for the rays (see diagram 5)
Stage 2 - we knit spikes in the center of each ray of our asterisk;
Stage 3 - we tie our asterisk around the perimeter as well, making spikes.
Stage 1. We knit a flat base of a five-pointed star.
I calculated the loops from the considerations that at the base of each ray there should be 5 loops: 2 loops for the left side of the ray, 1 loop for the axis of symmetry, along which the row with “spikes” will pass in the future, 2 loops for the right side of the ray asterisks.
We knit the basis of our five-pointed star - a circle according to the principle of knitting a round shape in rows (see. Circle, knitting a circle in rows), using the description below:
1 row - on a sliding loop we knit 5 tbsp. without nak. connect the beginning to the end of the circle conn. Art.
Note: It is not necessary to start knitting with sliding loop . If you haven’t “made friends” with her yet, you can have a very small ring of 3-4 ch. (or made by winding 3-4 turns of thread on a pencil) tie the 5th tbsp. without nak. However, with the help sliding loop small rings fit faster and more accurately;
2 row - 1 in. p.p., 10 tbsp. without nak. (2 tbsp. without nak. in each loop of the previous row), conn. a loop;
3 row - 1 in. p.p., 20 tbsp. without nak. (2 tbsp. without nak. in each loop of the previous row), conn. a loop;
4 row - 1 in. p.p., 20 tbsp. without nak., conn. a loop;
5 row - 1 in. p.p., 25 tbsp. without nak. (2 tbsp. without nak. every 4th loop of the previous row), conn. a loop.
As a small digression, I would like to note the “huge”, so to speak, role of the small, inconspicuous connecting post or, as it is also called, "connecting loop" or "deaf loop" ) when crocheting.
Of course, this loop, first of all, serves to connect the beginning and end of the row when knitting in a circle, thus justifying its name.
However connecting loop, at its core, it is almost a chain stitch, which was used a very long time ago for embroidery on fabric, and not being a column, it can perfectly follow the contour of a product or some kind of pattern.
This property connecting loop or "blind loop" Can be used very well when crocheting for decorative trimming of a knitted fabric or for “traveling” along the fabric in order to continue knitting in another place without tearing off the threads. What we will do now when knitting each of the 5 rays of our very original starfish.
So, knitting the fifth row base circle our asterisk according to the above description, we got 25 loops along the contour, and ended up at point A (see diagram 5).

Scheme 5. Marine three-dimensional relief star.
The next 5 loops of the previous row (section AD) will be the basis of the first ray of the star. With the help of 3 connections. loops we find ourselves at point B, in the 3rd central loop, on which we will tie a chain of 11 c. n., which will be the axis of symmetry of the star beam. Having knitted 11 c. etc., we find ourselves at point C (see diagram 5).
So, knitting the fifth row base circle our asterisk according to the above description, we got 25 loops along the contour, and ended up at point A (see diagram 5). The next 5 loops of the previous row (section AD) will be the basis of the first ray of the star. With the help of 3 connections. loops we find ourselves at point B, in the 3rd central loop, on which we will tie a chain of 11 c. n., which will be the axis of symmetry of the star beam. Having knitted 11 c. etc., we find ourselves at point C (see diagram 5).
Now our task is to tie this chain on both sides so that we get a symmetrical beam of an asterisk expanding downwards. To do this, first we knit a chain from the near edge according to scheme 5, thus returning from point C to point A and joining the beginning with a connecting loop. Then using the same conn. loops rise to point C, we knit to turn 1 tbsp. without nak. at point C.
Let's move on to the 2nd stage: we will tie embossed spikes in the center of each of the 5 rays.
Each row with spikes for each ray is knitted separately, that is, before knitting a new row with embossed spikes, the thread breaks, then you will understand why.
From the center of the asterisk O (see diagram 5) we lay connecting loops the path to the extreme point of the first ray C (the thread from the ball under the sprocket canvas is important!). It turns out 13-14 loops. This track from Comm. loops and is axis of symmetry our ray. We bend our ray along this path and knit back with single crochets to the center O, doing on each 2nd or 3rd loop "Pico from the 3rd c. P.". These "pico" and are "thorns" our starfish . Quantity "pico" that create the effect embossed "spikes" it should not be the same on each ray, because with a natural star, if you look closely, everything is quite chaotic!
Note that when we return along the path with Art. without nak. , then the thread is no longer under the canvas , A over it . And for laying "tracks" from connecting loops from the center O to the top of the next ray, for example, to point F, the thread from the ball should be under the canvas . Therefore, in order to start knitting a relief track with spikes for the next ray, the thread must be cut off!. You will feel it yourself when you do this work directly in practice.
So, the thread was cut off, and from the center O to the top of the next ray point F (see diagram 5) we knit the connection. columns (13-14 columns) track, bend the canvas along it and back also return to the center of the asterisk (point O in diagram 5), knitting each loop of st. without nak., making on the 3rd or 4th loop the element “picot from the 3rd c. P.). Having reached the center O, we break the thread. Let's start tying the next ray. Etc.
After decorating all 5 rays with embossed spikes, we can say that 2nd stage knitting of our slatted starfish, finished!
Let's move on to 3rd stage of knitting our asterisk, which consists in tying an asterisk along the contour with "thorns".
To do this, we tie our asterisk around the edge connecting posts , also doing "pico" on every 3rd, 4th or even 5th loop.
Having finished the design of the asterisk, we cut off the thread and hide it from the wrong side.
So the most complex marine relief star is ready! Although, if you figure it out - nothing complicated. A little troublesome.
Having understood the simple principle of knitting an asterisk, you can create your own by inventing new shapes and proportions, varying the ratio of the size of the circle diameter and the length and number of rays!!!

A crochet crochet star is a simple product, but at the same time an interesting and versatile item. In the shape of a star, you can make a soft toy for a baby, a napkin on a table or a rug on the floor, a blanket, a Christmas tree decoration and a huge variety of other options. Thus, having spent quite a bit of time and effort, you can create a beautiful and useful masterpiece with your own hands.
Christmas tree decoration "Star"
A bright star crocheted from motifs of different colors will become a worthy decoration for a New Year's beauty. As it rotates, its faces change colors. If the lower faces are not connected, then the star can be put on the top of the Christmas tree, where it will become the main decoration.
So let's get started. For work we will need:
- some mercerized cotton yarn in three colors;
- remnants of white or silver yarn for tying;
- hook number 2.
First, we need to connect 3 motives according to the scheme.
And then starch them to keep their shape.
Fold the motives, and tie their faces with a white thread with a single crochet.
In the upper part, tie a chain of air loops and close it into a loop.
The decoration is ready.
New Year's star: video mk for beginners
Soft crochet starfish
A voluminous soft crochet star can serve as a toy for a baby, a piece of furniture or a needle case for a needlewoman.
For work need to cook:
- remnants of blue yarn;
- hook with the corresponding number;
- filler.
We need to connect two circles. To do this, crochet 2 air loops, and then:
1r. - 6 tbsp. b / n in the second loop, (6);
2r. - 6 times we perform an increase, (12);
3r. - repeat the pattern 6 times (1 tbsp b / n + increase), (18);
4r. - 6 times (increase + 2 tbsp b / n), (24);
5 p. - 6 times (3 tbsp b / n + nailing), (30).
In the first circle, the working thread must be fixed and cut, and we continue knitting with the thread of the second circle.
Now we turn to knitting rays. To do this, in the first row in the second circle, we perform 7 tbsp. b / n, after which in the first circle we do 7 tbsp. b/n, (14)
In the second row from 1 loop in the second circle - 5 tbsp. b / n, decrease, 5 tbsp. b / n, decrease, (12)
3r. - decrease, 4 tbsp. b / n, decrease, 4 tbsp. w/n, (10);
4r. - 3 tbsp. b / n, decrease, 3 tbsp. b / n, decrease, (8);
5r. - reduction, 2 tbsp. b / n, decrease, 2 tbsp. b/n, (6).
Fasten and cut the working thread, and pull off the loops.
We fasten the thread to the extreme loop of the previous ray of the first circle
And then we knit in the second circle
14th Art. b / n do instead of attaching the thread.
We also knit the remaining rays - constantly capturing the extreme loops of the previous beam. When knitting the latter, we capture the extreme loops of adjacent rays
The shape and length of the rays can be adjusted. For example, if you make a decrease through a row, then they will be narrower and longer, and if there are 4 decreases in a row, then they will be short and plump.
Master class crochet pillow in the shape of a star
A gentle and soft star will be a worthy decoration of the interior in your home, or will become an original gift for friends and relatives. Knitting a pillow is not difficult, even beginner needlewomen can easily cope with this task.
What we will need:
- finished fabric yarn;
- suitable hook;
- patches of quilt / felt / felt;
- filler.
For knitting, it is better to use yarn of the same thickness. But if, suddenly, it is thicker for one side and thin for the other, the final size of the finished part will be adjusted by the number of circles. After each row, the yarn should be pulled out so that the fabric is even and does not twist.
So let's get started. We start knitting from the central part of the star.
1r. - we collect 3 ch, we perform 9 double crochets into it, and then we connect (connect with a column) and tightly tighten until it is completely closed.
2r. - again we dial 3 ch, in the next loop we make 2 columns with a crochet and continue to perform 2 dc in each loop. At the end of the row we do 1 dc in the next. loop and connecting column in the 3rd ch.
3r. - 3 ch, 9 * (1 dc in the next st, 2 dc in the next st). Next, 1 dc in the next st, 1 dc in the last loop. We finish the row with a connection column in the 3rd initial ch.
4r. - 3 ch, 9 * (1 dc in the next 2p, 2 dc in the next p.). Then, 1 dc in the next. 2p, 1 dc in the last p. Finish a series of connections. Art. in the 3rd initial v.p.
5r. - 3 ch, 9 * (1 dc in the next 3p, 2 dc in the next p.). 1 dc in the next. 3p., 1 dc in the last. p.
6r. - 3 ch, 9 * (1 dc in the next 4p, 2 dc in the next p.). 1 dc in the next. 4p, 1 dc in the last p. Connect.st in the 3rd initial v.p.
We do not cut the working thread.
We turn to crocheting the first beam.
1r. - we do ch 3 from the end of the 6th row. Then - 1 column. with nak. in the next 11 loops. We unroll the product.
2r. - we perform the connection. Art. in the 2nd loop from the hook and ch 3 Next - 1 column. with nak. in the next 9 loops. We unfold the product again.
3r. - Comm. Art. in the 2nd loop from the hook + 3ch. 1 pole. with nak. in the next 7 loops. Turn.
4r. - Comm. Art. in the 2nd loop + 3ch Then, 1 column. with nak. in the next 5 loops. We turn the canvas.
5r. - Comm. Art. in the 2nd loop + 3 ch Then, 1 pillar. with nak. in the next 3 loops. Rotate the canvas again.
Now let's do the rest of the rays.
1r. - we make a standing connecting column, as shown in the figure, in the next stitch (3 air loops) of the previous beam. Then, we perform 2 air.pet. and 1 pole. with nak in the next 11 pet. We develop the product.
3r. - Comm. pillar. in the 2nd pet. from hook. 3 air. pet. 1 pole. with nak. in a trace. 7 pet. We rotate the product again.
4r. - Comm. pillar. in the 2nd pet. from hook. 3 air. pet. 1 pole. with nak. in a trace. 5 pet. Turn.
5r. - Comm. pillar. in the 2nd pet. from hook. 3 air. pet. 1 pole. with nak. in a trace. 3 pet. Turn.
6r. - Comm. pillar. in the 2nd pet. from hook. 3 air. pet. 1 pole. with nak. in the same loop as 3 air. pet. And next. loop - 1 column. with nak. Cut the thread, fasten the end.
edging. We start with the base of any beam. We make 1 standing connecting st-to. Then, 13 connecting stitches are performed evenly up one side of the beam. 3 air. loop 13 connecting studs evenly down the other side of the beam. Thus, we tie the remaining beams and connect them with the first connecting column. Fasten the thread, cut it, and hide the tail in weaving.
Assembly. So that the filler does not “leak” through the holes in knitting, we use patches of a quilt as a lining (or felt, felt). We cut out stars from the lining material, which correspond in shape and size to our connected ones. The color of the lining should be taken into account, it should not contrast with the yarn. For example, white felt is more suitable for a light thread, and felt is more suitable for a dark one.
We will connect all the layers in this order - star, lining, lining, star.
We start with any stitch. We make 1 standing connecting stitch through 2 inner loops of each stitch
We make 1 such stitch in each loop until one beam remains. We stuff the pillow with filler between 2 layers of lining fabric.

Summer, sunshine, fresh breeze, the sound of the warm sea... And, of course, smooth pebbles and starfish are indispensable attributes of southern travel :-)
Today, together with designer Yulia Kolbaskina, we will create a wonderful summer decoration - knitted earrings "Starfish". Heady sound of the sea in our ears ;-)
.We will need:
light colored cotton thread
small beads to match (35 beads per earring)
2 fasteners
appropriate size hook
pliers. 
1 row:4 air loops (VP in the future) close into a ringlet
2 row:5 single crochet (SC in the future)
3 row:10 sc (2 sc in each loop of the previous row). After every 2nd sc, advance the bead..
4 row:for one tip of the star, knit *[ 1 sc + 6 ch + 5 sc (advance the bead after each single crochet) + sc]. Repeat 4 more times from "*".
5 row:for one tip of the star, knit *. Repeat 4 more times from "*".

6 row:tie the entire asterisk entirely next to the RLS.


assembly:)
Carefully hide the threads. Make a mixture [PVA glue + water] in a ratio of about 2: 1. Soak the workpiece in this mixture. Stretch, shape and dry flat. You can dry it on a sponge by fixing the tips of the star with needles.


Star earrings are ready! Wear with joy!
Luxurious piece of furniture - a pillow in the form of a star, knitted.
Consider the example of knitting a pad for 108 loops. She gets pretty small. If you want more - take thicker yarn. And below you will find a video tutorial with calculations for knitting such a pillow for 220 loops.
So, we collect 108 loops and distribute them on six knitting needles. It turns out 18 loops on each knitting needle. then we close the spokes with a ring. Knitting such a pillow is similar to knitting socks or mittens. Now you need to knit in a circle. Star knitting pattern:  We knit 7 loops with facial knit and make a broach: remove 2 loops on the right knitting needle (we start the knitting needle under the loops on the left).
We knit the next loop with facial knitting. We stretch this front loop through 2 removed loops. We leave the removed loop on the right knitting needle.
The number of loops has been halved, and if we count the decrease in loops along the entire row, then it will be 12 loops. In the place where we make broaches, a beautiful convex pigtail gradually forms, dividing the beam into 2 halves.
After the broaches, we knit 7 LP (facial loops), and we knit the remaining loop with purl. We distribute the loops on six knitting needles  3 row: we knit 6 loops with facial knitting, we make a broach and we knit the remaining loop as a purl. We stretch the front loop through the two removed
 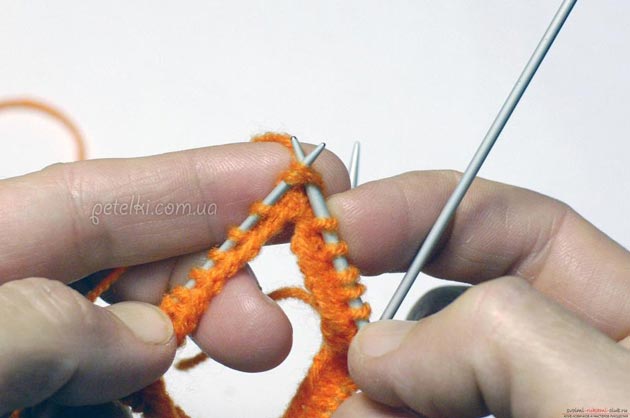 Leave it on the right needle
  The number of loops is reduced by two
Third row 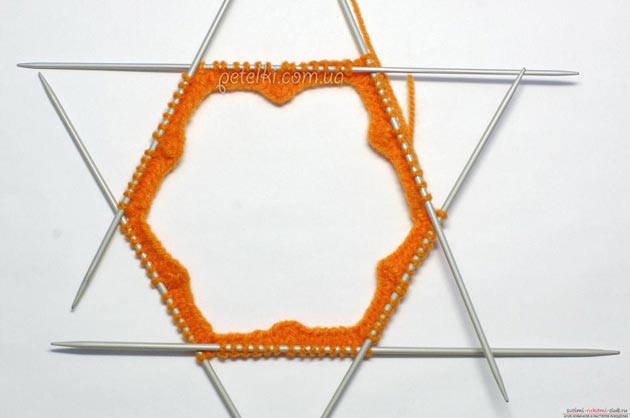 4 row: we knit 5 facial loops, make a broach and knit the last loop with a purl. Fourth row
  5 row: we knit 4 facial loops, make a broach and knit 1 purl loop. Fifth row
  6 row: we knit 3 loops with facial knitting, we make a broach, we knit 3 loops with facial knitting and 1 loop - purl. Sixth row
  7 row: we knit 2 loops with facial knitting, we make a broach, we knit 2 facial loops and 1 wrong side. Seventh row
  8th row: we knit 1 loop with the front viscous, we make a broach, we knit 1 front and one purl loop. Eighth row
9 row: behind the first two loops on the left we draw a knitting needle and transfer them to the right side. Now we knit a front viscous loop and draw it through the two removed ones. Knit the next stitch in purl stitch. We knit the remaining two loops like this: we make a broach and knit with a purl. At this stage, there is a high probability of loops jumping out of the knitting needles. To facilitate work, you can divide the loops on three knitting needles.
Ninth row  Tenth row
  10 row. We knit one front for two loops.
11 row. We repeat: we knit two loops with one front. Eleventh row  We tighten the loops that remain on the knitting needle to the middle, hiding the end inside. We tighten the loops
It remains to tie the second half of the pillow and sew them. You can use a synthetic winterizer as a filler (but do not overdo it, it is better not to stuff too much so that the pillow is soft). finished sprocket 
We will crochet an asterisk for slingo-beads, but you can use it as a brooch or a Christmas tree toy.
We will need:
Yarn red and blue;
- a hook of a suitable size (No. 1.0-1.3);
- filler (fleece);
- tapestry needle;
- and a bit of time.
From red yarn, we begin to knit the middle of the future asterisk:


We knit the main ring from the loop, tying it 5 times with single crochets (st. b / n.);
1 row: * knit 2 tbsp. b/n. in each loop of the previous row * (increase). repeat 5 times from * to * [= 10 tbsp. w/n];
2 row: * 1 tbsp. b / n., increase *. repeat 5 times. from * to * [= 15 tbsp. w/n];
3 row: * 1 tbsp. b / n., 1 tbsp. b / n., increase *. repeat 5 times. from * to * [= 20 st. w/n];
4 row: * 1 tbsp. b / n., 1 tbsp. b / n., 1 tbsp. b / n., increase *. repeat 5 times. from * to *[= 25 st. w/n].
Now, on the vertices of the pentagon (mine looks more like a circle), we need to connect the rays:


We knit a chain of 8 air loops (ch);
1 row: knit 1 ch, skip 1 loop in the previous row, * 1 tbsp. b / n *, repeat 8 times from * to *;


Similarly, we knit the next 4 beams, we knit the transitions between the beams using st. b / n .;
2 row: we tie the formed rays of art. b / n., at the top of each beam we make an increase. (i.e. we knit 2 sts b / n, in one st b / n, of the previous row)


3 row: we tie a star with blue yarn st. b / n .. Our top part of the starfish is ready. We knit the lower part of the starfish with a blue thread, just as we knitted the upper part, but not the color of the yarn.
We connect both parts with blue yarn with a connecting column, but not completely.


To make our star become voluminous, we fill it with fleece. Why fleece? Fleece will not be able to get out, unlike synthetic winterizer, after washing and will not get into the baby's mouth.

Then we complete the connection, mask the end of the thread.
Optionally, you can make small French knots with blue yarn on the upper red part of our starfish or, if you are not making it for a baby, decorate it with beads, beads.
Our starfish is ready.