Step-by-step execution of a stalk seam. Stem Stitch: Video Tutorials in Drawing with Threads Stitch Stitch Pattern for Beginners
For lovers of satin stitch embroidery, we suggest mastering a simple, but very important stem stitch for such embroidery, step-by-step video tutorials will help you figure out the details. The stem stitch is the main contour stitch in satin stitch embroidery. This type of embroidery is one of the brightest and most beautiful of all known. This art has been perfected for thousands of years and originates in the East.
In order to learn how to embroider stitches correctly and beautifully, you need to perfectly master the technique of basic seams. Let's take a closer look at the stem seam.
Learning to embroider a stem stitch: video tutorials for beginners
We offer you to watch a video master class that will help beginner needlewomen get acquainted with the features of beadwork with a stalk stitch.
Detailed instructions for making this seam in the video master class will clearly show the intricacies of embroidery.
Instructions for performing a stalk seam.
It is believed that this is one of the oldest seams. Very textured seam. They embroider all the elements of floral motifs: stems, leaves and petals, branches, which is what owes its name to.
Stem can be made with ordinary threads, beads and ribbons. It is necessary for embroidering irregularly shaped details or very complex motifs in an artistic surface.
The stem stitch works best on cotton. Before use, it must be washed in a washing machine and ironed. So you can avoid deformation of the finished product.
If you have no experience in embroidery - use the hoop. With their help, it is easier to navigate the work.
Stitch seam technique.Consists of oblique, tightly pressed to each other, stitches. Embroidered in any direction. The stalk stitch is mainly used as an outline for satin stitch embroidery. There are patterns that are completely embroidered with a stalk stitch.
Schematically, the stalk seam can be represented as four horizontal points.
The knot may not be tied. We simply fasten the thread to the canvas by making one stitch with a needle. Embroidery starts at point 1. We insert the needle at point 3. Then the needle emerges at point 2 and enter at point 4. And so on. The distance between the number 1 and 3 is the expected stitch length.
Important! The working thread should always be below the needle. Otherwise, the stitch will be tangled and crooked.
The stitches should be very close together to give the impression of a complete line.
The tradition of decorating things with beads is a very ancient tradition that existed in ancient Egypt. The forerunners of modern beads were small glass beads. They decorated clothes, hats, shoes, jewelry.

The first historically confirmed canvases embroidered with beads date back to the 9th - 12th centuries.
The culture of beadwork was very widespread in Rus', as evidenced by numerous archaeological finds.
Initially, beadwork was the privilege of girls from noble and wealthy families, but gradually this tradition spread to the masses. Needlewomen have always been considered enviable brides.
The culture of beading developed. Gradually, it became fashionable to decorate not only clothes, but also interior items and furniture. Pictures, caskets, purses and book covers were created from beads.
Beadwork is a valuable heritage left to us by our ancestors. Learning to embroider with beads is not easy, for this you need:
- attentiveness;
- accuracy;
- punctuality;
- zeal;
- perseverance;
- willingness to spend a lot of time on work.
We suggest that you familiarize yourself with the technique of beadwork with a stalk stitch, as it is basic and reliable.
The stalk seam is the most dense seam; according to the technique, the bead is sewn twice to the canvas. It is great for embroidering items that are often and actively used: decorations on clothes and pillows, fashion accessories, etc.
Instructions for making a beaded stalk seam.We string a bead on a pre-fixed thread. We introduce the needle into the canvas, we bring it out at a distance of one bead. Thread the thread again through the same bead and thread a new one.
The needle enters the work behind the last sewn bead and exits between the second and the first. Next, the needle passes through the second and string the third bead. The needle goes into the canvas and comes out between the third and second beads.

Used for contours. The needle always moves forward. The length of the stitches should be the same from the front and from the inside.
Seam "back needle"

Used for contours. First a forward stitch is made, then the needle returns to the previous stitch. This creates a single continuous line.
Split stitch


Used for outlines and for filling. The first stitch is made from the face to the inside. Next, from the inside, the needle should enter the middle of the previous stitch, splitting it.
stalk seam


Used for embroidering stems of flowers and thin twigs. It is performed in almost the same way as a split stitch. The only difference is that the needle in this case does not split the stitch, but passes next to it.
expanse

Used to fill patterns, leaves and flower petals. Make the first stitch from one outline to another. Then the next stitch starts again from the first outline next to the first stitch. Try to stack the stitches as close to each other as possible.
french knot

It is used to create accents in work, to fill, for example, the middle of flowers. Pull the thread to the face, make two turns around the needle. Next, holding the wound thread, insert the needle near the place where it came out on the face. Without releasing the held threads, pull the needle to the wrong side until the free thread all goes to the wrong side.
chain stitch

Attached loop

This stitch is similar to chain stitch, only in this case the eyelet is secured with a small stitch. With this stitch, you can make flowers.
Herringbone seam


Another type of buttonhole stitches. This seam needs a lot of space, as the stitches are quite large. In this case, the base of the loop is bred a short distance. The second stitch will be made from the center of the previous one. Due to this, each new loop is obtained with an offset.
Loose seam


It is good to fill small areas of embroidery with such a seam. It is performed with small stitches “forward the needle”, but in a chaotic manner.
Seam stitch
The seam line on the front side resembles a machine line, for which it got its name. It is performed from right to left. Having fixed the thread, make a stitch and pass the needle from the wrong side two stitches forward, while it is important not to tighten the working thread. The upper (front) stitches go tightly one after the other: the needle is injected where it came out of the fabric in the previous stitch. The bottom (purl) stitches go halfway back, so the length of the purl stitches is twice the length of the front stitches.
With this seam, the details of the product are sewn or decorative stitches are laid. Apply a seam line and in combination with other seams.
In appearance, the stalk seam resembles a tightly twisted cord. Each new stitch starts from right to left. The seam looks like a twisted rope, as if cut into the fabric. Therefore, it is sometimes called a "string". We must try to overlap each stitch tightly to the previous one, but not jump over it.
The seam is performed by moving the needle towards you, laying the stitches away from you. Each new stitch protrudes forward half the length of the previous one.
When performing a stalk seam, the working thread should always be on the same side - on the right or on the left. It is impossible to change the direction of the thread during operation, as its structure is violated.
The stem stitch is very common in embroidery. They can perform the entire embroidery pattern, it is also used in combination with other seams.
chain stitch
The chain stitch is a series of identical loops resembling chain links. Perform a seam in any direction, as convenient for the pattern.
A loop stitch is made as follows: the thread is brought out to the front side of the fabric, laid in an arc from left to right, inserted into the fabric at the place where it came from, and holding the loop with the fingers of the left hand, tighten the working thread. Then this process is repeated until a series of loops is obtained, coming out of one another with the direction in one direction.
Tambour seam perform drawings along the contour. They are also filled with patterns, sheathing first the line of the pattern along the contour, and then the middle.
When embroidering with a chain stitch, the working thread should not be tightened too much, each stitch should lie freely on the fabric. Holding the thread with your fingers, form the correct and uniform roundness of the loop.
For decorating fabric items: tablecloths, napkins, towels, apron, etc. - embroidery is often used. It makes products stylish, colorful, unique. Beautiful embroidery will allow you to make even simple decorating seams: stalk, tambour, "velvet", "knots", "herringbone" and others, the technique of which is really quite accessible. But do not think that a beautiful pattern will turn out right away: even the most elementary seams come out beautiful and neat only after long workouts. Therefore, if you want to decorate clothes, accessories or home textiles with beautiful embroidery, you will have to be patient. The first step should be to purchase accessories for embroidery: special threads (mulina), needles, fabrics, hoops (they are a must, because to get even seams, the fabric will have to be stretched, and pulled very tightly). The second step is to study the step-by-step instructions for making embellishing stitches. You will find them below.
"Lace" and "snake"
Seam Snake
"Lace" and the so-called "snake" are very light seams, it would be more correct to say that they are not simple, but elementary. They are performed on the basis of the simplest seam "forward the needle."
- Sew a “needle forward” stitch, while trying to ensure that all stitches are the same size. It is not necessary to grind strongly, but large stitches are all the more unsuitable. The optimal length is two millimeters.
- To get a “lace”, start making the second stitch on the left side, each time threading the needle and thread under the stitches on the right side in the same direction. To get a “snake”, alternate the direction: through the first stitch, pass the needle from the bottom up, through the second - vice versa.
These seams look original only if the threads are taken in two different colors, close in tone or, conversely, contrasting. If the threads are of the same color, these seams do not look elegant enough to be called decorating. However, they are rarely chosen for embroidery in any case.
Stem stitch (step by step)

When creating floral ornaments, they most often use a simple decorating seam, which is called a stalk stitch. It resembles a tightly twisted rope. Depending on how frequent and long the stitches are, the appearance of this “string” changes. The same seam is often used to embroider on drawings simply thin lines, straight and winding, denoting the outline of the drawing.
With seeming simplicity, the stalk seam requires some skill to perform. However, if you follow the step-by-step instructions for the technique of making a stalk seam, decorating products with it will actually be quite simple.
- Insert the needle from the inside and pull it to the front side.
- Holding the thread at the entry point, pull the thread slightly to the right and up and peg towards you.
- From the wrong side, make the next peg approximately in the middle of the stitch and pull it to the front side.
- Repeat the operation as many times as needed.
In order for the stalk seam to turn out even and attractive, try to make the stitches the same size, preferably medium-sized. In addition, it is necessary to ensure that they fit snugly against each other - in other words, there should not be a large distance between the stitches. Of course, it will take more time than embroidery with large stitches, but it will look aesthetically pleasing. So no need to rush.

With an ordinary needle on your hands, you can also make another very beautiful and at the same time simple decorating seam - chain stitch. It is also very common when embroiderers create floral ornaments. Outwardly, it resembles a chain.
- Insert a needle and thread from the wrong side to the front, pull the thread. It is more convenient to make a chain stitch with a needle when it goes from top to bottom.
- Lower the thread and, holding it with the thumb of your right hand, form a loop outline.
- Stitch from the entry point of the thread with the needle down. When pulling the thread with the needle, make sure that they remain inside the loop all the time. The stitch length should be small - along the length of the "link" of the "chain" that you want to get.
- Repeat the operation several times until you get a "chain" of the length you need.
- Try to change the direction of the stitches - this way you can embroider leaves and petals, start up a “chain” with a snake.
"Velvet" seam, or "goat"

“Goat” is often used to embroider the edging of napkins and aprons, it is also often used to “fill” the space inside the contour embroidered with a stem or chain stitch. From the front, this seam, which is sometimes called “velvet,” resembles intersecting lines, while from the inside, two dotted lines parallel to each other are observed.
- Work must be done from left to right. For convenience, two parallel lines can be drawn. On the top line from the inside, make a peg, pull the thread to the front side.
- Slightly to the right of this point on the bottom line from right to left, make a small stitch, pull the thread with the needle to the front side.
- Stepping back a little more to the right, make the same stitch on the ear on the top line. The next one will be already on the bottom line and so on.
"Loop" seam

This type of decorating seam resembles the one used for. It is performed quite simply - it can be seen in the figure. Even without step-by-step instructions, even an embroiderer who does not have needlework skills can make it. I must say that this light seam is used for decorating products infrequently. They usually let it go along the contour of handkerchiefs and napkins.
"Knots"

These elements, resembling knots or small, very small buds, are also very simple. Insert the needle into the fabric from the wrong side to the front. String a thread on it (wind it). Insert the needle from the right side to the wrong side at about the same point where the first peg was. An unusual stitch is ready. By the way, with the help of this unpretentious seam and a stalk seam, you can embroider amazingly beautiful patterns - the main thing is to show imagination and be patient, since the work is simple, but painstaking. However, in needlework everything requires perseverance and creativity.
"Herringbone"

Like the “goat”, it is performed between two parallel lines (you can draw them right away for convenience). We will sew from right to left. So, we make the first peg on the top line. We make the second peg on the lower ruler at the same level, we lead the needle forward and up (at an angle of 45 degrees) to make a stitch, but at the same time we press the thread against the fabric so that the needle from the inside comes out on top of it between the rulers. We make the next peg on the top line and lead along the slope to the left and down, also passing the thread under the needle. So alternately we make stitches from above, then from below to the center. It turns out "herringbone". If each time two stitches are made above and below, then a “double” Christmas tree will come out. Both of them are used most often to decorate children's underwear.
Elena Pronina
In Rus', in the evenings, entertaining themselves with songs and stories, the girls sat for hours at embroidery. They embroidered caftans, kokoshniks and sundresses. And that craftswoman was valued more, in which the seam was even. Grooms and their mothers, choosing a bride, paid attention not least to the sewing that she was wearing. If everything is beautiful, neat, and with imagination, then such a girl will be a good housewife and you must definitely take her into the house. So they learned to embroider from their mothers so that their husband and his family would like it and marry a worthy groom as soon as possible. It is easier for modern craftswomen. First, they embroider mostly for themselves. Secondly, thanks to the Internet, they can master any technique, for example, a stem stitch. There are a lot of videos on this issue, and modern craftswomen quickly learn to create whole pictures with threads.
In embroidery, there are many types of seams, but there is also some base, basic seams, namely:
- seam "forward with a needle";
- seam "line";
- buttonhole seam;
- chain stitch;
- cruciform seam;
- Bulgarian cross;
- stem seam.

This article is about the stem seam.
The stalk seam is considered one of the most ancient types of seams. It is very textured and colorful. As a rule, the contours of the pattern are performed with a stalk seam. It can be leaves, petals and stems (by the way, this is where the seam got its name from).

It is best to use cotton canvas for the basis of embroidery. Before starting work, it must be washed and steamed, so you will avoid further deformation of the product after sewing is completed.
In the absence of much experience in embroidery, you can use the hoop. They will greatly simplify the workflow for a novice craftswoman.
Seam with threads
The video shows how to perform a stalk seam with a needle and thread.
The stem seam is made from left to right. The sharp end of the needle constantly looks to the left, and for each subsequent stitch they are taken, stepping back, that is, to the right. On the front surface of the product, the stitches overlap each other, and on the wrong side they form a line.

Art does not stand still, each craftswoman adds her own zest to the work. So today, new varieties of stalk seam have appeared. Examples of such seams are shown below, and detailed instructions for embroidering them are contained in the video tutorials.
- portuguese stalk stitch.
- narrow stalk seam.
- wide stalk seam.
Embroider with glass beads
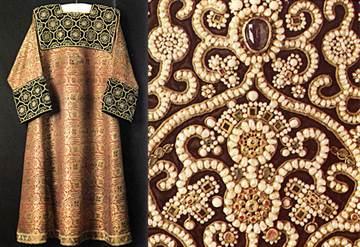
The tradition of embroidering things with beads appeared a very long time ago. In Ancient Rus', there were kokoshniks and sundresses embroidered with glass beads. A little later, collars and hats began to be embroidered with this material.
This article offers a video tutorial on this ancient technique.
Embroidery with glass beads using the stem stitch technique is the most popular technique, as this stitch is very strong and reliable. It is great for products that are subject to frequent external influences, such as collars, sleeves on clothes, handbags and so on.
Pillows embroidered with glass beads look very nice. Such a thing will be ideal for interior design, and will also be a very original gift.

And the seam technique itself is very simple and does not differ much from a seam made with threads.
- We fix the thread.
- You need to string a bead on the thread.
- The needle is inserted into the canvas and withdrawn through a gap equal to the width of one bead.
- The thread is again passed through the same bead and the next one is threaded.
- The needle should enter the work after the last sewn bead and exit between the 1st and 2nd.
- The needle passes through the 2nd bead, followed by the 3rd bead.
- The needle should go into the fabric and come out again between the 3rd and 2nd beads.

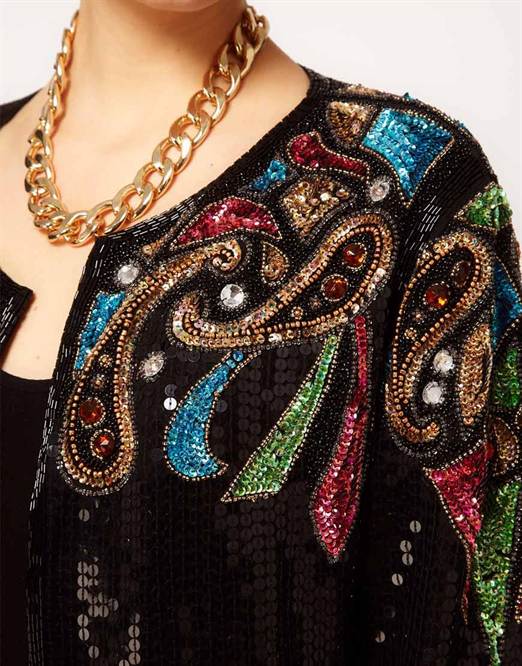
Working with ribbons
The last variety in the stalk seam toolkit will be a seam made with ribbons.

The principle of operation is the same as that of performing a stalk seam with a thread and a needle. Only, as the name implies, a tape is used instead of a thread.