Fluffy pompom gifts for the winter holidays. Blanket made of pompoms, three master class Blanket made of pompoms
If you find it difficult to decide what is best to take, then you should think about making it yourself, for example a blanket made from pompoms. This is a very beautiful and multifunctional product, so the baby and his parents will definitely like it. In this article you will learn a detailed master class on making blankets from pompoms.
MK - how to make a two-color blanket from pompoms?
You will need:
- wooden bars;
- nails and hammer;
- thick acrylic yarn in two colors, 4 skeins;
- scissors.
Progress:
- From wooden blocks we make a frame of the size you want to make a blanket. It can be square or rectangular in shape. We drive nails into it along the entire perimeter at a distance of 4-5 cm.
- Take white yarn and tie its end to the first nail on the top side of the frame. We lower it down, hook it onto the first and second nails and lift it up. There we start the yarn for the second and third and continue moving down. We wind the thread in the same way until we reach the corner of the frame. In the future, all vertical rows must be performed in this way.
- To switch to horizontal rows, we hook the thread at the corner of the frame as shown in the picture. We wind vertical rows of yarn in the same way as described in point No. 2.
- We repeat the winding so many times that each row has 20 threads both horizontally and vertically.
- Now we take pink yarn and wind it similarly to white, making 20-30 layers. The size of future pompoms will depend on this quantity.
- In places where vertical and horizontal rows intersect, it is necessary to tie all the threads. To do this, cut pieces of 7-10 cm, and then use them to grab the yarn diagonally and make a knot. It must be tightened very tightly so that later they do not come undone during operation.
- After all the knots are made, take scissors and cut in the middle between the two knots. We do this only with pink yarn (this is 20-30 threads). After all four threads have been cut around the knot, you should straighten the protruding ends so that you get a beautiful pom-pom. In order for the blanket to have a neat edging, you should leave the last row of knots uncut along the entire perimeter.
- The final step in making a pom pom blanket is to create the fringe. To do this, cut in the middle the part of the yarn that was caught on two nails.
- The blanket is ready.


This product itself is quite warm, so the baby wrapped in it will be quite comfortable. If you want to further insulate it, you can sew fleece of the appropriate size to it on the inside.
To decorate the resulting pompom blanket, before removing it from the frame, you can stretch a wide satin ribbon along the edges, matched to the color of the threads or chosen to indicate the gender of the child.

When we make a blanket from pompoms with our own hands, it depends only on the desire of the performer whether it will be one-color or multi-colored. In the first case, threads of only one color are wound onto the frame, and in the second - different colors.
Hello dear needlewomen. Here is my debut. We made our own blanket from pompoms. Unfortunately, there are no first photos (I can’t find how they fell through the ground) of how we made the frame. But I’ll tell you a little about him.
We took 50*50 bars, the height was 2m and the width was 1m. I’ll say right away that you need more bars, not only at the top and bottom, but also a couple of bars in the middle, because after tension, one of our bars bent.
The blanket turned out to be 1.65m*1m, perfect for an adult.
The nails were driven at a distance of 4 cm. It took about 150 nails, these are three packs of 100mm in size
There were about 35-38 rows of threads. Because I didn’t fully calculate the amount of yarn to make 50 rows, but for our large blanket it was enough (the blanket turned out to be a little heavy, although given its fluffiness this is even a plus) At the beginning I had 24 (12 black and 12 light green) skeins of acrylic threads (110 m in a ball), this seemed not enough to me, and I wound up about 400 m of mixed black threads, but it turned out to be 12 pieces of light green.

I also didn’t calculate the yarn for tying the pompoms themselves, so here I ended up with a hodgepodge of different colored threads. But most of them were ordinary white ones; after washing they were practically indistinguishable from light green ones.

After the threads were wound, my hands were itching to make at least a couple of pom-poms, and despite the late time (3 am!!) I finally made them.

When our left beam bent, it was decided to urgently relieve the tension from the threads and free the middle, this helped partially

And here are those same white threads, they are practically indistinguishable from light green ones.

See original ideas on how to make a carpet, bedspread, blanket, and pillows out of pompoms.
It is very nice to receive a gift that is made with your own hands. Moreover, such things are always obtained in a single copy and are not very similar to the others. Blankets, rugs, blankets made of pompoms - these products will not only decorate the interior of the room, but will also perform practical tasks and keep you warm, especially in cold weather. To understand how to create such things, see the information below.
How to buy a base and pom-poms for a rug with your own hands in Aliexpress: links to the catalog
If you don’t want to make fluffy pom-poms with your own hands, you can easily buy them on the world famous trading platform Aliexpress. You can order pompoms of different colors, sizes, made from a variety of materials.
Aliexpress - buy pompoms
How to make pompoms with your own hands from yarn: instructions, description, photo
They are made using different methods and from different materials. Let's learn how to make a pompom using two circles of cardboard and colored yarn.
Progress:
- Take ready-made cardboard blanks, as in the image below, and fold them together.
- Wrap threads around them. The more thread there is on the cardboard, the more magnificent the pompom will be.
- Using small scissors, cut the threads along the side borders.
- Pull the cardboard circles apart a little.
- Tie the product in the middle.
- Remove the circles. Straighten the resulting pompom and give it the perfect shape.

IMPORTANT: Wind the threads evenly onto the cardboard frames, then the pompom will turn out neat.
How to make a carpet from pompoms: instructions, description, photo
There are many options for making carpets, rugs, blankets, and pillows from pompoms. If you want to get a dense product, then it is better to attach the pompons closer to each other on a durable material.
For this:
- Knock down the "loom". It is enough to take a rectangular box of the required size and nail nails along the edges.
- Nail the nails at the same distance. Then intertwine the threads to make squares like the one in the image below.
 How to weave a rug from pompoms
 - It is advisable to make such weavings from yarn of different colors. The first twenty pieces of the bottom row, for example, are white.
- The second ones are blue. The bottom white ones will be the base, and the top ones will have to be cut around the perimeter of each square in the middle to make a fluffy pompom.
- The more threads there are on the “loom”, the fluffier the pompom will turn out.
- The only thing is that before cutting the threads, you need to tie them manually at the intersections.
- At the end, when all the pompoms are ready, straighten them. Carefully cut the threads from the carnations so that you get a fringe, as in the image below.

 Carpet - chicken
 IMPORTANT: To make a rug with a pattern, use yarn of different colors to create compositions.
How to make a blanket from pompoms: ideas, photos
If you want to make a warm blanket. Then you will need a frame of the required size. It is advisable to make a “loom” for weaving with a width of 95 cm and a height of 165 cm. Use 120 mm nails to form a lattice of threads. Moreover, hammer them into the frame a little, the height of the nail for weaving is the most comfortable 7-8 centimeters.
Wind the yarn - don't regret it. You can wind about 50 pieces of thread on each nail.

 Do-it-yourself blanket
 If you want a colored product, then wind threads of different colors, so the blanket will turn out beautiful, original.


Finally, cut the pompoms as described above in the middle of each side of the resulting squares. This is also not done quickly, but be careful not to cut off excess and the blanket is not left without a base.
How to make a blanket from pompoms: ideas, photos
To make a bedspread, you should first decide on its size and take into account that it may become slightly smaller in size due to the bulk of the pompoms. Therefore, approximately for the bedspread template, add another five centimeters to shrink it.
 Little yellow blanket
 You can make a good, warm bedspread that will decorate your bed from ready-made pom-poms and a base (burlap), as in the photo below. From multi-colored material, create an original ornament or pattern on the product. It is enough to sew each pompom to the base and you will get the result.
 Pompom base
 How to make a blanket from pompoms: ideas, photos
A blanket made with love will keep you and your family warm. It will also fill the house with positive energy. See below for examples of beautiful patterns on a pompom blanket. It's not difficult to make them.
On a special box with nails around the perimeter, stretch multi-colored threads of yarn. Weave a fabric of squares from at least 40-50 threads. Tie the intersections and cut the pompoms without touching the base.

This blanket is made from two white and blue threads.

 Blue blanket with white base
 How to make a children's rug from pompoms: ideas, photos
A small rug with a cute pattern can be made from threads and a mesh base. What’s good is that when creating a product you can come up with various patterns and even pictures. It can be used as a floor mat or can be hung on the wall.


A delicate pink carpet is suitable for a nursery where a girl lives. It will look very beautiful if it harmoniously matches the overall interior of the room.

A fluffy multi-colored rug is a great product; it will warm your feet and decorate the room.

How to make a bedside rug from pompoms: ideas, photos
Bedside rugs give the interior a special coziness. They can be made in various shapes. To do this, the base should be cut as you need it to make the item.

You can also make smooth transitions from one tone to another.


If you cut out the base in the shape of a heart and sew lush pom-poms on top, you will get such an original carpet.

 Rug heart
 How to make a bath mat from pompoms: ideas, photos
If you like your feet not to step on a cold floor, then a pom-pom bathroom rug is just the thing for such requirements. It can be made from yarn. Or you can make it from garbage bags. To do this, they are cut into strips and made into pompoms, and then sewn onto a thick base.


It is better to choose colors to match the overall design of the room.

How to make a rug for a chair out of pompoms: ideas, photos
Small square products are suitable for the chair. Moreover, they can be made for one seat, or they can be created in the form of a rectangle so that it covers both the back and the seat at once.
 Chair seat
 If you add cute threads in pink, white and dark tones, you will get cute pompoms, like in the picture.


How to make a pillow from pompoms: ideas, photos
A dense base should be used for the pillow. Make a pattern in the form of a pillowcase, and then trim the fabric with multi-colored pom-poms. Place padding polyester inside. Sew the sides and front. You will get a soft, bright pillow, as in the photo below.


You can make a decorative pillow in the shape of a flower. To do this, sew the pom-poms in layers, as in the picture.


IMPORTANT: Use pompoms as decorations. You can also sew beautiful appliqués where they are appropriate.
How to make a bear skin rug from pompoms: ideas, photos
There are more interesting ideas for a country house. In particular, you can easily make a bear skin pattern. And then sew dark-colored pom-poms on top and form a bear’s head from them.

Bear fangs can be found in stores that sell gag supplies. Replace the eyes with matching buttons.
 DIY bear skin
 How to make a bear rug from pompoms: ideas, photos
For such a product you will need to crochet the head, body, ears, and paws of the bear. Cover the abdomen with pompoms. Make a nose out of them and draw eyes. You will get such a funny bear.
 Rug - bear
 How to make a sheep rug from pompoms: ideas, photos
To begin, use regular knitting needles to knit a dense base of gray threads, as in the photo below. Make pom poms. For this:
- Wrap beige yarn around two fingers, but do not pull the threads tightly.
- Spreading your fingers a little, stretch the thread between them and tie the pompom in the middle.
- Trim the edges of the threads and trim them to make an even ball.
 Rug - sheep on the floor
 Sew the finished pompoms onto the back of the sheep. Eyes can be made from buttons.
How to make a leopard rug from pompoms: ideas, photos
A leopard rug can be a stylish decoration for your living room. To create it you will need pompoms of different sizes, made from black and white threads. The leopard's head can be made voluminous. To do this, it must be sewn from thick fabric and stuffed with synthetic padding, and then trimmed tightly with small pom-poms.


How to make a crocodile rug from pompoms: ideas, photos
The crocodile will turn out perfect if it is made from green pompoms. You will also need a base to make it. It can be made using the pattern shown below in the image.


After all the preparatory work, all that remains is to sew on the pom-poms and cut details. The product will be interesting if you use pompoms with different shades of green.


How to make a daisy rug from pompoms: ideas, photos
Chamomile is made according to the same pattern as the rest of the floor mats. The only thing that is used for the rug is white pompoms for the petals and yellow ones (as the center of the flower).

 Rug - daisies
 How to make a butterfly rug from pompoms: ideas, photos
For a butterfly carpet you will need a base in the form of wings and small neat pompoms of different colors. Sew around the base as in the image below and make a mustache on the head. This rug will look great in a child's room.

 Bright butterfly - rug
 How to make a New Year's wreath from pompoms?
To make such a wreath, you will need a solid base so that the pompoms fit well on it. Cardboard is ideal for this. Take a circle of thick cardboard of the required size. And then glue pompoms of different sizes onto it. Use Christmas tree decorations, ribbons, and bells as decorations.

 DIY wreath
 The best DIY pompom products: photos
Below are images of products in different designs. Thanks to the photo, you can find an idea for creating a beautiful interior decoration.


Video: Pompom carpet
Weaving from pompoms is a type of needlework that requires more perseverance than skill. Despite this and with due diligence, they look simply gorgeous.
The technology itself is quite simple, but there are several nuances. Firstly, the process is labor-intensive; prepare for the fact that calluses or abrasions may appear on your delicate fingers.
A simple medical plaster can help you avoid this by wrapping it around the first joint of your index finger; it will bear the main load.
The second factor is time. But there are little tricks here that will be revealed in this article. If the needlewoman is not sure of the degree of her perseverance, then we recommend, first, to practice on small napkins.
The third stumbling block is the workplace. Frames for large products require adequate space.
 For her favorite hobby, a craftswoman will need a frame and several skeins of multi-colored thread. This frame should be made by a loving husband.
To do this, you need several slats, preferably made of dense hardwood. Birch, poplar, and ash are suitable. Of course, denser ones - beech, walnut or oak will also come in handy, but the final product will be too heavy.
You can take a large piece of thick plywood 5-7 mm, or, in the worst case, chipboard.
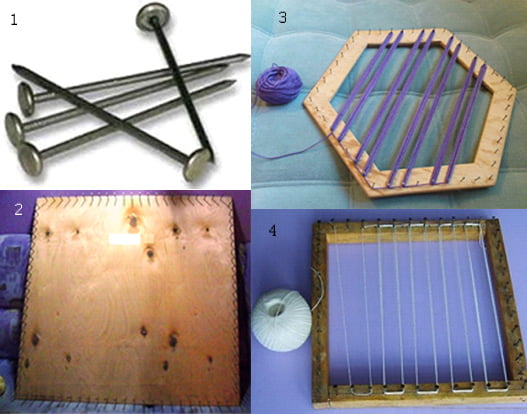
- Nails with wide heads.
- Monolithic plywood construction, the most durable and reliable.
- Hexagonal “professional” frame for creating complex multi-color compositions.
- A small “test” design, which can later be used for weaving small napkins.
Coniferous species can also be used, but the wood should be varnished or painted so that the resin does not protrude onto the surface. Nails in such a structure need to be driven much deeper, since soft wood loosens quite quickly.
The structure must have a fair amount of strength, since during the winding process the threads will be pulled quite tightly. It is better to strengthen the corners with jibs.
The sides can be made longer from the bottom - these will be the legs. This way, there will be no need to place the frame on a chair or lay it on the floor.
The dimensions of the product depend on the intended size or for a child's bed. Depending on the type of thread and tension force, the “shrinkage” of the blanket can be 5-10cm. The most convenient sizes for work are from 80x80 to 100x100mm, but basically it all depends on.
Seventy-gauge nails are driven into the finished wooden frame; in dense wood, it is recommended to pre-drill holes of a slightly smaller diameter so that the plank does not split.
The distance between the nails varies in the range of 3-5 cm. The smaller the distance, the denser the blanket will be and the harder it will be for the craftswoman to work. The number of nails should be in pairs. For a blanket measuring 80x80, you will need 20 of them on each side of the square.
The distance of the first nail from the inner corner of the frame should be half of the selected marching interval.
Secret No. 1. If possible, use nails with decorative or furniture heads. The risk of thread breakage with a wide cap is much lower.
Yarn for pompoms
 Yarn for a pompom blanket needs a soft, delicate and at the same time quite durable thread.
Unfortunately, natural materials in the mid-price range rarely combine such qualities.
Therefore, the ideal option is 100% acrylic. Mixed wool and pure wool can also be suitable, but working with them is somewhat more difficult, and allergic reactions of the body are possible in response to constant increased contact with the material.
Quantity - 5-6 hundred gram skeins, the length of the thread in such a skein is 350 m, for a product measuring 80x80.
Secret number 2. Use threads of different colors or shades. Separately for the base and separately for the pompoms. When cutting, you will not have to recalculate the number of layers with each cut.
Pompom weaving technology
 Schematic diagram of weaving
- Start of weaving
- Transition of direction from horizontal to vertical, and vice versa.
- Direction of yarn winding.
- An anchor point (a knot is tied).
- Outer layer cut lines.
It is better to start the weaving process vertically. The end of a thread is tied to the first nail, which goes down, wraps around two adjacent nails and rises up.
Two nails are also grasped at the top and the thread is lowered again. The cycle is repeated until the end of the frame.
Then, having wrapped the last nail vertically, we move to the first one horizontally and continue the process to the end. The result of weaving the warp should be 20 rows of thread directed in each direction.
Similarly, 30 rows of yarn of a different color are wound, which will later become pom-poms.
Secret number 3. In order not to wrap each row separately, you can knit 5 threads from five balls at once. In this case, for the base you will need to “walk” along the frame only 4 times, and for pom-poms 6. If you don’t have that amount of yarn, divide the available ones into several balls.
The number of rows of the base and outer side depends on the material and the patience of the craftswoman. According to the practice of working with acrylic yarn, 20 rows are enough for the warp.
The more layers of pom-poms are wound, the more magnificent it will be. But do not overdo it; the optimal range is 30-50 rows.
After finishing the weaving, the most tedious and painstaking stage begins. It is necessary to tie knots at all intersections of the resulting lattice. This is a very responsible job.
If you miss at least one, a hole will form in place of the cuts, which is difficult to close. All work will be ruined. The bandage must be made tighter so that the threads do not slip out after trimming during cleaning or fluffing.
Secret number 4. To facilitate and streamline this process, you can use the stitching method. 
To do this, it is advisable to use a special plastic or metal curved needle. The knot is made as usual, a sewing one. Performed twice crosswise, tightened as tightly as possible.
For fastening, use strong sewing threads from any material except elastic, which will “tighten” the product.
Others recommend separating from the frame as a last resort. Motivating this is that with stretched threads it is more convenient to find the middle between the knots. The cuts are made along threads of a different color from the warp exactly in the middle between the tightened knots.
Depending on the type of transformation, they can be divided into three categories: retractable, reversible and folding.
It is advisable to purchase a Provence folding sofa, since the transformation mechanism is hidden by external elements and will not have a negative impact on the overall integrity of the interior. Read about French-style sofas.
Then, if necessary, fluffing is carried out. Using a simple clothes brush, iron the cut layer in a circular motion.
As you can see, making a blanket from pompoms with your own hands is not too difficult, and with small improvements the work becomes not so painstaking. Therefore, you can move on to the next stage.
Patterns and patterns of pompom napkins
 The first design move that will not change anything either in technology or in the simplest weaving pattern is multi-colored pom-poms.
Its essence lies in winding yarn of several colors in the front layer. Those threads that are wound last will be in the center of the pompom.
You can decorate the finished product with satin or silk ribbons, threading them along the edge through one cell. And tied it in the corner with a neat bow. For strength, it can be additionally stitched.
The result is an elegant children's blanket made from pompoms, which is simply ideal for welcoming a young mother back from the maternity hospital. You can also make it very cute.
The main disadvantage of the presented method is that the entire surface will consist of identical elements. 
But if you want to create some kind of pattern, then you can use only the base, and attach ready-made pom-poms of other colors to the knots. If they are all the same size, the result will be similar.
There are several ways to make pompoms. To do this, you can use cardboard rings you made yourself.
You can purchase plastic composite rings, which are much more convenient to work with. Or you can buy a special mechanical machine for manual winding.
20 layers of yarn are wound onto the frame for the base, a pattern is taken with the placement of pompoms, where each circle must correspond to a knot on the frame.
Pompons of the corresponding color are sewn to the base.
Materials:
- wooden frame with nails driven in
- yarn for knitting (the thicker the yarn, the softer and fluffier the pom-poms will be)
Description of work:
1. First you need to make a blank - a frame made of thick plywood into which nails are driven. The size of the frame can be arbitrary, depending on the size of the blanket you need. In this case, the frame is approximately 80 x 80 cm. The distance between the nails is 4 cm.
Having secured the thread to the outermost nail, we begin to stretch it over the entire area of the frame.
2.
50 threads are pulled in a row, i.e. at the intersection there are 50 x 50 = 100 threads.

3. This blanket is made from yarn of two colors - white and yellow. First, about 20 threads of white are wound, then a little yellow and again white.

4. After the threads are stretched and the ends are well fixed, it is necessary to tie up all the intersections!

5. The threads are cut in the middle, between the intersections. Please note that not all 50 threads are trimmed, but only part of them! In this case, the lower 20 white threads remain intact.

6. These are the charming yellow and white pompoms you should get)


On the reverse side everything is neat and beautiful too!

And a few more options in different colors)


In this way you can make not only blankets, but also covers for chairs and stools, large blankets, napkins, etc. All you have enough imagination for) And for inspiration, I’m adding a few more excellent videos (though not in Russian)). They show a slightly different base frame, which is quite simple to make from thick cardboard!
These 3 videos show 3 different ways to join wound threads. It turns out very beautiful!