Original crochet flowers. A simple crochet flower, a master class for beginners. Ideas for creating knitted compositions

The article about knitted flowers turned out to be quite popular. Therefore, we continue to publish a collection of knitted flowers.
Pansies:
knit the first flower
scheme 1. Dial 6 air loops with eggplant-colored yarn, close them in
ring. Knit 1st and 2nd row according to scheme 1. Knit in orange color
3rd row.
Knit the second flower according to scheme 2. Dial 6 air loops,
close them in a circle. With orange yarn and knit from the 1st to the 4th row of the pos
scheme 2.
Bud: cast on 6 air loops from eggplant-colored yarn, close them in a ring. Knit from the 1st-4th row according to scheme 3.
Assembly:
starch the flowers and the bud, put the second flower on top of the first,
put on a plastic stem and fix with stamens. buds
plant on plastic stems.
 |
 |
 |
Three-leaf knitting pattern - brooches  |
 |
 |
 |
 |
 |
 |
 |
 |
 |
 |
 |
| The following flowers are very easy to put together
|
 |
 |
 |
 |
 |


We continue to publish a collection of knitted flowers.
Knitted daisies.
The core and petals of the flower are knitted with contrasting threads.
We knit a small flower:
cast on 5 air loops and close them in a circle with a half-column.
1 row: one air loop for lifting, 12 columns without a crochet.
2 row: * 7 air loops, in the second loop we knit a column without
nakida and then 6 single crochet, we knit the 6th column in the second
circular column*; repeat from * to * 5 more times (for a total of 6
petals).
3 row: tie all the petal according to scheme 1.
Heart of a small flower:
cast on 2 air loops.
1 row: 5 single crochets in the 2nd air loop
2nd row: 10 single crochet stitches behind the back wall of the loop of the previous row.
3 row: we make increases through 1 loop = 15 loops.
For a small flower, you need to finish knitting and break the thread. For a large flower, we knit 4 rows: we increase through 1 loop = 22 loops.
We knit a large flower according to scheme 2.
 small flower and small flower center |
 big flower |
| Knitting pattern for daffodils:
|
 |
 |
 |
 |
 |
 |
 |
 |
 |
 |
 |
| Author's flowers from Nelya Solovey:
|


Master class on knitting a flower "Poppy, field" from Elena - koluchka.
 |
1. Close 8 VP into a ring. (Yarn "Tenderness")
2. Knit 12 sc in half loops.
3. In the same half loops, knit the third row of 16 sc.
4. In the fourth row, 21 sc are knitted in the center of the "berry".
5.6. Turn the “berry” over and knit a row of 21 sc.
7. Take a thinner yarn ("Tulip"), pull the loop from the center of the "berry".
8. Insert a hook and loop in front of the last row of RLS, pull out and knit a loop from the thread under the “berry”.
9. Knit RLS for the edge of the “berry”, 3 VP, RLS for the edge of the “berry”.
10. Similarly, perform the remaining six jumpers, pulling the loops from the center of the "berry"
11. Knit a row of 21 sc.
12. On each loop of the previous row, perform a “stamen”: 16 VP, SS (21 pieces)
13.14. For the petal, attach from the inside of the conn. column and knit
first row 10 VP, SS. Second row: tie the first row with 12 sc. Third and
fourth row: 14 sc. Fifth and sixth row: 16 sc. seventh, eighth,
ninth: 18SBN. In the tenth row, evenly add 10 loops (total 28
loops). Eleventh row: RLS, PS, SSN, SS2N, SSN, PS, RLS
(repeat three times).
15. Similarly, tie the second upper petal. Make the bottom petals
a little more, increasing the chain from the VP of the first row by 2 -12 VP.
Accordingly, the number of columns in each row of the lower ones will increase by 2
petals.
16. In conclusion, tie the poppy petals with a crustacean step (yarn "Canaris" 203 m -20g).
Such a flower can be used to decorate a knitted product or
like an Irish lace motif. Elena's website has an online topic open
knitting products in the technique of Irish lace for lovers of poppies

For knitting flowers you will need: Iris threads in 2 additions, a 1.3 mm hook and a flower pot.
Knit petals according to the scheme 1 - 6 pcs.
flower center:
Knit in a circle
1 row: ch 2, from the first ch. knit (st.b / n, 6 ch) 6 times.
2 row: From each art. b / n of the previous rows knit 2 tbsp. b / n, with
this chain of 6 in. n. prev. Leave rows ahead of knitting.
3rd row: art. b/n.
See the result in photo 1.
 |
| Now you need to tie the petals with connecting posts in 2 reception of 3 things to the middle of the flower. The first 3 petals are tied to row No. 2 of the middle of the flower, and the second 3 - to row No. 3 (photo 2). For the stalk, you need to tie a number of art. b / n for connection. columns and more knit in a circle, if the stem is too wide - do reductions in the forefront, knitting 2 tbsp. b / n together. I reduced to width row 8 tbsp. b/n. Then a straw for cocktails just enters the stalk (for stability) (see photos 3 and 4). |
 |
| Earth in a pot: In the last row of the stem, change the thread to brown. 1 row: 1 st.b / n, (2 st. b / n from 1 st. previous row) 3 times, 1 st.b / n, (2 st. b / n from 1 st. previous row) 3 times. 2 row: 1 st.b / n, (1 st.b / n, 2 st. b / n from 1 st. previous row) 3 times, 1 st.b / n, (1 st.b / n, 2 items b / n from 1 item previous row) 3 times. 3 row: 1 st.b / n, (2 st.b / n, 2 st. b / n from 1 st. previous row) 3 times, 1 st.b / n, (2 st.b / n, 2 items b / n from 1 item previous row) 3 times. Then we sew the resulting hexagons of the earth in several colors along short sides. We tie in a circle to the required width of the pot. In order for the flowers in the pot to stand steadily, I cut out a piece of styrofoam along the size of the inside of the pot and stuck the tubes of stems there, and I glued the bound earth along the edge to the circumference of the pot. |

Petal:
Dial 5 in. n. and knit in a circle.
1 row: ch 1 lifting, 4 st b / n., 2 tbsp. b / n to the extreme v.p. chains,
2 vp, 2 tbsp. b / n in the same extreme c. n. chains, 3 tbsp. b / n, 2 tbsp. b/n c
1st vp chains, ch 2, 1 tbsp. b / n in the same loop.
2 row: 2 tbsp. b / n, 3 half-columns with a crochet, 2 tbsp. b / n, in a chain of
2 vp tie (1 st b / n, 2 ch, 1 st b / n), 2 st b / n, 3 semist. s / n,
2 st b / n, in a chain of 2 ch. tie (1 st b / n, 2 ch, 1 st b / n).
3 row: we knit with b / n columns, in a chain of 2 ch. tie 1 st b / n.
4 row: we knit with connecting posts one in one st b / n.
 |
flower center:
1 row: ch 2, from the first we knit 6 st b / n.
2nd row: 1 st b / n, 2 st b / n from 1 tbsp. previous row - repeat to the end of the row.
3rd row: knit st. b / n without increments.
Sheet:
1st row: Cast on 20 ch, 19 st double crochet, 5 st double crochet from extreme c. n. chains, 19 tbsp. with a crochet.
2 row: art. b/n.
Assembly: We attach 3 petals with connecting
columns to the last row of the middle of the flower Then with threads of green
colors on the connecting posts we knit a row of st. b / n and then in a circle to
required stem length. Sew 2-3 leaves to the base of the stem. IN
I inserted stems for stability of tubes for cocktails, and for
base tied around 2 old CDs. To keep the flowers from falling
sewed the middle through the hole of the disk tightly to the strapping from below.

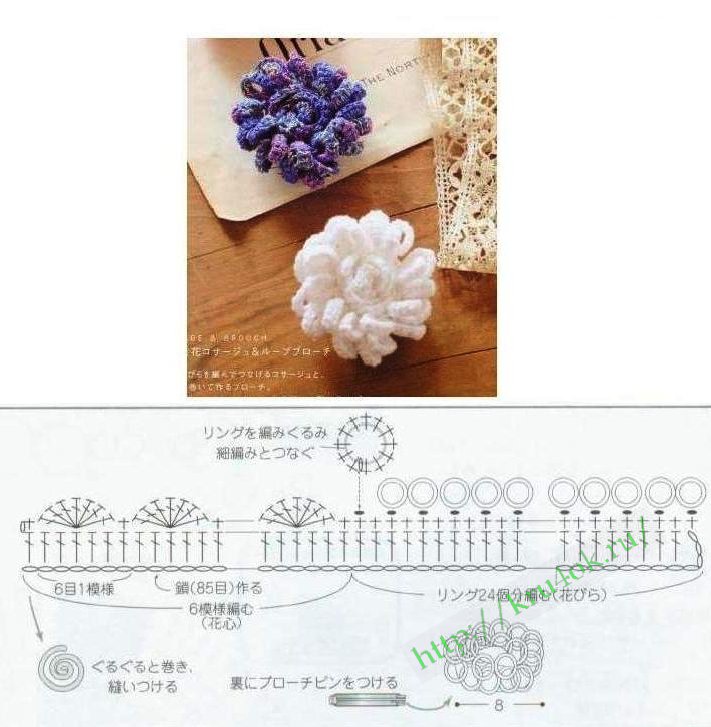
Several patterns of crochet flowers in your piggy bank. They can decorate a hat, dress, panama or make a brooch.
MATERIALS
Remains of yarn of various colors.
HOOK
Choose the size according to the thickness of your yarn.
Types of loops:
Air loop (ch.p.): in p.
insert the hook, throw a thread on it and stretch it through the loop.
Single crochet (st. b / n): insert the hook into the loop of the chain or lower
row and pull up a new loop, grab the thread and knit 2 loops on
hook in one go.
Double crochet (st. s / n): make a crochet on the hook, insert it into
loop of the chain and pull out a new loop, knit 3 sts on the hook in pairs in
2 receptions.
Column with 2 crochets (st. with 2 / n): make 2 crochets on the hook, enter
hook into the loop of the chain and pull out a new loop, knit 4 sts on the hook
in pairs in 3 doses.
Flowers: according to schemes 1,2 and 3.
DESCRIPTION OF THE WORK Flower "A".
Dial a chain of 16 c. p. and knit according to scheme 1.
ASSEMBLY
Fold the resulting braid in a spiral and secure the center from the wrong side with a few stitches.
DESCRIPTION OF THE WORK Flower "B".
Dial a chain of 52 c. p. and knit according to scheme 2. After finishing the 4th p., cut the thread.
ASSEMBLY
Roll the resulting braid in a spiral and fasten in the center from the inside. sides with a few stitches.
DESCRIPTION OF THE WORK Flower "B".
Dial a chain of 40 c. p. and knit according to scheme 3.
ASSEMBLY
Roll the resulting braid in a spiral and fasten the center from the inside. sides
several stitches. In the case of using flowers as a brooch,
attach with out. side pin.


Crochet has always been in demand, but to a different extent. Today
this type of needlework is more popular than ever. Classical
types of knitting: the sirloin pattern becomes the border of a summer jacket;
elements of guipure tablecloths - magnificent decor of blouses. Napkin patterns
hat fields are knitted, collar motifs are jacket coquettes. There are many examples.
This is a natural process, a kind of creative game. in value in
preservation of traditions and their modern embodiment.
Have you noticed, dear craftswomen, that the emphasis in knitting is on
complex options that are not subject to reproduction on a knitting machine?
One of these areas is guipure. It is designed to mimic the complex and
expensive Venetian embroidery.
The best examples of such knitted lace were obtained from the Irish
nuns, so over time it began to be called "monastic", and later
- Irish guipure. Please do not confuse with Irish lace, which is
method of execution differs from guipure. Classic guipure knitting
complex and painstaking. Since he imitated needle-embroidered lace,
then they used lace linen, thin cream or white paper threads
for knitting elements and very thin for nets and brids. Modern fashion
takes into account our busyness, the rapid pace of life, the desire to
realize the intended product. She favors models
coarse knit from thick yarn. This is in the hands of novice craftswomen.
You may have noticed that the mesh that holds the elements together is rarely
used. Actual canvases "coupling" guipure. steel elements
larger, the thread is thicker.
So, suppose you decide to knit a blouse completely or
fragment with guipure elements. It is advisable to pre-draw
sketch on the pattern, you can improvise in the course of knitting. Most
compositions are occupied by leaves. In various books and magazines,
Lots of knitting patterns. It is not possible to discuss them within the scope of this article.
manifold.
For example, it is customary to knit a classic guipure sheet in two ways: with
extension from one RLS (scheme 1) and with an extension on the arch (scheme 2).
At the same time, knitting methods can be different: for both half-loops, for
back half-loop, for the front half-loop, for the purl horizontal
half-loop of the columns of the previous row.
The texture of the sheet in the first photo turned out to be flat, in the second - ribbed.
Photo1. The sheet is crocheted according to scheme 1 for both half loops:  |
Photo 2. The sheet is crocheted according to scheme 1 for the back half loop:  |
Photo 3. Complex sheet.  |
Crochet leaf pattern 1 and 2:  |
Photo 4. Sheet 1 is crocheted according to scheme 2.  |
Scheme 3. Crochet a sheet. 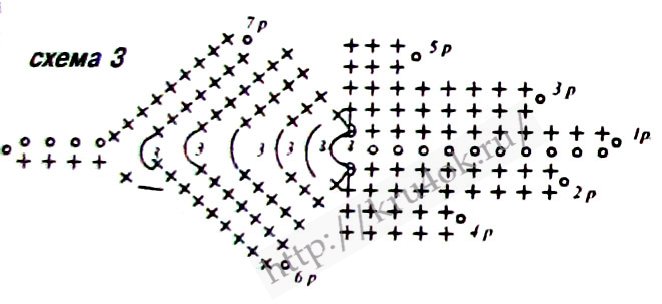 |
Scheme 4. Crochet a sheet.  |
The shape of the leaf, connected according to scheme 1, is wide at the handle and sharp at
end. Increases on the arch according to scheme 2 create a sharper one at the handle
leaf shape. With a large number of dialed air loops (10-12) and
the generally accepted indentation of 2 columns without a crochet sheet turns out to be wide.
The teeth of the leaf are concentrated on the front, the leaf is smooth at the handle.
This form is good when connecting them into a complex sheet (photo 3). At
a small number of air loops of the original chain (4-6) sheet
it turns out narrow and with multi-row knitting - long. teeth
are located along the entire length of the sheet (sheet 2 in photo 4).
And if the composition requires a large sheet with teeth along the entire length? Increase the number of single crochet indents (diagram 3).
For clear, ornamental compositions, one or two types are used.
leaves. The sketch draws leaves of different sizes and shapes: small and
large, flat and curved. The rotation of the sheet is obtained when knitting
different number of RLS on the left and right sides of the arch: 1 and 2, 2 and 3
give a slight turn of the sheet, and 1 and 3 - a steeper one. Sheet 4 on photo 4
associated with a turn in one direction (Scheme 4). This variety of shapes and
the size of the leaves only decorate the composition.
To be continued …

We continue the conversation about knitted leaves.
Diagram 5 shows a sheet in which the turns are connected alternately in
different sides. A variety of leaf shapes decorates the composition, gives
her expressiveness. Experiment and you. How else can
get curved leaves? In addition to zabchatyh, there are rounded and
random leaf shapes. Often found in compositions small
leaves connected by columns of different sizes. For rigidity and
beauty, tie them with single crochets with "pico" or "crustacean step"
(see diagram 6 and 7).
Tip: do not knit more than 2-3 half-columns in a row. Their function is to create
smooth transition from single crochet to double crochet.
Similar to knitting
small leaves seems logical knitting leaves of medium size
columns with 2 and three crochets. Yes, it is possible, but the sheet is even after
strapping is somewhat loose. Medium sized leaves
look better if you tie them with single crochets, half crochets and
columns with one crochet on both sides of the VP chain (diagram 8).
Tie such a sheet with single crochets twice in the same
column heads. Of course, on the rounded places of the sheet, add
single crochet. For the handle, knit 6-7 air loops and in
in the opposite direction, tie single crochets on them.
 |
Another version of the sheet: knit different-sized columns on columns without
nakida, with which on both sides tie a chain of air loops
(scheme 9).
Tie this sheet with bourdon: fold the knitting thread in half (this is
bourdon), secure the single crochet in the middle of the bourdon, fold the threads
bourdon together. Then hold the thread along the fabric and tie
single crochet. Having tied the sheet completely, tie 6-7 sc around
threads (on bourdon) for a leaf stalk. Tie the VP, cut off the bourdon
unevenly, attach the remnants to knitting and knit RLS in reverse
direction. Tie the connecting posts at the base last
sheet, break the thread and pull it to the wrong side. Thread tail use
for stitching elements together.
If you have conceived a canvas of openwork, transparent elements, then
the way the leaves are knitted is changing. The diagrams show options for
leaves: small (scheme 10) and medium (scheme 11). Binding in two rows
RLS will give shape.
 |
 |
 |
Two more options for openwork leaves are shown in Scheme 12.
To be continued …

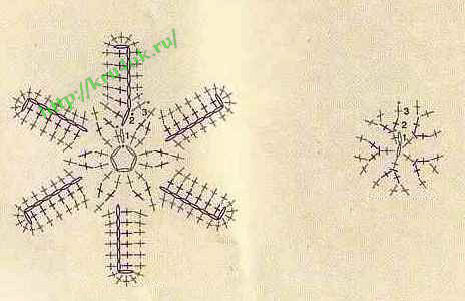
We continue to publish patterns of knitted leaves. This part of the leaves
real flowers and plants: clover, oak leaf, etc. They are perfect
for knitted applications, brooches, color compositions.
Knitted clover leaf  |
Knitted oak leaf  |
 |
 |
 |
 |
For an example, how you can use knitted leaves in a composition:  |
Knitted maple leaves  |
 |
To decorate a hat, scarf, blouse and other things, you can tie a flower with lush petals on this master class with video. For knitting a flower, yarn of two colors is used - light for the center and bright for the petals. Choose a crochet hook according to the thickness of the threads.
Description of crochet flower:
Start knitting a flower from the center with a light thread. On the hook, make the initial loop, dial 5 air p. and lock them into a ring by making a connection. Art. in the first loop. Next, dial 4 air.p. as lifting loops for knitting the first row. On the hook, make 2 yarn overs, insert it into the central ring, pull out a working loop, knit two yarn overs and a loop from the hook alternately. Linking the first art. s / 2n, again make 2 crochets on the hook and knit the second st. s / 2n. In total, tie 22 tbsp from the central ring. s / 2n. To complete the circular row, make a connection. in the 4th lifting loop.

For knitting the second row, make 1 air p. lifting and knit from each loop in a circle st. b/n. Finish the row with a connecting column in the 1st lifting loop, cut and fasten the thread on the wrong side. The result is a light circle - the center of the flower.

To knit the petals, take a thread of a different color, make the initial loop on the hook, insert the hook into the first loop of the row and attach the thread of the new color.
For the first petal * Dial 5 air loops, then make 2 yarn overs on the hook, insert it into the same loop and knit st. s / 2n, this is how an arch is formed - the backbone of the petal.


Now dial 3 air.p. lifting and inserting the hook for the leg of st.s / 2n, knit 7 tbsp. s / n. Secure the petal by making st. b / n from the next loop to the central circle, this loop will be the beginning of knitting the next petal, then repeat all the steps from *.


In this row, it is necessary to knit a petal from each loop of the central flower circle, in total you will get 22 petals in a circle = the number of columns of the first row.


Having connected the last petal, make art. b / n at the base of the first petal, then knit connecting posts along its side chain to the top.

Crochet, knitted little things, are now at the peak of popularity. Crocheted flowers look especially interesting for adult and children's clothing and hats. We suggest you try to knit beautiful bright flowers. Our master class is simple and clear, with a step-by-step description and diagrams. Crochet flowers for decoration can be knitted from completely different threads: cotton, woolen, synthetic, silk, mixed and darning. The main thing is that they are tightly twisted, and do not fall apart into thin threads.


The most popular crochet flower is, of course, the rose. Knitted roses are often decorated with children's and adult hats, cardigans, bags, headbands, and so on. We offer you the easiest master class that is suitable for beginners to crochet. The center of the rose can be decorated with a bead or a button, which is very important now.

For work you will need:
- Threads of medium thickness.
- Hook number 2.
- Scissors.
- The needle is big.
Cast on an even number of stitches. For example, if you crochet xxx50 loops, then the rose will be 7-7.5 cm in size. The number of loops depends on what size you want to get a rose. In our master class, we collect 26 loops, we will make a small rose. The first row - we knit RLS (single crochet).

Second row: we knit 2 VP (air loops) for lifting, in the 2nd loop we make RLS + 2 VP.

Third row: in the 1st loop of the second row we knit 5 CCH (double crochet).

The same thing in the next loop: we knit 5 CCH.

Thus, we knit the entire row, to the end.

A spiral has formed, which must be twisted into a column and stitched with a needle so that it does not fall apart.

In order to make a leaf, you need to knit a chain of 8 loops.

Second row: 2 sc (single crochet), 3 dc, 2 sc.

We continue to the end.

At the end of the work we knit a pico.


Such beautiful crocheted flowers are easy to knit in one evening. The combination of colors in this master class depends on your imagination, because pansies can be amazing in color.

We will knit according to this pattern:

Let's get started: make a slip stitch. We recruit 5 sc into it.

Next, we knit as follows: 1 runway (lift air loop), 2 sc in the sc of the first row, 6 ch, 2 sc in the second sc of the previous row, 6 ch, 2 sc in the third sc of the previous row, 6 ch, 2 sc in the fourth sc of the previous row , 6 VP, 2 RLS in the fifth RLS of the previous row.

Under 6 VP we knit 1 SS (connecting column), 1СБН, 1 PS (half-column), 1ССН (column with a crochet), 10 СС2Н (column with 2 crochets), 1 CCH, 1 CCH, 1 PS, 1 RLS. Under the next six VPs, we knit 1SBN, 1 CCH, 10 CC2H, 1 CCH, 1PS, 1 RLS.

Under the third 6 VPs, we will knit 1 RLS, 1PS, 8 SSN, 1PS, 1SBN. Under the fourth 6 VP we knit 1СБН, 1 PS, 8 CCH, 1PS, 1 RLS. Under the heels of 6 VP we knit 1 RLS, 1 PS, 8 SSN, 1 PS, 1SBN.

We tie RLS with two large petals on top with contrasting threads.

These cool flowers can be crocheted to decorate clothes, stripes on the head, and so on. An excellent decor will come out of such a lotus. You can pick up melange yarn with a small print, it will look very nice in this product.

This flower needs to be crocheted gradually, in several steps. First, three sheets are knitted. In order to tie a sheet, you need to dial a chain of 5 VPs and close it into a ring. Next, you need to tie a chain of RLS (single crochet). Then knit the leaves according to the pattern.

Next, let's move on to the petals. Let's start the lower petals with a set of 10 VPs. We tie the loops of CCH (columns with a crochet), look at the diagram. At the end, you need to tie the leaves of RLS, and then tie them with concave RLS, as in the diagram.

We knit the top flowers carefully, otherwise the product may warp, and it will not be symmetrical. For the upper flowers, you need to dial a chain of 8 VPs and tie with CCH (double crochets), as seen in the diagram. When all parts of the flower are ready, they must be sewn with the same threads.

Crocheting is not always the epitome of clothing for the whole family - it is also the creation of comfort in your own home. Each needlewoman at least once thought about knitting artificial flowers - they will always remain bright and airy, but there is no care for them. Moreover, each needlewoman has a lot of leftover yarn, which takes up a lot of space in cabinets and storage boxes. To get rid of leftovers with benefit, you can resort to crocheting a whole bouquet of flowers. The article presents crochet flowers, patterns and descriptions for free.
Crochet roses
Crocheted roses, only at first glance seem difficult to perform. In fact, their knitting turns out to be the simplest and most promising - in a short time, in just a few hours, you can create a whole bouquet. This is also a great opportunity to please loved ones with a bouquet of flowers, especially in winter and on an unplanned visit.
So, for crocheting roses, you will need the following materials and tools:
- red and green yarn;
- hook of a suitable number;
- small diameter wire;
- double sided tape.
Crocheting roses occurs in the following sequence:
- Choose a knitting pattern for a rosebud. Here you can use a simplified knitting pattern in the form of a long strip, which is then twisted and folded into a bud shape. Such knitting requires sewing up the base of the existing bud.

- The second option for crocheting a rosebud involves knitting each petal separately - this is not difficult, but painstaking. After knitting the required number of petals, they are simply collected into a bud and tied at the base with wire or thread.

- After choosing a pattern pattern, make a bud. Sew the base or tie it with wire. Individual petals are easier to collect on the base - it may already be a stem made of wire with a cotton or thread tip. The tip should be completely covered with petals.
- Next, tie the sepal according to the presented scheme. Of course, now you should use the green thread.

- In the same way, using the above diagram, tie the leaves. Beginners do not need to start knitting a whole shoot with leaves - it is enough to knit from 3 to 7 leaves, which depends on the length of the main stem. When knitting leaves, leave the long end of the thread at the base.
- If you used the first method of knitting a bud - knitting a strip folded into a bud - insert the wire designed to form the stem into the middle. Put a sepal on the bud and wrap the bud from the bottom with the second piece of wire - this is how you will form the pedicel.

- Use double-sided tape - wrap the stem with tape, grabbing the pedicel. As you wind, attach the leaves, capturing their base by 5-7 mm, wrap the stem with a piece of thread from the leaves and also secure with tape.
- From the sepal to the end of the stem, carefully and evenly, without leaving gaps, wrap the wire with adhesive tape with green thread.
- Similarly, make several roses, arrange them in a bouquet.
In the presented image, several other variations can be made. Some needlewomen prefer to simply put such bouquets in vases. The second wants to make a bush, resorting to using a simple flower pot, having previously installed roses in pieces of foam. Still others crocheted the pots separately so that the composition was completed. The following is a selection of ready-made compositions of different variations and a video with a master class for beginners in knitting. 


Knitted peonies

Peonies are knitted similarly to a rose. Here you should also use the diagram below and tie the bud. Next, a pedicel is formed with wire or thread. For knitting leaves, you can use the above pattern. A stem is similarly made of wire and leaves are attached. 
Bound peonies often form into a regular bouquet of flowers that look great in a long, narrow glass vase. A master class for knitting peonies is offered in the video.
Knitted daffodils

After crocheting the simplest flowers, you can begin to implement the most complex ones, namely, knitting daffodils. You can knit them in the same sequence as presented above, with the exception of using other patterns and threads.
So, start knitting daffodils in the following sequence: 
- Start knitting with a whisk - use scheme 1 in the picture below. The color of the corolla can be different - white, yellow, brown or even black.
- Attach a yellow or brown thread to the base of the corolla and continue knitting the core, according to scheme 2.
- Attach a yellow, orange or white thread to the base of the core for knitting bud petals - use pattern 4.
- At the end of knitting the bud, you should attach a green thread to the base and knit the cup according to scheme 3. The cup can also be knitted separately, and then attached to the bud.
Stems and knitting of leaves occurs in the sequence presented earlier. The only difference here is the shape of the leaves - to match them, they are knitted according to the proposed scheme in the picture. 

irises

Craftswomen are attracted by knitted irises, which are also formed into bouquets and placed in vases. There are two ways to knit irises.
First way 
The first method involves knitting bud petals in a more airy way. Here we use the scheme presented below. 


Otherwise, the technique of flower formation is no different from others. So, after the required number of petals are connected, they begin to form a bud - you will need to connect the petals and attach them to the wire, which also acts as a stem. This stem may have a base at the tip - it is either knitted or formed by winding a thread, cotton wool (it should be painted over in diluted paint). Leaves can be knitted according to the pattern that was used for knitting daffodil leaves.
Second way

The second method offers denser petals and "massive" buds, two schemes are used here.
The first scheme is for knitting the lower petals of a bud - the detailed technique is shown in the photo. A schematic interpretation of the proposed knitting is also given - the numbers in the diagram indicate the number of single crochets.


 The second pattern is knitting more wavy petals - the upper ones. It also offers complete instructions and a sequence in the photo, as well as a diagram of the number of single crochets for each row.


Both types of petals are collected as shown in the picture, the stem is formed in the same technique as before.

Tie a few irises and put them in a vase - they will look attractive in every interior.

tulips

"Yellow tulips, ooh!" - this phrase and melody arise every time when it comes to these beautiful spring messengers. They can be connected using also 2 ways - simpler or more complex.
The easy way

In a simple way, a tulip bud is a single crochet cup, which is clogged with cotton and sewn up in a certain way. In order not to read the descriptions for a long time, it is enough just to offer photos that seem to be craftswomen - their crochet handicrafts. 


A lot of tulips are knitted in a similar way, which are later collected in bouquets - it is better to put them in a basket, because such a composition is a spring essay. 
Second way
The second method involves knitting the bud petals separately. So, for starters, they begin to knit according to the scheme the inner petals in the amount of 3 pieces, the scheme of which is proposed - it also contains symbols. 
Next, proceed to knitting individual petals. First you need to tie the petals of the second layer - for this they use a cone-shaped shape. After knitting 2-3 petals of a more rounded shape - they will be external and final. 

All the petals are gathered together on a stem wire. Then they continue to form a flower in the same sequence as the previous flowers - do not forget about the leaves, which can be presented as simple double crochets.
Crocheted flowers are always spring in the house and spring mood in the soul. Create a cozy atmosphere in the room - arrange tied flowers on the windowsill and admire the spring landscape.