Napkins and border. Crochet openwork border: diagrams, photos, description Knitted border for a tablecloth with description
The final stage of knitting many products is tying its open edges. This measure is necessary to give knitted items neatness and completeness.
Areas of application for borders
According to the dictionary, a border is a strip along the edge of the canvas, differing from it in color, texture or pattern. Often, the border serves decorative purposes. It emphasizes the festive purpose of clothing or knitted interior items. The most convenient way to make a crocheted border. Schemes for implementing any ornament can be easily found online.
Most often, borders are used on items of clothing or interior decoration, but there are frequent cases of using this element in techniques such as scrapbooking, decoupage, sewing dolls, making jewelry and other crafts.
Using borders to decorate clothes
The lace of some ornaments are presented below) greatly decorates the clothes. It is used to decorate the bottom edge of the product, sleeves and necklines. Quite often, the product itself is knitted with a simple, uncomplicated pattern, and the main emphasis is placed on the lace border. This is true for skirts, dresses, sweaters and pullovers.

Speaking about the use of borders when knitting skirts, one cannot fail to mention the excellent opportunity to turn the border into a series of openwork ruffles. The crochet border (it is better to choose wider patterns for such models) has an uneven edge, which gives the ruffles additional volume, lightness and airiness. To create ruffles, the border is tied or sewn onto the main fabric in tiers. In this case, the free edge of each tier slightly overlaps the first rows of the next one.
The practical idea of adjusting the length of children's clothing is also very popular. When skirts, pants and shorts become short, but are still suitable for the child in other sizes, it makes sense to extend their service life. For this purpose, a border is crocheted to the bottom edge. The patterns for this kind of canvas are chosen to be simple, and the width varies by the number of rows.
Border for decorating tablecloths and napkins
The border owes its extreme popularity to the efforts of previous generations of knitters, among whom pillowcases, tablecloths, curtains, towels and other textile items decorated with knitted stripes were considered the height of fashion. Many of these traditions have carried over to the present day.
The openwork border must be consistent with the style and ornament of the main fabric of the tablecloth) can be knitted in a circle or using right angles, just like the border for processing the edges of napkins.

When tying towels, only the end edges are bordered, so there is no need to knit the corners.
Certain aspects of knitting borders
Based on the characteristics of the manufacturing process and appearance, the border can be:
- Rovnoy.
- Circular.
- Angular.
- Transverse.
As for the first type, everything is elementary here. The length of the border corresponds to the length of the edge, there are no corners. The edges remain free or are sewn together.

The circular method of knitting a border is similar to the process. It is important to follow the principle of correct expansion of the fabric. An excessive number of stitches will result in a “skirt” and the outer edge of the border being too wide. At the same time, insufficient addition prevents the formation of a round border shape. Its outer edge will be drawn out, and the canvas will be disproportionate.
Corner and transverse border
The photo below shows an option for decorating the corner of a textile product with a border.
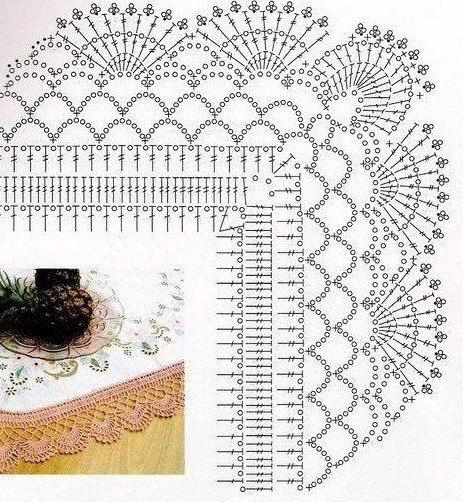
An important feature of such patterns is the expansion of the canvas in a certain place, and not along the entire row, as in circular canvases. Successive additions create a 90-degree angle and ensure the correct appearance of the border. These crochet border patterns (corner formation patterns can be developed independently) are suitable for processing the edges of any products. When calculating the knitting pattern for the edge corner, you should carefully check the number of repeats in each edge between the corners. Mistakes are fraught with incomplete and “truncated” rapports. Correct calculation is only possible with preliminary knitting and measurement of the control sample. This is especially true for knitting this type of blanket (patterns are often not very complex).

A border knitted across is one of the classic types of such decor. Its specificity is in the direction of knitting. In the photographs below you can see that the width of the canvas is the width of the border, and the height of the canvas is the length of the border.

The main pattern is a fillet grid with empty or filled cells. The formation of the openwork edge of such canvases occurs by reducing or adding the number of outer cells.
Non-standard use of border
The development of new types of hobbies and varieties of handicrafts has led to a certain merger of many branches of applied crafts. Therefore, it is not surprising that crochet borders (completely different patterns can be used here) are used to decorate postcards, notebooks, albums, chests and caskets.
More common and, one might say, traditional is the use of borders for sewing dolls or soft toys and decorating their clothes.
On the Internet you can find many photographs of costume jewelry and accessories, which are based on border patterns. Knitting narrow long ribbons makes it easier for craftswomen to create belts, scarves, bracelets and necklaces. This shape is very suitable for making gift potholders, aprons or bookmarks.
To give rigidity to the border, it is impregnated with specific solutions. Usually this is PVA glue, gelatin or starch.
Option, diagrams and instructions for crocheting scarves.
The question often arises of what to give to loved ones. Or how to express your sympathy to a friend. In this case, the ideal option would be a product made by yourself. An embroidered or hand-tied handkerchief is considered quite symbolic.
Traditionally, our grandmothers tied scarves for their loved ones. It was believed that such a gift would save the life of a soldier in battle. Indeed, many military men noted the magical power of a handkerchief given to their beloved. Now such a scarf can be purchased at any store, but if you are feeling anxious, then tie the scarf yourself. This is done quite simply using a hook.
Instructions for crocheting a scarf:
- Most often, the simplest elements are used for strapping. These are air loops, double crochets and single crochets.
- First, iron the scarf well; its edges should be overlocked.
- After this, insert the hook into the outermost part of the casing and make a VP, close it with a blind loop.
- Now tie the scarf with single crochets in two rows. Now you can start lace knitting. To do this, dial 10 VPs and close them with RLS.
- Tie the entire perimeter of the fabric in this way. Now just tie the chain stitches with sc. This is the simplest option and is ideal for beginners. The pattern looks nice and will complement a simple cotton scarf.
Below are the most popular patterns for tying scarves.


VIDEO: Openwork border
How to crochet a napkin: diagram, description, photo, video
Crocheting a napkin is quite simple. You need to be patient and have the necessary materials. Threads #10 or iris are ideal for tying napkins and hooks. Thin threads and a thin hook are selected if openwork and dense lace is needed.
Instructions:
- Tying a napkin is quite simple. It is necessary that the fabric is dense and the head of the hook is sharp enough. This is necessary to simply pierce the canvas.
- Close the blind loop at the very beginning. Knitting begins from the corner of the napkin. Next, knit a row with BN stitches.
- After that, knit a sc in the new row, and then, stepping back a little, knit 5 dc at one point. Knit 1 sc and again knit 5 dc into one hole.
- Continue until you have knitted the entire perimeter. It turns out to be a very interesting binding, reminiscent of petals. It is also quite simple and even a beginner can handle it. It is enough to have basic skills.


Very interesting are the sharp straps that resemble corners. More options can be seen in the photo. More details about the execution of the elements can be seen in the video.
VIDEO: Volumetric crochet border
In general, it is better to choose more voluminous options for tying a scarf. Since the scarf is larger in size than the handkerchief, there should be more rows of binding. Usually these are various festoons. Crocheted lace is tied around the edges.
Instructions:
- There is no need to tie the scarf around the RLS. Just dial 15 VPs and close them with RLS. You will get petals. Now they need to be tied.
- When you have completely knitted the entire row with VP petals, you now need to work with these petals. Now, to the middle of each petal, knit 4 dc, and then 10 ch. Again in the same petal 4 dc.
- After that, knit 4 VP and close in the middle of the petal from the VP. Again knit 4 VP and continue as with the previous petal.
More details can be seen in the diagram below. Apply a variety of lace options. The schemes are shown in the photo below.


Crochet patterns for tying handkerchiefs: diagrams, descriptions, photos
There are a lot of options for tying handkerchiefs. With basic knitting skills, you can tie a handkerchief yourself. Such a product will be an excellent souvenir and a sign of attention.
Description:
- This is a simple, but very cute version of lace for tying a handkerchief.
- It is enough to be able to perform VP and RLS. These are the main elements for this harness.
- To work, you should use thin threads and a thin hook with a small head. The binding must be tight.
- Tie the entire scarf around the perimeter in blocks of 10 VPs, closing the sc. You will get petals.
- Now you need to knit the second row. Only now, in the center of each petal, you need to knit a sc, every 15 VP.
- The next three rows are knitted in the same way as the others. Below are diagrams and photos of finished scarves with binding.


As you can see, crocheting a scarf or scarf is quite simple. At the same time, it is not necessary to master the technique of performing complex elements. It is enough to know how to knit the basic elements.
DIMENSIONS
Diameter approx. 23 cmYOU WILL NEED
Yarn (100% cotton; 387 m/50 g) - 10 g each of white, lilac, apricot and green; hook number 1.SCHEME

COMPLETING OF THE WORK
For the middle flower, use a green thread to make an initial chain of 6 vp. and close it into a ring using the connection. Art.Perform 3 v.p. lifting instead of the 1st column, then take 15 tbsp. s/n in the ring, finish 1 connection. Art. in the 3rd ch. rise = 1st circular row.
Continue working according to the pattern with the lilac thread; to do this, attach a new thread using the connector. Art. and perform the 2nd and 3rd circular rows of the pattern. Start each circular row with the indicated number of vp. lifting and finishing the connection. Art. If necessary, proceed to the beginning of the next circular row using the connection. Art. After the 3rd row of the pattern, the middle flower is ready.
In the same way, perform another 14 motifs, with 7 motifs knitted in the described sequence of colors (green and lilac thread), and in the remaining 7 motifs the lilac thread is replaced with apricot.
Arrange the motifs alternately (see photo) and, starting with the 2nd flower, connect them sequentially in the places indicated by the arrows in the diagram. Combine the last motive with the first.
Attach a white thread to the middle flower and knit the 4th-18th circular rows according to the pattern, with the 8th and 14th circular rows done with a lilac thread, the 9th and 15th circular rows with a green thread, the 10th and 16th circular rows - with apricot thread, the remaining rows are knitted with white thread. To change color, attach a new thread using the connector. Art.
Important: in the 7th circular row between the groups of art. s/n on one loop of the base, evenly distributed, perform 4 times only 2 tbsp. s/n = 156 loops.
In the 12th round row there should be 39 repeats. In the 13th circular row, knit on 195 loops.
In the 17th circular row, evenly distributed, skip 27 x 4 and 15 x 3 loops from the previous row so that in the 18th circular row you get 42 repeats.
At the same time, in the 18th circular row, in the places indicated by the arrows, attach floral motifs using st. b/n. For greater clarity, only part of the diagram is shown; the rows continue by analogy.
The numbers on the diagram indicate circular rows.
ASSEMBLY
Prick the finished napkin onto the backing, sprinkle with starch diluted with water and let dry.Photo: Diana Creative magazine No. 10/2015
Knitted collars
http://vse-sama.ru/sumochki-i-drugie-aksessuary/vjazanyj-vorotnik-model-1.html
Crochet collar.
Width: 12 cm.
Materials: yarn "Snowflake" (100% cotton), approx. 25 g white, hook number 1.
Description of work: dial a chain of 213 v. p. (1 rapport = 20 v. p. + 13 v. p.). There are 10 rapports in total.
1st r.: 10 c. p. (1 v. p. rise + 9 v. p.), 1 tbsp. b/n in the 15th century. p. chains from the hook, * 9 in. p., 1 tbsp. b/n in the 4th century. p. base of the chain from hook *, repeat from * to * to the end of the row.
2nd r.: 6 c. p. (1 v. p. rise + 5 v. p.), * 1 tbsp. b/n to the next arch from the 9th century. p. of the previous row from the hook, 5 c. p. *, repeat from * to * to the end of the row. Glad to finish Art. b/n.
3rd r.: 1 c. p. lifting, 3 tbsp. b/n in the arch from the 5th century. n. of the previous row, * 4 tbsp. b/n to the next arch from the 5th century. p. of the previous row *, repeat from * to * to the end of the row.
Then continue work according to the scheme up to the 21st row inclusive. Cut the thread.
Tying: attach a new thread to the base of the collar and knit 1 row according to the tying pattern on 3 sides of the collar. 2nd row: knit st. b/n in a circle according to the row diagram. Finish the row using conn. Art. 
http://vse-sama.ru/sumochki-i-drugie-aksessuary/vjazanyj-vorotnik-model-2.html
The collar is crocheted.
Width: 8 cm.
Materials: yarn "Snowflake", (100% cotton), 25 g white;
Hook No. 0.75.
Description of work: dial a chain of 315 v. p. (1 rapport = 24 v. p. + 3 v. p.). There are 13 rapports in total.
1st r.: 5 c. p. (3 v. p. rise + 2 v. p.), 1 tbsp. s/n in the 7th century. chains from a hook, * 1 tbsp. s/n in 3rd century. p. base of the chain from the hook, 2 in. p. *, repeat from * to * until the end of the row.
2nd r.: 3 c. p. lifting, 2 tbsp. s/n in the arch from 2nd century. p. of the previous rad, * 2 c. p., 1 tbsp. s/n to the next arch from 2nd century. p. of the previous row from hook *, repeat from * to * to the end of the row. Glad to finish 3rd century. s/n to the last arch from the 2nd century. p. of the previous row.
Next, knit according to the pattern for the 14th row. Cut the thread.
Tying: attach a new thread to the base of the collar and knit 1 row according to the tying pattern on 3 sides of the collar. 2nd r.: knit from the neck side of the st. b/n in a circle on three sides according to the rad scheme.
Starch the finished collar, stretch it to size and leave until dry. 
