Crochet ballet shoes: a diagram describing step-by-step actions for beginner needlewomen using the example of making booties and slippers on the sole. Crocheted ballerinas master class Knitted crochet street ballet flats with patterns
It is sometimes very difficult to please a little fashionista. In the cold season, children's feet must be warm. We offer an example of crocheting children's ballet flats, a diagram with a description will help to make the product much faster. This will be the best solution for a coquette. After all, the decor can be the most diverse.
For a little girl
Let's look at the example of knitting ballet flats for a 5-6 year old girl. To begin with, let's take the simplest solution that even a novice needlewoman can handle. The description will contain both schemas and a description.
So, we need: a crochet hook size 2.5-3.5, a skein of thread to your taste, preferably darker (it's more practical), contrasting threads for decoration.

We knit the next row with double crochets. Knitting is circular, that is, we tie strips of air loops on both sides. In the last loop we knit six columns with a crochet.


We unfold the knitting and knit the double crochets in the opposite direction. In the original loop, we finish the row by knitting 5 columns with a crochet in it (in total, 6 of them will come out in the 1st loop). We knit a connecting column.

Let's move on to the next row. We knit 14 columns without a crochet. Then 9 double crochets. In the next 6 loops, we knit 2 loops with a crochet. And then on the other side, similarly, 9 double crochet and 14 single crochet. Thus, we expand one side of the sole of the ballet shoes so that they follow the shape of the foot.


In order to knit more evenly, next row we knit one double crochet in each loop, with the exception of the toe and heel. There we knit like this: two double crochets in one loop, then 1 double crochet, and then again two double crochets.

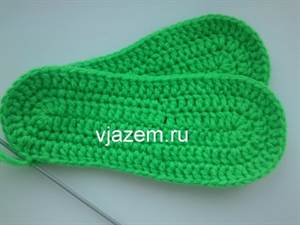
The stand is ready. For the second sole, repeat all steps 1-5.
Let's start knitting the top. Crochet is necessary to capture not loops, but only one. This will allow the knitting to “lift up”. We recommend knitting the first row of the top with relief columns. But they can also be replaced with the usual double crochets.


We knit the second row of the top with double crochets in each loop.


The third row is knitted with single crochets.

We knit the fourth row with single crochets, but already with decreases. You need to make seven cuts in the sock: every two columns.
We continue to make cuts, knit with single crochets.
Fifth row. Seven cuts: two loops together through one pass loop. Sixth row. Seven cuts in a row. The seventh row already contains only two abbreviations.

One slipper is ready. For the second, repeat steps 7-11.

For beauty and elegance, we tie ballet flats with single crochets with a contrasting thread. From the same thread, you can make and sew pom-poms.
If difficulties arise in the process of work, a video on the process of knitting different types of columns can be found on the Internet or at the end of our article.

Ballet shoes are ready. If in this example you use not a white, but a yellow thread, there will be dandelion ballet flats. For decoration, you can use ribbons, beads or ready-made stripes. For a girl, it will be a very original solution to use a shiny gold or silver thread as a decorative thread. Another beautiful and popular solution can be knitting ballet flats from a thread-guardian.
For felt soles
Over the past couple of years, crocheting homemade ballet flats and slippers with felt soles has gained great popularity. In this case, the sole does not fit, but is cut out according to the shape of the child's foot from the purchased insole. Then the insole is evenly sheathed with thread. This is done in order to be able to start knitting. Then it continues according to the selected description or scheme.


Booties for newborns
If you or your friends are expecting replenishment, booties for newborns will be a good attribute for discharge, christening, for a photo shoot, and just for ordinary walks. Such a little thing can be a good gift and memorabilia. You can connect them very simply and quickly.
Using different types of decor, such booties can be a great gift for the New Year holidays, March 8, and just for any memorable date.


A master class in crocheting everyday booties for a newborn girl is attached next.
We will need: a hook of 2-3 sizes, 2 colors of threads, possibly leftovers. Do not forget about the composition of the threads.
On cold winter evenings, you want to surround yourself with something warm: hot tea, a fireplace, a sweater carefully knitted by your grandmother, and legs wrapped in a blanket. And if there is no blanket, then the feet can be hidden in woolen socks. Alternatively, you can wear crocheted slippers. Ballet shoes are beautiful and elegant, and most importantly, they will suit fashionistas of any age: from babies in a cradle to adult ladies.
Knitted or crocheted ballet flats compare favorably with other shoes in that they do not cover the entire foot, but have a heel. They are comfortable to wear, and most importantly, easy to knit. It will take a little time to make such slippers, and needlewomen of any level can cope with them.
Let's look at some details. Ballet shoes can be made on felt soles, then they will last much longer. But traces can be connected. In this case, the work takes place in one breath, since, starting from the sole, they finish with the processing of the upper edge.

There are a lot of schemes with a description for ballet flats: these are booties for babies, and slippers for adults of various types - openwork, knitted with an elastic band, straight and with clasps.
Knitting master class
Consider step by step how to crochet slippers-ballet flats. The scheme and description are quite simple, even a novice craftswoman can handle them. To work, you need a 2.5 or 3 mm hook and suitable yarn.
Yarn selection
To knit a truly warm pair, you will need woolen or semi-woolen yarn. Such a thread warms well and keeps heat, but it is completely unsuitable for constant wear and quickly wears out.
Therefore, in this case, it is worth knitting footprints either from another yarn, such as acrylic, or making them double from threads of different composition, or using felt insoles.
In addition, the size of the hook depends on the chosen yarn. For example, "Children's whim": the manufacturer claims that it is suitable for 3 mm knitting needles. So, the hook will be required with the same number. However, if you take a hook 1.5, then in the same way, without changing the number of loops, you can knit ballet flats for a child.

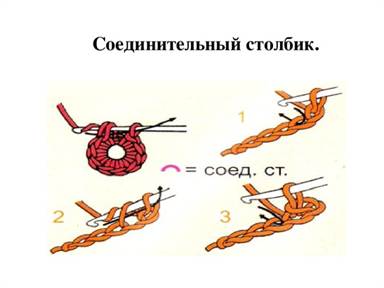
Conventions
The knitting pattern of this model of ballet flats is not particularly difficult. Nevertheless, not all knitters can read patterns; many even knit “by eye”. Therefore, in this master class, a verbal description is given for the graphic scheme, which uses the following abbreviations:

Operating procedure
Consider the option with a connected sole. Work starts from the middle and goes in a circle. They collect a chain of 30 air loops (VP) + 1 lifting loop. The first row starts with the second loop from the hook.
Each row ends with a connecting column and a lifting loop: one - if the row is knitted with RLS, two in the case of half-columns and three when the row consists of double crochets.

The figure shows step-by-step instructions for the diagram. Consider some of the nuances:
- After 3 sc with a common base in the first round, we continue to tie the chain on the reverse side, for which we carefully turn the knitting. In the second row, we begin to add loops.
- In the second row, the last increase is counted from the lifting VP, that is, 1 RLS is knitted into the last column and the row ends in the first loop.
- In the seventh row, we begin to form the expansion of the sock. Here between ** repeat 7 times.
- The eighth row is the last row of the sole. Repeat between the stars 6 times.
The trace is ready, the thread is not cut off. If you use different yarns for knitting the top and sole, or if you want to make a two-layer track, then you need to fasten the thread and hide the tip.
Having connected the second part of the bottom, fold both halves and tie them in a circle with connecting posts. Then they move on to work on the ballet itself. The first row of the top can be knitted in three ways:
- Embossed concave columns with a crochet.
- SSN for the front or back wall.
- Continue straight knitting dc.
In the first case, a clear boundary is formed between the sole and the top of the slipper in the form of a pigtail. The second option provides a smoother flow from one part of the product to another. The third allows you to make a rounded transition.

Sometimes one scheme is not enough to avoid problems in work. In this case, some explanation is needed:
- In the second row, the formation of the ballet toe begins. Between ** repeat 10 times.
- The third row forms the heel. The whole row is knitted in columns with nikid. Between ** repeat 8 times.
- We continue to reduce the loops in the fourth row. Between ** repeat 8 times.

The ballet is ready. It remains to tie the upper edge in the way that is more to your liking. The diagram shows a variant of RLS + pico from 3 VP + RLS.
To decorate slippers, you can use knitted flowers or satin ribbon. This model involves decorating the toe with five flowers along the edge. Flowers are knitted according to a simple pattern in one row: fold the amigurumi ring, knit (SC + 2 VP + SSN + 2 VP), repeat 7 times.
 To crochet baby booties for babies according to this pattern, in the initial chain, knit not 30 VP, but 18. The expansion of the toe and rounding of the heel is done according to the same principle.
There are no problems with patterns on the net, and crochet ballerinas look stylish. But most importantly, they will bring comfort to your home and warmth to your feet.
Home shoes have become an integral part of the cosiness and comfort of our home. But at the same time, women treat her appearance with special trepidation. This shoe should not only save our legs, but also serve as their decoration. And what will do better with this task than a little thing made with your own hands. This is especially true for crocheted patterns. Not only do they look attractive, but they also help health. After all, the woven sole massages the human foot, but which has many acupuncture points. Moreover, great skill and skill in the process of creation is not required. Even an inexperienced needlewoman will cope with the work, it is enough to carefully study the description and diagram.
Features of creating crochet ballet flats 
All work on the creation of this wonderful little thing can be divided into three stages:
- Sole making. It can be knitted or made using improvised materials. For harvesting, take suede, thick leather or felt. Stand on a piece of material with your foot and trace the outline of the foot. Add 1.5 cm along the edge and cut out the workpiece. Then, using an awl at an equal distance, make holes for crocheting. As a sole, you can use a ready-made felt insole, which is sold in shoe stores;
- Knitting the base. Any yarn can be used for the product, but when choosing, keep in mind that the product will quickly get dirty and often be cleaned or washed. Therefore, it is better to use synthetic fiber: high-quality acrylic or viscose. Another parameter worth paying attention to is the thickness of the thread. For this product, choose thick threads. If only fine yarn is available, fold it several times. The optimal number of fiber folds at which it is comfortable to work with yarn is three;
- Decoration of finished shoes. I don’t think it’s worth talking about the role of jewelry in transforming the appearance of a thing. In this capacity, both knitted elements and various decorative details can act: beads, beads, sequins, ribbons and more.
Reference! Also, footwear can consist of a single piece or be assembled from several pre-linked motifs. They also differ in shape: they can completely cover the limb or do it only partially.
For the cold season, it is preferable to use a denser model, and for summer, tie slippers that cover only the toe and heel. They will have better air circulation and the foot will not overheat.
How to crochet ballet slippers 
The principle of knitting homemade ballet flats is the same for almost all types of models. Let's look at the example of a detailed procedure.
This sample is made of yarn with parameters 120gr\50m - sole and 140gr\50m - warp. The sole is knitted with a crochet No. 3. The rest of the knitting is done with crochet No. 2:
- Dial a chain of 40 ch. and knit 2sc, 19 sc, 1 dc, 17 dc. Further, we knit 5 CCHs in the extreme loop of the chain and knit 17 CCHs, 1 PSN, 20 RLS, a connecting column on its second side;
- Then we start each new row with a lifting ch. and performing increases: 3 on the heel and 5 in the toe area. We knit the remaining loops as in the previous row;
- Starting from the fourth row, work to perform RLS;
- At 7 p. instead of RLS, knit CCH;
- From 8 p. work to continue RLS without increments;
- From 15 p. we form a toe. To do this, in the area of \u200b\u200bthe toe, we evenly make five decreases;
- At 16-18 p. perform 7 reductions;
- In the 19th row, after the decrease, we knit 2 RLS and unfold the work;
- Knit several rows so as to close the toe;
- To give shape in the center of short rows, decrease in the central part;
- Next, we perform a circular row. At the same time, perform three decreases on the heel with an interval of two loops;
- Run the last row and sew, if you wish, decor.
If you want to knit shoes from separate motifs, then the workflow looks a little different. The initial stage (manufacturing of the sole) is carried out in a similar way. After that, the required number of elements is knitted according to the selected pattern. It is better to use hexagonal shapes.
Then, using a needle or hook, they are attached to each other and to the sole. The edge of the product is tied, and the little thing, if required, is decorated with decor.
How to decorate ballet flats
 There are a lot of techniques for decorating knitted shoes. It can be pompoms or a flower made of yarn, an embroidered appliqué or a beaded pattern. Another interesting way to give this item an unusual look that will cheer you up is to make them in the form of a cute animal face. Let's take a closer look at each option:

I want to warn you right away, this is not quite a master class. Rather, these are my notes in the course of knitting. I am doing this work for the first time, so mistakes and all sorts of "jambs" cannot be avoided. Please do not judge strictly because I tried my best.
MK slippers
So, for everyone who is interested in my embodiment of slippers (the model was not invented by me, the shoes are connected according to the description from open sources), I want to tell you how I did it, step by step. First of all, I want to say that the description is quite simple and understandable, so I'm sure you could manage without my advice. By the way, here it is, this is the very description:
//img-fotki.yandex.ru/get/4710…
Abbreviations used in the description:
st b / n - single crochet
st s / n - double crochet
SS - connecting post
p - loop
c.p. - air loop
For beginners:
single crochets knit like this: //img-fotki.yandex.ru/get/5412…
double crochets like this:
and this is how half-columns are knitted with a crochet: //img-fotki.yandex.ru/get/5312…
As for the required materials: 
we will need:
- yarn for the sole. This time I took a hank of those that are sold for 15-20 rubles. on the market, I will knit in 2 threads;
- yarn for the main part. For this pair, I took a wool mixture from Kamteks "Romance" 120 m per 100 g (I want to advise, take a thread thicker than mine);
- hooks No. 3 and No. 4;
- satin ribbon 3-5 cm wide for bows and 1 cm wide in order to pull these bows;
- insoles of the right size;
- tailor's pins with a plastic tip;
- sewing threads and needles.
Let's get started
I want to warn you that the numbers given in the description refer to hooks of a larger size than those that I will use. This time I am knitting slippers in size 36, but I will focus on the numbers that correspond to the average size.
1 circle: with a black thread in 2 additions and crochet No. 4 I dial 27 ch. 
I do 2 tbsp. b / n in the 2nd loop from the hook 
st b / n in the next 13 ch, half-column in the next loop, st s / n in the next 9 ch. 
2 sts s / n in the next ch, 5 sts s / n in the last ch Then we knit from the opposite side of the chain 
2 st s / n in the next loop, st s / n in the next 9 ch, half-column in the next ch, st b / n in the last 14 ch, connect the SS in the first st b / n ( total 58 loops) 
2 circle: ch 1 for lifting, st b / n in the first loop (I make this column directly into the loop into which I closed the SS in the previous one), 2 st b / n in the next loop, st b / n in the next 14 ch, st in next 12 sts, 2 sts in next st, 3 sts in next st, 2 sts in next ch, st in next 12 sts, sc in next 14 sts, 2 sts in last st , connect the SS in the first st b / n (total 64 loops) 
3 circle: 1 vp for lifting, st b / n in the first loop, 2 st b / n in the next loop, st b / n in the next 13 loops, skip the next loop, st b / n in the next 12 loops, (2 st b / n in the next loop, st b / n in the next 3 loops) - repeat 2 times, 2 st b / n in the next loop, st b / n in the next 12 loops, skip the next loop, st b / n in the next 13 loops, 2 st b / n in the last loop, connect. (total 67 loops) 
4th circle: we attach the thread for knitting the main part. Sc in first st, 2 Sc in next st, Sc in next 30 sts, 2 Sc in next st, Sc in next 3 sts, 2 Sc in next st the next loop, st b / n in the next 29 loops, 2 st b / n in the last loop, connect. (total 71 loops) 
Please note: the edges of our knitting began to wrap inward. As my mother says, the cookbook says nothing about it. So, personally, I continue to knit, as I knitted and do not twist knitting. Thus, the front side of knitting remains inside me.
5 circle: 1 vp for lifting, st b / n in the first loop, st b / n in the next 2 loops, 2 st b / n in the next loop, st b / n in the next 29 loops, 2 st b / n in the next loop, st b / n in the next 7 loops, 2 st b / n in the next loop, st b / n in the next 28 loops, 2 st b / n in the last loop, connect. Total 75 loops 
From 6 to 8 circles: knit straight, without additions or decreases. Do not forget to do c.p. for lifting 
9 circle: from this row we will begin to decrease. Ch 1, sc in first st, sc in next 26 sts, (skip next st, sc in next 2 sts) - repeat this 4 times, (sc in next 2 sts, skip next st) - repeat 4 times, st b / n in the remaining 24 sts, connect. Total 67 loops 
Now the front of our slippers began to round and close 
10 circle: ch 1, st b / n in the first loop, st b / n in the next 28 loops, (skip the next sts, st b / n in the next loop) - repeat 3 times, (st b / n in the next loop , skip the next p.) - also repeat 3 times, st b / n in the last 26 p., connect. There are 61 stitches in total. 

11 circle: ch 1, st b / n in the first loop, st b / n in the next 29 p., (skip the next p., st b / n in the next p.) - repeat 3 times, st b / n in the last 25 p., connect. Only 58 sts left. 

12 circle: in the scheme, this row is recommended to be knitted behind the back walls of the loops. When knitting the first pair, I did just that. And in the next one I already knitted it in the standard way “under the loop”. I'll explain why. When knitting behind the back walls of the loops, the edge stretches more than with the usual knitting method. If your yarn is soft, I recommend knitting “under the loop”, if the yarn is elastic, you can knit behind the back walls - at your discretion.
In the description, a thread of a different color is also attached in this row. I continued to knit with the main color. 1 ch, st b / n in the first p., st b / n in the next 29 p., st b / n in the next 3 p. together. If you suddenly don't know how to do it: 


st b / n in the last 25 p, connect. Total 56 p. 
13 circle: again, at your discretion, knit this row behind the back wall of the loops or as standard “under the loop”. 3 vp for lifting, st s / n in each loop in a circle, connect.
This completes the knitting according to the description. 

Next, I tie the slippers. To do this, I attach a black thread. The thread is not the one that went to the sole. It is softer and thinner. So, I attach the thread, and I turn the work !!! That is, I will knit in the opposite direction to the knitting of the main fabric. I knit this row for the back walls of the loops. The hook is also changed to number 3. I knit 2 ch for lifting and in a circle in all loops half-columns with a crochet. 

Knitted slippers - ballet flats have a beautiful shape, they make the legs graceful, like a ballerina. Slippers connected crochet on a felt insole, so the sole is well insulated and keeps its shape. Felt insoles can be bought or cut to fit your foot.
For knitting slippers, in addition to the insoles, you will need acrylic yarn 150-200 gr., Any two colors, hook No. 3 and a small piece of satin ribbon for decoration - bows. When knitting, make a thin thread in two additions so that the knitting is dense and thick.
Description of knitting slippers:
First you need to tie the sole of the slipper, use dark yarn. Dial the initial chain of loops, for the 39th size 40 air loops. Knit the sole in circular rows, by tying around the initial chain. First row: from the second loop from the hook, knit 2 tbsp. b / n, then along the row 19 st. b / n and to expand the foot, knit 1 half-column, 17 tbsp. s / n, from the last loop for rounding, knit 5 tbsp. s / n, then knit on the reverse side of the chain 17 tbsp. s / n, 1 half-st., 19 tbsp. b / n, from the last two loops of 2 tbsp. b/n. Finish a series of connections. Art.

2nd row: do 1 air p. lifting, from the first loop, knit 2 tbsp. b / n, then knit over st. b / n - art. b / n, over half a century. - half a station, above st. s / n - art. s / n. To round the toe of 5 tbsp. s / n of the first row, knit from each 2. tbsp. s / n, on the heel, also make 3 additions of art. b/n.

For the next 5 rows, knit st. b / n, making 5 additions for rounding on the toe, and 3 additions on the heel.

The knitted sole must fit the cut-out insole.
Tie the felt insole around Art. b/n. To do this, make a hole with an awl at the edge of the insole, insert a hook into it and knit st. b/n. So knit from each puncture for 2-3 tbsp. b/n.

After tying the insole, do not cut the working thread. Attach the connected insole to the felt one and, inserting the hook into the extreme half-loops of both, tie them next to st. b / n in a circle, thereby connecting the two insoles together.


At the end of the row, make a connection. Art. in the first loop, cut and fasten the thread.

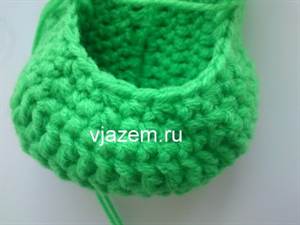
Knitting the top of the slipper. Attach a thread of a different color to the knitted sole and knit in a circle 5 rows of art. b/n. Knit rows of columns in a spiral, i.e. to move on to the next row, start knitting a column from the first loop.

In the 6th row, to narrow the upper part of the slipper, divide the number of loops of the front part by 6 and decrease in these places, knitting 2 tbsp. b / n together after 5 st b / n. Places of reductions can be seen with paper clips, passing them through the reduced posts.

In the next rows, decrease through 4 columns, then through 3, 2 and 1 columns.
In the last two rows on the heel, also do 3 decreases so that the slippers keep well on the leg.

in the 10th row on the top of the slipper, after decreasing through 1 column, knit 4 sts in a row, b / n. Then turn the work and knit back 3 tbsp. b / n, on the central part, make 3 decreases after 1 tbsp. b / n, 3 st b / n. Turn the knitting again and knit the row back, decreasing after 1 stitch.