Crossed purl stitches with knitting needles. How to knit crossed front and back loops. Video. How to knit crossed loops: a brief educational program
Crossed loops are widely used when knitting warm items such as socks, mittens and hats. The advantage of such loops is that the knitted fabric is very dense, wear-resistant and retains its shape well, unlike knitting loops in the classical way. We offer instructions for beginner needlewomen, which describe step by step how to knit an elementary crossed loop, wrong side on the main side, on your own, and also consider several basic patterns performed with crossed loops.
How to knit a crossed purl loop: basic methods
There are at least two ways to knit such loops. Let's look at both of them step by step.
Necessary materials and equipment:- a small amount of woolen or semi-woolen yarn;
- straight knitting needles of the appropriate diameter.
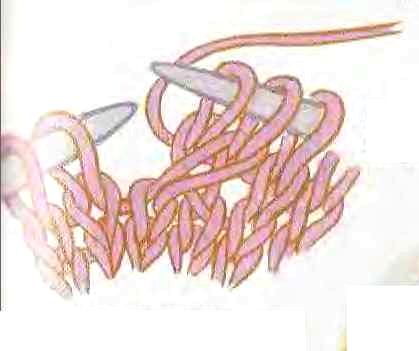
- In one of the purl rows, we begin to knit crossed loops. To do this, we bring the working knitting needle under the broach between the knitted loop and the next loop, which is still on the left knitting needle.
- We put the broach on the left knitting needle and cross it with the working knitting needle for the right leg. From the resulting crossed loop from the broach to the adjacent loop, we pull out the wrong loop.
- We make the next loop in the classical way. The hole between the loops in this case will be completely invisible.
The broach is often referred to as a cross thread, so in some descriptions this way of knitting a crossed purl loop is called knitting from a cross thread. Sometimes the name "knitting from the gap" is also used. It's the same knitting pattern.
Method number 2 - from the yarn:- We collect a small number of loops with knitting needles and knit several rows of garter stitch in the usual way.
- In one of the purl rows, we begin to knit crossed loops. To do this, we form one crochet by throwing a working thread on the right knitting needle.
- We transfer the yarn over to the left knitting needle, turning the resulting loop clockwise, that is, crossing it. We knit the wrong loop from the yarn by analogy with the broach.

The crochet method is used to expand the knitted fabric. If no increase is needed, knit two adjacent stitches together after yarn over.
Consider popular patterns with crossed loops
Crossed loops add extra density to the product, so they are often used for knitting warm winter things. To make the product look neat, crossed loops alternate with classic ones.
"Grandma's" gum.
Crossed loops are often called "grandmother's", and elastic bands for socks that are knitted with such loops are "grandmother's" elastic bands. They are not as smooth and neat as classic ones, but very warm and elastic.
- For an elastic band 1 * 1, we collect an odd number of loops, plus two to form an edge.
- We knit the first row and all odd ones with crossed loops, alternating "grandmother's" l.p. and i.p.
- We knit even rows l.p. and i.p. in a classic way, due to which the elastic bands take the form of "herringbones".
In the same way, you can knit elastic bands 2 * 2 and 3 * 3 loops.
Small dense hatching pattern.
The number of loops is even, plus two additional loops for forming an edge. In the first row, after dropping the edge loop, we alternate one purl and one crossed front loop. At the end of the row, we knit the edge of the classic sp.
Thus, we knit the first four rows, then shift the pattern one loop to the side, as shown in the diagram. It should be remembered that in the purl rows, all loops must be knitted in the traditional way.
Pattern "shadow strip".
We collect the required number of loops for knitting with a garter stitch. We begin to knit in the classic way: the front rows - with traditional front loops, the wrong ones - with traditional purl loops.
After a few rows, at our discretion, we knit a whole row with crossed "grandmother's" loops. In this place, a strip is formed, which differs in structure from the rest of the knitted fabric. We repeat such strips with the necessary interval. You should not do them too often, as the product in this case may not look very neat.
Garter knit with crossed loops.
Crossed stitches can be used to create a garter stitch with more raised stitches and greater density and durability (e.g. for a warm ski sweater or winter hat).
We collect the required number of loops and knit the product in one of the following ways:
- we knit the front rows with crossed loops, and the wrong ones with classic ones;
- We knit the purl rows with crossed loops, and the front rows with classic ones.
It is worth remembering that knitting with crossed loops significantly increases the total work time due to the fact that each loop that needs to be knitted with “grandmother's” must actually be thrown twice from knitting needle to knitting needle.
Video on the topic of the article
In order to more clearly demonstrate the order of knitting crossed loops and their difference from classic loops, we suggest watching the following video tutorials.
Crossover stitches are knitting two or three stitches out of order, but without using an extra needle. This is a very simple way to create patterns in which lines formed by crossed loops are located on the surface of the knitted fabric. Some criss-cross stitch patterns look like miniature braids, while others allow you to create diagonals, zigzags, and diamonds.
Crisscrossing stitches tightens the knitted fabric, therefore, with a lot of crossed stitches, patterns can make the knitted fabric more dense and less elastic, unless, of course, thicker knitting needles are used.
Crossed loops are generally easy to make, but there are many varieties that significantly change the look of the crossed loops.
The crossing of the loops can be performed both in the front and back rows, while the loops can be knitted both front and back, or in combination with these loops.
Crossed stitch patterns in circular knitting are very easy to knit according to the scheme - especially for patterns with moving loops in each row. Simply read each row of the diagram from right to left, changing the symbols in the intersections of the front rows accordingly.
HOW TO MAKE A LEFT CROSS This cross is performed in the front row. Since the loops change places, the first loop lies on top and is tilted to the left, while the loop lying behind it is made from the back wall. 1. Knit from the back of the second loop.
2. Knit st from the front of the first st.


LEFT CROSS OPTIONS To cross over to the left of two loops that will be knitted and purl, purl from the back wall of the second loop, then the front loop from the front wall of the first loop.
For a left slant criss-cross on a purl row, purl from the back of the second st, then purl from the front of the first st.
HOW TO MAKE A RIGHT CROSS In this crossover, made in the front row, the second loop lies on top and is inclined to the right, while the loop located behind is made from the back wall. 1. Knit from the front of the second loop.

2. Knit from the back of the first loop.

3. Slip both stitches off the left needle at the same time.
CROSS OPTIONSRIGHT Knit from the front, not from the back of the first loop, following step 2. Alternatively, knit two loops together, and then knit the first loop again, before dropping both loops from the left needle.
To cross over to the right from the front and back loops, knit the front loop from the front wall of the second loop, then purl the first loop.
To cross over to the right of two loops in the purl row, purl from the front wall of the second loop, then purl from the front wall of the first loop.
Patterns made with crossed loops.
How to cross loops? For this, there is a trick like loop movement- this is such a technique in knitting, when several loops are interchanged relative to each other. You can swap both two loops, and more loops. In order to swap two loops, first the second loop is knitted, and then the first, while the loops cross at the same time. Depending on the method of knitting, these loops may deviate to the left or right. You can also swap more loops, this technique is used when knitting. In this lesson, we'll look at .
Moving two facial loops with an inclination to the right.


How to cross loops with an inclination to the right:
We begin the crossing of two loops by knitting the second loop. We don’t touch the first loop at first, we don’t need to knit it, don’t remove it from the knitting needle, but we begin to knit the second loop with the front one behind the front wall, so that the first loop is behind the right knitting needle. Having knitted the second loop, we leave it on the left knitting needle without removing it. Then we knit the first loop of the front. And only then can both loops be removed from the left knitting needle from the left knitting needle.
Moving two front loops with an inclination to the left.


How to cross loops with an inclination to the left:
To knit such loops, we also do not first knit the first loop, but start by knitting the second loop. We knit it with the front grandmother, i.e. behind the back wall so that the first loop is in front of the right knitting needle. We do not drop this loop from the left knitting needle, but we knit the first loop. Only we knit the first loop with the front one behind the front wall. Then we drop both loops from the left knitting needle.
Crossing loops is widely used when knitting various patterns. You can find these displaced loops in openwork patterns, but they are most often used in textured patterns, so rhombuses and slanted stripes are often knitted.
Moving more loops relative to each other in the form of bundles and braids, we will analyze with you. If you have any questions, then ask! I will try to explain and show everything in detail.
… Moreover, despite the seeming simplicity of the question, plus a sufficient amount of various material on this topic on the Internet, it was personally difficult for me to “enter” all this. even now I have not yet fully understood all the nuances ... In general, there is still something to work on :)
I always adhere to the principle that the best way to understand is to try to do ...
To begin with, many people call crossed loops - grandmother's loops, but is it really so? ...
The question is interesting ... and the answer is not unambiguous ... Although if you understand it thoroughly, then grandmother's loops are also crossed :)
But, only with them, with my knitting method, the appearance is lame ...
Here, look, two patterns of knitting with grandmother's loops, ...
First: front side - grandmother's front, wrong side - ordinary purl loops
Second: front side - grandmother's front loops, wrong side - purl crossed loops 
Let's see it clearly...
How to knit grandmother's loops with knitting needles
To begin with, grandmother's loops, in my concept, can only be facial ... it’s just more convenient for me to think so as not to get completely confused, yes, and to be honest, I just can’t imagine a grandmother who “twisted her hands” for knitting purl crossed ... ... but vice versa ...
This is done in the following way.

Try using this method of knitting a crossed front loop. As a result, in combination with crossed purl loops, it turns out exactly what you need ...  The loops come out even, dense and clearly defined. It is this method of knitting the front loop that I will later call the crossed front loop in the articles on this blog.
Friends, it is clear that crossed loops, exactly like grandmother's loops, are used in knitting to create various patterns. Today I knitted the simplest samples of the usual front surface, but with crossed loops only in order to figure out how these same loops should be knitted in this or that case. And she was quite satisfied with the result. I hope that this material will be useful for you as well. And also, I would really like to know how you knit crossed loops with knitting needles :)
And don't forget to leave your comment. Your opinion matters to me!
If you liked the article, then share this information with your friends by pressing the buttons of social networks! Only, a huge request! - do not copy the entire material, please use the social buttons! Do not be shy! I'll help you as much as I can :) I had an idea - Share it! Find errors - write, correct! There was a desire to somehow help the blog - I will only be glad! Hosting costs money, and materials are not cheap these days... So, if possible, help financially)))
One of the fastest and most unusual ways to decorate the fabric when knitting is knitting with facial crossed loops. With the help of modified front loops, you can form any pattern on a plain canvas. If you knit according to the pattern of a loop through one loop, you will get a voluminous embossed fabric, in which it will be warm and comfortable to walk even in severe frosts. Sweaters, hats, pants are most often knitted with this pattern for children, as well as for adults. Knitting turns out to be lush and at the same time dense, which allows the product to retain heat near the body for a long time.
You can also knit only with crossed loops such things as coats, warm skirts, trousers. Knitting will be dense, inelastic, but very warm.
Often crossed loops come out by accident. For example, with circular knitting. To knit a straight front loop, you need to take the loop by the back wall (right half), but crossed ones are obtained if you start the knitting needle by the front wall (left half).
The front crossed loop is also necessary when you need to increase loops in knitting. If you knit an ordinary straight front loop, then a hole will appear at the place of the increase, which does not always look beautiful and aesthetically pleasing. Therefore, the craftswomen know such a secret, and they add a crossed loop. Then there will be no hole - it will close with a cross of threads, the finished product will look even and neat.
How to knit crossed loops: a brief educational program
The front crossed loop is a regular front loop that is knitted behind the other wall. There is no fundamental difference from the usual straight front loop, but the front crossed loop has an interesting look.

Unfortunately, this type of knitting is only suitable for hand knitting. To understand how to knit a front crossed loop, it is important to understand the intricacies: the whole point of knitting with crossed crossed front loops is that the loop, when knitting or purl, is taken not on the other side, as in a regular knit, but on its other part, the side . In machine knitting, this type of knitting is incredibly difficult to apply, you will have to constantly turn the loops, which is not very convenient, extremely labor-intensive and energy-intensive.

Multicolor Knitting with Crossed Stitches
You can knit with front crossed loops not only plain fabrics, but you can add other colors in knitting. For example, you can draw the outline of a figure, transfer it to the canvas, calculate the correct number of loops, form a pattern from the front crossed loops and knit it in a different color. Small flowers, checkmarks, rhombuses and similar patterns will look ideal.
Crossed front loop: how to knit
First you need to decide on the pattern and frequency of repetition in knitting crossed loops. When knitting one loop through one loop, a rather monotonous product is obtained, which can be diluted with other colors, stripes, patterns. When knitting two loops through two loops, a pattern will be obtained that looks like a chessboard, which looks quite interesting when knitting for boys. To avoid unnecessary work, the pattern of facial crossed loops must be thought out in advance. Patterns of rhombuses, wavy lines, diagonal lines, honeycombs and other simple patterns look very good.
In total, there are two options for knitting a crossed loop, both are performed by knitting behind the front wall. The only difference is that the working thread can be captured both clockwise and counterclockwise, and the appearance of the resulting loop depends on this. Try this in your work and see what the new stitch looks like on the right needle.

It is not very convenient to knit a crossed front loop, every experienced needlewoman will automatically knit the correct straight front loop without hesitation, and will never confuse the front loop with a crossed front loop.
When knitting the fabric on the wrong side, you can also repeat the pattern (and sometimes it is even necessary to get the desired pattern), and then the craftswoman knits the wrong crossed loop. The knitting method is exactly the same: we start the knitting needle behind the back wall of the loop of the previous row and pull out a new loop, already crossed.

Important differences
The usual (that is, a straight front loop) is always knitted for the right half. The crossed (crossed) front loop is knitted for the left half, that is, the back wall with straight, not circular knitting. Perhaps these are all the features of such knitting. Is it really easy?