Crochet women's blouses with a round yoke patterns. Crocheted coquette for children's dress: round and square (diagrams). Coat with round yoke
A huge number of knitted models of women's and children's clothing (dresses, blouses, tops, sundresses) include such a constructive element as a coquette. It means the upper part of the product, which differs from the main part of the canvas in a pattern or color. In addition to its aesthetic role, it greatly facilitates the knitting of any model, as it is knitted in a circle, automatically leveling the need to knit the neckline and armhole lines.
The coquette is that element of clothing modeling that contains the widest possibilities for creating exclusive items of women's wardrobe - it gives originality and charm to crocheted products. The coquette is often used by needlewomen in the design of dresses, sweaters, cardigans and crocheted vests. It looks no less interesting as an addition to knitted clothing models - coquette lace can transform and decorate even a long-forgotten, but such a previously beloved sundress or jumper! Moreover, a coquette with openwork edges can also act as an independent wardrobe item, in particular, decorate a female image as an elegant collar necklace.
A round yoke is a classic of crocheted needlework, which many craftswomen are not averse to practicing, especially those who are just learning to crochet. The yoke can be knitted in one piece or detachable if you plan to knit a product with a clasp.

There are two main options for crocheting a round yoke:
- from the neck down, i.e. first, the coquette itself is knitted and all further knitting is built on its lower edge, from which the sleeves, back and front of the product continue;
- from the armpit up in the transverse direction, i.e. the yoke is knitted from the final row of the fabric of the back and / or the front of the product (it can be done with a fastener in front, on the back or in one piece).
In any case, a round yoke must be knitted in strict accordance with the pattern provided for the model, because in order to obtain a part with a perfectly correct shape, it is necessary to strictly follow the principles of expanding the fabric. At the same time, working on crocheted coquettes does not require a high level of skill from the needlewoman; even a beginner in knitting can easily handle them. For those who like to experiment and create their own models, we offer five crochet round yoke models with detailed diagrams and step-by-step instructions for their implementation.
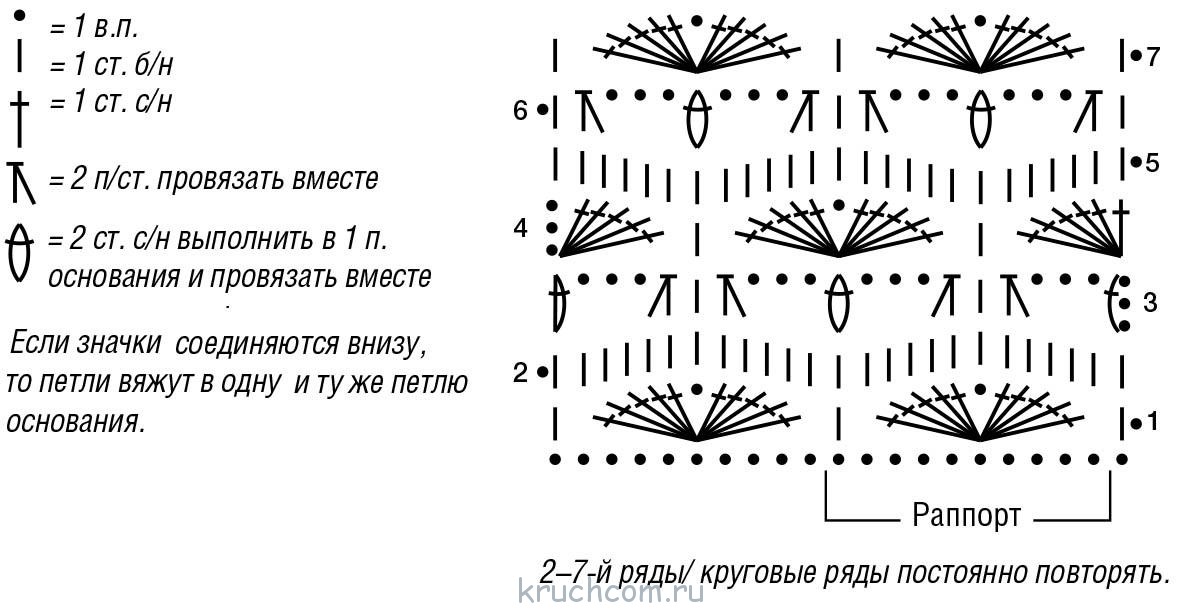
Designations:
- VP - air loop;
- runway - runway lift;
- RLS or Art. b / n - single crochet;
- SSN or Art. s / n - double crochet;
- PS - half-column;
- PR - prev. row;
- SS - connecting column.
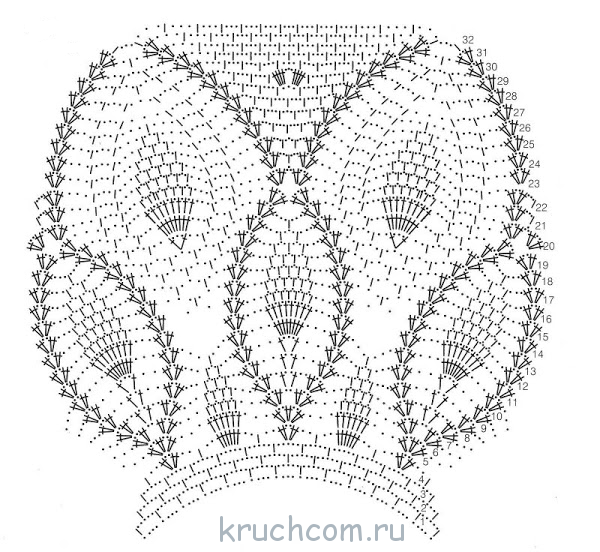
Graceful coquette, made in the pattern "pineapples"

The “pineapple pattern”, beloved by many, continues to win the hearts of needlewomen - the process of knitting it cannot be called super complicated, and the results delight with incredible beauty. Crocheted pineapples look chic on yokes, moreover, it is convenient to connect any other knitting intended for making the back and front of the product (openwork, fillet, motifs) to the completion of such a pattern. We propose to consider step by step the stages of knitting a coquette “in pineapples” with a solid fabric.
The element schema looks like this:
Completing of the work
Knitting is carried out in a circular way, according to the principle "from the neck". We knit the base-chain of 160 VP, close it in a circle with the help of the SS.
Row number 1: 4 VP, 2 CCH in the next. VP, then rapports to the end of the row: skip 3 VP and perform 2 CCH in the next. VP, + 1 VP, next. we knit a loop 2 CCH + 1 VP. We finish the row by skipping 3 VPs, then knit 1 dc in the same loop as the first VP of the row, close the SS row in the third VP from the beginning of the row. We continue to work in a circle with a pattern according to the scheme of the coquette.
We knit until the length of the yoke is 20 cm. In the penultimate row of the element, we separate the loops for knitting the back, front and sleeves.
Round yoke with openwork pattern

Such a coquette is especially relevant for summer dresses and tops, because with its help you can close several knitting moves at once - it plays the role of both straps and sleeves of the product. All that remains to be done after the yoke is ready is to sew or tie it to the main fabric of the blouse, sundress, dress.
Knitting pattern for a coquette pattern:
The coquette is knitted in circular rows, with an openwork pattern according to the pattern.
The base is a chain of 160 VPs, closing in a SS ring.
Each circular row starts with the 1st runway (not a b / n column) or 3 VPs for one SSN, and ends with one SS in the upper runway. Rapports from columns of s / n, alternating with VP, are repeated constantly, from the 2nd to the 7th circular row.
At the same time, knitting an openwork pattern, do not forget to perform the following reductions:
Row number 4: in each group of CCH we knit not 10, but only 8 columns of s / n.
Rows No. 5-6: evenly reduce the number of RLS and VP.
Row number 7: in each group of CCH we knit not 8, but only 6 columns of s / n.
Rows No. 8-9: evenly reduce the number of RLS and VP.
Row number 10: in each group of CCH we knit not 6, but only 4 columns of s / n.
Row number 11: evenly reduce the number of sc.
After 11 circular rows, the width of the fabric should be approximately 12-14 cm (depending on the “span” of knitting and yarn), we finish knitting SS. We use the finished yoke to decorate the desired model of clothing.
Original flower coquette

Embossed coquette of floral motifs is one of the favorites of knitters. With proper skill, making it will not be difficult, and at the same time - it truly decorates any knitted in a royal way!
The fabric of the coquette is based on the knitting of interconnected floral motifs. We start knitting from the center of the floral motif: we collect a base of 5 VPs, we close it in a circle with the help of the SS.
We knit in a circle:
Row number 1: capturing the end of the thread, we knit 1 RLS for the ring from the VP, then we knit with rapports: 3 VP + 1 RLS, you should get 4 arches from the VP.
Row number 2: for each arch from the VP we knit 1 RLS + 1 PS + 4 CCH + 1 PS + 1 RLS, in total we get 4 petals of the future flower.
Row number 3: we bring the hook out of the back wall of the loop, we knit 2 VPs (thus we reach the middle of the lower side of the first petal), we knit with rapports in the middle of the petal: in the center of 4 SSN PR we knit 1 RLS into the arch from the VP of the first row + 5 VP, in total you should get 4 arches of air loops.
Row No. 4: we knit for each arch of 5 VPs 1 RLS + 1 PS + 6 CCH + 1 PS + 1 RLS, as a result we get 4 petals.
Row number 5: we bring the hook out of the back wall of the loop, we knit 2 VPs (thus we reach the middle of the first petal), we knit with rapports in the middle of the petal: in the center of 6 CCH PR we knit 1 RLS into the arch from the VP of the third row + 4 VP, repeat like this to the end of the row, we close the SS in the RLS of the first petal from the beginning of the row (4 chains from the VP turned out).
Row number 6: we knit for each arch from the VP 1 RLS + 1 PS + 2 CCH + 5 VP for the “corner” + 2 CCH + 1 PS + 1 RLS. We finish the SS in the initial RLS, we get 4 petals with 4 "corners".
We connect the connected flowers to each other in the "corners" with the help of the SS in the center of such a corner and in the middle of the arch of 5 VPs. For the first top row of the coquette, approximately 20-25 of these colors are needed (depending on the size of the future clothing model). We collect them in a ring, fasten the SS. Then we perform the desired number of similar rows of flowers, connect them together with a hook. We sew the finished coquette to the previously knitted top or sundress.
Playful coquette collar under the throat

To decorate a knitted product with such a yoke, you need to knit from the armpit up in the transverse direction, i.e. bottom-up, knitting a yoke from the last row of the finished fabric.
Row No. 1 continues knitting in a circular method, starting from the right armhole (immediately knit with rapports 15 times: 3 VP + 1 CCH in the first VP of the chain + 1 PS in the second PS PR from the hook), on the back we knit 46 PS in the next. 46 PS PR, finish with the left armhole (15 repeating combinations: 3 VP + 1 CCH in the first VP of the chain + 1 PS in the second PS PR from the hook), we knit the front part of the yoke with the 70th PS in 70 PS PR.
Row number 2: right armhole (15 rapports: 2 PS in the next arch of 3 VP PR from the hook), on the back we knit 46 PS in the next. 46 PS PR, left armhole (15 rapports: 2 PS in the next arch of 3 VP PR from the hook), front - 70 PS in 70 PS PR. In total, you should get 180 PS.
Rows No. 3-5: knit in a circle PS.
Row number 6: change the color of the yarn, knit PS.
Rows No. 7-10: we knit PS.
Row number 11 and all next. we knit odd rows with rapports to the end of the row: 5 PS in the next. 5 PS PR, 2 unfinished PS, united by one vertex, we knit into 2 PS PR.
Row No. 12 and all subsequent even rows: we knit with half-columns. Row No. 20 we knit 86 PS in the next. 86 PS PR.
Rows No. 21-34 knit straight. SS. We cut the thread.
Tying the coquette with a frill: attach the yarn to row No. 6 (of the same color).
Row number 1: 5 VP (3 runway + 2 VP), rapports to the end of the row: 1 CCH in the next. PS PR + 2 VP. SS.
Row No. 2: 3 runway, 4 CCH in an arch of 2 VP PR, rapports to the end of the row: 5 CCH in the next. an arch of 2 VP PR from the hook. SS. The coquette is ready!
Translucent thin coquette for a sundress


The coquette model is quite narrow, so it can serve as straps for a summer sundress. Her openwork will look perfect in lace tops, marine capes, tunics, as well as light dresses. Let's start knitting.
The coquette is whole-knitted, crocheted in a circular way.
We collect a chain of 180 VP, close the SS in a ring.
Row number 1: 4 VP + 179 C2H in the next. 179 VP base-chains. SS.
Row No. 2: 4 runways + 2 unfinished S2H, united by one vertex into the first runway + 3 VP + 1 S2H into the same runway, then we knit 60 rapports: 3 unfinished S2H with one vertex we knit into the third S2H PR from the hook + 3 VP + 1 С2Н in the same С2Н PR. SS.
Row number 3: 4 runways + 3 C2H in the arch of 3 VP PR, then - 60 rapports: 4 C2H in the next. an arch of 3 VP PR from the hook. SS. In total, you should get 240 C2H. We divide the yoke into 4 parts (2 sleeves, back and front of the product), we continue knitting a sundress.
Sources of inspiration in the form of knitting patterns for round yokes
There are just an inexhaustible number of variations on the theme of round coquettes, choose any and create!
Openwork yoke with clasp


Bright variation on the theme of "pineapple" coquette

Round yoke with triangular motifs


Air yoke for a summer top

Snow-white coquette-collar


Original coquette for a children's dress


Warm yoke for a spring-autumn sleeveless jacket

Coquette from openwork motifs


Coquette cape


One-piece knitted yoke under the throat

Video tutorials on crocheting round yokes
Elizabeth Rumyantseva
For diligence and art there is nothing impossible.
Content
An element with this name is knitted at the top of the products. It can be blouses, dresses, tunics and even jackets. The coquette for them is done with a facial surface, ornaments or openwork patterns with a hook. Then it is simply sewn to the finished product. Below you will find some tips and tutorials for knitting the neck.
How to crochet a round yoke
In various magazines, you can find more than one way to knit this element. They differ in the number of reductions that are made at the beginning or end of this part and depend on the specific style of the product, pattern, direction of knitting. According to the last parameter, a knitted yoke can be performed:
- From the neck down. Available in one piece or with a clasp. From the bottom edge of the openwork element, then the back, front, sleeves are knitted.
- Up from the armpit. It is also knitted in a single piece or with a clasp on the back or front.
- across from one end to the other. In this case, the technique of knitting with shortened lines is used. It is often used to perform certain patterns, for example, in the form of braids.

It is recommended to use the first of all methods, because it is easier to expand the canvas than to narrow it. It doesn’t matter which particular method you choose, because before starting work, you need to calculate the top and bottom of the yoke. Its shape depends on the model of the future blouse or dress. The diagrams show the difference of this element for products with set-in, raglan or straight sleeves. The calculation is based on these 3 types of cut.
In order for a round crochet yoke to turn out correctly, you must first build a pattern of natural or scaled size, where to draw the lines of this element. According to the resulting drawing, the following parameters are measured:
- volume at the top, as well as at the bottom - in the number of bars and cm;
- lengths - in cm or rapports of a knitted pattern;
- desired height - also in cm.
Crochet yoke for baby dress
To knit a round top to a girl's dress, you need to know the girth of her head. Such a length is gaining a chain of air loops (VP). If a clasp is supposed, then you can take a value slightly larger than the girth of the neck. As for yarn, it is better for a child to buy cotton threads, for example, from Iris or Snezhinka. They have a medium thickness and a glossy texture. If you need a knitted dress or blouse that is not for a warm summer period, then you can use synthetic or semi-woolen yarn that is not very thick.
As an example, such a pattern of a round crochet yoke for a children's dress is given:
- Dial 72 VPs, lock them into a round product (ringlet), make another 3 lifting VPs (at the beginning of each next row, too).
- In the first 3 and last 4 stitches, double crochet (dc). Perform the rest by alternating 1 VP and 1 CCH.
- Next, knit the beginning and end in the same way, and make the central part in cycles of 2 CCH + 1 VP between them, knitting them under the air loop of the previous row.
- Then, after the same beginning and before the same end, as in paragraph 2, already perform 3 CCHs, making 1 VP between them. Tie them on both sides of the central loop.
- For the next 3 rows, use the description of point 3, then repeat point 4 1 time, only do the following for a complex of 3 CCHs: in the center, and 2 more loops after the start and before the end of knitting.
- In the last row after the beginning, as in paragraph 2, alternate knitting 7 columns with 2 crochets and 1 without them, making them in between complexes with a column in the previous line.

Crochet coquette for women's dress
A round openwork Japanese coquette looks very beautiful on women's dresses. In the knitting master classes it is indicated that about 100-150 g of white yarn with a density of about 170 m per 50 g is required. The instruction is given for size 44. A round crochet yoke for women is knitted on it like this:
- Dial 156 VP, close with a ring.
- Knit according to the scheme of the pattern up to 23 rows. There will be 12 rapports across the width of the canvas. One includes half of 2 elements side by side.
- Each row, start with 3 VP lifts and end with a connecting column.
There is also a simpler scheme. On it you need to do the following.
Any mother wants her child to be the most elegant and beautiful. This is especially true for young fashionistas. But not everyone has the opportunity to buy new dresses. The solution is to sew or knit an outfit for the girl yourself. It remains only to choose a pattern or pattern. Let us dwell on an interesting detail for a children's dress, which will make it original and delight the little princess. A round yoke is what we are talking about in crocheting.
If you have ever knitted napkins, you will immediately notice that the scheme of the coquette pattern is not much different from them. The only difference is that you need to leave room for the neck so that the product can be worn on the baby. Therefore, before starting needlework, measure the circumference of the child's head.
The knitted detail organizes the whole product and defines its style - expanding towards the bottom. Therefore, you don’t even have to bother with the pattern too much. The second advantage is ease of execution. Using various types of columns and air loops, stunning openwork is created. Novice craftswomen are unlikely to dare to take on the complex “pineapple” pattern; a simpler option is suitable for them, to which the master class is dedicated below. At the end of the article, you will find intricate designs for a baby dress, including the famous lily pattern, often used in crochet. And to finally deal with the coquette - video tutorials from professional needlewomen.
We knit our own round yoke crochet: choose a knitting method
There are two common ways to make an openwork coquette:
- on top of the neck, which then goes into the dress itself;
- from below, in this case the yoke can be sewn to the finished base of the dress.
The first method is more commonly used. Having started knitting from the neckline, gradually increasing the number of loops in the rows, they move on to the details of the front and back, which are also knitted in a circle.
We will knit a dress for a baby 3-9 months old. For the outfit you will need:
- pink cotton yarn (thread thickness 150/160 meters per 50 grams) - 50 grams per yoke;
- gray cotton yarn (similar thickness) - 110-120 grams for a skirt;
- hook No. 2.5 and slightly thinner for tying the product - No. 1.75;
- thin satin ribbon or braid - 1.5 meters;
- needle for stitching knitted things;
- button.

The dress is made in stages.
- We knit a coquette according to the scheme. Having typed a chain of 77 air loops, we make rows from 1 to 9. The color of the yoke is gray.
- Having knitted the first 9 rows, the work is divided into 3 parts: one part of the front and two of the back. Having added 10 air loops to each of the armholes, we perform a row of 10 and 11. Starting from the 11th row, the product closes in a circle.
As a result, we have: 26 loops on each of the parts of the back and 52 loops on the front of the dress.
- We carry out the skirt of the dress with a pattern according to the pattern of pink yarn.
The pattern repeat is 4 loops. Increases are highlighted in blue, due to which the silhouette of the outfit will expand. Having knitted a pattern up to 9 rows once, they begin to repeat rows 8 and 9 until the skirt reaches the required length (27–28 cm). This will be approximately 33 rows. The final 34th row is a border that adorns the edge of the product.
- We put in order the neck of the product, performing their strapping. Here you need to change the hook, taking a smaller tool.
The border consists of two rows. The first row is a combination of double crochets and single crochets with air loops. The second row is the “crawl step” pattern, performed only along the cutout on the back. We sew a button to the dress, not forgetting to provide a loop for it.
- It remains to decorate the dress. We knit five flowers from pink yarn, sew them to the yoke. In addition to the dress, you can knit booties and a headband for a young lady.
If crocheting a full dress is a difficult task for you, use the idea of making a combined dress. The yoke is crocheted, and the skirt consists of ordinary fabric.
Having completed the upper part of the dress with any pattern you like, prepare the fabric base. Matter is ground in such a way that a hollow cylinder is obtained. Its diameter should be greater than the volume of the coquette. Next, the matter is gathered into folds and sewn on a typewriter to a knitted part.
Complex options.Let's start with the lily pattern, so popular in Japanese magazines. We offer a diagram.

We start knitting from a chain of air loops, on which posts are hung. As a result, an elegant pattern resembling flowers is formed.
The dress made of "pineapples" looks elegant.
According to this scheme, you can knit not only a yoke, but the entire children's dress. The drawing is complex, but the result is worth it! Please note that you need to carefully monitor the performed loops. Inaccuracy will break the pattern, as a result, you will have to redo the work.
And here is an example of a dress that combines two complex patterns. The coquette of the dress is connected with lilies, and the skirt is with a pineapple pattern.

Video selection on the topic of the article
You can learn ideas for knitting dresses for little fashionistas from the proposed video selection. Watch how professionals perform their products and repeat!
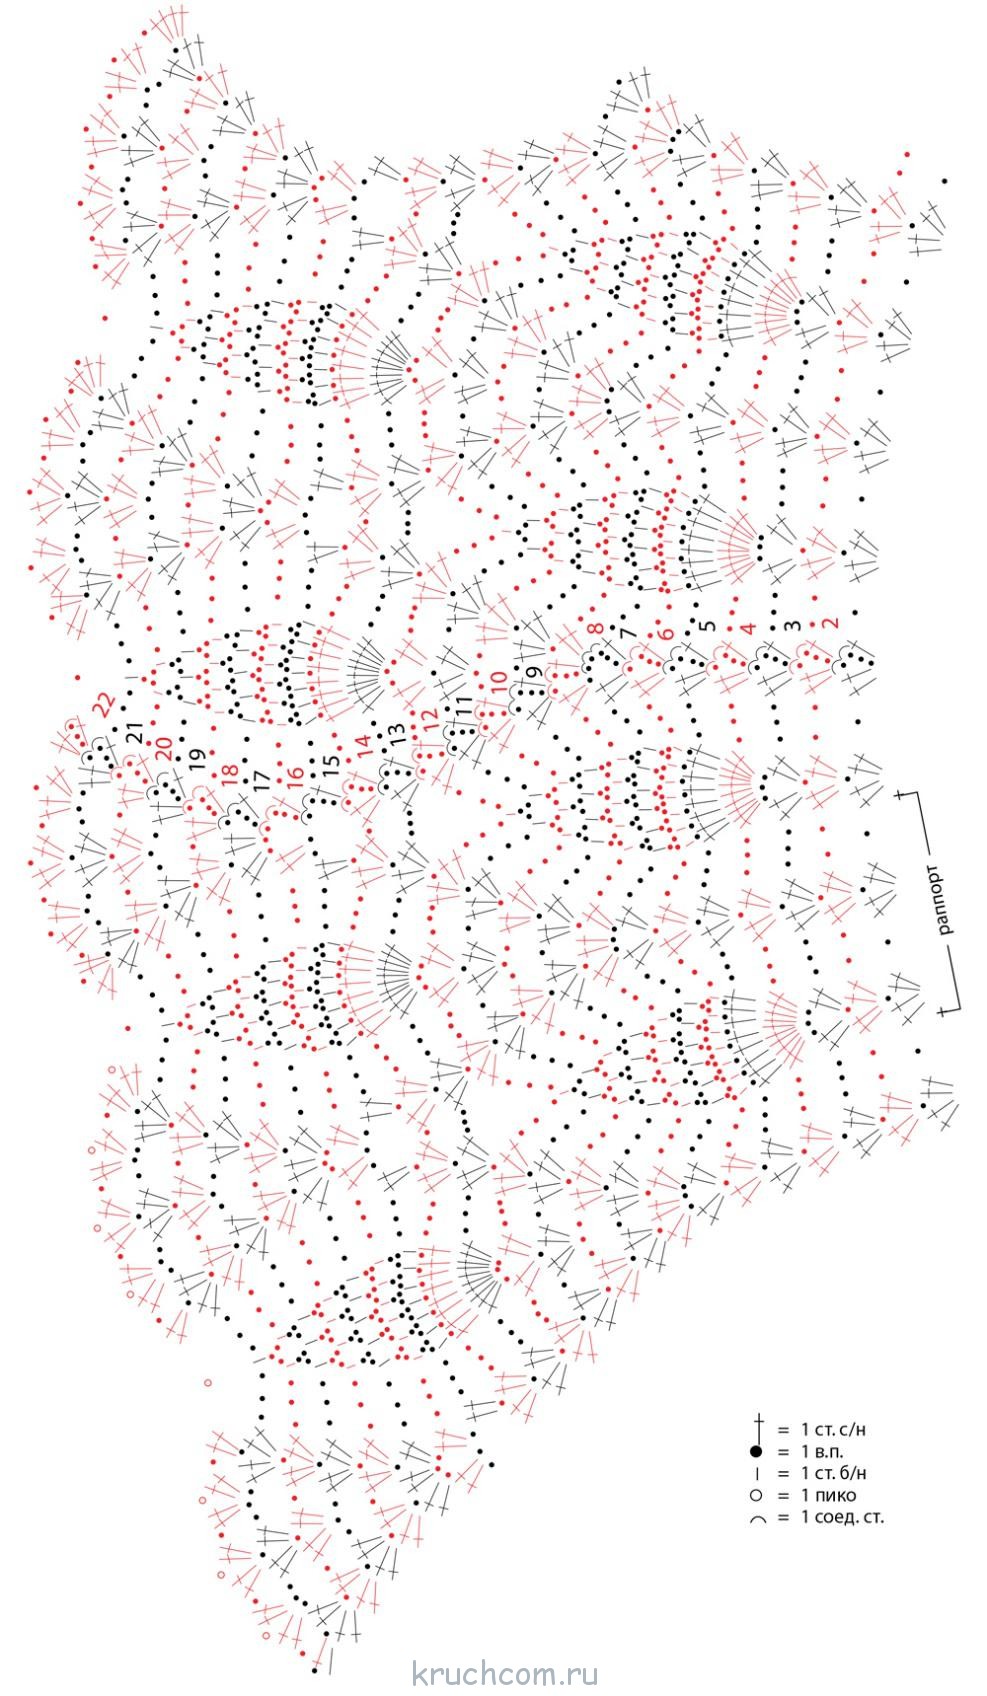
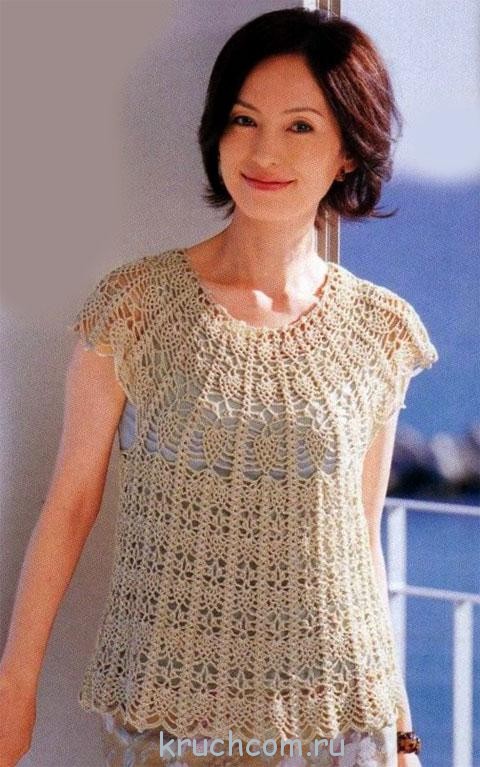
beautiful model crochet blouses made with a round yoke decorated with a pineapple pattern, the main part of the blouse is connected with a simple openwork pattern. The blouse is crocheted from top to bottom according to the given patterns in circular rows without seams.
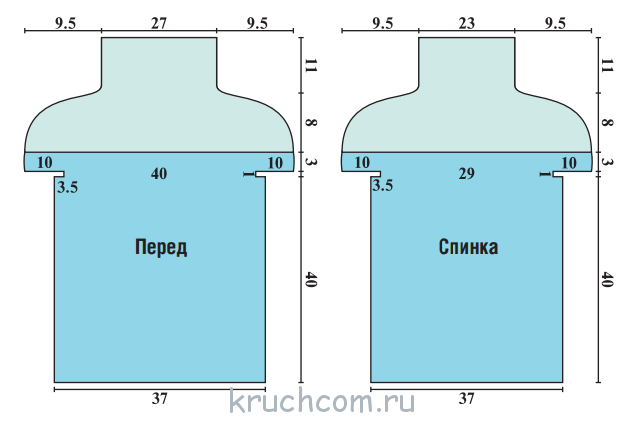
Size: 38.
You will need: 400 g of black yarn (100% cotton, 50 g / 170 m), hook number 2.
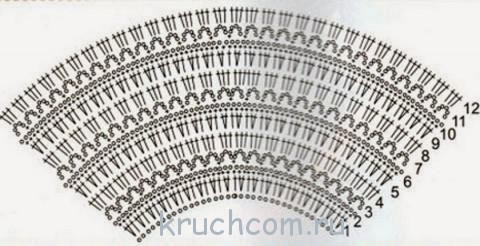
Coquette pattern: scheme 1-1, knit in a circle. The diagram shows circles.

Main pattern: scheme 1-2, from the 4th to the 7th rows are repeated. The diagram shows circles.

Description of crochet blouse: The dimensions and direction of knitting are given on the pattern (Fig. 1-1, 1-2). The product starts to knit from above from the neckline. The work is carried out in stages.

The first stage of crocheting a blouse begins with knitting a round yoke. Dial a chain of 128 in. (the number of loops is a multiple of 8), close it in a ring and knit according to the 1-1 pattern, distributing the required number of rapports (in this embodiment, 16 rapports). Knit in a circle without seams, place the line of rise to a new row along the raglan line.
To expand the canvas, make additions, as indicated in the diagram. You knit all the rows of the scheme and finish work on the yoke. Tie the top edge with one row and a pattern according to the scheme 1-1 (highlighted in red).
The second stage of knitting a blouse consists in knitting the front and back with an openwork pattern. Divide the canvas into 4 parts (sleeve 4 rapports, front 4 rapports, back 4 rapports). Leave the armholes out of work for now. We connect the back and front into one fabric and knit from top to bottom in a circle without seams with a pattern according to scheme 1-2. Tie to the desired length of the product. Tie the bottom edge in a circle with a pattern according to the pattern 1-3.
In the last third stage of knitting a blouse sleeves are knitted. You start knitting the sleeve from the edge of the yoke where you left armholes for them. Knit from top to bottom in a circle without seams with a pattern according to the pattern 1-2. Tie the sleeve to the desired length. Knit the second sleeve in the same way. Tie the bottom edges of the sleeves according to the scheme 1-4.

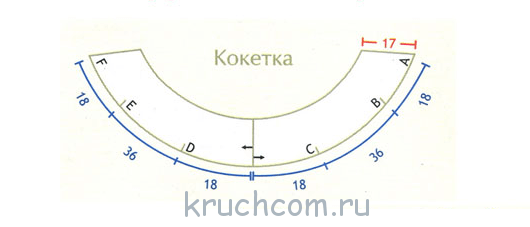
How to correctly make calculations in order to complete a model with a round yoke.
When making any product with any form of coquette, we need to build a pattern in natural (or scaled) size, then apply the lines of our coquette to the pattern.
Then we need to make some measurements on the connected sample with the selected pattern and on the existing pattern.
1. You need to know the volume of the coquette from above - in cm and in the number of columns - a pink line.
2. Know the volume of the coquette along its lower, wide edge - in cm and in the number of columns - the green line.
3. Know the length of the yoke of the selected model in cm and in the rapports of the knitted sample - the brown line.
Depends on:
a) how many columns you need to increase (expand) each rapport of the coquette pattern, in which rows of the rapport it is most convenient to make the necessary increases;
b) the coquette can be of any length from top to bottom, and depending on what pattern it is built on, it depends:
- will we finish with a narrow (short) yoke all the details with raglan reductions towards the armholes;
- will we issue increases for the armholes themselves;
- are short rows needed at the transition to the main canvas, etc.
Example 1. Round yoke with front closure, sleeveless (dropped shoulder)
Consider a specific example, a pattern and a specific model.
Let's make a model with a lowered shoulder, formed by the length of a round yoke, based on a standard pattern with a set-in sleeve for 48r-ra. Choose a pattern and knit a sample. We make all calculations based on the pattern and the knitted sample:

 In a 10x10 sample, we get 25.2 st and 12.2 rows. In one rapport - 6p and 4 rows. Around the circumference of the neck 50 cm, we collect 126 ch. +1, i.e., we are gaining 21 rapport. From the calculations of the expansion of the coquettes, we know that the initial number of loops increases by no more than 2.8-three times, and measuring with a tape around the body and lowered arms should be within 130 plus or minus 10 loops, we calculate to which the number of columns in the rapport we need to come by expanding the yoke.
- measuring cm with a ribbon according to the pattern gives 136-137cm, which gives us (136x127p) according to the sample: 50cm = 345.4p. We dialed 21 rapport, which means that we must bring the calculated number of loops to a multiplicity of 21:
345.4:21 \u003d 16.5 loops \u003d 17 loops in one rapport along the bottom of the coquette.
Let's take a closer look at our example. With a rapport height of 4 rows and a yoke length of 19.5 cm, we need to knit 23 rows, making even increases in the pattern lines.  Having connected the coquette, we proceed to the distribution of the coquette into two shelves and a back. We have 21 rapports. If we traditionally divide it into 3 parts - one for the front, the second for the back and the third for both sleeves, then we get 7 rapports per 1 part, which corresponds to 7p.x17p. = 119 loops, and the width of the back without armholes is 39cm, which is equal to 6 rapports of the extended scheme.
17px6p = 102p. Let's check again: (39cm x127st.): 50cm = 99st.
Therefore, we will separate 6 rapports on the back, 3 rapports on the shelves, 4.5 rapports on the sleeves.
First, we need to lengthen the back - knit a full repeat of the pattern in height, to get a "sprout" - that is, so that the "front" of the model does not "ride" up, does not ride up to the neck.
On the middle 6 rapports of the coquette, which correspond to the back, we knit 4 rows of the pattern. We now knit with rapports obtained by expanding the coquette pattern  According to the pattern, the width of the back with armholes is 49.5 cm or 7.5 rapport. Add armholes to the back on its sides. To do this, after knitting the 4th row of the sprout of the back, we knit a chain of ch at the end of the row. 5 cm long, we make lifting loops and perform 0.75 rapport of the pattern on a knitted chain, 6 rapports of the back pattern, on the other side of the back we similarly add the width of the 2nd armhole, also include them in the pattern and knit the entire length of the back at 7.5 rapports (0.75 + 6 + 0.75 = 7.5 rap.).
Then we proceed to the implementation of one, then the second shelf:  Tie the formed armholes. We will tie the bottom and shelves by completing the straps and holes for the buttons on the right strap. We tie the neck.