Volumetric star crochet scheme. Master class: crochet stars on the Christmas tree. Description of crochet star pillow
A crochet crochet star is a simple product, but at the same time an interesting and versatile item. In the shape of a star, you can make a soft toy for a baby, a napkin on a table or a rug on the floor, a blanket, a Christmas tree decoration and a huge variety of other options. Thus, having spent quite a bit of time and effort, you can create a beautiful and useful masterpiece with your own hands.
Christmas tree decoration "Star"
A bright star crocheted from motifs of different colors will become a worthy decoration for a New Year's beauty. As it rotates, its faces change colors. If the lower faces are not connected, then the star can be put on the top of the Christmas tree, where it will become the main decoration.
So let's get started. For work we will need:
- some mercerized cotton yarn in three colors;
- remnants of white or silver yarn for tying;
- hook number 2.
First, we need to connect 3 motives according to the scheme.
And then starch them to keep their shape.
Fold the motives, and tie their faces with a white thread with a single crochet.
In the upper part, tie a chain of air loops and close it into a loop.
The decoration is ready.
New Year's star: video mk for beginners
Soft crochet starfish
A voluminous soft crochet star can serve as a toy for a baby, a piece of furniture or a needle case for a needlewoman.
For work need to cook:
- remnants of blue yarn;
- hook with the corresponding number;
- filler.
We need to connect two circles. To do this, crochet 2 air loops, and then:
1r. - 6 tbsp. b / n in the second loop, (6);
2r. - 6 times we perform an increase, (12);
3r. - repeat the pattern 6 times (1 tbsp b / n + increase), (18);
4r. - 6 times (increase + 2 tbsp b / n), (24);
5 p. - 6 times (3 tbsp b / n + nailing), (30).
In the first circle, the working thread must be fixed and cut, and we continue knitting with the thread of the second circle.
Now we turn to knitting rays. To do this, in the first row in the second circle, we perform 7 tbsp. b / n, after which in the first circle we do 7 tbsp. b/n, (14)
In the second row from 1 loop in the second circle - 5 tbsp. b / n, decrease, 5 tbsp. b / n, decrease, (12)
3r. - decrease, 4 tbsp. b / n, decrease, 4 tbsp. w/n, (10);
4r. - 3 tbsp. b / n, decrease, 3 tbsp. b / n, decrease, (8);
5r. - reduction, 2 tbsp. b / n, decrease, 2 tbsp. b/n, (6).
Fasten and cut the working thread, and pull off the loops.
We fasten the thread to the extreme loop of the previous ray of the first circle
And then we knit in the second circle
14th Art. b / n do instead of attaching the thread.
We also knit the remaining rays - constantly capturing the extreme loops of the previous beam. When knitting the latter, we capture the extreme loops of adjacent rays
The shape and length of the rays can be adjusted. For example, if you make a decrease through the row, then they will be narrower and longer, and if there are 4 decreases in a row, then they will be short and plump.
Master class crochet pillow in the shape of a star
A gentle and soft star will be a worthy decoration of the interior in your home, or will become an original gift for friends and relatives. Knitting a pillow is not difficult, even beginner needlewomen can easily cope with this task.
What we will need:
- finished fabric yarn;
- suitable hook;
- patches of quilt / felt / felt;
- filler.
For knitting, it is better to use yarn of the same thickness. But if, suddenly, it is thicker for one side and thin for the other, the final size of the finished part will be adjusted by the number of circles. After each row, the yarn should be pulled out so that the fabric is even and does not twist.
So let's get started. We start knitting from the central part of the star.
1r. - we collect 3 ch, we perform 9 double crochets into it, and then we connect (connect with a column) and tightly tighten until it is completely closed.
2r. - again we dial 3 ch, in the next loop we make 2 columns with a crochet and continue to perform 2 dc in each loop. At the end of the row we do 1 dc in the next. loop and connecting column in the 3rd ch.
3r. - 3 ch, 9 * (1 dc in the next st, 2 dc in the next st). Next, 1 dc in the next st, 1 dc in the last loop. We finish the row with a connection column in the 3rd initial ch.
4r. - 3 ch, 9 * (1 dc in the next 2p, 2 dc in the next p.). Then, 1 dc in the next. 2p, 1 dc in the last p. Finish a series of connections. Art. in the 3rd initial v.p.
5r. - 3 ch, 9 * (1 dc in the next 3p, 2 dc in the next p.). 1 dc in the next. 3p., 1 dc in the last. p.
6r. - 3 ch, 9 * (1 dc in the next 4p, 2 dc in the next p.). 1 dc in the next. 4p, 1 dc in the last p. Connect.st in the 3rd initial v.p.
We do not cut the working thread.
We turn to crocheting the first beam.
1r. - we do ch 3 from the end of the 6th row. Then - 1 column. with nak. in the next 11 loops. We unroll the product.
2r. - we perform the connection. Art. in the 2nd loop from the hook and ch 3 Next - 1 column. with nak. in the next 9 loops. We unfold the product again.
3r. - Comm. Art. in the 2nd loop from the hook + 3ch. 1 pole. with nak. in the next 7 loops. Turn.
4r. - Comm. Art. in the 2nd loop + 3ch Then, 1 column. with nak. in the next 5 loops. We turn the canvas.
5r. - Comm. Art. in the 2nd loop + 3 ch Then, 1 pillar. with nak. in the next 3 loops. Rotate the canvas again.
Now let's do the rest of the rays.
1r. - we make a standing connecting column, as shown in the figure, in the next stitch (3 air loops) of the previous beam. Then, we perform 2 air.pet. and 1 pole. with nak in the next 11 pet. We develop the product.
3r. - Comm. pillar. in the 2nd pet. from hook. 3 air. pet. 1 pole. with nak. in a trace. 7 pet. We rotate the product again.
4r. - Comm. pillar. in the 2nd pet. from hook. 3 air. pet. 1 pole. with nak. in a trace. 5 pet. Turn.
5r. - Comm. pillar. in the 2nd pet. from hook. 3 air. pet. 1 pole. with nak. in a trace. 3 pet. Turn.
6r. - Comm. pillar. in the 2nd pet. from hook. 3 air. pet. 1 pole. with nak. in the same loop as 3 air. pet. And next. loop - 1 column. with nak. Cut the thread, fasten the end.
edging. We start with the base of any beam. We make 1 standing connecting st-to. Then, 13 connecting stitches are performed evenly up one side of the beam. 3 air. loop 13 connecting studs evenly down the other side of the beam. Thus, we tie the remaining beams and connect them with the first connecting column. Fasten the thread, cut it, and hide the tail in weaving.
Assembly. So that the filler does not “leak” through the holes in knitting, we use patches of a quilt as a lining (or felt, felt). We cut out stars from the lining material, which correspond in shape and size to our connected ones. The color of the lining should be taken into account, it should not contrast with the yarn. For example, white felt is more suitable for a light thread, and felt is more suitable for a dark one.
We will connect all the layers in this order - star, lining, lining, star.
We start with any stitch. We make 1 standing connecting stitch through 2 inner loops of each stitch
We make 1 such stitch in each loop until one beam remains. We stuff the pillow with filler between 2 layers of lining fabric.

Christmas tree on a bottle from Lilia Ulanova: Knitted balls, bows from candy wrappers, a star.

2.
3.
4.
5.
6.
7.
8.
9.
10.
11.

sliding ring
1:8 dc (or sbn) in the ring.
2: * 1 ssn (or sbn) * pr ssn (or sbn) * 2.
3-4: 9dc (or sc),
5: *2 dc (or sbn). prssn (or sbn) * -2.
6-7: 12 sc (or sc).
8: *3 dc (or sb). prssn (or sbn) * -2
9-10: 15 dc (or sc).
11: *4 dc (or sb). prssn (or sbn) * -2.
12-13: 18 dc (or sc).
14: *5 dc (or sb). prssn (or sbn) * - 2 times.
15-16: 21 sc (or sc).
17: *6 ssn (sbn). pr ssn (or sbn) * -2.
18-19: 24 ssn (sbn).
20: *7 ssn (sbn). prssn (sbn) * 2
21-22: 27 sc (sc).
23: *8 ssn (sbn). prssn (sbn) * 2
24-25: 30 ssn (sbn).
26: *9 ssn (sbn). prssn (sbn) * 2
27-28: 33 sc (sc).
29: *10 sc (sc). prssn (sbn) * 2
30-31: 36 sc (sc).
32: *11 ssn (sbn). prssn (sbn) * 2
33-34: 39 sc (sc).
35: *12 ssn (sbn). prssn (sbn) * 2 times.
36-37: 42 sc (sc).
38: *13 st s / n (sbn). 2prssn * 2
39-40: 45 sc (sc).
41: *14 ssn (sbn). prssn (with bn) * 2
42-43: 48 sc (sc).
44: *15 ssn (sbn). prssn (sbn) * 2
45-46: 51 sc (sc).
47: *16 ssn (sbn). prssn (sbn) * 2
48-49: 54 sc (sc).
50: *17 ssn (sbn). prssn (sbn) * 2
51-52: 57 sc (sc).
53: *18 ssn (sbn). prssn (sbn) * 2
54-55: 60 sc (sc).
56: *19 ssn (sbn). prssn (sbn) * 2
57-58: 63 ssn (sbn).
59: *20 ssn (sbn). prssn (sbn) * 2
60-61: 66 sc (sc).
Stuff the base, then, while holding, begin to perform contractions of ssn (sbn). Work: *1 dc (sc) decreasing (insert hook into st, then insert hook into next st, yarn over and pull through all sts), repeat from * to end.
Knitting twigs
Tie 10 ch. then work a half-table sc in 2nd * 1 half-table sc in the next loop, repeat from * to the end of the row. Then knit according to the pattern below.

a - air loop
- single crochet
- single crochet / double crochet
column with 3 crochets
- double crochet
- reduction of three sts s / n or st b / n
Assembly

3.

The idea of clothes for the Podarёnka Christmas tree
Height 25 cm
Hook number 2, acrylic yarn 300m / 100g, wire.
Legend:
sc - single crochet
SSN - column with 1 crochet
Vp - air loop
Prib - 2 sc in one loop
Dec - 2 sc together
elongated loops
Christmas tree thread
1 - 6 sc in the ring
2 - 6inc \u003d 12 sc
3 - (1 sc, inc) x 6 = 18 sc
4 - (2 sc, inc) x 6 = 2 4 sc
5 - (3 sc, inc) x 6 = 30 sc
6 - (4 sc, inc) x 6 = 36 sc
7- ass.st. with extended loops = 36
8- \u003d 36 sbn - a plastic bottom, making a hole in the center for the wire
9 - 36 sc with elongated loops
10 - 36 sc
11 - 36 sc with elongated loops
12 - (10 sc, dec) * 3 = 33 sc
13 - 33 sbn with elongated loops
14 - (9 sc, dec) * 3 = 30 sc
15 - 30 sc with elongated loops
16 - (8 sc, dec) * 3 = 27 sc
17 - 27 sc with elongated loops
18 - (7 sc, dec) * 3 = 2 4 sc
19 - 2 4 sc with elongated loops
20 - (6 sc, dec) * 3 = 21 sc
21 - 21 sc with elongated loops
22 - (5 sc, dec) * 3 = 18 sc
23 - 18 sc with elongated loops
24 - (4 sc, dec) * 3 = 15 sc
25 - 15 sbn with elongated loops
26 - (3 sc, dec) * 3 = 12 sc
27 - 12 sbn with elongated loops
28 - (2 sc, dec) * 3 = 9 sc
29 - 9 sbn with elongated loops
30 - 4ub
We stuff along the way, insert the wire, bend the tip at the top with a loop, wrap it with a Christmas tree-colored thread.
At the bottom, we leave a longer wire-barrel + loop in the boot for stability.
Boot and hat
Shoe color thread
7 ch, 1 p. - in the 2nd: inc, 4 sc, 3 sc in 1y, 4 sc, inc = 15
2 - 2 inc, 4 sc, 3 inc, 5 sc, inc = 21
3 - (1 sc, inc) * 2, 4 sc, (1 sc, inc) * 3.6 sc, inc = 27
4 - (2 sc, inc) * 2, 4 sc, (2 sc, inc) * 3.7 sc, inc = 33
5 - 6 sc, inc, 8 sc, inc, 6 sc, inc, 9 sc, inc = 37
6 - backst - 2 sb, dec, 33 sb = 36
7 = 36
8-9 - white color = 36 sc
10 - shoe color = 36 sc
11 - 13 sc, dec, 2 sc, *dec, 1 sc*-2, dec, 2 sc, dec, 7 sc = 31
12 - 2 sc, dec, 10 sc. * dec, 2 sc * -2, dec, 7 sc - 27
13 - 12 sc, (dec, 2 sc) * 2, dec, 5 sc = 24
14 - 14 sc, 2 dec, 6 sc = 22
15-17= 22 sc
18 - white color = 22 sc with elongated loops
19 - white color = "crawl step"
Inside, insert the insole, wire with a loop, fill.
Wrap or tie the visible part of the wire between the tree and the boot with a thread of the color of the trunk (brown, for example). You can tie a circle - close, fill.
circle
1 - 6 sc in the ring
2 - 6 inc = 12 sc
3 - (1 sc, inc) x 6 = 18 sc
Hat - 18 ch in the ring
1- 5= 18 sc
6- 8= 18 dc


Required:
about 35 g of polyamide thread of a suitable color;
hook number 2.5;
needle and thread;
cap from a tube of toothpaste (for the base);
a little cotton;
pencil (barrel);
plasticine.
Legend:
Bold dot \u003d 1 air loop (air p.)
stick \u003d 1 single crochet (st b / n)
cross = 1 double crochet (st s / n)
If the icons are connected at the bottom, the columns are knitted into one base.

Knit the main part of the Christmas tree according to the scheme: dial a chain from ch. about 24 cm long. Start each row with 3 ch. lift.
1-3: ssn
4: (1 dc, 3 ch, 1 dc) - in 1y to the end
5: - in each arch of the previous row, again knit * 1 dc, 3 in n and 1 more dc *, and between them - arches of 3 ch. Do not knit this row to the end, but stop at a distance approximately equal to one turn around the “trunk” (pencil).
Turn the work and knit the 6th row, which begins with arches of air loops.
When the distance equal to one more turn around the pencil is knitted with arches, continue knitting the 6th row according to the pattern of the 5th row.
Knit the last 7th row in the same way, only to the place where the 3rd turn ends. Thus, the herringbone expands downward.
Next, the Christmas tree twisted around the trunk must be fixed with a needle and thread.
Then complete the base for our Christmas tree. To do this, fill the lid of the tube of toothpaste with plasticine of any color. Put some cotton wool on top of the plasticine, tear it slightly in the middle and insert a pencil. Decorate the Christmas tree with a garland of beads and beads.

1.
2.
3.
4.
5.
6.
7.
8.
9.
1.
2.
3.
4.

First, let's knit a cone.

in a magic ring, tie 4 tbsp. b/n
4 tbsp. b/n
(st. b / n, +) (+ we will denote the addition - in one st. b / n knit 2 st. b / n)
6 art. b / n knitted for both half loops
6 art. b / n knitted for the back half loop
(2st b / n., +) repeat to the end of the row
8 art. b / n knitted for both half loops
8 art. b / n for the rear half-loop
(st. b / n, +)
12 st. b / n knitted for both half loops
12 st. b / n for the rear half-loop
(2st b/n, +)
16 art. b / n knitted for both half loops
16 art. b / n for the rear half-loop
(3st b/n, +)
20 st. b / n knitted for both half loops
20 st. b / n for the rear half-loop
(4st b/n, +)
24 st. b / n knitted for both half loops
24 st. b / n for the rear half-loop
21 September 2015
Soon the New Year is a holiday of magic and wonderful fulfillment of desires. To feel the beauty of this holiday, we decorate our house with garlands, toys, decorate the Christmas tree and turn on the flickering lights. The modern market for New Year's products provides the widest selection of all kinds of Christmas decorations, but you really want something unique, original, your own.
A master class on making a Christmas tree stars related crochet. The simplest knitting elements, a little imagination and an exclusive decoration are already hanging in a place of honor.
So, to make your knitted masterpiece, prepare:
- red yarn (or other color);
- Crochet hook;
- filler (cotton wool, fluff, synthetic winterizer);
- beads, rhinestones, ribbons and everything that can come in handy.
Knitted crochet star
We knit a red star from rhombuses. For the product we need 12 pieces.
We knit 15 rows according to the scheme.

After each row, we unfold the product. And we start a new row with a rise. As a result, we get the correct rhombus.

We repeat these steps 11 more times and get 12 identical diamonds.

The star will consist of two halves, each will require 6 diamonds.

We sew 6 rhombuses with the central sides.

We get two stars, which we put together and sew on the sides between each other, leaving one ray not sewn. We twist.

We fill the product with synthetic winterizer.

We sew up the rest, having previously inserted a loop for our toy into the last ray.

Turn on the fantasy and decorate the star to taste.

The toy can be made both in one color and combine different ones (up to the rainbow) or alternate two shades. The toy is ready!

Linked star You can hang it on a Christmas tree or decorate it with a New Year's composition. Decoupage lovers can easily do instead of a star snowflake. All homemade jewelry will look great on a green beauty. Good luck with your work and happy holidays.
Especially for the site Lessons Needlework Olechka30.
The "correct" Christmas decorations are a separate world in which you want to dive, like in the ocean waters somewhere on the shore with golden sand: dive, swim, dive and not come up. These are the toys with which you want to sit at the table, telling family stories and legends, remembering relatives, laughing at the interesting events that took place last New Year and feeling real happiness. And yes, of course, it's mostly about handmade Christmas toys- those in which the master puts a piece of his soul, which are created with History, which are filled with love. In general, let's crochet star- let it be a project of the current year: you decorate it with a Christmas tree toy, decorate a Christmas tree with it, and after years and decades you will tell your grandchildren how you made this particular toy and what you wanted to say.
knitted star- it's simple and fun. Doing?
How to crochet a star - 5 master classes:
1. Christmas tree-stocking for gifts

See what a great idea! On one side is a Christmas toy. Simple, elegant and quite themed: a beautiful star on the Christmas tree. On the other hand, this is a great repository for surprises: giving, for example, such a toy to a child, you can say that it is magical and prove it by putting a candy or a tangerine inside every night.
2. A simple five-pointed star

It is not always necessary to invent something unusual or catchy, sometimes it is enough just to do something classic and standard, but to do it with love and soul - in this case, the best things of all possible are obtained! The proposed scheme is available and suitable even for those who are just starting to get acquainted with crochet.
3. Patchwork Star

Patchwork is traditionally a “sewing” technique, however, its principles can also be implemented in the context of crocheting, moreover, the result is amazing and so infectious that it’s hard to stop later: you want to knit something like this again and again, again and again. In general, when deciding in favor of this star, be aware of the consequences.
4. Eight-pointed star

An option for those who love everything unusual and non-standard. Such a Christmas toy is primarily striking in its shape - these are not the classic five rays, but eight at once, moreover, they are not the same in size, which attracts attention even more. Well, besides - an interesting ornament in the center.
We will need orange Baby Vita yarn (100% acrylic, 100 gr, 400 m), sock knitting needles (7 pieces), a needle with a large eye for sewing details and a synthetic winterizer or other filler. Cast on 108 stitches. 1 row. 108 p. 2 row. We divide into six toe knitting needles of 18 LP.  We knit 7 facial loops (lp), then we make a broach. First, we remove two loops on the right knitting needle, turning the knitting needle under them on the left.
  And we knit the next one after them, as a facial one.
  Then, we stretch this front through two loops.
  And leave it on the right needle.
  Thus, the number of loops is reduced by two, and along the entire row - by 12. A beautiful convex pigtail is formed at the place of the broach, it will be in the middle of the star's beam. After the broach, we knit another 7 sts and the last 1 purl loop (sp). 3 row. 6 lvl, broach, 6 lvl, 1 sp.
  4 row. 5 lvl, broach, 5 lvl, 1 sp.
 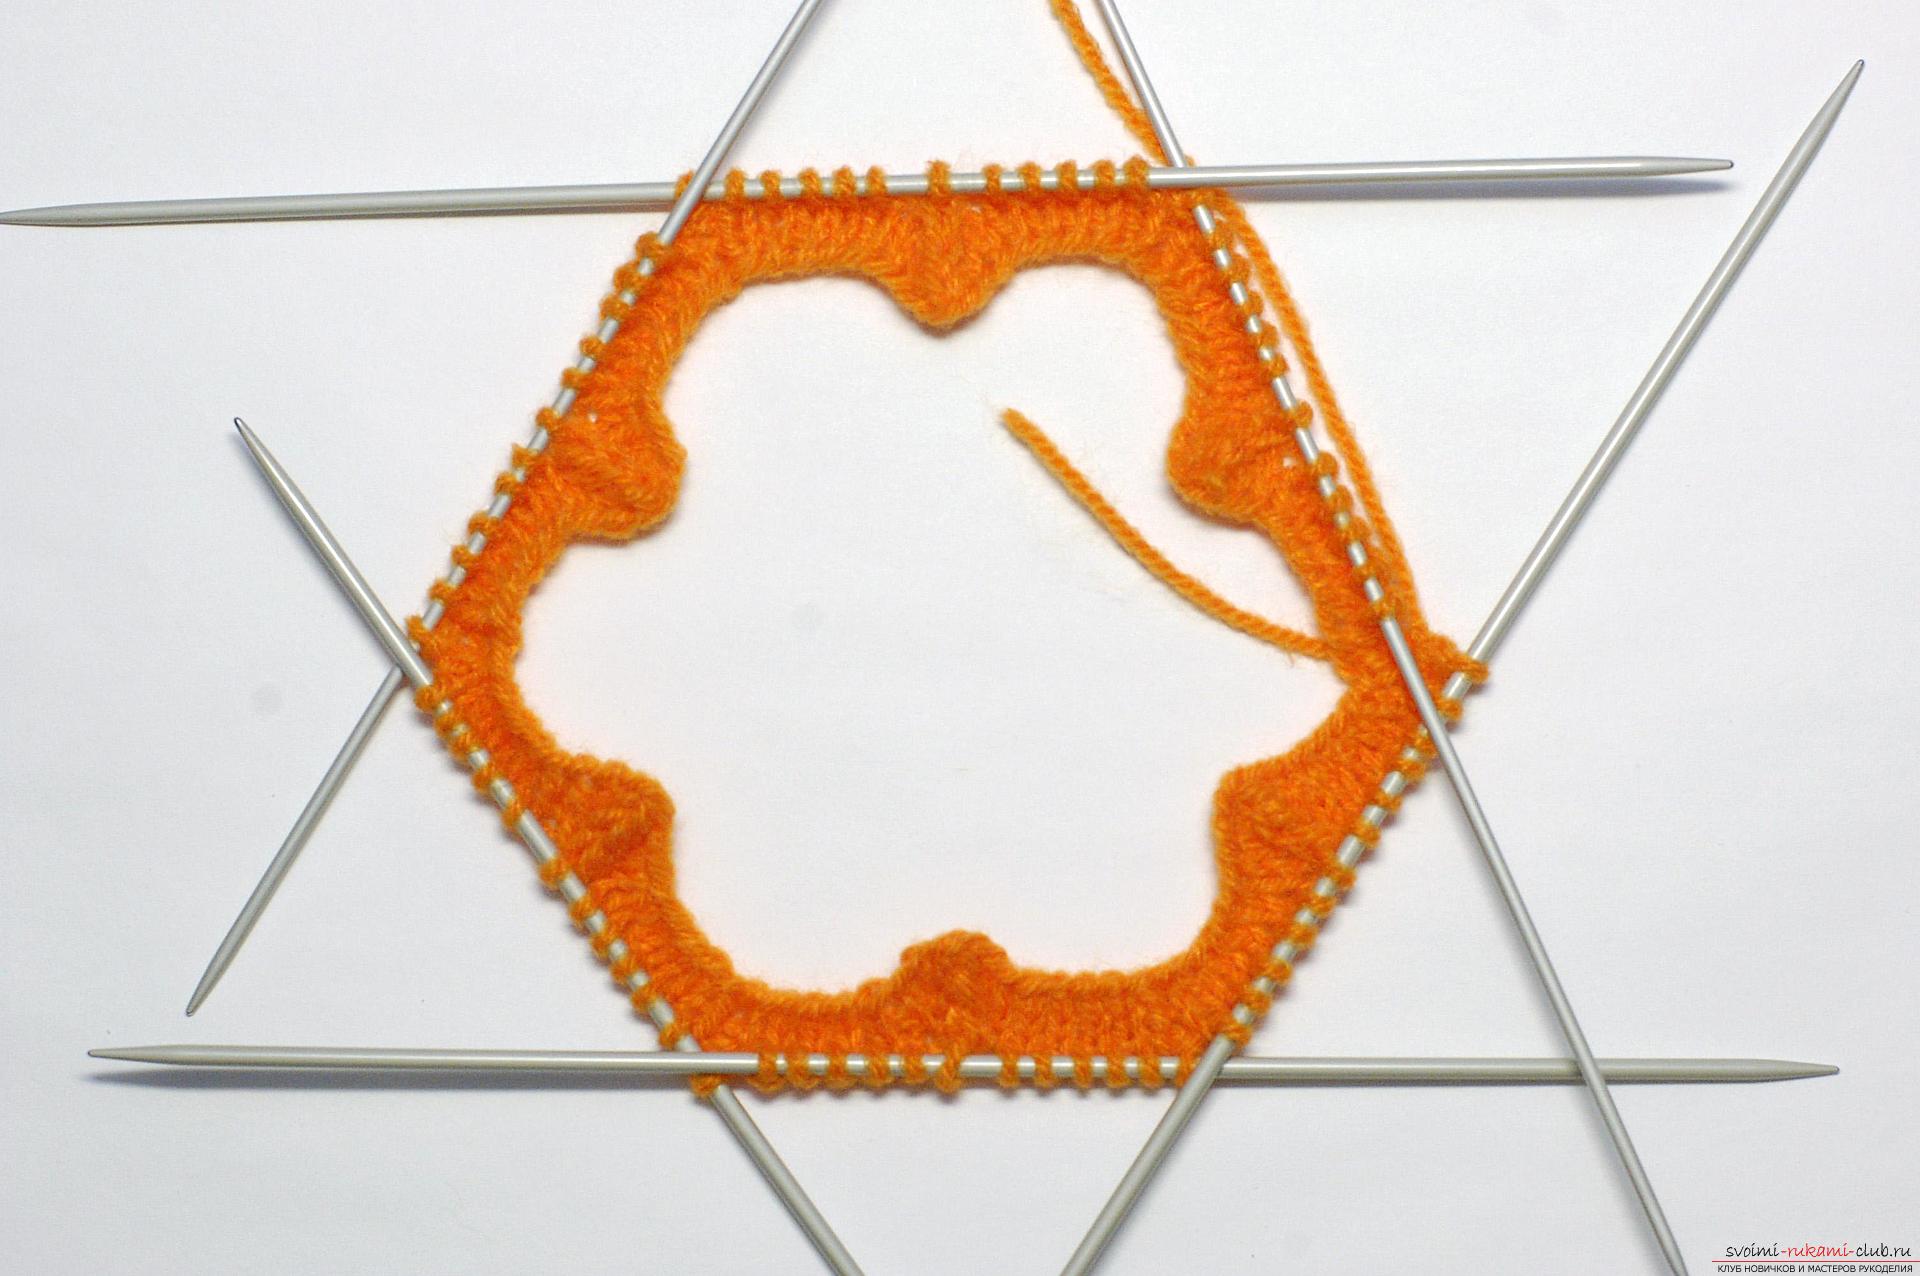 5 row. 4 LP, broach, 4 LP, 1 sp.
  6 row. 3 lvl, broach, 3 lvl, 1 sp.
  7 row. 2 LP, broach, 2 LP, 1 SP.
  8 row. 1 LP, broach, 1 LP, 1 SP.
  9 row. We start a knitting needle on the left for the first two loops, remove them to the right, knit the next knitting needle, stretch it through the first two and knit the last one as a wrong one. There are only two loops left on the knitting needle - broach and wrong side. So that the knitting needles do not jump out of knitting, we distribute it into three.
  10 row. We knit two loops into one front.
  11 row. Two loops in 1 LP.
  We tighten the remaining loops in the middle and hide the end inward. We will knit one more such detail, sew them together with a needle with a large eye and stuff them lightly with padding polyester.
  From the thread left over from sewing, we will raise a chain of air loops and make a loop out of it into which you can insert a ribbon.
  For the ribbon, you can hang our star on the Christmas tree. Happy New Year and Merry Christmas!
Comments
related posts:
The master class will teach you how to crochet a New Year's craft - a knitted garland for the Christmas tree A step-by-step master class will teach you how to crochet a knitted crown for a girl The master class will teach you how to crochet a New Year's craft - a knitted Christmas tree toy