Unwrapped gift box with dimensions. How to make a cardboard box with your own hands: diagram, template, master class, photo. How to make a cardboard box with a lid, round, heart, rectangular, triangular, square, flat with your own hands? Video:
There are many different types of folding boxes. The most common design is the cardboard box, the bottom and top of which are not adjacent to a common side; when assembling it, the cardboard scan is bent along four parallel lines, one of which separates a narrow flap (forming a factory seam), which is glued, and the blank takes the form of a sleeve. The edges are cut in the form of valves, scoring lines are applied to them; then these valves are closed and fixed on the edge of the sleeve, and as a result a closed package is formed.
Rice. 6.2. The main types of folding cartons shown here come in many variations. The figure shows flat blanks that are cut; scoring lines are applied to them, and then the box is assembled and glued. The glue flap is usually die-cut along with the back side of the box so that after gluing, the open cut of the cardboard faces back (outside shown, also called die side)
A box with a glued bottom is very similar to the type described above, but both bottoms are sealed after filling. On fig. 6.2 shows various shapes of bottom flaps. Bottom flaps are often provided with special locks to prevent heavy goods from falling out when the box is lifted. Parcel boxes have additional slots and tabs that prevent the package from opening up on the way.
We have given only the main varieties, on the basis of which a talented designer can create many new modifications. Packaging may have various cutouts and protrusions that allow the consumer to better view the product or provide a certain location of the goods inside the box. With the inclusion of additional parts (perforations and swivel joints, tongues and slots, music stands and cuffs), the cost increases slightly or does not change at all. It is this variety of design that makes the folding box so convenient.
The choice of design and materials for the box is determined by the type of product and marketing considerations for a particular product. If the packaging performs exclusively utilitarian functions (for example, it serves to store products) or is supplied to industrial enterprises or organizations, then the cost price is primarily taken into account when making decisions. In this case, the problem is to use the thinnest grade of cardboard that is acceptable in this case, and calculate the minimum development area.
The increase or decrease in the strength of cardboard, depending on its thickness, is given in table. 6.2, as well as on the graphs presented in fig. 6.3, 6.4 and 6.5. After the technical requirements are formulated, it is necessary to conduct tests confirming the suitability of the chosen design. Drop and vibration tests are of particular importance; they should be carried out in conditions as close as possible to operational conditions, that is, by placing the contents for which it is intended in the box and packing as many boxes into the shipping container as it is planned to transport in it in practice.
| Box volume, cu. inches | Content weight, pounds | Cardboard thickness, inches |
| up to 20 | up to 0.25 | 0,018 |
| from 20 to 40 | from 0.25 to 0.50 | 0,020 |
| from 40 to 60 | from 0.50 to 0.75 | 0,022 |
| from 60 to 80 | from 0.75 to 1.00 | 0,024 |
| from 80 to 100 | from 1.00 to 1.25 | 0,026 |
| from 100 to 150 | from 1.25 to 1.50 | 0,028 |
| from 150 to 200 | from 1.50 to 2.00 | 0,030 |
| from 200 to 250 | from 2.00 to 2.50 | 0,032 |
| from 250 to 300 | from 2.50 to 3.75 | 0,036 |
| from 300 to 375 | from 3.75 to 5.00 | 0,040 |

Rice. 6.3. The rigidity of the cardboard is determined by the modulus of elasticity (Young's modulus), the length of the fibers and the cross section of the sheet. Single fibers of wood pulp have an elastic modulus of about 500,000 psi (pounds per square inch) (3.448 MPa). Since most of the fibers are arranged parallel to the direction of the sheeting of the paper (longitudinal direction), the stiffness in this direction is higher. As the thickness of the sheet increases, the moment of inertia increases in proportion to the square of the distance from the center of the sheet to its outer surface. Therefore, to the greatest extent, the rigidity is determined by the outer layers
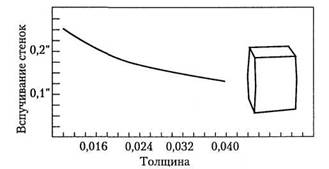
Rice. 6.4. When packing bulk products in large boxes, their walls deform and swell under the internal pressure of the contents. The most important factor is the area of the side. The graph shows that increasing the thickness of the cardboard only slightly reduces the swelling of the walls.
One of the requirements for a folding carton is its attractiveness to the buyer, but other factors must be considered. First of all, you should consider the way the product is laid out. The packaging must be stable and not fall off the shelf in the store. The front side of the box should also look good in the case when a lot of boxes are displayed on the shelves in the distribution network. It is necessary that the size of the package (compared to the size of the product) be solid, but at the same time not mislead the consumer. On fig. 6.6 shows how to determine the most appropriate size for a soft tube carton as an example.

Rice. 6.5. During transportation, the carton is subjected mainly to compressive forces. The graph shows how the strength of cardboard increases as its thickness increases. As an example, consider the maximum load (in pounds) from top to bottom that a 210 x 76 x 279 mm cardboard box can support.
The size of the cardboard box should correspond to the standard height of the shelves in the store. If in the distribution network the product in question is usually hung on consoles, then the box must be provided with a hanging loop or one of the sides should be lengthened and a hole of the appropriate size should be made in it. It should be easy for the consumer to pick up the packaged product from the shelf and hold it in their hands. A heavy cardboard box can be supplied with a handle cut from the same reamer. A window on the box can help to ensure a good level of sales, through which its contents or a high-quality image of the packaged product can be seen.
In the area of placing packaged products on store shelves, changes are also taking place. For a long time in retail, cartons have been placed (and printed accordingly) facing the consumer when possible - outwards and upwards - to draw more attention to the product on display. Sometimes a box is designed to be placed horizontally on a shelf (the reason may be that the product looks better in this case, and sometimes the possibility of stacking boxes in two layers), and it even happens that savvy packaging designers use a ready-made type of box used by some or another company for vertically displayed products. But at the same time, the variety of products offered in stores, especially in supermarkets, is increasing, and many store managers prefer a smaller front side, as this allows more types of products to be displayed on the shelf. There is constant competition for shelf space.
The use of boxes with a fifth side should be approached with extreme caution. In terms of drawing attention to the product on the shelf, they are really effective, but they require more cardboard to produce, they can create problems when processing on the production line, as well as when packing in shipping cases. However, such boxes may be indispensable for packing small items that otherwise run the risk of simply going unnoticed.
Rice. 6.6. Bristol-Lund formula (Bristol Lund) used to calculate the most appropriate size for a soft tube carton (but the rule against packaging that creates misrepresentations about the product is usually also observed)
In some cases, in order to prevent petty theft, it is necessary to make the box large enough that it cannot be hidden in the hand or placed inside another box. For the same reason, it is preferable to glue the flaps of the box, otherwise the thief will be able to remove the goods and return the empty packaging to the shelf.
The good appearance of packaging in a retail network is determined by the strength of the box itself, the quality of the cardboard used and the type of printing. It is not advisable to save money by using a lower quality material that will quickly lose its presentation.
Once the marketing aspects are taken into account, further decisions on the choice of materials and on the design of the box should be based on consideration of the purpose of the package and its cost requirements; analysis of individual aspects should be carried out in stages.
Since different factories produce different boards, it makes sense for the packaging engineer to first determine the marketing and technical requirements for the box being developed, and then select the type of board that best suits them.

Rice. 6.7. Under the influence of weather and storage conditions, the strength of the cardboard can be halved
Next, you need to find out whether this material will be available in the required quantity and in a certain period of time. So, for example, heavy grades of recycled cardboard with a thickness of more than 30 points (0.8 mm), as well as especially heavy grades of solid bleached sulphate cardboard, are gradually being phased out. (SBS) currently used only for the production of milk cartons. Other materials such as 10 pt (0.25 mm) board and profiled corrugated board E And F(which is sometimes used to make heavy duty folding boxes) will be very difficult to obtain in some regions. Another factor is weather conditions. So, for example, the rigidity of the boxboard and the strength of the box are affected by humidity (Fig. 6.7).
If recycled board is selected, the packaging technologist should also consider the cost of printing recycled board and making boxes from it, as well as the possibility that the productivity of the packaging equipment will be lower, as quality decreases at higher speeds. In addition, recycled board may not be strong enough to produce some complex designs such as end stoppers and latch tabs. As a result, it may be that a thicker grade of recycled paperboard may be required to achieve the desired packaging performance, but in this case, heavier loads and larger shipping cases must be used.
In cases where manual or semi-automated packaging operations are expected in the near future, it is desirable to assess the long-term outlook and determine whether there will be a shift to automatic equipment in the future. For example, a box with a latch on the bottom is ideal for manual loading and cannot be closed on automatic equipment. It is necessary to develop operating cards, design packaging and filling equipment parts in such a way that when switching to more complex technologies, it is not necessary to replace die-cutting dies and printing forms, and even more so all used packaging equipment.
Cost is always an important consideration and is largely determined by the choice of design and the type of material used. As a rule, any improvement in the characteristics of the paperboard or improvement in the appearance of its surface leads to an increase in the cost. This is an area where a packaging technologist can provide important assistance to the marketing department when making product packaging decisions. There are no hard and fast rules here, and the final choice is made on a compromise basis. Using the data in Table. 6.3, a decision can be made as to whether to use paperboard with recycled cores or solely virgin fibres.
Table 63 Comparison of the characteristics of cardboard made from virgin material and cardboard with inner layers made from another (recycled) material
| Characteristics | Solid bleached sulphate board | Cardboard with inner layers of recycled fibers |
| Wall deformation (swelling) | When opening the box, the walls are deformed due to the lower rigidity in the longitudinal direction | Longitudinal stiffness is higher |
| Rilevka | Scoring lines are held securely | Scoring lines lose their shape over time |
| Creep | Small creep rates; less compressive fatigue | High creep rate; high compression fatigue |
| Gluing | Requires expensive synthetic adhesive | It is acceptable to use inexpensive dextrin glue |
| Processing Uniformity | More uniform machining | Handled less evenly |
After all these issues are considered, such an important factor as economic efficiency is taken into account. While sustainability has received a fair amount of attention lately, most packaging experts agree that the choice is always made in favor of the most functional and most economical option.
The packaging designer needs to collaborate with the designer of the manufacturing company supplying the boxes. Recently, there has been a desire to determine the technical characteristics by mutual agreement between the supplier and the customer; the box development plan is also made acceptable to both parties. Material suppliers and packaging manufacturers know that this takes a lot of time, but the effort is well worth it.
The main points that need to be specified in the specifications of folding cartons are:
- dimensions;
- materials used;
- groove scheme.
Dimensions are always given in the following order: length, width, depth; they are measured from the middle of one scoring line to the middle of the other. Length is measured along the lid hinge, width is measured from the hinge to the folded flap, and depth is measured parallel to the adhesive flap. In the case of a complex structure, it makes sense to present a detailed diagram.
It is necessary to accurately specify the thickness of the cardboard, its density, coating and gloss. The characteristics of both the front and back surfaces are given, for example: white cardboard with machine coating, gray cardboard, kink-resistant boxboard, etc. The type of printing is also required. All colors and shades must be indicated using standard coding systems or presented as samples; in addition, permissible deviations from established standards are indicated. If it is necessary to use glossy paints or varnish the entire surface of the box or its individual sections, then this should be indicated in the technical specifications. It is necessary to specify in detail which sampling methods will be accepted, as well as the level of quality required during acceptance inspection.
When developing a specific package, first of all, it is necessary to establish the internal dimensions of the container, determined by the size of the packaged products. The length of each size is increased slightly - typically by 1/32 to 1/16 inch (0.8 to 1.6 mm) - so that there is a gap between it and the box. Then the thickness of the cardboard is selected; the most commonly used material is 18 and 20 points thick (0.457 and 0.51 mm). To make sure that the dimensions chosen are correct, at this stage it is advisable to make a sample of the packaging.
Most large carton factories and even some packaging companies have a design office; Job
carried out on a computer. Using a computer-aided design system and a graphics tablet, a diagram of the critical points of the box drawing is made, which are then entered into the database. The computer then connects these points with lines. A plotter is connected to the computer, which transfers the resulting drawing onto a sheet of cardboard or vinyl plastic. If the image is applied to cardboard, then with the help of the same plotter, scoring and cutting of the workpiece can be performed with exact observance of the technical conditions. The sample is then evaluated by both the packaging plant and the box supplier and approved by them.
If the plotter is printing on vinyl, then a layout can be printed on a transparent polyester film, which is then used as a mounting sheet to ensure that the images are correctly positioned relative to the box details.
In smaller packaging plants, it is preferable to make samples by hand. Cardboard fibers are almost always horizontal, that is, they run around the sides of the box, perpendicular to the main scoring lines; this direction of the fibers helps to avoid deformation (bulging) along the top edge and helps to keep the main sides flat (Fig. 6.8).
To make a sample box, a reamer is cut along the contour with scissors or a knife, and scoring lines are applied by placing the blank face down on a long length of scoring ruler, which can be provided by the box supplier. This steel ruler is mounted on a wooden stand with the rounded edge facing up. The workpiece is pressed against the scoring ruler from above with the help of a bar with a forked surface, which is drawn along the cardboard along the lines drawn with a pencil. The bar is made of solid wood; a groove is made on its end surface 1/16 inch wide and 1/32 inch deep (1.6 by 0.8 mm). This creates a bead along the scoring lines that breaks the rigidity of the boxboard in this area, making it possible to make neat folds (see figure 6.9).

Rice. 6.8. The fibers of the cardboard most often run in a direction around the box, perpendicular to the main lines of the scoring. Due to this, the material has greater rigidity in the interval from one scoring line to another. Curved edges provide rigidity in the opposite direction
Rice. 6.9. The cardboard is bent in the direction from the scoring line. The roll formed by the groove of the scorer and die cutter breaks the bond between the layers of paper. When the sheet is folded, the paperboard at the fold line delaminates and protrudes outwards in the form of a roll, thereby reducing the load on the outer layer of the paperboard. If this had not happened, the outer surface would have torn

Rice. 6.10. Main dimensions (in inches) using a typical folding box as an example. There are no general standards, and the number of varieties produced is quite large.
Further, if we are talking about a glued box, then regardless of how the sample was made, the blank is folded, glue is applied, and then the box is laid flat under the load and held until the glue dries. Provided that the cutting and scoring are performed correctly, the sides should be located exactly at right angles to each other, and the valves that form the end walls and fix them should be inserted into the slots or stand in the desired position without excessive friction. In rare cases, it is necessary to cut the edges or apply new scoring lines to ensure a more correct assembly. This sample can then be used to check whether the originally selected dimensions of the box fit, that is, whether the contents fit in the box as expected. The most common sizes can be found in Fig. 6.10; the exact terminology for describing the details of a cardboard box is given in fig. 6.11.
If the boxes of the type under test are intended to be processed on automatic equipment, then it is necessary that the supplier of the boxes make a punching die. At least 500 samples should be made, which are glued on an industrial gluing machine; they are tested on the equipment for the production of boxes. Samples are not required to be printed, but must be made from the appropriate material.

Rice. 6.11. To ensure mutual understanding with supplier enterprises, the details of folding cartons should be named correctly
Nowadays, there is an increasing number of various application programs, and images for boxes are increasingly prepared on a computer. When using a computer-aided design system, the development of the box design can be carried out together with the work on the printed image, and thus immediately - in accordance with exact specifications - the package as a whole is developed. However, computer printouts should not be used as a reference for color matching when printing. The proofing system used to validate the print sample and the ink used should be as close as possible to the selected printing process technology, as printing methods vary greatly.
In small enterprises and in printing houses where the packaging is made by hand, a test printed sheet is prepared. Such a sheet, printed from a stamp, allows you to check whether the seal is correctly located on each side of the cardboard box.
Cardboard boxes should be packed in strong shipping boxes with about 15% free space to avoid damage to the folded folds. If the boxes are packed too tightly, the opposite sides will be pressed against each other, while it is preferable that they bulge outward slightly, as this makes it easier to open the box before filling. Small boxes are preferably packed on trays, but in large boxes, the contents can be easily separated by sheets of cardboard. All boxes in a stack must be stacked in the same direction, which is especially important if the assembly will be done with automatic equipment. Transport boxes for these purposes are usually made of corrugated cardboard; they must be strong enough to withstand stacking 5 to 6 feet (1.5 to 1.8 m) high without warping. It is undesirable to store glued and assembled boxes for more than 6 months, as the cardboard may warp or harden.
This sachet box is very good for small gifts and souvenirs, such as cosmetics or handmade soap. Also, this is a good option for use as a bonbonniere at a wedding. Finished size including handles 120*80*40 mm.
For this box, I have prepared several files with templates that you can download from the forum of our site (link at the end of the article). After you have downloaded and unzipped the files, you will find 4 files in the folder that will help you make these cute boxes.
File named package-bw.jpg can be used by owners of a black and white printer. This file contains a diagram of the box, which you can print on a regular A4 sheet, cut out and transfer to the colored paper from which you want to make the box. If possible, you can print this template directly on a sheet of colored paper from the wrong side (in case the paper is A4).
For owners of a color printer and Photoshop, I have prepared special templates with which you can print ready-made color scans from the front and back sides, and then make boxes out of them. Those. all you need is thick paper for printing on a printer. I recommend using paper from Lomond or Fora with a weight of at least 180 g/m2. I use Lomond paper (matte one-sided with linen texture, 230g/m2). The files are called Packet-layers-1.pdf, Packet-layers-1.pdf, Packet-layers-1.pdf, i.e. three reamers for the boxes you see in the photos.
I'll tell you in more detail how to print these scans correctly. Those who have color printers are well aware of the problem with refilling cartridges with color ink. And for those who do not have a CISS (continuous ink supply system), this becomes a whole problem. Therefore, you need to print in a way that does not waste ink.
Thus, it is necessary to print a scan from one side and the other so that they match. It is very difficult to achieve an exact match, so I made a sweep of the front side a little wider than the wrong side.
So, I will describe step by step what and how to do for those who have never worked in Photoshop.
1.
Open any of the three files, for example package-layers-1.pdf. If you don't have the Layers panel open, press F7. In the "Layers" panel you see two layers, on the "background" there is a scan for the wrong side, on "Layer 1" - for the front.
2. First, print the front side of the scan by inserting a sheet of paper into the printer with the front side and selecting the "File-View and Print-Print" tab from the menu. Be sure to note which edge you inserted the paper (mark with a pencil on the edge).
3.
By clicking on the "eye" button, marked in the picture with a red circle, we make the layer with the front side inactive, and the layer with the wrong side becomes visible.


4. Now print the wrong side of the scan. But first you need to turn the paper over to the wrong side and insert it into the printer with the same edge. And be sure to display the image horizontally. To do this, go to the menu "Image - Rotate Canvas - Display Canvas Horizontally".

5. We print the wrong side by clicking on the menu "File-View and Print-Print". Everything, our scan is ready. It remains to cut it out, make a score of dotted lines and bend them. We glue the box, if desired, make holes marked on the template.
The article will tell you about how you can do it yourself and use a cardboard box. Here you will find templates and master classes for making boxes of various shapes.
A box is the easiest way to pack or hide something. The box can serve as an excellent means of storing things: jewelry, postcards, small items and cosmetics. Of course, modern stores will provide you with a lot of options for boxes: large, small, curly, square, with lids, decorated and simple cardboard.
It is much more pleasant to create something with your own hands and decorate it the way you would like it and the way the product itself will correspond to the style of the holiday, room, occasion. You can make crafts from absolutely any cardboard. The material can be purchased at a craft store (you will find a large selection of colors and textures of cardboard), or you can use the one in which household appliances are often packed (refrigerators, for example, or washing machines).
For work you will need:
- Cardboard (as many as required for your preferred product size).
- Hot glue (you can, of course, use any other, but hot glue is preferable to the extent of its quick drying and strong bonding of the material).
- Template (with the help of it you can understand exactly how you should cut, bend and glue the material).
- Scissors and a pencil - for basting, cutting. This is necessary in order for your product to look neat and aesthetically pleasing.
Hinged lid box templateIMPORTANT: There are two main types of cardboard box with a lid. One suggests the presence of a lid that covers the top of the box, the other a lid that leans back, but is part of the box.

 Box template with cover lid
 How to make a box with a lid step by step:
- Prepare all the supplies, print out the template for the box on the printer or draw it in the exact ratio on the cardboard.
- Cut out two pieces of cardboard
- Start bending the dotted lines and carefully gluing them together.
- Press the edges firmly to hold the material together.
- Let the product dry a little.
- After drying, you can decorate the box to your liking.
Video: "Box: master class"
How to make a round cardboard box: diagram, template
A round cardboard box is a very beautiful and practical product that will always find its use. Having decorated it to your liking, you can store jewelry and bijouterie, sewing and embroidery kits, cosmetics, clippings and much more inside.
Making a round cardboard box is a little more difficult than, for example, a square one. However, it is quite realistic to “figure out” with your own hands, without spending a lot of money on materials. Use thick cardboard and exactly follow the template provided, you can only change the size, but not the shape of the parts.
How to make a round cardboard box, templates:

 Round Cardboard Box Template #1
  What parts does a round cardboard box consist of: template No. 2
 In what order should the parts of the round box be glued together: template No. 3
  Round cardboard box with handle: finished product
 Video: "Gift box or cardboard box: a detailed master class"
How to make a heart box out of cardboard?
A heart-shaped box is much more difficult to make than a round or square box. However, if you follow the tips and patterns, you will easily create this beautiful piece.
A heart-shaped box is not only a storage box, it is the perfect package for giving a gift to a loved one. Such a box can be filled with many surprises: sweets, souvenirs, trinkets, gifts, key rings, flower petals, even butterflies can fit in it.
IMPORTANT: In many respects, the heart box is similar to a round box, but here everything depends on the bottom: if it is proportional, then the whole product can look neat and even. The box has two bottoms: inner and outer, the walls of the box are attached according to the principle of a round box.
Different patterns for making a heart-shaped cardboard box:
 One Piece Heart Box Template: Template #1
 One Piece Heart Box Template: Template #2
 Step by step work in photo:

 Prepare identical hearts: two bottoms and a lid
 Tape the bottom of the box
 Fix and wait for it to dry completely, make a cover
 Video: "Heart-shaped box: master class"
How to make boxes out of paper and cardboard?
Giving gifts in bags, plastic wraps and paper wrappers is no longer beautiful and is considered a sign of "bad taste". Your gift will look much more spectacular in paper or cardboard packaging, which you glue and decorate yourself.
IMPORTANT: The size and shape of your box depends only on what exactly you will give. More "heavy" gifts require thick cardboard, and for small and light ones, you can even glue a paper box together.
Boxes made of cardboard and paper, different patterns:
 Simple Rectangular Box Template
 Flip-top box: template
 Triangular box: template
 Simple square box template
 Pouch box: template
 How to make a box of colored cardboard?
In the modern art store you will find a huge selection of cardboard:
- Kraft cardboard (solid sand color material)
- Colored cardboard
- Velvet cardboard
- Holographic cardboard
- Glitter Cardboard
- Cardboard with prints, drawings and inscriptions
- Textured cardboard and more
IMPORTANT: All this variety of choice allows you to create cardboard boxes of incredible beauty and use them for any purpose.

 Cardboard for creativity
 Video: "How to make a cardboard box?"
How to make a cardboard box without a lid?
In case you need to make a cardboard box without a lid, you should also use the template. This product is perfect for storing personal items: pencils, cosmetic brushes, hair accessories and much more.
 Box template without lid
 Video: “Do-it-yourself origami box without a lid”
How to make a cardboard box for sweets?
Boxes of chocolates do not have to be bought in the store, you never know for sure what will be inside. It is always more pleasant to make a box with your own hands, fill it with sweets to your liking and give it to a loved one. It will be not only a "delicious" gift, but also very original and special.

 Box with pens: pattern
  Butterfly box: template
 Box triangle: pattern
 How to make a cardboard jewelry box?
It is very comfortable to store jewelry, bijouterie and watches in a cardboard box. You can buy it or make it yourself, decorating it to your liking. If desired, inside the box you can make one or several departments.
A few tips and templates for making a flat cardboard box will help you make your own packaging of any size.

 Flat box template
 Video: DIY Flat Storage Box
How to make a square cardboard box?
The small square box can be used as a bombonnière or as a package for small surprises for your loved ones.

 Simple square box template
 How to make a triangular cardboard box?
A triangular box can exist as a separate unusual package, or it can be part of a package in the form of a cake.

 Triangular box template
 Do we decorate cardboard boxes with our own hands?
Decorating a homemade box depends only on how original and great your imagination is. You should also decorate the box, focusing on the occasion (holiday, for example, or indoor decor).
How and with what you can decorate any cardboard box:
- Lace and fabric
- Satin ribbons
- Twine and burlap
- Stickers and stickers
- Buttons and other accessories
- Sequins and stones
- colored paper
- kraft paper
- Drawings and inscriptions
Video: "5 ideas for decorating a box"
Today I am sharing with you my development of a reamer for a box with high sides. This scan is unusual in that it saves paper, and also allows you to place it on a smaller paper format, which is important when assembling boxes with high sides.
Of course, we are talking only about such boxes and only in the case of a double side (hard). For other types of boxes or lids, it will be more efficient to use standard reamers.
It all started with the fact that I needed such boxes for the "mother's treasures" project, and the standard scan did not fit into the A3 paper format precisely because of the double high sides.

The unwrapping was born from several mistakes, and now, based on another mistake, I will show you how to make such boxes.
There are two mistakes in the photo - a box with the wrong lid and a lid that I assembled by mistake the same size as the box, because of which it simply did not fit =)
For this cover, I will now make a box.

Get ready, now there will be some numbers, geometry and spatial white shapes. But I tried to make as many explanations and photos of the process as possible for you, so it should be clear.
So, first decide on the desired size of the box. It is better to write them down and sketch them, even if schematically and clumsily, like me =) My box is 5 cm high, width and length are 6 and 9, respectively.
Now you need to draw a sweep, so as not to get confused, it looks like the figure on the right.
The shaded rectangle is the future bottom of the box, it has length/width dimensions.
IMPORTANT: the location of the bottom must be exactly as in the figure: the horizontal dimension "a" (length) is greater than the vertical "b" (width). If they are the same size, it doesn't matter.
The difference between this sweep and the standard one is that in the usual one, one more strip would have to be added on the left and on the right, equal to the height of the box. But sometimes these same two "extra" heights simply do not fit on a sheet of paper.
Now about the sizes. We measure up and down from the rectangle-bottom twice along the height of the box, and the extreme rows are 1-1.5 mm less so that the bends do not overlap the bottom.
To the left and to the right we measure the size "c", equal to the larger of the width and height. In my case, the height is smaller than the width, so I measured the same size as the width of the "b" box. In any case, it should be a larger size.

After measurements, we cut out the resulting rectangle and do scoring along the lines. You can use special tools for creasing, you can use a knitting needle or a non-writing pen, whichever is more convenient for you.

Here is another photo, the position is similar to the picture.

Now some geometry again :)
The picture on the left shows what I indicated above: the extreme top and bottom lines should be slightly less than the height, literally 1-1.5 mm. In my case it is 4.9 cm.
When the rectangle is ready, you need to make several cuts, in the places that are shown in the figure on the right with a green marker, and then bend along all lines, so that later it would be easier to glue

This is what should be the result

A little more geometry :)
Now you need to decide what is superfluous on the scan. It all depends on which size (width or height) you have more. Since I had a larger width, I use the diagram on the right: I cut off what is highlighted in green. Oblique cuts are needed in order not to interfere with the bends of the valves, make the bevel small, about 2 mm, and you also need to take into account that these parts will be inside, so the maximum height should be 1-1.5 mm less than the height.
If you have a larger size - height, then the oblique cuts are purely symbolic (1-2 mm), but the upper flaps will need to be cut to fit the width (smaller size).
Everything sounds probably not clear, so the drawings should be much more informative.

That's how I got it. as you can see, there are only two rectangles from the waste. Unlike the standard scheme, where at least 4 are cut off, and sometimes more.

Now it remains the simplest physically and the most difficult theoretically (it is difficult to explain in the figures what to stick where).
So let's start with the top valve. We simply glue it and bend it (indicated as 1).
Then we will deal with the left inner valve, why it is indicated by different numbers, but in one block - I will explain later.

This is what the reamer should look like when the top flap is glued on.

Now we proceed to the left inner valve.
Apply glue to the part where my finger is pointing

And in this way we glue it, assembling one of the sides

Here's what happens

We lay the layout down with the place that sticks together, and iron it well so that the surfaces are held together.
I have such a pen, it has a smooth tail, but at the same time slightly pointed

With it, I press down all the corners that my finger does not have access to, as well as the entire gluing area at the same time. Since I work with a glue stick, gluing is fast, and the paper (in my case, drawing paper) does not warp.

Now let's deal with the second part of the inner valve. We smear it with glue

And glue to the bottom side. The result is a figure like this. Similarly, we iron the place of gluing well so that everything holds firmly.
And now let's take a look at the right side. We work with it in the same way, first we glue the part that the finger points to

And glue the sidewall to it

And then .... and here is the reason why in Figure 11 I painted over the internal valve with one figure, although it denotes two stages. We are left with one valve at the end, which is very problematic to push inward, especially if the paper is thick, and it is difficult to crawl with glue so as not to stain everything around.
That is why I smear the entire painted valve at once, and quickly glue it alternately to the two sides. Since it is solid, it is easier to smear it entirely with glue. By placing it inside immediately, nothing gets dirty and it is more convenient to align the corners.