Crochet openwork border. Braid crochet patterns
A crocheted border radically changes the appearance of the product. This method of decoration is perfect for decorating an already finished product, or refreshing an old thing. Crocheted edging patterns and descriptions will be given in this article. Indeed, if you are just starting to learn the basics of knitting, you will need any information.
Varieties of the border
Today, magazines, websites and other sources can offer a huge variety of different ways to knit a border. They differ in width, style and strict adherence to lines.
Crochet masters share the existing types of borders as follows:
- transverse;
- tied along;
- openwork;
- tape;
- multilayer;
- loin;
- border;
- fringed.
The scheme of each of these methods differs in its complexity and has certain nuances. For each product to be tied, you can choose one or another method, or combine several.
Knitting borders: video master class
Openwork motifs
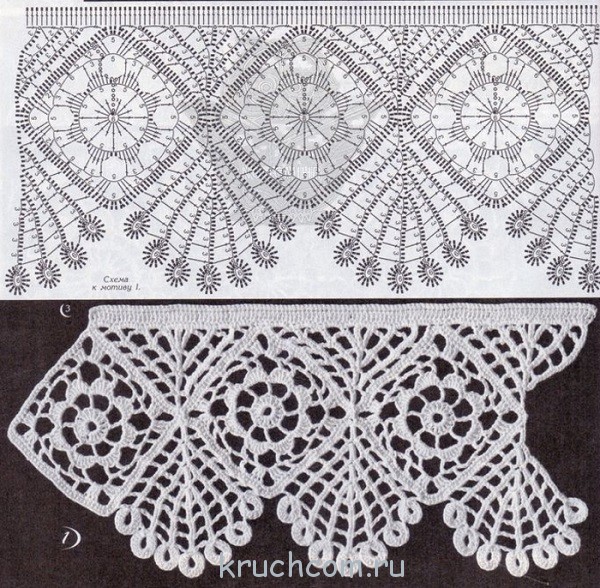
Openwork border is the most common type of edge processing. It is used not only to decorate clothes, but also in decoupage or in the manufacture of jewelry. As a rule, the thing itself is knitted with a pattern that does not attract attention, and the main emphasis is given to the openwork of the edge.
Patterns for openwork knitting are in high demand, both among experienced craftswomen and beginners. Beautiful openwork crochet can be made with a variety of patterns: scallops, "pineapples", shells; be wide and narrow.
A wide openwork crocheted border is most suitable for decorating a tablecloth and a rug. On the network you can find a variety of schemes for this method of strapping. We invite you to pay attention to this beautiful pattern, perfect for adding elegance to the tablecloth.
Tying the edge with pom-poms: video master class
Openwork knitting: description and scheme
To properly tie a fillet cloth, you need to know some rules:
1. When knitting a fillet, the hook is inserted into the middle part of the column, and in no case into 2 half loops of the bottom row. Otherwise, the columns will shift.
2. A loin cloth called “French mesh” is knitted into an arch from air, so the cells resemble a chess field.
3. Any thread is suitable for a sirloin border.
4. You can knit in this way, both across and along. The chosen direction depends on the location of the pattern.
A selection of knitting patterns for borders


Crocheting is such a vast art that even tying the edges of a variety of products allows you to choose from many possible options. Moreover, such a detail as a crocheted border can give a simple thing, like the most ordinary dress or blouse, an elegant sophisticated look, or, conversely, turn into a ridiculous-looking product that you don’t want to wear, even if it turns out to be the only one in the wardrobe. Therefore, it is so important to learn how to combine crochet styles and successfully apply them in the details that play their role in shaping the style - the edges of the crochet product.
Tablecloths, handkerchiefs, napkins, towels, curtains, sleeves and the neck of any component of the wardrobe will look completely new if you choose the right pattern for crocheting the edge. By the way, this technique is also used if there is a need to “hide” the craftswoman’s mistakes, which can be easily seen with the naked eye on the edges of the products. And also finishing the edge with different knitted patterns that can give a second life to any old little thing that you don’t want to part with at all.
Crocheting the edge of the product - diagrams and description
Choosing the right pattern on the border is already half the battle. This issue has its own subtleties that are important to consider when choosing a pattern for the edge of the product:
- narrow border (up to 1.5 cm) - suitable for light knitted items with openwork motifs, and also ideal for children's clothing;
- Border that passes into the collar (5-8 cm or 15-20 cm) - goes with most knitwear.
- Wide trim pattern (1.5 - 4.5 cm) - looks good on products made of yarn of medium thickness, namely, on the edges of the sleeves and the neck of jumpers and pullovers.
A beautiful pattern along the edge can be knitted directly when creating the whole thing - then you don’t have to suffer by fitting the openwork ribbon to the product, but you can sew on the finished border by tying it in advance. Here the choice is quite simple.
But the options for patterns for tying the edges provide much more space. So, what are the possible options for finishing and decorating the edge of a knitted product with a hook do needlewomen have?
- crayfish step

Popular articles:
The most favorite crocheting option among beginner knitters is the crochet step, consisting of single crochets that are knitted from left to right: starting to the right of the working loop. This pattern allows you to maintain the original shape of the canvas, preventing the edge from stretching. This method of tying the edges also has its own varieties.
step from left to right
The hook is inserted into the first loop on the right and a single crochet is knitted. Insert the hook into the next loop on the right and knit a single crochet again. And so on to the end of the row.
step from right to left
This option of tying the edges is considered more complex, but also more familiar. With the working loop on the hook, insert the hook into the loop on the left and grab the working thread. Pull up the thread and with both loops on the hook, turn the nose of the hook counterclockwise (see diagram above). After twisting the loops on the hook, yarn over and pull it through both loops on the hook. With one working loop on the hook, insert the hook into the loop on the left (moving away from you) and grab the working thread. Pull out the loop. After twisting the loops on the hook again, yarn over and pull it through both loops on the hook. Continue in the same way. The resulting rad should look something like this.
- Pico
 Crochet pico crochet patterns.
 Pico tying consists in chains closed in a circle of several air loops - from three or more. These loops are ideal for tying cuffs and sleeves.
A row of pico is performed on the front side of the product. Chain 1, skip first single crochet, work 1 single crochet into next single crochet. Work a chain of 4 stitches, then single crochet into the first stitch of this chain to make a picot. Work 1 single crochet into each of the next 2 single crochets. Continue knitting picot and 2 single crochets around the edge of the product in the same way. There are also several other options for knitting pico (see diagram above).
- Arched harness or Shell

The pattern is obtained by knitting loops of different heights with the highest loop in the center. The shell can be done in a row, knitted with single crochet, half crochet and double crochet. The binding is performed on the front side of the product. Chain 1, single crochet 1 into the next stitch. Skip 1 st, work 1 half double crochet, 3 double crochets and 1 half double crochet - all in the next loop. Skip 1 st and single crochet 1 into the next st to secure the edge of the shell. Continue tying the edge of the product with shells in the same way.
- Border of decorative openwork patterns
Here, the form and all kinds of schemes are not limited by anything but the imagination and capabilities of the knitter. There are so many options for crocheting an openwork border, from the simplest to the incredibly complex. Often they are crocheted separately from the entire product and then sewn to the desired edges. Consider several schemes and how to use them on different things.
Neck strapping
Very often, needlewomen are looking for ways to crochet the neck of a sweater or sweater in such a way as to hide the open cuts of the product, and at the same time, the thing has acquired a more interesting and special look. There are many ways to do this, you just have to choose from dozens of schemes the most appropriate strapping style. Consider a few examples of how to beautifully crochet a neck to improve the look of a knitted thing and not ignore the principle of completeness.
- Quick neck tying

This step-by-step design option is suitable for beginners and those needlewomen who do not have time to perform more complex neck processing. It turns out beautiful and simple.
A knitted product can be decorated with a neck made in a circle, or the ends of the neck can be joined with a seam.
We take the finished fabric and crochet from the wrong side of the working thread, pull the loop to the front side.
Thus, we collect several loops on the hook. Important: the loops must not be cast on loosely.

Then these loops are thrown onto the knitting needle, after which we continue to dial loops with the hook. We pull the loop with a hook, transfer it to the knitting needle, etc.

Loops are set. Now we knit the first row in such a way that there are front loops from the inside, and purl loops in the front row. If we knit the neck in a circle - we knit the wrong loops. If with a seam - facial.

If you want to achieve a “factory effect” of connecting the collar with the product, we knit the first row with knitting needles as follows: on the wrong side of the product, the first row is knitted with facial loops (the loops will be purl on the front side), and then the first row on the front side looks like the collar is pinned needle.
According to the first knitting option of the first row, the following result is obtained:

Then we knit the neck of the desired length. If this is a loop lapel, close it with knitting needles or crochet, if desired. If it is a stand-up collar, it is better to close the loops with a needle.
- Nice neck finish

This is also a simple crochet option for a beautiful edge, in which the most difficult and important thing is to correctly calculate the rapport of the pattern.
The height of the rapport is the width of the bar. The width of the rapport is the number of loops by which the number of loops of the entire length of the neck is divided without a remainder. For example: plank height 16 rows. 16/2=8. Rapport cannot be less than 8 loops. On 8 loops we will have an openwork decker.
In this case, the neck is 180 loops. The rapport of 12 loops 180:12=15 was determined by the selection method. 15 repetitions of rapport.
It is better to have 2 additional loops for stitching the strap. In my case, this is not the case, but the difference in the neck pattern on the shoulder line is not noticeable.
You need to knit according to the following scheme, in which only odd rows are indicated:

- floral pattern

The pattern for tying is a bush of a chain in three air loops and two double crochets. It is knitted from one point - the base of the chain. The bushes are fixed with a half-column at a certain distance from each other (for example, in two loops of the fixing row of the neck). At the beginning of the row, make one air loop for lifting. Follow the pattern.

Nice sleeve finish
Often, the sleeves are crocheted in the same pattern as the neckline - in this way, the thing is designed in the same style, which means it looks harmonious. Let's try to knit a few simple patterns.
- Sleeve scallops

First of all, dial a chain of 5 air loops.
Insert the hook under the cast on chain, grab the working thread and pull up the loop.
Grab the working thread again and knit the elongated loop. This is how the first single crochet was obtained, knitted from under the chain, and 2 loops remained on the hook.
Knit the elongated loop, another loop will be added to the hook.
When there are 11 loops on the hook, grab the working thread and knit through all the loops from the hook.
Now secure the scallop by single crochet, stepping back 3 loops from the beginning of the scallop. Scallop to end of row following step by step photo.

It is necessary to work according to the following scheme:

- Large lace border

At the beginning of the row, knit an air loop. Insert the hook under the nearest braid of the edge to be tied. Knit a single crochet. Knit the air loop again.

Insert your hook into the front loop of the upper braid of the single crochet knitted earlier and then insert the hook into the left side loop of the same single crochet. Insert the hook under the nearest braid of the edge to be tied. Pull out the loop. Pick up the thread and knit a single crochet. You need to repeat from 4 to 8 points. The result is such a binding of the edge, which, due to its elasticity, will not tighten the bottom of the product.

Product bottom
You can crochet the bottom of the product in a variety of ways, but we will consider one of the easiest options, and a more complex and beautiful tying method, suitable not only for knitted items, but also for towels, tablecloths and other material products.
- Binding the bottom of the Pico item

Along the edge of the product, start knitting with two single crochets.
Next, chain 3 stitches and guide the hook into the base of the single crochet as shown in the photo. Then double crochet again and 3 chain stitches after them.

- floral border

A row with a floral motif is knitted as follows: ch 3. lifting, 3 CCH in the first arch from the vp, 1 CCH in the next arch. We begin to knit a flower: ch 3, 3 unfinished dc on one loop of the base, knit all loops on the hook = 1st petal. Ch 4, remove the hook from knitting, insert into the upper part of the connected group of columns from right to left, grab the last loop of the chain and pull it through all the loops = ringlet.
Next petal: *ch3, dc 2 in ring, ch3, sc in ring* (= 2nd petal), repeat from * to * 2 more times. Last petal: ch 3, 3 unfinished dc, work through all loops on the hook (= 5th petal). The flower is ready.
3 CCH through one arch of the previous row, 1 CCH into the next arch, and we begin to knit the next flower.

Video lesson
Decorating the edges of knitted products with a crochet is not an easy task, because first you need to pick up a beautiful pattern, then knit it correctly and without unnecessary broaches, and then sew it on so that it looks perfect, and most importantly, in its place. It may be difficult for beginner craftswomen to cope with this task at first, but do not despair. You can always "peep" the secrets of this craft from more experienced craftswomen.
Crochet the edge of the product video:
Many needlewomen master the art of crocheting a border. Believe me, this will be very useful to you in everyday life. With the help of a border, you can decorate napkins and towels, process the edge of clothes, decorate interior items, curtains and much more. There are many different ways to knit a border. If you are just learning crochet skills, then choose the simplest patterns, subsequently complicating the task. In our article we will talk about how to crochet a border. Schemes and a description of the knitting process will help you create real masterpieces.
What are the types of borders?
The crocheted border, first of all, differs in width. In addition, the border can be made in an openwork style or with strict adherence to lines. Experienced needlewomen distinguish the following types of borders:
Crochet lace border: diagrams and description
If you want to knit an openwork border for finishing towels, napkins or a towel, then a zigzag pattern is quite suitable. Even a beginner can do this openwork pattern. The main advantage of knitting such a border is that the product is knitted in length, that is, you do not need to calculate the number of loops in advance. You can try on the border to the finished product in the knitting process.
Necessary materials:
- threads (iris, cotton or synthetic with lurex);
- hook;
- needle.
Step by step description of the process:

Crochet wide border: diagrams and description
A wide border can be used to trim children's clothing or women's skirts. Depending on the chosen yarn, such a border can be a wonderful decoration for home textiles.
Necessary materials:
- yarn;
- hook;
- needle.
Step by step description of the process:

Crocheting the edge: patterns
To lengthen a child's thing, sometimes you need to crochet the edge. Very often, needlewomen tie the edges of their knitted sweaters, vests, so that they do not wrap up and constantly keep their shape. Let's see how to do it. Basically, for tying the product, the “Shell” border is chosen.
Necessary materials:
- yarn;
- hook.
Step by step description of the process:

Knitwear is always in fashion, especially handmade ones. If you want to make your clothes or home textiles original, then tie them with an openwork or wide border. There is nothing difficult in this. You will see, you are sure to give many things a second life.
From time immemorial, the border has been considered the knitting element that gives any product true tenderness and sophistication. With its help, any crocheted items are decorated - from garments to kitchen accessories (napkins, tablecloths, towels, curtains and much more). Moreover, not only finished knitted products are tied with a decorative border. Openwork lace, knitted along the free edge of the fabric, can breathe new life into an old, long-forgotten thing from a women's or children's wardrobe.
There are a lot of ways to knit a border. It is knitted along and across, in one layer and with layering, using fillet, openwork, ribbon techniques, as well as in the form of a border or fringe. Each option for knitting a border has its own subtleties, therefore, if the craftswoman has just begun to learn the basics of crocheting, we recommend choosing the simplest tying patterns, subsequently gradually complicating the tasks of knitting. 
Today we will talk about how to crochet a border. We offer needlewomen a large collection of patterns and step-by-step instructions for crocheting the edges of knitted products - from simple "picot" to super-complex knitted "butterflies". 
Text abbreviations:
- VP - air. a loop;
- Runway - air. lifting loop;
- Art. s / n - double crochet;
- Art. b / n - single crochet;
- Art. s / 2n - a double crochet;
- pet. - a loop;
- chain - chain;
- РН - working thread;
- PR - previous row;
- SS - connecting column.
The simplest border for beginners based on "pico"
With the help of such a border, you can tie whatever you want: knitted napkins or ordinary fabric handkerchiefs. The binding is absolutely simple to perform, consists of four rows, so even a newly-made knitter can master it. 

Knitting progress:
We tie the canvas in a circular way with a number of b / n columns. SS.
Following. we knit 6 VPs in a row (1 runway + 5 VPs), 1 tbsp. b / n in the 5th st. b / n PR, then we knit with rapports to the end of the row: “5 VP, 1 tbsp. b / n in the 5th st. b / n PR ". SS.
We knit the third row in the same way, only the b / n column should fall on the central loop of the arch from 5 VP PR.
We tie the fourth row. repeating knitted combination: “1 tbsp. b / n in the central. pet. arches from VP PR + 3 VP + 2 tbsp. s / n to the center. pet. track. arches of 5 VP PR, above and between them - by pico (3 VP + 1 SS in the first VP), between pico - 3 VP each, we complete the rapport with three VP and art. b / n to the center. pet. track. arches from 5 VP PR. SS. Kaima is ready!
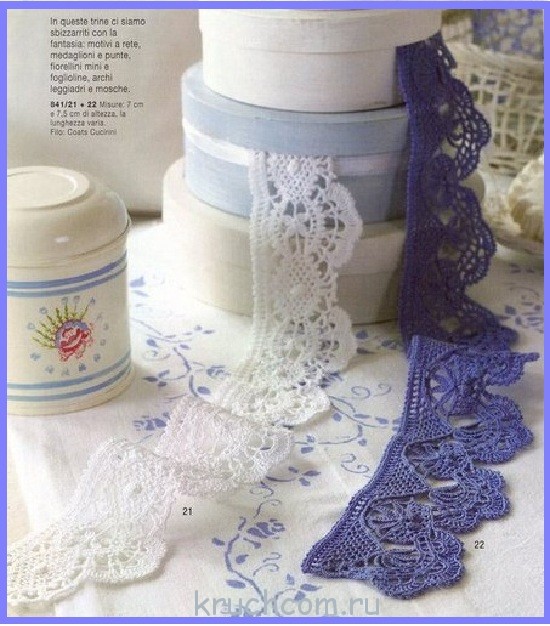
Narrow openwork border

The most beautiful airy border can decorate women's blouses and children's tops; in its frame, both a wide variety of clothing items and all kinds of knitted accessories look equally good.
Work steps:
The border is knitted in a transverse way, with openwork motifs.
We collect a chain. out of 11 VPs (7 VPs + 3 VPs + 1 VP).
Row number 1: 1 tbsp. s / n in the 7th VP chain. from the hook, 2 VP, 2 tbsp. s / n in the 4th VP of the base from the hook, between the columns - flail. from 3 VP.
Row number 2: 5 runways, 3 tbsp. s / n to the center. pet. arches from 3 VP PR, 1 VP, 3 tbsp. s / n in the same pet. arches, 2 VP, 1 tbsp. s / n in the next. Art. s / n PR, 1 VP., 1 tbsp. s / n to the 3rd runway PR.
Further, we continue the work according to the knitting pattern until the border reaches the desired length. Semicircular motifs in the course of knitting are tied with art. b / n with pico.
Treat the finished border with a solution of starch and iron to give the perfect shape.
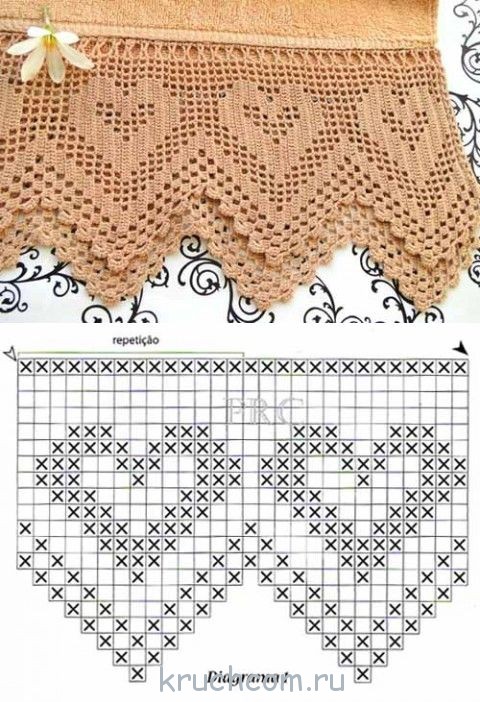
Border "hearts" in loin knitting technique

A border made using fillet technique is one of the most popular types of crochet straps. Towels, napkins and tablecloths are decorated with a sirloin border, in addition, with its help you can decorate kitchen curtains and other home interior elements in an original way.
The scalloped heart border can be a bright accent to many knitted and fabric gizmos, take, for example, kitchen curtains, in which you want to bring a little variety.
Fillet pattern scheme:

The process of knitting a sirloin border is incredibly simple and similar to embroidery technology. It must be remembered that each cell of the pattern consists of three loops, an empty one is knitted “1 tbsp. s / n + 2 VP ”, filled -“ 3 tbsp. s / n.
For the border "hearts" we collect a flail. on 55 VP + 3 runways, and knit with empty and filled loin cells according to the above pattern.
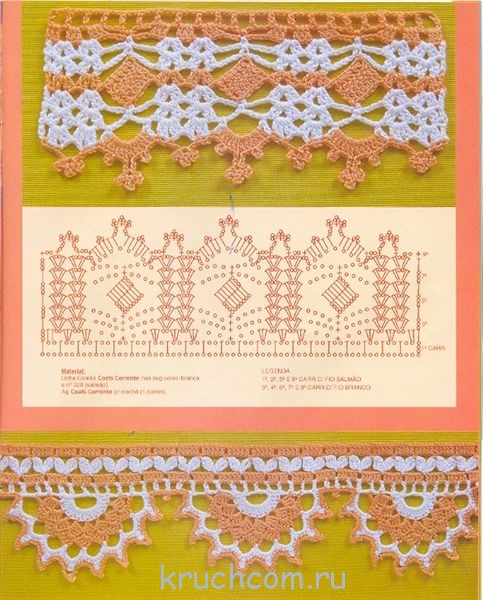
Complex openwork border
Openwork border - the leader among the methods of crocheting the free edges of the product. Patterns of openwork strapping are in high demand among craftswomen, so there are plenty of options for them: scallops, "pineapples", shells, floral motifs, etc.
The openwork border is narrow and wide. The latter is ideal for framing towels and tablecloths. We offer needlewomen to stop their attention on the most beautiful pattern of a wide openwork border, perfect for adding elegance to a tablecloth.
The process of crocheting such a border is not easy, but the results of the work will be appreciated, see for yourself! 
Knitting pattern:

Knitting order:
We knit the beginning and end of the border according to the scheme of the first motive, then alternately according to the schemes of the second and first motives until the border reaches the desired length.
The first motive: we start with a flail closed in a ring. for 5 VP.
Row number 1: 4 runways, 6 tbsp. with 2 / n in the next. 2 VP rings.
Row number 2: 4 runways, 1 tbsp. with 2 / n in the next. Art. with 2 / n PR, 2 tbsp. with 2 / n in the next. Art. s 2 / n PR, 3 VP, 2 unfinished. Art. with 2 / n with one vertex, in the first VP chain. out of 3 VPs, 3 are unfinished. Art. with 2/n with one vertex, in the next. Art. s 2 / n PR, 3 VP, 2 unfinished. Art. with 2 / n with one vertex, in the 1st VP chain. from 3 VP, 2 tbsp. with 2 / n in the next. Art. with 2 / n PR, 2 tbsp. with 2 / n in the next. Art. with 2 / n PR.
Rows No. 3-4: we knit according to the scheme of the first motive.
The second motive: we collect the chain. on 13 VPs (7 VPs, 4 runways, 2 VPs).
Row number 1: 4 runway, 1 SS between the fourth and third row of the first motive, 2 VP, 8 st. from 2 / n to the ninth VP chain., 3 VP, 1 SS between the fourth and third row of the first motive on the opposite side of the chain.
Rows No. 2-4: knit according to the pattern.
Warp: knit straight and back according to the warp knitting pattern (rows No. 1-8).
Strapping: we tie the border in a circular way according to the strapping pattern. Ready!
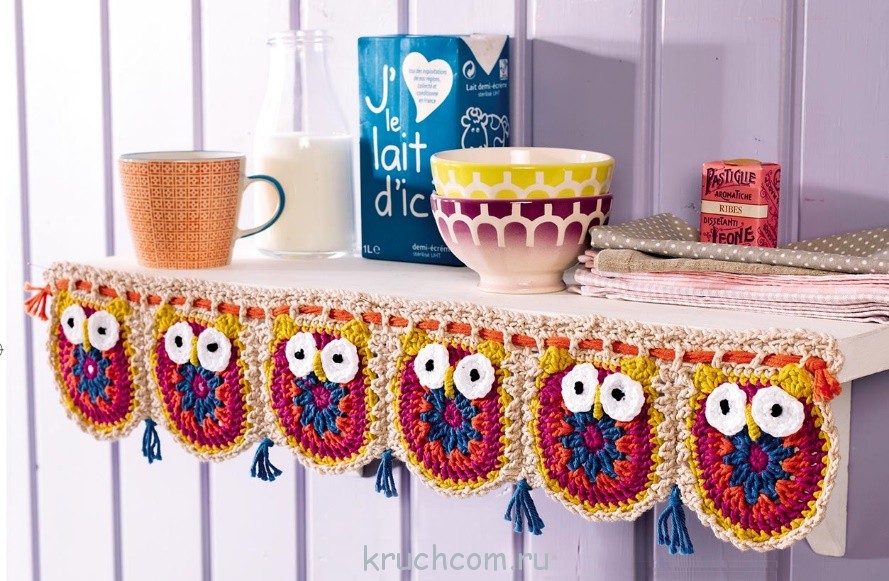
Dense border "funny hearts"
A bright decoration made of contrasting threads will appeal not only to adults, but also to children. With the help of such a border, you can decorate the shelves for toys in the children's bedroom, as well as decorate clothes and accessories. 
Knitting pattern:

Knitting steps:
We knit seven hearts from 5 VPs with pink yarn, close them in a circle with one SS. We knit according to scheme A two circular rows.
Then we make a chain with light green yarn. 120 VP + 1 runway and knit next. way:
Rows No. 1-2: Art. b / n;
Row number 3: 6 tbsp. b / n, 6 rapports: “in the next. pet. we knit the basics 1 tbsp. b / n, 2 VP, 1 tbsp. s / 2n, 2 VP and 1 tbsp. b / n, in parallel with the help of a column s / 2n we grab the first half of the heart (marked with arrows in the diagram), next. 4 pet. we knit the basics according to the 1st st. b / n, next. base loop - 1 tbsp. b / n, 2 VP, 1 tbsp. s / 2n, 2 VP and 1 tbsp. b / n, while grabbing the second half of the heart, 11 tbsp. w/n. After the last we knit a heart with 6 ordinary st. b/n. Kaima is ready!
Original border with pom-poms

Step by step knitting:
- We collect a chain. for 6 VP.
- We collect 3 tbsp. s / n in the 3rd VP from the hook. In total - 4 pet. on hook.
- We make a crochet of the pH, stretch it through all the loops on the hook.
- Again we collect 3 VP.
- In the last pet. the previous group of 3 tbsp. s / n again knit 3 tbsp. s / n and repeat all the steps. We get another "cluster".
- We knit the SS in the pet., With which the first "cluster" began. We do it so that 1 tbsp. s / n remained behind, and two - in front. This order also applies to the first cluster.
- Again we collect 3 VP. We attach them to the SS in the place of attachment to the main canvas.
- Repeat steps 1-7 as many times as needed until the entire canvas is tied with a border of miniature pom-poms.

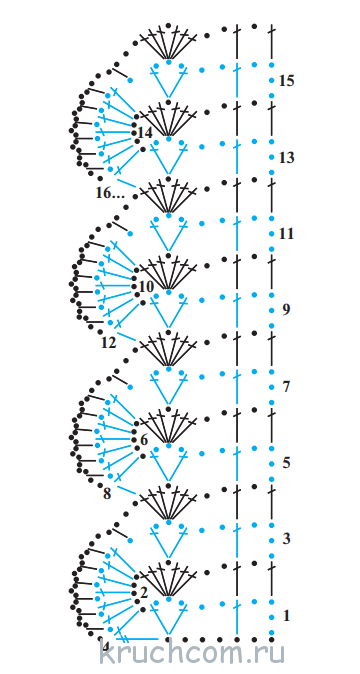
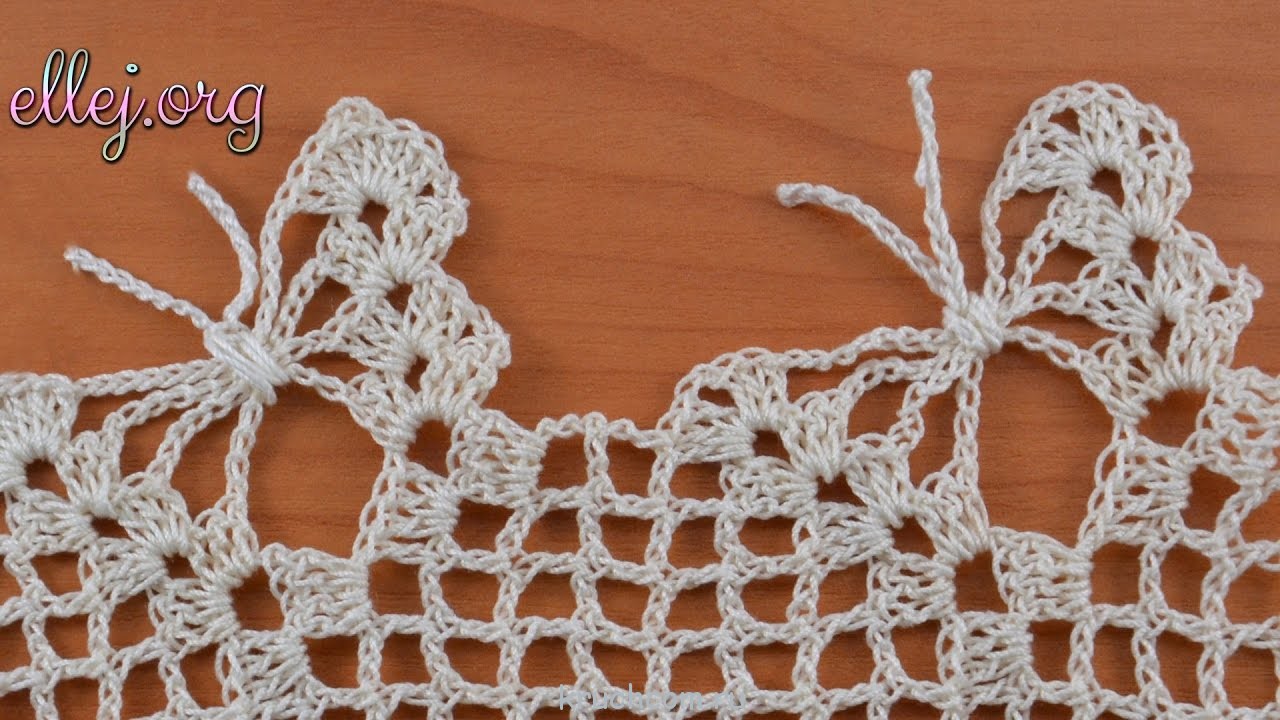
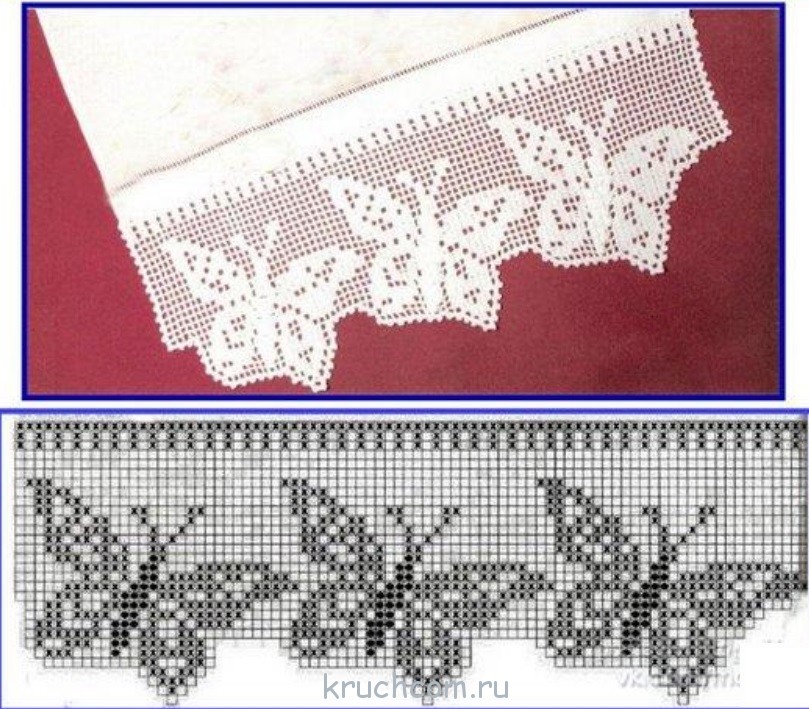
Exclusive border with butterflies
The border of amazing beauty with butterflies fluttering over it captivates many needlewomen. By the way, her knitting is not extra-heavy, so not only professional craftswomen, but also beginners in crochet needlework can practice knitting such an openwork border.
The knitted border is knitted with cross knitting. Openwork butterflies are knitted along the edge of the fillet net. After the main part of the border is ready, you need to knit laces from the VP, with which the chains of air loops inside the butterflies are subsequently tied, thereby forming a clearly defined body and antennae of the butterfly.
For knitting such a border, it is best to use the finest cotton threads, then the work will look extremely gentle and airy.

Knitting pattern:
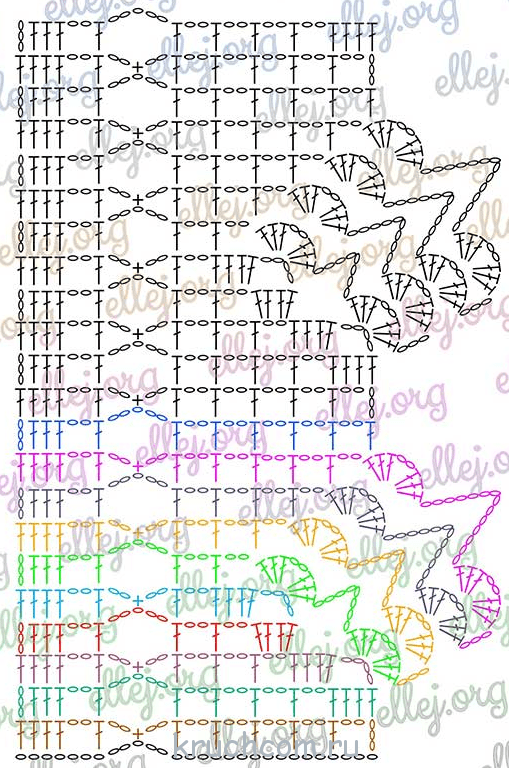
Knitting progress:
- We collect a chain. on 33 VP. From the 9th VP from the hook, we begin to knit with a sirloin net (st. s / n + 2 VP), skip 2 sts between the columns. In total, you need to tie such 5 tbsp. s / n.
- After the fifth art. s / n we collect 2 VP, we skip two pet. on the chain and knit st. b/n.
- We collect 2 more VP, skip two pet. on the chain., knit st. s / n.
- Cast on 2 ch, skip 2 sts. To the end of the row we knit according to Art. s / n in each pet.
- We knit according to Art. s / n in the next. 3 art. s / n PR.
- We collect 2 VP, we knit st. s / n in the next. Art. s / n PR.
- We collect 5 VP, we knit st. s / n in the next. Art. s / n and then 4 more cells with fillet knitting.
- In the last loin cage PR - we knit 3 tbsp. s / n.
- We collect 4 VP, we unfold knitting.
- In an empty sirloin cage (after the cage with PR columns), we knit 3 tbsp. s / n.
- Next, we knit with sirloin cells to an arch of five VPs (i.e. 3 sirloin cells).
- We collect 2 VP, we knit st. b / n in the third pet. on an arch of five VPs.
- We collect 2 more VPs, finish the row: 1 tbsp. s / n + 2 VP + 4 tbsp. s / n.
- We start all rows on this side with the same knitted combination: 3 tbsp. s / n, 2 VP, art. s / n. Then - an arch of 5 VPs.
- We knit 2 loin cells: art. s / n + 2 VP + art. s / n + 2 VP + art. s / n.
- Above the trail loin cell PR knit 3 tbsp. s / n. We collect 4 VP, we unfold knitting.
- We knit 3 tbsp. s / n in the first empty loin cell PR + 1 tbsp. s / n in the next. Art. s / n PR.
- We collect 2 VP, we knit st. s / n in the next. Art. All rows on this side of knitting finish the next. knitted combination: 2 VP, art. b / n in the arch, 2 VP, art. s / n in a column, 2 VP, 4 tbsp. s / n.
- We collect 3 VP, we unfold knitting.
- We knit according to the scheme (st. s / n, loin cell, arch of 5 VP, st. s / n in st. PR), then we collect 2 VP, we knit st. s / n in the next. Art. ETC.
- We collect 2 more VPs, in the corner arch of knitting - 3 tbsp. s / n, 2 VP, 3 tbsp. s / n.
- We collect 8 VP, we knit 3 tbsp. s / n, 2 VP, 3 tbsp. s / n into another arch from the VP located below. We collect 3 VP, we unfold knitting.
- We knit 3 tbsp. s / n, 2 VP, 3 tbsp. s / n into the central loop of the arch from the two loops of the previous step.
- We collect 10 VP, we knit 3 tbsp. s / n, 2 VP, 3 tbsp. s / n in the arch of 2 VP step No. 23.
- We collect 2 VP, we knit st. s / n in after. Art. filled cell. We knit a row according to the scheme (with loin cells, an arch of 5 VPs, 4 st. s / n).
- We collect 3 VP, unfold knitting, knit a row according to a familiar pattern.
- After 3 connected fillet cells, we collect 2 VP, we knit 3 tbsp. s / n + 2 VP + 3 tbsp. s / n into a nearby corner arch of 2 VPs (this will be the right butterfly wing).
- We collect 12 VP, we knit 3 tbsp. s / n + 2 VP + 3 tbsp. s / n into the underlying arch of 2 VPs (left wing of the butterfly).
- We collect 3 VP, a knitting turn.
- We knit the last. a row of butterflies: shells - into shells, between them - a flail. for 14 VP.
- Next, we knit a row according to a well-known pattern. We collect 3 VP, unfold knitting again.
- We knit 3 tbsp. s / n, 2 VP, art. s / n, arch for 5 VP, 5 sirloin cells. Rise 3 VP, knit as the very first row. Repeat the pattern until the border reaches the desired length.
- Let's start with the antennae of the butterfly. We collect a chain. at 25-30 VP, we carefully hide the tails of the threads inside. We tie all 4 arches from the VP with a chain (you can use a regular knot). We get a well-defined butterfly. To decorate a butterfly, its larger wing can be tied with a picot. Ready!
A selection of knitting patterns for your creative inspiration


Video master classes on the topic "Crochet edging"
For those who find it more convenient to work with video tutorials, we provide detailed master classes on knitting all kinds of borders: