What to make from an old sweater with your own hands: ideas, photos, how to sew Country sweater blanket? Easily! A simple and fun tutorial Plaid from old sweaters and crochet
Do you have a lot of T-shirts in your wardrobe? Let's find a use for them. We sew a blanket from old T-shirts. In this case, we will use the patchwork technique.
This process is as simple as it is fascinating.
We will need:
- old t-shirts;
- fleece on the inside of the blanket;
- tape for processing the edge;
- sewing machine;
- ruler;
- good sharp scissors;
- iron;
- interlining;
- tailor's pins.
Take the T-shirts and arrange them in the order that the quilt ornament will be folded. Take a picture so that you don’t forget and don’t get confused in the process of work.
Cut out squares of the same size from T-shirts. You can use a ruler, or you can cut out a template from cardboard and cut out several layers of squares at once, chipping them with pins. Here you will need very good sharp scissors, because. knitwear is not easy to cut.

Each square must be planted on interlining. Trim straight edges.

Sew horizontal rows of squares. This blanket has 30 squares. You should have six strips of five squares.

Lay out the finished tapes and check the pattern. Now we will sew the ribbons together. You can sew the ribbons in order, or you can sew the top two first, then the bottom two and then sew them to the central ribbon on both sides.

This is the canvas you have.

This is what the back of the blanket looks like.

Take the fleece, put the blanket blank on top and pin both sheets along the seam lines from top to bottom with pins. Sew along this line on the right side of the quilt. So you will need to go through all the seam lines.
You'll need a lot of patience because you'll have to adjust every five seconds to make sure everything fits smoothly, because fleece is a very stretchy material.

Here is what you should end up with. This is the inner side of the blanket, the one that will be to the body.
Good afternoon friends!
I am sure that each of you has old sweaters at home, for children, adults, tired, out of fashion. And it's a shame to throw it away. Let's give a second life to an old sweater, because you can make a lot of interesting things out of them, and not just pillows, which I talked about last time. What to make from an old sweater: ideas with photos and sewing tips - in my today's topic.
What to make from old sweaters: photo
I have collected a selection of photos of ideas that I liked, what can be done from an old sweater, but of course, not everyone is able to post here. After all, you can do anything, craftswomen know how to remake old things into fashionable new clothes in such a way that people around them envy. I'm not capable of this, I would like something simpler, for example:
- potholders for the kitchen
- coasters for hot
- cases for cups and teapots
- planter for flowers
- baskets
- cases for a vase
- cozy candlesticks
- hats
- scarves
- mittens
- mitts
- socks
- gaiters
- slippers
- lampshades
- new chair covers
- Christmas toys and decorations
- gift packaging
- clothing for laptops and tablets
- bracelets
- pillows
- rugs
- clutches and bags.
You can come up with other things, sew clothes and beds for your pets, a blanket of several sweaters.
And I realized the idea of decorating an old bag with knitted details a long time ago, as soon as it first caught my eye. True, I knitted these details myself, but you can also adapt an old sweater there. served me for another 2-3 seasons, gave pleasure to myself and others.
Presented and several other rework ideas I included in my video.
DIY alteration of an old sweater
Use those sweaters for alteration into things for the home that will fit into the interior in color, then they will become an excellent additional decor.
Naturally, if you need several sweaters for a large product, such as a plaid, then they should also be combined in color.
The sweater should not be too worn, matted, with spools, otherwise you will not get a beautiful, neat new thing. As a last resort, we use only well-preserved parts of it.
Before cutting and sewing, the sweater should be washed in warm water and dried, because after drying the thing may still shrink, and then it will be possible to turn it inside out and lay it out on the table.
But you can also stretch an old sweater if necessary, if, for example, you need to sew socks or stockings from narrow sleeves. To do this, the sleeve must be moistened, lathered (you can use both soap and shampoo) and with your hands, rubbing the soap, stretch the canvas. Then rinse in warm water, lay out on a table or on the floor, straighten, again, smoothing with your hands, stretch and leave to dry.
A cap

From an old sweater, it is quite possible to sew a simple cute hat, the only drawback of which is the seams on both sides.
Well, there are cases when such a hat is useful: in the country, for sports, hiking.
You just need to attach an old hat to the sweater so that its edge coincides with the edge of the elastic at the bottom of the sweater, circle around with chalk or pencil, add seam allowances, cut, sew, process the edge.
Mittens and socks

By the same principle, mittens and socks can be sewn from an old sweater.
We attach the old mitten to our knitted product so that the edge coincides with the elastic band, draw a new mitten, taking into account allowances of 1 cm, cut it out, chop it off with pins, sew it on a typewriter, turn it inside out and try it on.
If there is no old mitten, you can simply circle your hand.
Sewing socks from an old sweater is also very easy, using old socks as a template. According to them, you need to draw the desired shape on the sleeve or other part of the sweater and sew along the sole and side seams. Insert an elastic band at the top of the sock.
Gaiters, mitts

To create these cozy, warm and fashionable little things, you need to cut out two rectangular strips of the desired width and height from the sweater and sew them. It is desirable that the edge with an elastic band, if any, begins to function as a cuff.
Slippers
It is enough to cut out the upper part and the insole with the help of a pattern and it will be easy to sew slippers from an old sweater in the form of slippers, which Evgenia did for the competition.
Potholders

By inserting a lining of thick material between the two parts of the mittens, which should be made wider and larger, you can build a potholder for the kitchen. In this case, you can grind the edges along the face and process with an oblique trim.
Flower pots, covers for candlesticks, vases, lampshades

I combined these products into one group, since they are almost the same to make.
If the sleeve, collar or the entire sweater (in the case of a large lampshade) fits the item being decorated, you just need to cut this part, pull it over the product, cut it to height and process the edge, hemming or gluing it.
If no part of the sweater fits in size, it remains to cut out two parts of the desired configuration from a suitable wide part and sew them together on the sides.
Dog sweater

For those who have small dogs at home, you can sew a sweater for them to walk on cold days.
How to do this, I spied on the video of the channel
The principle is this:
- Cut off the sleeve from the sweater.
- Take measurements from the back of the dog from neck to tail.
- Cut off the excess fabric on the sleeve according to the measurements.
- Trim rounding the lower part that will be on the stomach so that it is shorter than the back of the dog.
- Mark places for paws and make cuts.
- From the second sleeve, cut off the cuffs with a small amount of fabric according to the size of the paws.
- Cut the cuff lengthwise into two parts and sew each of them - we get two sleeves for the paws.
- Sew the sleeves into the sweater, hem the edges, turn it right side out.
- If desired, decorate the sweater with pompoms, buttons.
If the dog is large and one sleeve from a sweater is not enough for her, you can try to sew clothes for her from all parts of the old sweater according to the diagram and pattern presented. You can even make "sleeves" for the hind legs and sew a whole jumpsuit.
One moment that confuses me in this whole story: is it convenient to wear a sweater over the dog's head? Can you still make a button fastener on top?
Cat bed

I peeped this idea on the Internet and decided to make such a cozy couch for my cat Vasilisa.
It didn't even have to be cut.
- I took the old one, folded the collar inward, did not want to cut it off, and hemmed it.
- I drew a line under the sleeves with chalk and sewed a sweater along it on a typewriter.
- In the lower part I inserted a piece of padding polyester folded four times.
- Sewed the bottom edge.
- I stuffed the sleeves and the top of the sweater with rags and holofiber.
- I connected the sleeves with cuffs, insert one into the other, and sewed.

True, my Basilisk was at first very wary of the new couch, strove to run away from the photo shoot. But after a few days, I noticed that she climbs into it on her own and sleeps, curled up.
Pillows
These are the coziest things in the house. If it is not possible to knit them, then you can make them from an old sweater. And I was just interested in such an idea of reworking an old thing, this is what I came up with:

First of all, consider the old sweater: does it match the color of the room design, does it match with the existing accessories.
If everything suits, we cut off the upper part of the sweater with the neck and sleeves, and try on the lower part on the pillow. If too big, adjust to size.
We sew the side and top edges, turn the cover inside out.
At the bottom, you can make a button closure, or sew a zipper. And I just sewed it up with a needle and thread after I put the pillow in this new cover.
If the sweater already had a button closure, this moment can also be used as an additional pillow decor.
And you can also decorate the pillow with applications, bows, pockets, straps and other accessories.
Despite the fact that there were already buttons on my pillow, such decor seemed insufficient to me. And I made more knitted roses.
Plaid

Another inspiration that never leaves my mind is to make a plaid out of old sweaters.
They will probably need 8 - 10 pieces. How to sew such a blanket:
- Rip each sweater or cut at the seams, cut off the sleeves.
- Cut into squares using the template. I think it's better not to grind. Rectangles are not very suitable here, but if you do use them, then they should be twice the length of the width. Why, I will explain further.
- Lay out all the prepared squares on the floor for trying on, see how best to arrange them by color. At the same time, they should be placed in a checkerboard pattern in the direction of knitting (either along or across), so that the plaid does not eventually stretch in one direction.
If you use not squares, but rectangles, then they must be folded in pairs in two. And in other cases, cutting, I don’t even know what to do, it will be hard. - Pin with pins and sew the squares together first into stripes.
- It is better to start sewing the strips together from the middle part of the plaid, changing the direction in each row: either from left to right, then from right to left, in order to avoid skew.
- Sew on the flannel lining.
- If desired, make rounded edges by cutting them out with a plate.
- Treat the edges of the plaid with a wide trim or just a buttonhole seam with a needle and thread.
Winter, frost. We spend a lot of time at home. In order for the evenings to be useful, let's take care of what in the summer, spring and autumn there is simply not enough time and energy. But you need a positive attitude. We are waiting for spring, a time of renewal and new hopes . Therefore, we not only internally tune in to changes, but also externally: first of all, we will put things in order at home. And let's start with this: check our wardrobes, chests of drawers and bedside tables. It is behind their doors that all our imperfections, omissions and long-forgotten unnecessary things are often hidden. Today we will deal with a chest of drawers and a closet in which clothes are stored.
I want to draw the attention of those visitors to the site who do not accept any alteration of old things at all, for whom it is easier to throw away everything old. Then this article is not for you. In order not to get annoyed and not spoil your mood, do not read further!
I will share my little experience with everyone else. Today, for the first time, I decided to recycle old sweaters and blouses into something useful. Circumstances led me to this idea:
- too many of these very knitwear (which are not used at any time of the year) have accumulated in the closet
- a new bed covered with an old tapestry bedspread
- I have free time that I want to put to good use
- I wanted to learn how to sew
I already tried to master the patchwork technique and sewed it. And I really like him!Such a cozy, handmade wool rug. It fits perfectly into the interior.
Let's start work! We open the closet and look for those knitwear that we have not worn for a long time. One important condition: we select knitwear according to tones. So, pink, red, gray will look harmoniously together.
Note: white will suit any color and will refresh any product well.
Take to work everything that you do not wear: skirts, pullovers, jumpers, sweaters and warm old woolen scarves! I decided to use red, pink, gray and white knitwear for my bedspread.
Once you've got enough jersey and match it by tone, start cutting at the seams. The seams must be carefully cut and folded into a separate bag. Imagine that even these strips can also work! Of these, you can sew rugs for a balcony or cottage.
Next, we cut the resulting pieces of knitwear into strips (rectangles), but if you want, they can be squares. It will be much more difficult to work with other shapes (triangles, circles, trapezoids and others). Therefore, we leave them for real craftswomen.
I cut rectangles 8 cm wide.
Important: the rectangles must be the same width in order for the cover to turn out to be the correct shape.
The length of knitted strips can be completely different: from 10cm to 40cm. For me, the length of the strips from 20 to 35 cm turned out to be the most convenient.
If you have enough endurance to cut a large number of strips, this is already half the battle. Don't quit what you started and bring it to the end: sew a new bedspread on your bed!

Cut strips need to be ironed. By the way, for my bedspread, I used jersey of different thicknesses. Perhaps this is not entirely correct, but, in principle, it is possible to combine.
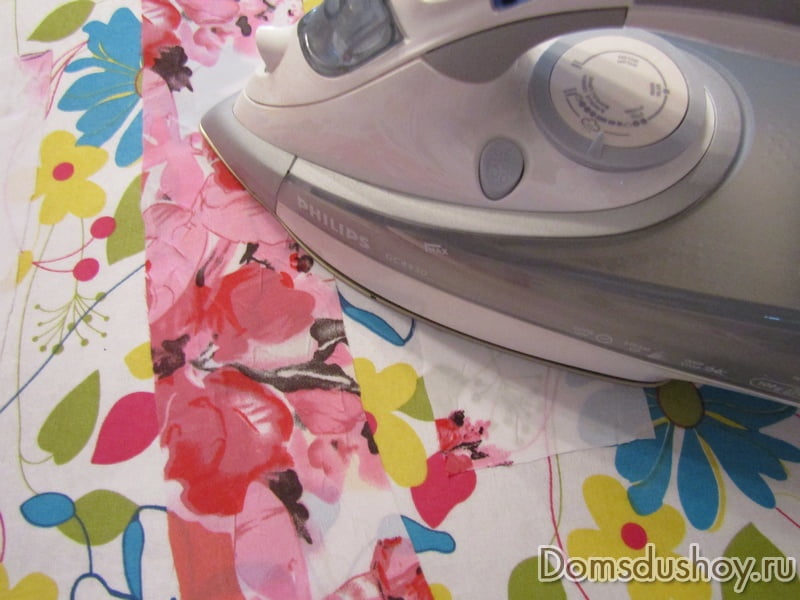
All the cut blanks were folded into for ease of use when sewing. The box helps to keep the blanks in stacks by color and prevents them from falling apart.

Let's get to work.
Just want to warn you: be patient!
It will take several evenings of hard work to sew a bedspread from cut pieces of knitwear.
You need to sew like this:
- take two pieces of jersey from your blank box
- put them to each other with the right sides in width (the side where 8 cm), and on the wrong side, make a seam connecting these two rectangles
- then, without tearing off the threads, turn the second stitched rectangle to the front side and attach a new piece of knitwear to it (from the box) also with the front side and again make a seam from the inside
- the following pieces are sewn in the same way as the first ones until a rather long strip of blanks is obtained
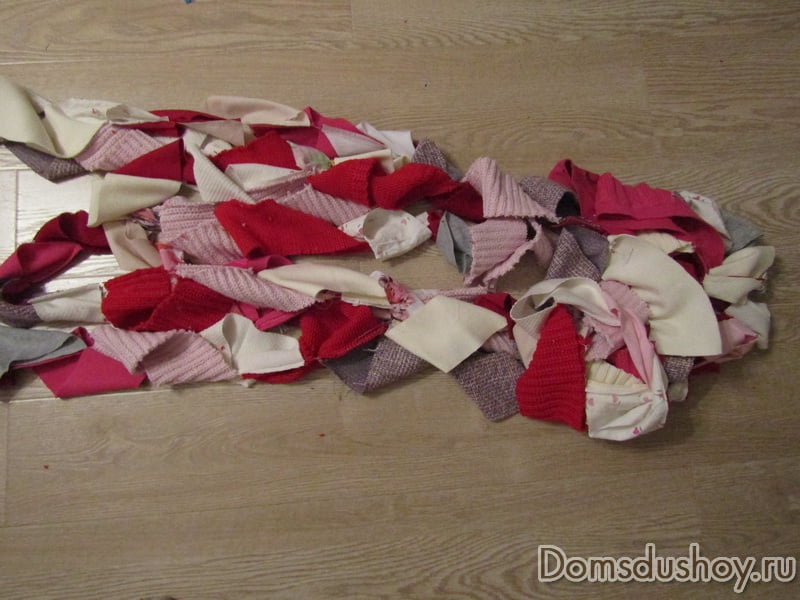
Note: we alternate the strips in completely different ways, without a system. Of course, it is better if they do not repeat often.

The result of this work will be such a strip. At first glance, a completely messy and unattractive pile of rags. Alas! We have to try to make something more or less acceptable for use in our house from all this.
The resulting strips now need to be stitched along the length. To do this, measure the width of your bed and add another 50 centimeters so that the bedspread can freely cover its entire area and hang a little from the edges.
We measure the first strip on a centimeter tape and cut it off from the workpiece that we got. And we sew all subsequent strips, focusing on the length of the previous strip. It turns out like this:

The reverse side of my future bedspread turned out like this:
By the way, when you start stitching the strips along the length, you quickly begin to see the final result.
Another nuance: when making products from patchwork, it is considered mandatory that the transverse seams be directed in one direction. To do this, start sewing each new row from the same edge as the previous one.

It is better to sew a bedspread from four parts, because it will be difficult to cope with a large and voluminous product at once. Therefore, when you sew one fourth part, iron it from the front and the wrong side. Do the same with the other parts of the bedspread when you are done.

Here I have already sewn two pieces of the future bedspread. Ironed them well with steam. I try them on my bed, I dream to finish the work as soon as possible and see the result!

A little more patience and perseverance won't hurt! For my future bedspread, I need some kind of lining. For this, I wanted to pick up a fabric stitched with synthetic winterizer. But it turned out that in the stores nearby me they don’t keep such fabric. Alas! I had to buy faux fur in pink. Not the best option, let me tell you. It turned out to be quite heavy and somewhat overshadowed my joy from the finished work on sewing the bedspread.
But do not lose heart about this! We continue to work, and then we will come up with something!

I sewed faux fur around the entire perimeter to my knitwear blanks. And now, I offer your eyes a new cover made of old and unnecessary things!

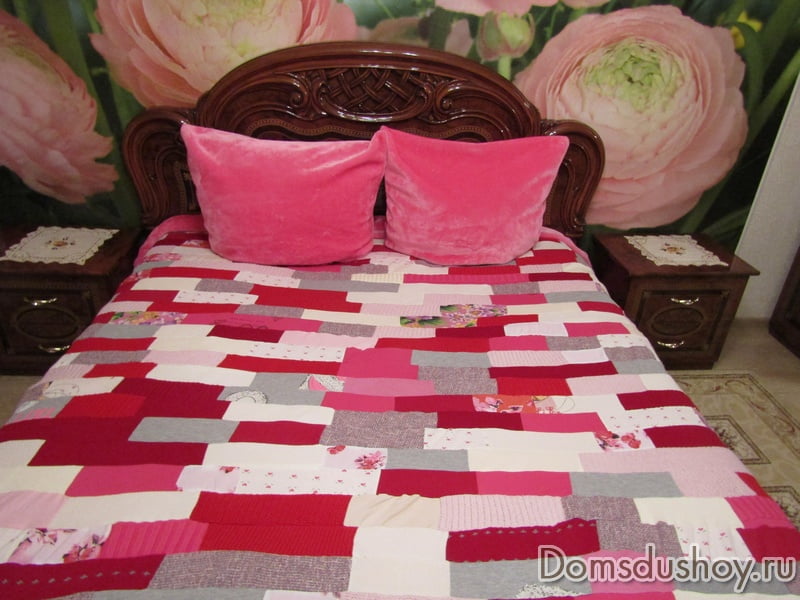
Why did I choose rose red for my bedspread? Probably understandable, because the peonies on the wall will not want to harmonize with a blue or brown background.
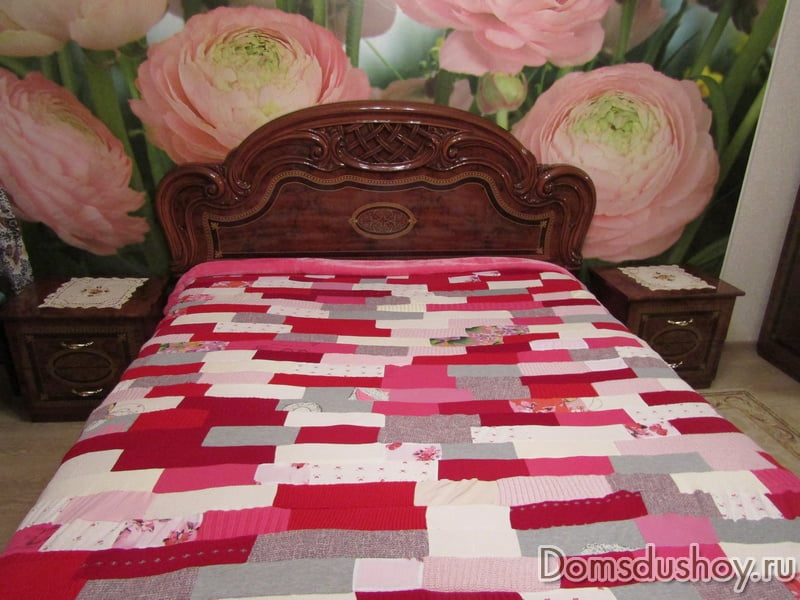
I find a new bedspread brightens up my bedroom. Now she looks happy and refreshed. (Yes, this bedspread can be used as a blanket if your bedroom is cool)
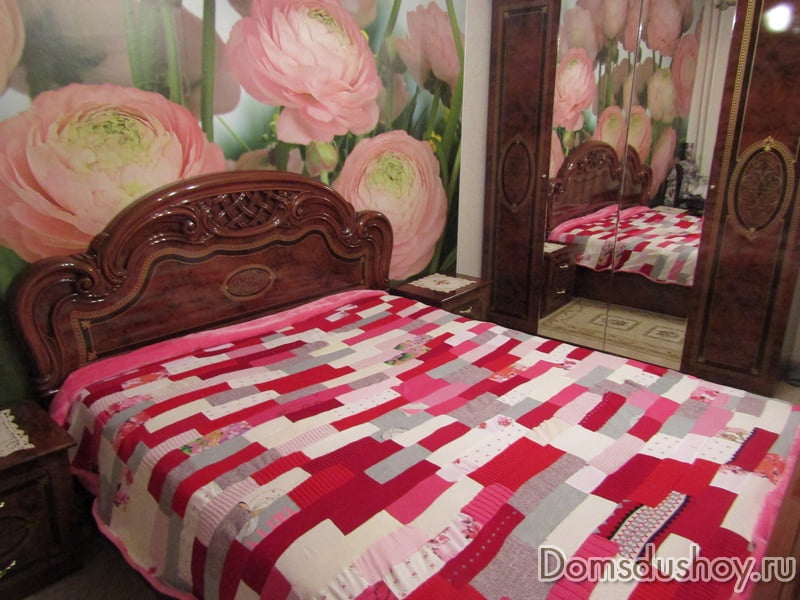
For the completed set, I used the leftover faux fur to make two pillowcases. (You understand, this is so, for an elegant interior! I take them off at night)
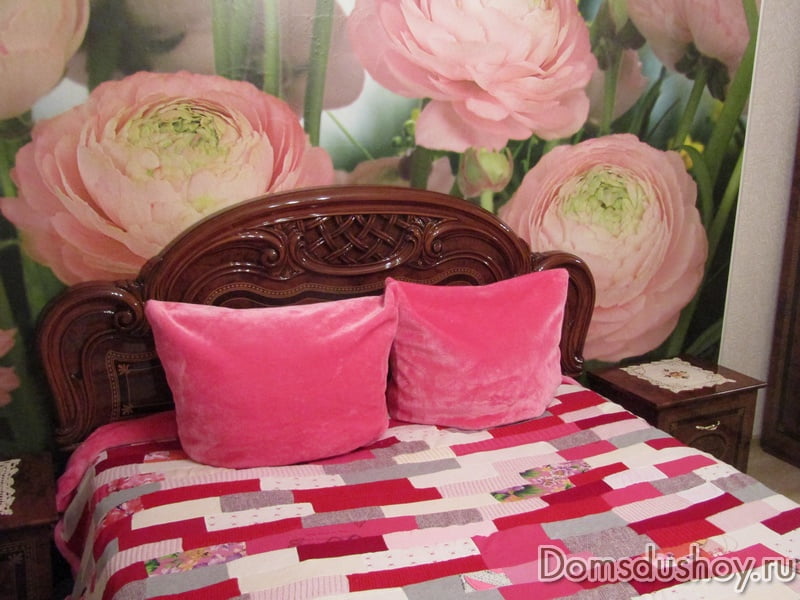
This is how the bedspread + pillows look together.
Yes, I almost forgot about mine, which I also sewed from an old sweater earlier! Let her decorate the bed too!

Well, the work on making bedspreads from old knitwear has been completed! If you also have a desire and attitude, try sewing a bedspread for your home or your favorite summer cottage. See how many pluses you can find in this job:
- Clear cabinets of unnecessary items
- Winter evenings are busy with creative work
- Your loved ones can help you make bedspread blanks.
- You make a handmade thing, so warm and cozy
- The bedspread can be used as a blanket, blanket and even a carpet for playing with children on the floor.
- Surely no one you will see exactly the same bedspread
- You are a real economical hostess, in which everything goes into business
- When making patchwork things, there is where to use your ingenuity and imagination.

Finally:
If suddenly something does not work out, do not despair and do not quit the lesson. Tell yourself: I will still do what I want. Correct the mistakes and get back to work! You know that perseverance and hard work always pay off!
Good luck to everyone and patience in arranging your life!
To see how to beautifully finish the edge of a new blanket, bedspread or throw, check out this helpful tutorial.
Some more good ideas for those who want to give new life to old things.
2018, . All rights reserved.
If you have accumulated old sweaters at home, do not rush to throw them away! Of these, you can make with your own hands an original useful homemade product for the home - a warm blanket of sweaters.
“Knitted are decorative, original and sometimes they are not inferior in beauty and elegance to machine-made knitwear” (quote from M.V. Maksimova’s book “The ABC of Knitting”)
Two old sweaters, one women's scarf and the remnants of threads from old works went into the manufacture of this blanket-plaid. (Surely you will be interested). The sweaters were knitted from good wool, but it was impossible to unravel them, so she was in the process of wearing. It was decided to simply cut a certain number of squares with the dimensions most fully allowing the use of the material. The size chosen was 15 by 15 cm. After harvesting 42 squares, the edges were processed. Not overcasting, which is widely known, was used, but the glue method. A simple drawing was placed on a table (bench) under a transparent film and fixed with adhesive tape.

A metal ruler was superimposed on the cut out flap (uneven blue line) along the red line and pressed very tightly against the flap. Further, with a solution of PVA glue "Joiner" (diluted one to one with water), all sides of the square were smeared sequentially along the RED line.

After the glue has dried (about an hour), you can continue processing the squares-cutting along the BLACK line. Then continue to work as usual - strapping to size, etc. Blanks - the next photo.

After that, I washed all the blanks, steamed them to size and connected them in the order I needed. The mode of washing the blanks was manual, sparing, at least with PVA and waterproof glue, but suddenly everything will spread. Fringes and decorative stitching between the squares were made from the remains.
Nobody wears them anymore, and it's a pity to throw them away. Common situation?
If you are planning to sort out your wardrobe, this does not mean at all that your old sweater, which has already served its purpose, should be thrown away. If you love knitwear, you can ennoble your home and yourself for the cold season, creating warmth and comfort around you. And it's all thanks to your sweater.
I bring to your attention 10 wonderful ideas that will make you feel like a kind of magician. Choose the "transformation" that you like!
1. Cute hat
From one or more old sweaters - for example, those that children will no longer wear because they have grown out of them, you can make warm hats for the winter.
You can also use additional fabrics to insulate or shape your new hat.

From a warm sweater, you can get 2 options for a winter headdress.

Put a hat of the desired size on the sweater, circle the outline (including seams). Sew the 2 pieces of the hat on a sewing machine or by hand.

Or this hat is very easy to make, and it will take about 10 minutes. 
The sewing algorithm is simple:
1. You will need: an old sweater, scissors and an old hat you usually wear to measure your size.
2. Cut the bottom half of the sweater to your desired length.
3. Cut this part of the sweater along the seam.
4. Use an old hat to measure the right size and cut off the unnecessary.
5. Fold the resulting part into 3-4 layers.


6. Cut out the arc at the top.
7. Sew the two edges of the hat.
8. Sew the top arcs.
9. Cut off the excess along the seam, turn over and the hat is ready!

Here is a similar video instruction, but instead of using a glue gun, we will not glue, but sew the seams.
2. Warm mittens or mitts
All you need is a sweater, scissors, needles and thread (or a sewing machine).

Cut the mittens so that you can use the "gum" (the bottom of the sweater). Before cutting, take measurements from your hand or take the mitten of the person for whom you are making new mittens. Now you just have to sew the parts of the mittens from the inside out and turn them on the front side. Ready!

Do you want to have mittens made by your own hands in a matter of minutes? 
Follow the next steps in the photo and read the instructions below to make sweater mittens: 
. Prepare the sweater: A wool sweater works best for this idea (at least 80% wool, but 100% is preferred). Wash the sweater in lukewarm water, then dry it on a hot battery to keep the wool fibers tangled together so they don't fall apart when you cut. Your sweater will shrink significantly after drying. Hint: Wash your sweater in a mesh bag to avoid clogging the washing machine with wool fibers.
. turn out sweater inside out and lay it on the table. Place your hand on one of the side edges of the sweater and trace the shape of the mitten around it. Add about an inch around the perimeter to secure the seam. Don't forget to leave the bottom part for the cuffs.
. Cut out along your contour mitten.
. Fasten front and back layers with a few pins around the edges.
. Sew: Thread the floss needle and make simple stitches along your outline. Make sure the bottom of the mitten is wide enough for your hand to fit easily. Remove excess fabric. Be careful not to cut too close to the stitching as it may fall apart.
. Now the fun part! Turn the mitt inside out to see the finished handmade product.
. Decorate: Use buttons, colorful threads, and other embellishments to make the mitten even more interesting.
. Repeat all steps on the opposite side of the sweater for the other mitten.
It is even easier to make warm mitts: 
These mitts are very comfortable to use your smartphone in the winter.
- From the edge of the sweater, cut a rectangle 30 cm high and 20 cm long. Cut along the seam so you have two pieces.

- Fold both pieces lengthwise right side inward. Mark a hole about 6 cm wide for the thumb with pins, stepping back 5 cm from the edge.
- Then sew, leaving a hole for the thumb and making a hem at the bottom.
Or like this: 
- Cut out the cuff from the sleeve.
- Determine your preferred glove finger length. Add about 2 cm to this length and cut off the sweater sleeve.
- Secure the sleeve opening on the sewing machine with a zigzag stitch or overlock stitch.
- Wrap the ends into the sleeve by 2 cm and sew with a needle and thread.
- Put on a glove on your hand and determine the right place for the thumb hole. Cut where you want the hole to be. Carefully unravel the seam until the hole is a comfortable size for your thumb. Then secure the hole with a thread with a needle so that the threads do not continue to unravel.
- Since the sleeves are a little looser than the gloves should be, you need to reduce the diameter a bit. To do this, put gloves on your hands, pinch the excess fabric along the length of the sleeve, secure with a few pins.
- Take off your gloves. Secure by hand the trim and seam with a needle and thread, using a reverse stitch.

3. Elegant lampshade
Any sweater can be used for the lampshade, but if you want an original and beautiful decor, then it is better to look for something cute among unnecessary things.

Next, you need to pull the sweater over the lampshade and cut off the excess material at the top. At the same time, leave about 3-4 cm of material to fold over and glue the edge with hot glue along the top of the lampshade. Just a sight!

Or make something like this:

4. Gift box
Your autumn or winter gift can become soft and cozy! Cut out strips of fabric from an old sweater and make a stylish package of your own. You can use yarn for decoration (boubon, fringe). Or you can wrap the whole box and make a bow at the top. I want bright ideas!

5. Christmas wreath on the door
Warm greetings to everyone!
As a basis for a wreath, you can take a circle made of straw. And you will also need: a sweater (red, green or shiny is better for the New Year), a glue gun and decor.
Cut the seam of the sweater sleeve to wrap the sleeve around the wreath part. Glue the material at the seam and cut off the excess fabric. Take the rest of the fabric and finish the next section of the wreath in the same way. When the wreath is finished with fabric, add the desired decoration (letters, sparkles, cones, etc.).

6. Sweater for your favorite dog
For small dogs, you can only use the sleeve of a sweater, but make sure the dog will fit in it before you get started.

You can make a tank top or a three-quarter sleeve sweater. Your dog will look stylish and will not freeze on a walk or in a cold house.

Simple dog overalls
Before you decide to sew clothes for your pet, you need to accurately take measurements. This is done according to the scheme. Overalls for dogs do not require a large number of measurements. You only need to know the distance from the middle of the neck to the tail and the length of the limbs.

Well, if you decide to precisely fit the clothes to the size of the pet, then you will need to take more measurements: neck circumference, chest volume (at the level behind the elbows), the length of the hind and forelimbs, the distance from the neck to the tail, and also from the bottom of the neck to the navel. All measurements must be done with your own hands using a special tape with millimeter divisions.

Explanation of values:
A - neck girth;
B - distance from the middle of the neck to the tail;
C is the distance between the hind and fore limbs;
D - length from the collar to the edge of the sleeve;
E - chest girth behind the elbows;
F - girth of the hind limb in the widest part;
G - girth of the forelimb in the widest part;
H - girth of the muzzle.
Elementary pattern: 
In order to make a pattern, you should determine the size from the neck to the tail of the dog, then divide it into eight parts. One part will become the cage of your circuit. Further on the cells, it will be possible to draw the details of the product, which will subsequently need to be transferred to the fabric of the sweater.
7. Cozy flowerpots, mugs
This is an easy way to decorate plastic pots. For example, an idea for the finishing touch when decorating a house at the last minute for a holiday party.

Sweater sleeves are suitable for decorating flowerpots. Measure the height of your pot and cut off part of the sleeve, leaving about 4 cm of margin. Put the fabric over the flower pot and finish the edges if necessary (sew, glue, etc.)

A simple but interesting touch to your interior: 
By the same principle, you can dress vases, mugs, etc. in winter clothes. 

8. Pet bed
We made a pillow for ourselves - take care of your four-legged friend too. Sewing a couch from an old sweater is probably even easier than a regular pillow.
To do this, simply insert a pillow into the sweater itself (preferably a dense one so that it does not sag under the weight of the animal), stuff the sleeves tightly with any fabric material, fasten them together so that they frame the resulting base and act as a side. Everything, the couch is ready.

If you are not strong in needlework, it will most likely not turn out to be very even, but believe me, your pet will be grateful to you anyway, especially since this bed will smell like you, and pets really appreciate things with the smell of the owner.

Want to be more precise? 
1. Sew the neck of the sweater inside out and sew the sweater at the height of the cutouts
for sleeves to make a single side.
2. Fill the side with holofiber, padding polyester or other material.
3. Sew the cuffs of the sleeves together.
4. Inside the rest of the sweater, put a round pillow and connect everything with the sleeves.

Comfortable couch in front of you!

9. Pillows-"dumki"
One way to decide the fate of an old sweater is to sew decorative pillows on the sofa from it. Thus, those who do not know how to knit at all will have the opportunity to decorate their home with unusual knitted products.
To make pillows look more original, choose solid-colored sweaters with intricate knits, braids, "knobs", or sweaters with Scandinavian patterns on a white background.

First of all, consider an old sweater. Does it match in color to the design of the room, is it combined with existing accessories. The sweater should not be too worn, otherwise it will not turn out to be a beautiful, neat new thing. As a last resort, we use only well-preserved parts of it.

Attach the pillow to the sweater and mark the correct size. 
We cut off the upper part of the sweater with a neck and sleeves and cut out a pillow cover of the size we need.
Sew the sides and top.


On the bottom, you can make a button fastener or just sew it up after the pillow is put into the cover.

It takes a minimum of cutting and sewing, but such pillows will delight the eye for a long time and create a warm and welcoming atmosphere in the house.
You can decorate them as you wish with buttons, flowers, or other decorations.

10. Plaid
In order to make a blanket with your own hands, collect all the woolen sweaters in the house. I think that every housewife will find such things that have not been worn for a long time, but still look quite decent and can serve as excellent material for a future blanket. Think about what color scheme you would like your plaid to be. For my plaid, I used about 10 sweaters in blue, gray and cream. But more can be used. I bought some of my sweaters on sale and they cost me only $1, you can also go to second-hand stores where they sell quite good quality items at a reasonable price. Ask your friends, they might be happy to give you their unwanted woolen clothes!

Pre-prepare your sweaters: open the seams, remove buttons, buttons, zippers. Sort fabrics by color and wash separately by color to prevent fading.
Put your sweaters in an old pillowcase to keep wool fluff from clogging the washing machine. Then wash them with detergent in hot and then cold water, then use a centrifuge to finish washing.
This is necessary in order to see which of the sweaters shrink more during the washing process, and which do not change their original shape at all.

To do this, prepare a template of the desired size from cardboard. 
Having made the squares, figure out how they will be placed by laying them out on the floor. 
You can start sewing. I used the largest straight stitch on my sewing machine. Leave an allowance of about 1/4 inch. Sew all the pieces together, gently pushing the fabric, if necessary, slowly drag it through the sewing machine. After sewing, the sewing machine will have to be thoroughly cleaned, as a lot of fluff remains.

Here are the large pieces that I finished with before making the final seams. 
From the inside, it looks like this: 
I also made a wool lining for my throw, you can use flannel, which also makes a great lining. I also rounded the corners of the blanket using the template.

As for the finishing, I do it by hand, using a closed overlock stitch. I really like the look that this stitching gives to the plaid. This is how I imagine a warm and cozy homemade blanket. I hope the photos help to better imagine how to make a stitch.


Imagine how useful it is to have such a blanket handy on the couch on chilly winter evenings. 
According to theyou.ru, designadecor.blogspot.ru
Now your favorite sweater can stay with you for a few more years!
New life for old things.