Top frosty patterns. We knit a pullover with a trendy frosty pattern Knitting a frosty pattern diagram description
Pullover "Frost pattern"
For a long time I wanted to knit such a pullover. It took me a long time to figure out the circuit and, finally, I connected it. In my personal opinion, it turned out to be a very beautiful, very winter and quite stylish pullover with a short sleeve (to be worn under a turtleneck).
I used yarn Nako - 400 g, hosiery and circular knitting needles No. 4.5, with elastic No. 4.
The scheme used is given below (the scheme is not mine, found on the Internet).

The pullover is based on a square napkin, which is knitted from the center. The diagram shows 1/4 of this napkin.

Instructions for the scheme.

In order not to have a very dense ring in the center of the flower, I scored 4 air loops and knitted the required number of loops on stocking needles from them. So the center of the flower looks much neater.

When the central flower is ready, I switched to circular ones.

I separated the loops for the gate (I got 22 loops), this is 48 size.

You should have a square. Separate the loops for the sleeves, side parts, bottom into additional knitting needles. Tie the second part (let's say the front, with a large neckline) sew the loop into the loop side and shoulder parts.

Flower petals are knitted in the sleeves (I left 25 loops on the sleeves from the front and back), then 8 rows of elastic 2 * 2.
The front and back parts of the front stitch are also lengthened by 7 cm, and then the elastic band 2 * 2 20 rows.

In conclusion, the collar is tied with an elastic band 2 * 2.
Pullover is ready!

Every woman wants to have in her wardrobe a unique and inimitable thing, but one that cannot be bought in any of the boutiques. That is why manual work has always been appreciated and will be appreciated. It is this desire that makes us take up knitting needles, look for a suitable scheme and the right material for days. In this article we want to invite you to knit a frosty pattern with knitting needles.
This pattern captivates with its beauty and elegance. With it, you can knit a great pullover with short or long sleeves, and when combined with a turtleneck in a contrasting color, you can shade our entire frosty pattern even more.
It may seem complicated to many, but it is not, it is enough just to correctly calculate the loops, following the diagram with a detailed description. And if the diagrams are difficult for you, then the detailed video attached below will help you figure it out. So, let's get to work.
snow fairy tale
Before starting work, it is worth deciding on the choice of yarn that is best suited for our pattern. Since our pattern is quite dense, it is not recommended to use thick yarn, because it will look rough, here you need something light, airy, but not very thin. Angora or wool is best.
Also carefully select the knitting needles, so as not to be mistaken, it is best to knit a probe.

This scheme is very easy and understandable, but if you are a beginner, then you should pay attention to the fact that the main pattern is made by crossed loops. If this is something new and not very clear for you, then detailed photo tutorials are provided below.

Let's start knitting according to the scheme.
We will need:
- hook number 2 or 3;
- knitting needles No. 4 or 4.5-5 pcs.;
- knitting needles number 5;
- yarn.
We start with a sliding loop.
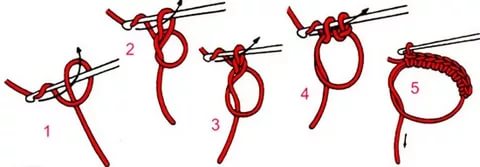
In this loop, using a hook, we collect 16 loops. From the loops of the hook with the help of knitting needles, we pull out the loops and distribute all 16 loops on 4 knitting needles.


Mark the beginning of the row and the end of the row with a marker.
Please note that only the front rows are indicated in the diagram. We need to knit three rows in a circle with facial loops.

Thus, we have already knitted 4 rows (1st row - a sliding loop and 3 rows of facial ones). We turn to knitting needles No. 5 and knit according to the scheme: crossed loop, 4 yarn over, 2 crossed, 4 yarn over, crossed loop. So we repeat three more times.
On the 6th row we knit with purl loops, and we knit the crossed loops with the crossed ones. On the 7th row, knit all stitches. On the 8th row, all loops are purl, according to the pattern. On the 9th row: 2 loops together with a slope to the left, 1 front, 2 yarn over, 1 front, 2 loops together with a slope to the right. We continue to knit like this until the end of the row. On the 10th row, purl loops, knit 2 loops together, remove 2 yarn overs, knit 1 knit, purl 1. On the 11th row we knit facial. We continue to knit strictly according to this pattern until the 21st row.
On the 21st row: 2 loops together with slopes to the left, 1 front, 2 loops together with a slope to the right, yarn over, 5 front, yarn over, 2 loops together with a slope to the left, 1 front, 2 together with a slope to the right, yarn over, 5 front , nakid. We repeat the report 3 times. On the 22nd row we knit purl according to the pattern. On the 23rd: 3 loops together, 2 yarn over, knit 7, yarn over, 3 loops together, yarn over, knit 7, yarn over. On the 24th purl, 3 loops together we knit 1 front and 2 crochets (1 purl, 1 front).
On the 25th row: knit 1, knit 2 from one loop, knit 9, yarn over, knit 1, yarn over, knit 9. On the 26th row, purl according to the pattern. On the 27th row: knit 2 from 1 loop and so 3 times in a row, 2 loops together, from slopes to the left, 8 front loops, yarn over, 1 front loop, yarn over, 2 loops together, from slopes to the right and again knit three times from 1 loop 2. We knit the 28th row with purl according to the pattern. On the 29th row: crossed loop, 2 yarn over, 2 crossed loops, 2 yarn over, 2 crossed loops, 2 yarn over, 1 crossed loop, 2 loops together with a slope to the left, 17 loops from the front, 2 loops together with a slope to the right. We knit the 30th row with purl loops according to the pattern. On the 31st row: crossed loop, 1 front, 2 yarn over, repeat to the end of the row.
Thus, you need to knit 46 rows. If it's not enough for you, then you can continue. You should end up with a square:

Video on the topic of the article
Hand-knitted items are relevant any time of the year. Owners of original knitted things always look fashionable, stylishly interesting and eye-catching. With the help of a properly selected model, you can adjust the figure, hide flaws and emphasize your advantages.
Among the variety of knitted patterns, one can especially distinguish things connected with jacquard patterns.
We present you a pullover with a jacquard pattern for every day.
Jacquard - fashionable pattern
Jacquard is a multi-color knitting, also called intarsia, in which the change of colors occurs frequently, mainly at a distance of 2 to 7 loops. This technique is known in many countries, and the culture of a single country finds its own interesting display in it. In products for the cold season, the winter theme prevails, in this case the Norwegian or so-called frosty pattern is often used.
Knitting technique

The jacquard technique involves knitting with stocking knitting needles (front stitch). If knitting is done in a circle, that is, only the front rows are knitted, this greatly simplifies the implementation of the jacquard pattern. At the same time, the process of weaving threads of different colors always occurs from the wrong side, that is, the broaches and weaves on the front side of the product are not visible, but are hidden behind. To avoid excessive density of the product, you should not use more than two colors in one row, otherwise a large number of broaches will thicken the knitted fabric too much. For convenience and the correct execution of the pattern, it is always necessary to refer to the pattern pattern, calculate the number of loops of different colors and strictly follow the instructions for the pattern. Skipping a few stitches can ruin the entire pattern.
Benefits of jacquard pattern
A pullover with a jacquard pattern is a warm and practical, original and stylish thing that can be knitted as a gift not only for a girl or a child, but also for a man. Using patterns with a Norwegian pattern, which can be found on our website, beautifully combining them with each other, you can create amazing sweaters, leggings, hats, mittens and many different wardrobe items.
- the thread in the broach should not tighten the fabric or sag; during operation, it is necessary to monitor the uniformity of tension;
- at the beginning of work, determine the thread of what color in the broach will be on top and always follow this principle;
- when switching from a thread of one color to another, you always need to cross them, otherwise holes will form in the canvas.
One of the most common Norwegian patterns is considered to be an asterisk or a snowflake, with a wide variety of sizes and shapes. You can also knit such a pullover with a jacquard pattern.
Women's pullover with jacquard pattern and embroidery

The sweater is knitted with threads of contrasting colors, where white is the main color, and black is the pattern, you can choose any shades, the combinations of which will look no less beautiful.
For a product in size 36-38, you need:
- 300 g of white yarn (160 m / 100 g);
- 100 gr of black yarn;
- circular knitting needles No. 3.5, 4;
- pattern;
- pattern scheme (we don’t knit deer, but embroider after knitting all the details, in the process of working, knit this part in one tone with white threads).
We knit the elastic on the bottom of the sweater and sleeves with smaller knitting needles, the main parts with knitting needles No. 4.
We knit the back
To knit the back, cast on 90 loops with threads of the main color and make an elastic band 2 x 2 45 rows high, this is 13 cm, it is worth noting that in our case we start and finish the row after and before the purl loops, not counting the edge loops. Finishing the gum, distribute evenly and add 9 p. And as a result we get 99 loops on the knitting needles. We continue knitting stocking stitch 18 rows. Let's get started with the image. We place the pattern between the edge ones, perform 78 rows from the marks “a” to “c” with the Norwegian pattern, “e” is the middle of the pattern. At a height of 39 cm from the beginning of the part, we knit, taking into account the formation of the armhole. We decorate it by closing 3 loops on each side of the back and in every second row 2 times 2, 6 x 1. After finishing work with the scheme, we knit with the main color and close the central 39 loops at a height of 15 cm from the armhole. To round the neckline from the inner edges, close two loops on both shoulders and after 2 cm close the remaining 15 loops on each shoulder.

We knit the front part in the same pattern as the back, with the execution of the pattern and the armhole, we make the neckline deeper. Having connected 11 cm in height from the armhole, we close the central 33 loops, and in every second row on the inner sides of the cutout 2 x 2, 1 x 1, we finish both parts separately. At a distance equal to the height of the back, we close 15 loops on the shoulders.
Cast on 50 sts for sleeves and rib 12 cm. Before moving to the main part, add 1 loop at the edges and in the center of the row, for a total of 53 loops on the needles. To expand the sleeve to the beginning of the armhole, it is necessary to add 1 loop on both sides 9 times according to this scheme: in the 5th row, then 4 times in each sixth and eighth rows. In white, we knit an elastic band and a front surface before and after the pattern. At a height of 11 cm from the elastic, we perform the Norwegian pattern from 53 to 78 rows of the scheme 3 times, the middle of the sleeve is indicated in gray on the diagram and knit to the end in white. With a sleeve length of 43 cm, we close 3 loops from the sides, in each second 7 x 2, 2 x 1, 7 x 2. Close the remaining 11 loops.
Before assembling, prick all parts, moisten, and dry naturally. Embroider on the back, front and sleeves of the deer according to the pattern. Sew at the seams. Dial 104 loops along the neckline and knit with an elastic band in a circle of 8 cm with knitting needles No. 3.5, switch to knitting needles No. 4 and work another 12 cm. Finish the work.
Knitting is an opportunity to express beauty with a thread. Scientists have proven that needlework at the biological level benefits a woman, gives her femininity and sets her in a peaceful mood. And when a craftswoman creates masterpieces with her own hands, this only adds to the benefits of creativity. The frosty pattern with the help of ordinary knitting needles is knitted very easily, and the result will not leave you indifferent - a beautiful openwork is perfect for sweaters and shawls.
We knit a frosty pattern with knitting needles: a description and pattern of the pattern
Consider the description of the knitting pattern. The pattern itself is easy to make. The pattern is understandable even for a beginner, but you should practice knitting.

Getting started, you need to master the skill of knitting crossed loops, loops for the front and back lobe, knitting two loops together on the wrong side and two together on the front.
These loops knit quickly and easily.

- 16 loops are crocheted into the sliding loop. Knitting needles 4.5 from the loops of the hook are pulled out onto the knitting needles (4 knitting needles on each with 4 loops, a total of 16 loops is obtained). A marker is attached, you can - a contrasting thread. This is the beginning and end of the series. The diagram shows only the front rows and 1/4 of the circle. Knit in a circle 3 rows.
- Take knitting needles number 5. Knit 5th row. This is the front row. Crossed loop, 4 yarn over, two crossed loops, 4 yarn over, crossed loop. This is repeated 3 more times.
- 6th row. Back row. Here the crossed loop is knitted crossed, 4 yarns are knitted, 1 person., 1 out., 1 person., 1 out. etc.
- 7th row. Front row. All loops are facial.
- 8th row. Back row. All loops according to the drawing (facial).
- 9th row. Front row. In the diagram, there are two loops together with a slope to the left. There is a variant of knitting for the top slice. In this case, they are removed from the knitting needle and turn the loops, return them to the left knitting needle, call two together for the lower lobule, 1 front, 2 yarn over, 1 front, two together with a slope to the right for the upper lobules. Knit to the end of the row, without deviating from the scheme.
- 10th row. Back row. The loops that were knitted two together are removed behind the knitting needle. So we knit in a circle where there are two together. The front is knitted with the front, 2 nakida (1 front, 1 purl).
- 11th row. Front row. Knit strictly according to the pattern. So they knit up to 21 rows, making sure that the loops are even and not twisted.
- 21st row. Front row. Knit according to the pattern. Two together with a slope to the left, 1 front, two together to the right, yarn over, 5 front, yarn over, two together to the left, 1 front, two together to the right, yarn over, 5 knit, yarn over. Yes, 3 more times.
- 22nd row. Wrong row, knit according to the pattern. The row is circular. There, where there were two loops together, the thread is removed strictly behind the knitting needle.
- 23rd row. Front row. 3 loops together (slip 1 loop, knit 2 together, stretch through the removed one), 2 yarn over, knit 7, yarn over, three together, yarn over, knit 7, yarn over.
- 24th row. Circular purl row. Where three were knitted together, they knit a front loop, two yarns, (1 front, 1 purl,) all the rest - according to the pattern. All crochets that are obtained between the petals are knitted with facial ones.
- 25th row. Front row. 1 front, from 1 loop, tie two, (1 for the top, and 1 for the bottom slice). knit 9, yarn over, knit 1, yarn over, knit 9, etc.
- 26th row. Circular purl row according to the pattern.
- 27th row. Front row. From 1 loop 2, from 1 loop 2, from 1 loop 2. Two together (to the left), 8 front, yarn over, 1 front, yarn over, 8 front, two together (to the right), according to the scheme, from 1 loop 2, from 1 loop 2. The knitting of the first petal begins.
- 28th row. Circular purl row according to the pattern.
- 29th row. Front row. Crossed loop, 2 yarn over, 2 crossed, 2 yarn over, 2 crossed loops, 2 yarn over, 1 crossed, two together (left), 17 knit, two together (right).
- 30th row. Circular purl row. We knit according to the pattern.
- 31st - row. Front row. Crossed, 1 front, 2 yarn over, etc.
Thus knit up to 46 rows. If the pattern turned out to be of sufficient size - the work can be completed, if more is needed - knitting continues.

Thus, a square of petals is obtained, which form a frosty pattern.
This pattern is best suited for women's clothing - sweaters, raglans, jumpers. The pattern is interesting and openwork, it looks good on tight sweaters - it makes the product lighter and makes it softer and fluffier.
Let's focus on the right choice of yarn
It should be borne in mind that this pattern is quite dense. Too thick yarn can look rough. When choosing a thread, it is best to knit a test sample with a pattern and evaluate how dense the product is. It may be worth using knitting needles of a different diameter for the selected thread, or take a different yarn.
Things connected with such a pattern look perfect from angora or wool. The thing turns out to be very warm and as if weightless.
From a cotton thread, products are obtained more dense. However, such a thread can give elasticity to a thing. The pattern will be well read and will not lose shape when worn.

A selection of videos on the topic of the article will help you better understand the technology of knitting a frosty pattern.
Video on the topic of the article