How easy it is to sew a dress with your own hands. How to quickly sew a simple dress without a pattern. way: two piece dress
An article for those who want to learn how to sew at home. You will learn what to make from old jeans, how to sew a hat-sock, culottes, scarves from T-shirts.
Hat-sock at home: a master class

It is very easy to create such a headdress. For this you need to have:
- knitted fabric;
- pattern;
- scissors;
- pins;
- threads;
- sewing machine.

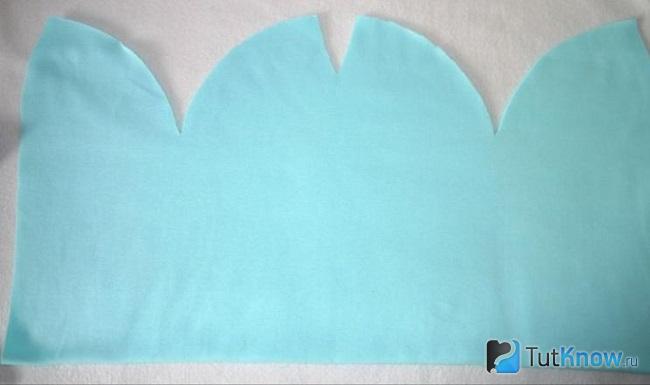
This pattern is designed for head size 54-56. One panel is 28 cm high and 22–23 cm wide.
Pin the pattern to the fabric with pins, cut out the fabric, leaving a 1 cm seam allowance.

This model will help you learn how to sew from scratch on your own, you can repeat this master class at home. To do this, we continue the description of the work.
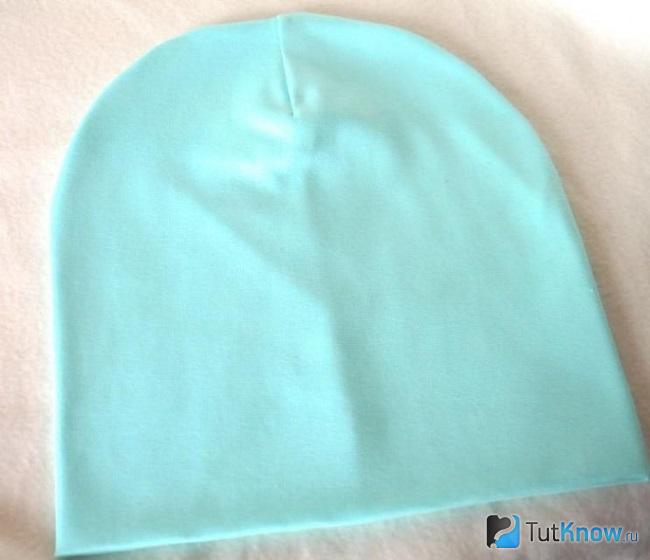
Remove the pins, immediately stick them into the needle pad so as not to drop or lose. Expand the fabric blank, it should turn out like this.
Now fold it in half, right sides inward, sew here using an overlock or a special line that is sewn around the edges of the product.

Sew the semi-circular seams on the top and bottom sides of the hat. Now fold it in half so that one of the parts becomes the lining of the headdress. Pin the details at the top with pins, sew using the same overcasting stitch.

Here's how to learn how to sew a beanie and cut it from scratch. You will get a stylish new thing, the production of which will take little time. Turn it right side out, put it on and you can go for a walk.
How to make a scarf with your own hands?
A knitted scarf is perfect for such a headdress. You will make it in 5 minutes. To do this, cut off the lower part from the T-shirt under the armhole, slightly squeeze this part from top to bottom to make drapery elements. After that, you can try on a new thing.
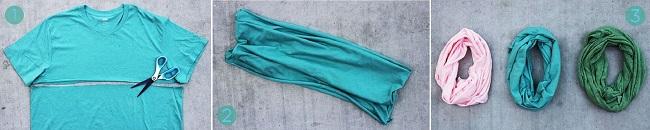
If you want your scarf to be fringed, then here's how: cut off part of the T-shirt from the armpits. At the bottom, chop it into strips 1 wide, 17–20 cm long. Tie each pair of the resulting ribbons with a knot. Then make the same knots in a checkerboard pattern, retreating down 7 cm.

By the way, you can decorate a T-shirt with such a fringe to give it a more original look.

As for how to make a similar snood scarf with your own hands, you can decorate it with beads. To do this, the cut out fragment of the T-shirt must first be cut from above and below into strips 2 cm wide, then put a bead on each, fix it from below with a knot.

If you like it when the scarf has a lot of fringe, then cut the blank into long strips. Then each of them needs to be slightly stretched, giving the desired shape. To make a snood scarf, you need to sew the sides of these blanks with your own hands. This seam will be on the back.

But these are not all ideas that will tell you how easy it is to learn how to sew at home using unnecessary T-shirts. To implement the following you will need:
- pot or pan lid;
- simple pencil;
- scissors;
- t-shirt.

The next scarf is no less original.

To make it, take:
- two T-shirts of different colors;
- a needle and thread;
- centimeter tape;
- scissors.

Cut the t-shirts along the red dotted lines. Cut out one of the sidewalls on both blanks to get two pieces. Fold each of them in half lengthwise and stitch along the long edge.
Now see how to make a braid. To do this, put the middle of the first part in the center of the second. By sticking your hand here, you will bring the loop of the first workpiece up. In the same way, create a braid further. It remains to sew the edges of the two blanks, this seam will be at the back.

You will get a beautiful snood scarf if you sew openwork sewing to the cut off strip of a T-shirt with your own hands.

Cut lots of stripes from different colors of T-shirts for another original scarf. You can tie it in several ways.
Here's how to learn how to sew clothes at home. The following ideas are also very easy to do, suitable for beginner dressmakers, and will allow them to fall in love with this type of needlework.
How to learn to sew a top, vest at home?
For beginner dressmakers, the following idea will also be easy to follow.

To sew a vest of this type, you will need:
- quite dense fabric;
- 2 large buttons;
- thread with a needle or overlock;
- scissors.
Divide the top segment into three equal parts to mark the location of the slots. Complete them. If the fabric is frayed, then overcast the armholes, and if it is a cloth like a drape, then you can leave the slots in their original form.
And the loop must be overcast so that it does not stretch. Sew on buttons, the second can be basted for decoration, the vest is ready.
Now about how to sew a top for the summer with a beautiful flower. For it you will need:
- knitted fabric;
- scissors;
- threads;
- sewing machine;
- tailor's needle.

The back and front, in this case, are two rectangles. To make a pattern according to your size, attach an unfolded newspaper to the back, determine the width and length of the future top in this part. In the same way, make a pattern for the front.
To make it more convenient to form a flower, do not sew the shelf and back on the sidewalls yet.
- For the straps, cut two strips 10 cm wide, 50 cm long. Connect each one lengthwise in half, right sides inward. Sew along the long edge, turn the straps on the face, sew them on the wrong side of the front.
- Process the upper part of the product by tucking it twice and sewing it on a typewriter. Here's how to sew the top with your own hands next.
- Start shaping the flower. Cut strips 10 cm wide. In total, you will need about 2 meters of such blanks.
- Fold them in half lengthwise, right side up, iron in that position. Start sewing the flower in a large circle, gradually moving towards the center. Make a frill out of the tape, fixing it in this position with pins. Then each circle is sewn on a sewing machine.

When you have completed it completely, process the top of the back, sew the straps here, stitch the sidewalls. Here's how to sew a top. For beginners, this work will not be difficult. The next one shouldn't be a problem either.
For her you will need:
- well-draped fabric;
- sewing machine;
- crayon;
- ruler;
- needle with thread;
- scissors.

From the fabric, cut out 2 squares with sides of 80 cm. Determine by your size where you need to sew on the right and left sides to separate the arms from the sides. Then you need to sew a top on the shoulders, after which the product can be worn.
If you have old jeans that are rather tired or frayed in some places, you can make a fashionable vest-top out of them. In the photo, it is marked in red how to cut out a new product.

It can be worn as an independent thing, put on over a T-shirt, turtleneck or make such a top the top of a sundress.

In this case, for the bottom, you need to cut a rectangle of cotton fabric, the width of which is one and a half times the volume of the hips. At the top, it is shirred and sewn to the bottom of the top.

If you already have a denim vest, you want to update and decorate it, then sew on lace in the collar area, but narrower ones? on the bottom and on the bar.

In general, for those who want to learn how to sew from scratch on their own, reworking old things is a very fertile topic. The process will be easy and interesting, so you can consider it in more detail.
What to do with old jeans?
If you want to sew an apron, and you have already used jeans for a year, use them.

The main part of the apron will be the top of the jeans. If you want to sew it with a breast, then rip it out of the trouser leg ripped on one side, unfolding that one. Such an apron is trimmed with braid or a strip of colored fabric, having gathered it. From the same material, open the ties at the waist and neck.
If you want to create a flirty apron, then make the bottom frill longer. Pass the belt through the loops to emphasize the waistline.

The breastless apron also looks great. It can be decorated with ruffles and a belt made of other fabrics.

In order not to separately sew on pockets and have a comfortable apron, use the back of the jeans. By the way, from the front and from the panels you can create a couple more aprons.

If you want to quickly turn white jeans into romantic ones with clouds, then take:
- bowl
- sponge
- acrylic paints for fabric;
- gloves.
Pour water into a bowl, add just a little blue acrylic paint, just a few drops, you should get a sky blue tint.
Put the jeans on the cellophane, dipping the sponge into the prepared solution, apply it to the fabric.
Now dilute the paint in a different proportion to get a picture of a slightly different shade. Apply this solution with a sponge to your jeans.

When the background is ready, take white acrylic paint, do not dilute it with water, draw the clouds themselves.

Now wait until the product dries, then iron it with a hot iron and you can put on beautiful jeans with clouds.

But back to the main topic. From old jeans you can sew a great organizer for small things.
Take the back of the pants with patch pockets, cut it off. If the organizer should be vertical, as in this case, then cut the back of the trousers in half, sew one to the other vertically. If you want the organizer to have several compartments, then sew pockets on the leg. Sew a belt from jeans along the edges of the product so that it does not stretch in different directions.
But the option with a vertical arrangement of pockets, for which you need to cut the back of the trousers to the knees, sew on additional pockets.

Of course, there are many options for what to do. From them you can make a bag, potholders, sitting on a chair and much more. For beginners, this is a great opportunity to learn an interesting craft.
When you get your hands full, you can create other things, such as pants.
How to sew culottes, leggings?
Leggings do not restrict movement, they are comfortable to play sports, work in the garden and just walk.
Slender ladies can wear a short top, a turtleneck with a vest under such trousers. Ladies with curvaceous shapes can be advised to put on a spacious shirt with cutouts on the sides that covers the hips. In such clothes they will be comfortable.
To sew leggings you will need:
- knitted fabric;
- threads;
- linen elastic;
- scissors and related small equipment.

The following is a universal pattern for several sizes, for:
- XL is yellow;
- L is represented by green;
- blue is M;
- and pink is S.

If you have a pattern, transfer the pattern to it. If not, tape two newspapers together and draw it here. You can draw squares on white paper or whatman paper. The side of the small squares is 2 cm, and the large ones are 10 cm.
On the left in the pattern is the back of the leggings, on the right? front. To learn how to sew at home, fold the knitted fabric in half with the right sides inward. Place a pattern on it, pin it around the edges with pins, cut it out, leaving 7 mm seam allowances on all sides. Overcast the edges of the parts.

Now sew the right half, then the left half on the sides on the wrong side, then sew front and back, and after? step seams. Fold the trousers down and hem here. Fold the top of the trousers, sew, then insert the elastic and you can wear fashionable leggings.

In another way, culottes are called skirt-pants. This is a versatile clothing that will be comfortable for women of different builds.
To sew culottes, recut the following pattern.

As you can see, it is given for several sizes at once, for 44–42 and 46. From above, you will lay the folds, stitch the step seams of the left and right halves of the trousers. Then sew a new thing on the sides and in the center back and front.
Learn about the various tools you may need. Tailoring requires a lot of different tools for sewing, for making models, and for measuring samples to make sure they will fit you. You will need to learn each type of tool and know how to use it. In the beginning, you will feel uncomfortable with all these tools, but the more you practice, the easier you will feel.
- Iron and ironing board. It's fine to use the one you already have as an iron, but you'll probably want to invest in a higher quality iron. You will use it as a press when you are sewing, as this will ensure that the seams will fit properly.
- Ripper. You will use it when you make wrong stitches and need to tear them out.
- Chalk for marking fabric so you know where to sew and cut.
- You need really good sharp scissors that are only meant for cutting fabric, otherwise the scissors will quickly become dull and this can damage or fray the fabric.
- Tracing paper for developing patterns and changing models.
- Rulers for measuring when you create your model (both during the design stage and during sewing).
- A measuring tape, especially a flexible tape measure. You will use it to take measurements and make appropriate adjustments if necessary.
- Pins to hold the fabric in place before you start sewing. Pins should be used sparingly as they can damage the fabric you are working with.
Buy a sewing machine. There are two main types of sewing machines: those that are in the domestic/domestic category and those that are in the industrial category. There are pros and cons to both categories, so figuring out which works best for you will take some time.
- Household sewing machines tend to be more portable and more versatile. They can make a variety of stitches. However, they are not very good in terms of speed and power and they are not very good for heavy fabrics.
- Industrial sewing machines are much more powerful and much faster, but they are usually only able to make one type of stitch (such as a straight lockstitch). They do this stitch very well, but, alas, are not so versatile. They also tend to take up a lot of space.
Learn the components of your sewing machine. Hopefully it will come with an instruction manual because you will need to know which direction the spool is spinning and where the bobbin case is. However, you need to know at least the basic components of a sewing machine before you can make fun stuff.
- The spool holder holds the spool of thread and controls the direction of the thread as the fabric passes through the needle of the sewing machine. Depending on the type of machine, the spool holder can be horizontal or vertical.
- A spool is a threaded bobbin on which thread is wound. You must wind the thread around the threads of the bobbin and place the thread cap (located under the needle plate) on top.
- Your sewing machine should also have different stitch adjustments to determine the length of each stitch, the amount of tension needed to make sure the stitches go properly, and different types of stitches (if you have a sewing machine that makes different types of stitches).
- Pay attention to the lever that controls the thread tension. If the thread tension is not at the proper level, the thread will form a knot at the top and stop the sewing machine.
- You can check with a nearby sewing shop, maybe they have some classes or someone willing to help you learn how to sew on a sewing machine, or you can ask a knowledgeable family member or friend.
Start simple. When you decide to sew clothes, you will want to start with simple designs, otherwise you can easily get frustrated and give up. It's best to start with the skirt because it's easier than sewing a 3-piece suit and it takes less measurements to sew a skirt.
- When you are first starting out, try to avoid tailoring with buttons or zippers. Sew an apron or pajamas with elastic bands. Once you get the hang of your tools and machine, you can start moving forward.
Sewing a dress according to a finished pattern is not as easy as it seems. Someone will object: “Just think - just cut the fabric and sew on a typewriter!” In fact, this process is longer and more painstaking.
However, the finished pattern provides great benefits for everyone, especially for those who are learning to sew. Thanks to high-quality patterns and detailed sewing instructions, we can easily sew a dress according to our figure, without complicated calculations, mind-blowing tattoos and fittings, and, most likely, the dress will be sewn no worse than in a professional atelier. Of course, provided that in the process of sewing you will take into account a lot of little secrets and tricks.
What rules should be followed by those who still do not have enough experience in sewing?
Rule 1: choose a simple pattern to begin with and gradually, step by step, move on to a more complex one.
The complexity of the pattern is directly related to experience, and experience - with the result. In Burda magazines, the degree of difficulty is necessarily indicated by conditional icons. Don't ignore them! If you are a beginner, do not immediately take on a complex model, where you may encounter processes such as suture or pulling.Perhaps, for a start, it is best for you to sew the simplest but most elegant model: the T-shaped dress described in.

By the way, don't let the simplicity of the pattern fool you. Sometimes just from a rectangular canvas with the help of skillful drapery, you can create stunningly beautiful, feminine and interesting dresses, as described, for example, in.

You will find almost the same simple model in . True, for him the pattern will have to be retaken from the pattern sheet in the magazine.

Rule 2: check your measurements
Before copying the pattern from the magazine, take your measurements. Do not be guided by the size by which you buy your dresses in the store. After taking measurements (see - how to take measurements correctly), you may be surprised to find that, it turns out in the magazine, your size will be a couple of orders of magnitude larger or smaller.If your measurements are noticeably different above or below your waist, retake a larger pattern, and while trying on, carefully remove the excess in the right places: first pin it off with pins (), then sweep with frequent stitches and try again.
Rule 3: choose the “right” fabric
If you decide to sew a dress for the first time, do not immediately buy expensive fabric. Check if the pattern matches the fabric you have chosen. There are patterns that are only suitable for stretch fabrics. If you sew a dress from a material that does not stretch across the fabric according to the pattern for bielastic fabric, most likely you will not "fit" into it. For example, for a model from or from, only stretchable knitted fabrics are suitable.
When buying fabric, keep in mind that with a large pattern, you will have to combine it at the seams. Sometimes rapports are more than a meter high, as, for example, in - here the rapport height is 140 cm with a large number of cut details! In these cases, tissue consumption can increase very markedly.

To sew knitwear, you may need special attachments for a sewing machine. Before sewing, be sure to test on a piece of fabric how well your machine does the seams. For sewing knitwear, it is ideal to have an overlocker at home.
It is even more difficult to deal with structural knitted materials, for example, with boucle, as in. Perhaps, if you are just learning to sew, it is better to take on a more complex dress, but not from a knitted boucle, as in. Such models are best mastered with a little practice.

Rule 4: follow the description of the process of making the dress punctually
Before you start copying patterns, cutting fabrics and sewing, be sure to carefully read the instructions. It is useful to learn to sew from models, for which step-by-step instructions are provided with many illustrations.On the pattern sheets, pay attention to the pattern lines of your exact size - after all, as a rule, the same pattern is given for several sizes. After copying the patterns, check them with the reduced drawings in the instructions and the listing of details in the “Cutting” section, whether you have all the patterns in stock, whether the necessary patterns (for example, the right and left sleeves) are copied in a mirror image. You will have to draw some details yourself according to the dimensions indicated in the instructions.
By the way, when copying patterns, do not cut sheets with patterns. Photograph them using carbon paper () or tracing paper (). Otherwise, you will buy a magazine for just one pattern.
Before cutting the fabric, check again if you need to allow for seams and hemlines: if you do not, your dress may turn out to be too tight or short.
Usually, paper patterns are pricked onto the fabric - pay attention to whether it is possible to save on fabric, sometimes you can sew one more little thing from the saved material. After pricking around with tailor's chalk (), first draw the outline of the pattern, and then the allowances of the desired width.
A very important detail: alignment marks. They must be transferred to the seam allowances; when sewing, marks with the same numbers must be exactly opposite each other.
Read the instructions in full, no matter how "boring" it may seem to you. Don't skip the Sewing section. Sew the parts exactly in the sequence given in this section. Follow all directions. Little things like cutting seam allowances or lining a detail can make all the difference in the fit of a dress.
At the end of each step, and preferably more often, iron your product and try it on, checking the fit in every detail.
Rule 5: Distinguish between simple and complex sewing operations
For example, sewing on a sleeve with a classic bell-shaped rim is a complex operation, not everyone succeeds in doing it flawlessly the first time, so it’s best to start with the easier-to-sew “bat” sleeves, as described in.Don't be fooled by the seeming simplicity of making raglan sleeves, for example, as in, especially with tucks around the collar.

Here, if you have too narrow or too wide shoulders, you will have to more accurately fit the pattern to the figure. With wide shoulders, they will seem even wider if you sew yourself a dress with winged sleeves of the original cut. This option is ideal for girls with narrow shoulders and a fragile figure.

For broad-shouldered girls, it is better to sew fashionable wing sleeves for either a top or a sundress.

By the way, you can easily make a pattern of wing sleeves yourself, but keep in mind that for such a detail it is better to take light, gently falling fabrics.
You probably already understood that sewing is fraught with many little secrets, thanks to which good tailors sew things that ennoble the one who wears them. But anyone who wants to do it can learn these tricks and secrets. You just need to carefully follow the advice of those who know how to sew.
There is an opinion among beginner needlewomen that for sewing clothes you need to be able to build patterns. And since this is not an easy task, one can only dream of new clothes. But you can easily sew clothes without a pattern, knowing how it's done. Examples of work will be discussed in the article.
How to sew clothes without making patterns?
It is difficult to agree that a pattern is not required for a perfectly fitting outfit. But when tailoring, you can still do without numerous measurements and complex drawings that not everyone can master. Moreover, the one who sewed any outfit in the atelier remembers that even when taking all the measurements, the craftswoman tries on the outfit to fit it, because sometimes even a correctly constructed pattern does not guarantee a perfectly fitting suit. But are all these drawings really necessary?
Some craftsmen can easily sew clothes without a pattern, having made only 1-2 measurements beforehand. Of course, they are likely to rely on their experience and knowledge. But still, since they can work like that, it means that everyone can do it. The main thing is to pay maximum attention to the matter.
To learn how to sew without a pattern, you must first practice on the easiest things that can be created from a simple piece of fabric. It is easy to work with such products, and the experience gained will be invaluable. It is also better to start with not very heavy stretch fabrics: they are quite easy to work with, and their ability to stretch can come in handy with small errors made by inexperienced needlewomen.
How to sew new things following the example of old ones?
You can sew easily and simply without patterns, using clothes that fit you well. For cutting, you need to purchase a material of the right size that is similar in texture. Now take a carbon paper and redraw the details of the clothes you want to sew. For example, you wanted to please yourself with a new blouse.
For a good and high-quality cutting, align the redrawn parts of the back and front: the side and shoulder sections should be the same size. The same goes for the sleeves. If everything matches for you, lay out the patterns on the fabric and start cutting. Connect all the received parts: the back and front shelf, then the sleeves. After finishing the neckline, bottom of the product and sleeves, you can try on a blouse sewn by yourself.
Required Tools
Whether you're going to design your clothes by building intricate blueprints or just plain sewing, you should always have the right tools at hand. Of course, you can do everything manually, but in this case, the work will take a lot of time, and the quality of the resulting product will leave much to be desired. Therefore, it is better to have a sewing machine.
Also in your arsenal should be excellent cutting scissors that can easily cut any fabric. Additionally, you may need small scissors for cutting threads and for finishing work.
It would be useful to get a centimeter for taking the necessary measurements, a ripper and pins. You will also need crayons: even if you sew without a pattern, you still have to draw elements of future clothes on the fabric.
Sewing a sundress on the straps without a pattern
A sundress is exactly the thing for tailoring which does not require much experience. It is not necessary to have deep knowledge of the technology of correct cutting. So, we sew with our own hands without a pattern a sundress from a piece of fabric. Everyone chooses the length of the future product from personal preferences. You need to add another 20 cm to it. This supply of fabric will be needed when finishing the top and bottom of the garment.

Before starting work, you need to measure the volume of the hips. Divide the resulting size in half and set aside on the fabric. You should get rectangles. They need to be cut and sewn, leaving 15 cm on top. To process the armhole, you need to tuck the edge half a centimeter and topstitch. The top of the sundress will have a drawstring. For its tailoring, the upper cut is folded by 3 cm and sewn on the front and back of the product. You need to tighten the cord into the drawstring and tie it on the shoulders in the form of straps.
Various ribbons can be used as a cord. The remaining pieces of fabric will also work. You can simply cut ribbons of the required size from them. Otherwise, the cord will have to be processed. After hemming the bottom, the outfit you made can be tried on.
Additionally, you can decorate a sundress with a belt or ruffles, it all depends on your ingenuity.
How to sew a tunic without a pattern?
It is easy and simple to sew a variety of products without patterns. A striking example is the tunic. To sew it, take the material and put on it half the volume of your hips, plus a couple of centimeters for a loose fit. You also need to postpone the height of the product, which can be completely different and will depend only on your choice. As a result, on the fabric you should get a rectangle. The material must be folded in half and cut out two main parts - the back and front shelves.
Now it's time to finish the neckline. On the back shelf, measure 2-3 cm down and 7 cm to the sides from the center of the rectangle. Round off the resulting cut. The width of the neck on the front shelf should correspond to the same parameter on the back, but the depth should be done more. Now we sew the rectangles on the sides, taking into account the dimensions of the required space for the hands. You also need to sew the shoulder seams. Then we proceed to the processing of the neck and cutouts for the hands. After hemming the bottom of the product, you can replenish your wardrobe with an excellent tunic.

You can make the neck on the front shelf smaller than on the back. Such a product will look quite original.
We sew a simple dress without a pattern
Quickly, without building patterns, you can sew light open dresses. For work, you will need crinkled or stretch viscose fabric and materials for drapery and decoration. The width of the product may be different, but for this model it is better to take larger fabrics. Choose an arbitrary length and cut out two rectangles of the corresponding sizes. In the area of the bodice and at the top of the back, you need to lay the seams with an elastic thread. You can also use a regular elastic band. It is placed on the wrong side of the product and basted with a special seam. Two such seams, located at a distance of about two centimeters, will hold the dress well.
Now you need to process the product on the side, tuck and hem the top and bottom of the dress. Update is ready!

Festive dress without a pattern: how to sew?
Often, despite the variety of things in the closet, you want to wear something new for the upcoming event. Buying a new one is not always possible. Therefore, if you are planning a holiday, but there is no suitable outfit, you can create an excellent dress without a pattern in an hour. How to sew it, consider in order.
To start, take a skirt that fits you well and redraw it onto the fabric, adding height at the waist. Now fold the fabric and cut out two pieces: the front shelf and the back. If the fabric is stretch, then it will be enough for you to simply sew two parts. If the fabric does not stretch, it is better to make darts and insert a zipper. Now you need to process the bottom and top of the product, bending the edges.
For the top, you will need a piece of a similar fabric, 20 cm wide. The edges of the fabric must be folded inside out and stitched. Now the cut must be attached to the skirt, stepping back from the center of the front by 2 cm, and sew it further, heading towards the back. For beauty, you can make a couple of small folds.

Sewing a baby dress without a pattern
We also sew a children's dress easily without patterns, using a regular T-shirt of the right size. The item of clothing must be laid out on a piece of paper and circled. For these purposes, you can use cheap wallpaper: a roll is enough for you for many of these patterns. Since the dress should be longer, increase the size down. Also make the pattern wider at the bottom - this will make the dress fluffy. When copying a T-shirt, do not forget to make allowances for the seams.
Cut out the resulting pattern, making the bottom slightly rounded, and transfer to the fabric. After cutting out the shelves, start sewing them together. After the parts are connected on the side and on the shoulders, finish the neckline and armholes. They can be additionally decorated with lace or ruffles. Now it remains only to hem the bottom of the dress - and a new outfit for your child is ready. Using this method, you can sew a variety of children's dresses without a pattern.

To make the dress sure, take a loose T-shirt for an example. If the sewn thing is too big for it, you can always take it in.
Refresh your wardrobe with a little black dress
The little black dress has always been a coveted item in every woman's wardrobe. It can be sewn without a pattern if you have suitable knitwear. First you need to take a meter of fabric and fold it in half. We take a T-shirt with wide shoulder seams and apply it to the prepared fabric. We outline the top, and from the waist line we set aside the length that will be suitable for your future outfit. The resulting pattern is cut out and stitched on the side and shoulders. Try on the resulting dress. If the neck is too small, then you will have to insert a zipper or make a fastener. You can also increase its size.

Now let's move on to the sleeves. We cut out two rectangles, the width of which should correspond to the girth of your arm in the widest place, and the length is taken as classic - 60 cm. We apply the resulting rectangles to the shelves and cut them along the armhole line. Now the resulting sleeves need to be sewn on. By following this algorithm, you will get a great little black dress.
In order to sew a dress with your own hands, you need not only to correctly build a dress pattern. When sewing a dress, you need to know the technology for processing cut details, to be able to perform the first fitting of a dress. For some types of fabric, you need to be able to do wet-heat treatment of some parts of the dress, be able to properly iron the seams and iron the allowances, etc.
It is impossible to describe the entire technological process of tailoring a dress in a short article, especially in general terms. Different models and styles of dresses have their own characteristics not only in cut, but also in tailoring and processing. But, nevertheless, there are a number of general recommendations that can be used by anyone who decides to sew a simple summer dress with their own hands.

Do you like indoor or garden flowers? In the nursery "Green Gate" you can buy rooted cuttings and cuttings of various domestic and perennial garden flowers. We constantly update the collection of anthuriums and hibiscus. Flowers and plants are sent by mail.
Dress pattern preparation

After building a dress pattern, it needs to be prepared.
1. The contours of the back, shelves and sleeves must be transferred from the main drawing to another sheet of paper. Each detail of the pattern should be depicted on a separate sheet. Paper for this can be used without marking. And after, when you are convinced of the accuracy of your pattern, it can be transferred to thick cardboard or oilcloth, film.
2. On the details of the pattern, it is necessary to draw waist and hip lines, tuck lines and other most important lines, mark key points, notches, and a shared line.
3. Before cutting the details of the dress, check with a centimeter all the segments of the connecting lines of the details of the pattern. Make sure that the armhole size matches the volume of the armhole, taking into account the fit or pleat at the top of the sleeve (if any). Compare neck and collar. Be sure to check that the side seams of the dress match up so they don't have to be tucked in while sewing on the sewing machine. The seams along the shoulder cut, the bottom of the sleeve, etc. should also be the same.
4. If a discrepancy is found, eliminate it either by cutting off the excess, or by gluing additional pieces of paper and changing the contour.
5. Do not forget to leave allowances when laying out patterns on fabric for subsequent cutting.
6. Professional tailors do not build patterns with allowances, but it is more convenient for beginner tailors to make patterns with allowances. Then the appearance of an error when cutting the fabric is excluded.

Many fabrics need to be prepped before being cut. Woolen fabrics often require decating, a wet heat treatment of the fabric. For some fabrics, abundant moisturizing (washing) is required, followed by natural drying. Fabrics with pile, such as velveteen, velor, have different shades. All this and more must be considered before cutting the fabric and sewing the dress.
1. Iron cotton, linen and silk fabrics from the inside out. If the fabric is skewed, moisten it and pull it out.
2.Woolen fabric and artificial fiber fabric need to be decanted.
3. Determine the right side of the fabric. For some fabrics, this is difficult to do. In this case, focus on the edge. All rolls of fabric are folded at the factory with the front side inside (special drums), along the edges of which there are needles. This means that the punctures from these needles should be more noticeable from the side of the front of the fabric.
4. Inspect the entire piece of fabric. If you find defects, immediately circle them with chalk so that you can bypass them when cutting.
5. Sometimes, some fabrics for summer dresses need to be trimmed along the section cut off in the store. Pull the cross thread at the cut edge of the fabric, and you can use it to determine exactly where to cut the fabric.
6. If the fabrics have a pile or a pattern directed to one side, you need to cut the details of the dress in only one direction. All details of the pattern, except for facings, belts, cuffs, must be laid out in one direction. The pile should be directed from the bottom up.

Lay the fabric on the table for cutting inside out top or in the folded state (edge with edge), face inward. Laying can be done in a turn or in a fold.

The technology of processing and sewing a dress depends on the model and fabric chosen for sewing the dress. But in any case, you need to follow the general recommendations of the sequence of operations to prepare the dress for the first fitting.
1. Lay snares (if required) along the contour and contour lines of the patterns.
2. Sweep small parts (wedges, extensions, etc.)
3. Prepare the shelf. Sweep darts. Top first, then along the waistline. If there is a yoke that is adjusted to the assembled part of the bodice, assemble this part on the sewing machine.
4. Preparation for sewing the back of the dress. Baste cuts or folds in the middle of the back. Baste darts or gathers at the waistline, as well as darts at the neck or shoulders. In the presence of folds, undercuts and other shaped lines, the pay must first be swept along these lines.
5. Preparation for tailoring the skirt of the dress. Baste folds, reliefs or shaped lines, baste darts, baste a pocket. 6. Connection of the bodice of the dress with the skirt. If the side seams of the skirt coincide with the side seams of the bodice, first sweep the skirt with the bodice along the waist line, that is, the back with the back panel and the shelf of the dress with the front panel, and then the shoulder and side sections. If the side cuts of the bodice of the dress do not match the side cuts of the skirt, sweep the shoulder and side cuts on the bodice, and then the bodice with the skirt along the waistline. Bend the bottom of the skirt and sweep.
7. Preparing the sleeves. A narrow sleeve must be subjected to a wet-heat treatment (stretch the elbow section of the fabric with an iron and plant the place of the bend of the arm). Then the collar of the sleeve must be assembled into two threads, the first of which is placed 0.7 cm from the cut, and the other - at a distance of 0.5 cm from the first, retreating from the seam of the sleeve by 8-10 cm. Pull off both threads for planting the sleeves. When sewing a wide sleeve with a cuff, if the sleeve is gathered at the bottom, gather the bottom of the sleeve into an assembly, and then baste the cuff.
First dress fitting

When making the first fitting of a dress, it should be remembered that the pins are stuck along the vertical sections with the point down. On horizontal seams - edge to the left.
This is just a short list of the knowledge that beginners need to arm themselves with before sewing a dress with their own hands. Unfortunately, novice dressmakers often associate sewing a dress with fabric, scissors and a sewing machine, losing sight of the intermediate steps. Sewing a dress on a sewing machine is only the final stage of preliminary preparation, several dress fittings. And the sewing machine is only a tool for stitching fitted parts in the skillful hands of a dressmaker. However, the technology of sewing products on a sewing machine is also not an easy task, and we have articles on this site on our website.