Beautiful crochet scarf for beginners. Crochet baby scarves: patterns. How to crochet a baby scarf. Crochet children's scarf for a girl - diagrams with a description
If you have only recently started crocheting, it may seem to you that you cannot master such a product as a scarf. However, you can easily make a simple scarf with just a few basic crochet skills. This is a great project for beginners, during which you will hone your skills in knitting stitches, double crochets, and learn how to complete the product.
Steps
Part 1
simple scarf- At least 180 m of hand knitting yarn.
- A crochet hook that fits your yarn. To find out the correct hook size for your yarn, read the information on the skein label.
- Scissors.
- A darning needle or chain hook to complete the finished scarf.
-
Make the first loop. To start the main row, you will need to make a slip knot, which then needs to be hooked up. For this:
- Wrap the end of the yarn (stand back a few inches from the end) around your index finger to form a loop.
- At the tip of your finger, where the loop is, you need to grab the free end of the yarn with a hook and stretch it through the first loop so that you get the second one.
- Remove this loop from your finger and pull on the first loop to tighten the knot.
- Crochet the second loop again and make it the desired size by tightening or loosening the knot.
-
Dial a chain of 13 + 3 air loops. To chain with chain stitches, slip the working end of the yarn over the hook in front of the slip knot, and then pull the loop of yarn through the slip knot - this will be your first chain loop. Cast on 13 of the same stitches and 3 more for a total of 16 chain stitches.
- The additional three air loops are the lifting loops. The rise loops give you some room to turn your knit and start a new row. Until you finish the scarf, you will need to knit 3 instep stitches for each new row.
- Be careful not to knit too tight or too loose. Try to keep all air loops approximately the same size and density.
-
Knit the first row double crochets . After you have worked a chain of 13 + 3 chains, count 5 chains from the hook, and then knit a double crochet in this loop fifth from the hook.
-
Cast on 3 air loops, skip one column of the previous row, and in the second tie a column with a crochet. In order to start the second row, you again need to cast on three lifting stitches, skip the first double crochet of the previous row, and in the second double crochet the current row. Continue to double crochet to the end of the row.
- Follow the rows in the same sequence until the scarf is the length you want.
-
Complete the scarf. Once your canvas reaches the desired length, you need to finish it. To do this, double crochet the last stitch, and then pull the loop on the hook so that it is at least a few centimeters wide. Cut the loop in the middle, and then pull up the end of the yarn that comes from the skein (ball of yarn). Then pull the end of the yarn to tighten the knot.
- You can also tie a second knot by pulling the yarn through the second column from the end to secure the end of knitting even more securely.
- To hide this ponytail, thread it through the eye of a darning needle or chain hook, then sew it into the hem of the scarf. When almost the entire end of the yarn is hidden in the product, pull it through the next knitting column and cut off the protruding end.
Part 2
How to make a unique scarf-
Take a yarn that is special in texture or color. Yarn alone can completely change the look of a product. To make your scarf become the thing that you want to wear without taking it off, be sure to choose a yarn that is special in texture or color.
- For example, you can use smooth yarn or more fluffy. You can choose plain yarn or melange (multi-color). Go to the nearest craft store where you can choose what you like.
-
Add a border. A border is an easy way to decorate a scarf, but it also gives you the opportunity to practice knitting new stitches or improve the ones with which you knitted a scarf. To knit the border, tie the end of the yarn to the corner of the product, and then start knitting columns along the long edge of the scarf. Knit the scarf once, twice, or three times, and then complete the hem in the same way as you completed the scarf. Here are a few stitches that you can use to knit a border:
- Single crochet
Find the materials you need. Making the simplest scarf is easy and you only need a few things to make it. To knit a simple scarf, you will need:
Today we will teach you how to crochet a scarf with a regular crochet - original in shape and bold in color - this is a characteristic of fashionable things this season. This type of clothing is intended not only to save humanity from bad weather. The special mission of the modern scarf is to complement and complete the female or male image. The main requirement that all modern designers impose on these accessories is dullness and brightness. All the colors of the rainbow are in fashion, and chocolate shades, yellow, green are especially in demand. At the peak of fame are products with prints: zigzags, waves, ethnic motifs, stripes and checks. Long fringe and large knitting are the highlight of the modern scarf.


This stylish and warm item of clothing is simply bound to settle not only on your closet shelf, but also in the wardrobe of your family and friends. Therefore, dear knitters, “prepare the sleigh in the summer” - get the hook and threads and get to work. And to help you, this article provides information on how to crochet a stylish scarf with a crochet hook for women, men, and children.
Crochet a scarf option for beginners according to patterns
The model of the scarf, which is shown in the photo, is very light in execution. Even the knitter who almost just took the hook in her hands can knit it.

Such a product is knitted with two types of loops: a single crochet (1st row) and a single crochet (last row).
We will need 100% fine wool yarn in four different colors, 50 g each, hooks No. 4 and No. 4.5.
Size: width - 17 cm, length - 182 cm without fringe.
Knitting density: 14 loops, 9 rows of Art. s / n. = canvas 10x10 cm.
Work sequence.
Knit a chain of air loops equal to the length of the scarf. 1st row knit with single crochet. Then knit the entire fabric with double crochets, changing the color of the thread in the right places to make stripes. The last row is knitted with single crochets. Along the edges of the scarf (in width), make tassels.
Knitting pattern:


Such a striped accessory will suit both women and men and children. It all depends on what color yarn you choose.
Openwork technique for performing work with descriptions and instructions
Such an elegant openwork scarf can be a wonderful gift for your beloved girlfriend, sister or mother. Be sure that for such a fabulous gift they will be very grateful to you.

To knit such a model, you will need fine wool blend yarn - 50 g, hook number 3.
Knitting is performed with such loops: air, single crochet and single crochet.
Step-by-step master class for beginners in needlework
Link a chain of 37 ch. Next, knit 53 rows of fabric according to the pattern: 5 rapports of 10 rows + 3 rows. Then, on one and the other side of the scarf, tie the border with the Pineapple pattern. The border is knitted from 14 rows: from the 1st to the 8th row completely, 9-14 rows each “pineapple” is knitted separately.
The scheme of knitting an openwork scarf in the picture below.

Pattern "Pineapples" gives the product additional lightness and elegance.
To add color to the product, use decorative elements. Or you can decorate the edges with decorative trim.
Model "Vivien" with interesting additional ideas
A stylish, lush and at the same time very warm scarf is exactly what should always be at hand, or rather, on the neck of every woman in the cold season. The Vivien model fully meets all these characteristics.

Look at the photo and see for yourself. A beautiful, original, warm knitted Vivienne scarf is able to warm your body and decorate your look.
The work takes place in two stages: first, the base of the scarf is knitted - a mesh, then a lush border is imposed on it.
We need wool or wool blend yarn - 250 g (the border is knitted in two strands), hook No. 4.
The work sequence is shown below.
Trying to knit a small mesh
Dial 15 ch. + 3 v.p. instead of Art. s / n. for the first row. Then knit 2 more ch, skip 2 ch. in the chain, and on the third loop knit st. s / n. To the end of the row, knit in this way: ch 2, skip 2 loops, 1 tbsp. s / n. The next rows are repeated. The double crochets are knitted over the double crochets to form a mesh.
Border for knitting along the fabric of the product
Expand knitting and knit a border along the scarf fabric:
1 row. Tie the edge of the product with single crochets so that each “cell” has 3 columns.
2 row. Knit in columns with 1 crochet, while from each 1 tbsp. b/n. previous row knit 2 tbsp. s / n. (due to this, the number of loops should increase by 2 times).
3 row. Knit st. s / n., while again increasing the number of loops by 2 times (from each loop of the previous row we knit 2 tbsp. s / n.
4 row. Knit similarly to the third row, increasing the number of loops by 2 times.
5 row. Knit st. s / n. Increase the number of loops not by 2, but by 1.5 times: from 2 loops of the previous row, knit 3 loops. Finish knitting.
You should end up with a very elegant, neat product that should be worn with things to match it. Such a thing can be either a dark contrasting turtleneck.
Vivienne scheme for more experienced needlewomen
Scheme of the "Grid" pattern.

For knitting a border, you can use not just a pattern from Art. s / n. The following photo shows the pattern options for the Vivienne scarf.


The originality of this scarf can be emphasized by combining different colors of yarn, as shown in the following photo.

Believe me, wearing such an accessory is a real pleasure.
In boutiques, we are so often impressed by lace dresses made of thin threads in shop windows! But few people know that such dresses, and even better, are crocheted in one or two evenings, even by an inexperienced craftswoman! Read about making handmade dresses, step by step photos in this article will help you achieve the best result!
A trumpet scarf for a stylish look for every day
Remember the fashion of the 80s. Then almost the entire female half of the population wore a scarf-pipe or, as it was also called, a "collar". This thing is universal, it can be worn as a scarf, or you can put it on your head instead of a hat. In the 2015-2016 season, this accessory is back in fashion. The clamp has a new name - "snood". A knitted tube scarf complete with mitts or mittens looks stylish, fashionable, and versatile.
Let's start our master class. Look at the photo: you will immediately be visited by the desire to add such an accessory to your collection of scarves.

Scarf dimensions: girth - 100 cm, height - 60 cm.
To knit this model of a scarf-pipe, you will need 100% wool yarn - 450 g, hook number 3.
Main pattern: the number of loops cast on for knitting should be a multiple of 6. Knit according to the scheme in circular rows. Each row starts with 1 or 3 ch. instead of 1 st. b/n. or 1st st. s / n. respectively, and from the loops before the rapport. Next, knit rapport loops and end with loops after rapport and connect with a connecting column to the third ch. lift. Knit 1 time from the 1st to the 3rd round, and then perform all rows in the same way as the 3rd circular row.
Knitting density: 6 circular rows of 18 typesetting loops = canvas 10x10 cm.
Step-by-step MK with a detailed knitting pattern
Dial a chain of 198 ch. and close them into a ring. Next, knit with the main pattern 33 rapport. When the fabric reaches 60 cm, finish knitting. Run the strapping "crawl step" along the first and last circular row of the product.

Scarf - crocheted pipe. Wear it with pleasure! A charming image and a great mood are guaranteed!
See the video tutorial for an example.
We create a scarf-hood with a phased sequence of work
Another original product is a crochet hooded scarf. This accessory is designed to protect your head and neck from cold and wind. Its advantage is that it is both a scarf and a headdress at the same time. After reviewing the information of the next master class, you can knit such a cute hood scarf with your own hands.

To knit this model, you will need yarn (50% mohair, 50% acrylic) - 300 g, hook number 3, elastic band.
Knitting density. 8 rows 1.5 rapport = 10x10 cm.
Left and right halves of the hood with assembly
Dial a chain of 39 ch. + 3 v.p. lift. Next, knit according to the pattern. After knitting 70 rows, add 1 rapport for 10 rows to expand on the right. Run another 20 rows and finish knitting.
The right half of the hood is knitted similarly to the left, only the extension is done in a mirror image.
Sew a hood. On the first row of the left half, knit the pattern according to the scheme. Then continue along the pattern, while making decreases on both sides in each 2nd row, 1/3 of the rapport. At the end, complete the chain from v.p. - 15 cm, attach pompoms to it. Similarly, the left half to perform the right.
Crochet hood-scarf pattern:

Such a thing will not only warm you, but also become a stylish addition to a jacket or coat.
Warm pleasant new thing for a beloved man
Men also wear scarves. They give the image elegance, rigor and at the same time attractiveness. Look at the following scarf model. This classic men's crochet pattern can be worn under a coat or over a jacket, and can also be wrapped around the throat.

To knit this model, you will need 100% wool yarn - 50 g dark gray (1) and 50 g light gray (2), hook number 3.
Knitting density: 20 tbsp. s / n. X 9 rows = 10x10 cm.
Important:
- When changing colors, it is necessary to knit the indicated art. s / n. to the last two loops. Then continue with a thread of a different color.
- While knitting a section in one color, keep a thread of a different color along the top of the last row of st. s / n.
- While knitting 5-8 rows of the pattern after the last st. s / n., the first 2 v.p. knit in the same color as the last st. s / n. 3rd vp knit in a different color.
Description of the knitting sequence. Run a chain of 37 ch. and then knit according to the pattern. Rows 1-8 repeat 14 times. Then repeat rows 1-4 once. Finish knitting. Decorate the edges of the scarf with a fringe.
Crochet pattern for a men's scarf:

Tie your beloved husband as a gift with such a wonderful accessory. The love you have invested in the product will warm your loved one both in the rain and in the cold. Warm words of gratitude and a strong kiss from your loved one are provided to you.
We select a stylish model for young children
As you know, children do not really like to wear a scarf and always strive to take it off. Only very interesting and beautiful accessories can interest small fidgets. Look at the next photo.

Here is such a fun, cute crochet baby scarf that your baby will surely like. This bright accessory will make your child's outfit irresistible. And this model will suit both girls and boys.
In order to make a Lion cub scarf, you will need 100% wool or wool blend yarn in orange and brown, hook number 2.
1 row. 10 vp, then 5 tbsp. s / n. over 6 -1 v.p. chains.
2 row and all subsequent rows knit according to the scheme: 5 ch, 5 tbsp. s / n. Knit to the length you need.
Then continue to work according to the scheme with yarn of a different color according to the same principle: ch 5. and 5 st. s / n., but at the same time every 3rd v.p. on the left side it is knitted, capturing the arch from the vp. orange stripes. The progress of work is shown in stages in the photo below.


The base of the scarf is knitted. It remains to complete the muzzle of a lion cub. To do this, knit a circle of the diameter you need, the edges of which are framed with a fringe of tassels. This process is shown in the following photos.


Decorate the muzzle with embroidery.
Scheme of a children's scarf:

An original and accessible knitting accessory for a baby is ready. He will not only warm and decorate the child, but will also become the main character in children's role-playing games.
Knit things for yourself, your family and friends. Warm up and decorate your image. With a beautiful, unique, elegant and warm knitted scarf, no cold will scare you!

Crocheting allows you to create really amazing things!

A scarf is not only a warm accessory, but also an opportunity to complement an already perfect image. At the same time, a self-made product will look much more original and unusual. Even novice needlewomen with the most minimal skills will be able to crochet a scarf: it's simple and fast.
A thick knitted scarf is especially useful if the sweater does not have a long neck, when it is windy and cold outside. Elegant lace - will decorate even the simplest and most concise coat model. Even the most ordinary scarf, if it is beautifully tied, will become a fashion accessory and decoration of the image as a whole. A small scarf is easy to hide under clothes without losing its protective functions.
A scarf is not only a warm accessory, but also an opportunity to complement an already perfect look.
Applying only basic knowledge, painted step by step, it will be possible to create a beautiful, unusual, but easy-to-make product. Such an accessory will add sophistication to any outfit and will simply warm you in the most severe winter frost.
What you need:
- 180 m of yarn;
- hook;
- scissors.
We knit according to the scheme:
- Wrap the end of the yarn around your finger so that a loop is formed.
- Grab the free end of the thread with a crochet hook and pull through this loop.
- Remove the second stitch from the finger and stretch it into the first, tighten the knot.
- Pick up the second stitch again and make it the required size.
- Throw the working thread on the hook in front of the knot and pull the yarn through it.
- Thus, dial sixteen loops.
- Count five stitches from the hook, then knit a double crochet. To do this, throw the thread once on the hook and insert it into the air loop. Pick up the yarn again and pull through a couple of loops. Through the remaining pair of loops, stretch the thread again.
- Thus, complete the row and cast on three air loops.
- Skip the first column and continue knitting by analogy with the previous row.
- Continue to work in the indicated sequence until the scarf is the desired length.
- Knit the last column and pull the loop on the hook to make it longer. Cut it in the middle and pull out the end of the thread, tighten the knot.
Crochet elastic scarf (video)
How to crochet a men's scarf
When choosing scarf knitting patterns for men, in most cases they prefer embossed. The finished product is quite strict, solid and original.
What is necessary:
- yarn;
- hook number 4.

When choosing scarf knitting patterns for men, in most cases they prefer embossed
Knitting in stages:
- Cast on loops, the number of which directly depends on the desired width and should be a multiple of three, plus an additional two edge loops.
- In the first row, knit each loop with a single crochet.
- Start the second line with three air loops, then alternately knit three internal relief columns and three external ones, finish with a column.
- Start the third row with a pair of air loops, knit first three outer and then three inner relief columns, complete the row again with a column.
- By the same principle, knit the next line.
- In the next step, start with a couple of air loops, three internal and three external relief columns, finish with a column.
- Knit the next row in the same way as the previous one.
Continue knitting until the desired length is reached, repeating the scheme from the third row and then in a similar way.
Crochet scarf: instructions for beginners
Beautiful, warm, reliably protecting not only the neck, but also the head from the cold, even a beginner needlewoman can tie a scarf-collar. The circuit is so simple that it does not cause any difficulties.
What you need:
- 300 m of yarn;
- hook number 4.5.

A scarf collar can be knitted even by a beginner needlewoman
Description of work:
- Cast on an even number of stitches.
- Close the loops into a ring using a connecting post, make three lifting loops.
- Skip one loop of the previous row, knit a column.
- Knit an air loop, skip one previous line and knit a double crochet.
- Thus knit the whole circle.
- With the help of a connecting column, knit not only the last air stitch, but also a couple of loops at the beginning of the line.
- Make a couple of air loops in the formed hole.
- After that, knit with double crochets over the air stitches of the previous line.
Knit a collar of the desired length and hide the ends of the thread inward.
Crochet openwork scarf: easy pattern
Women's models of scarves must be unusual and incredibly beautiful. That is why they often resort to openwork knitting, thanks to which the products are perfect, somewhat reminiscent of exquisite Japanese motifs.
What is necessary:
- 220 m of yarn;
- hook number 1.5.
Progress:
- Dial a chain of sixty-three loops.
- In the fourth loop from the hook, knit a double crochet, after which, until the end of the row, knit all the stitches with such columns.
- At the end of the first line, make a lifting air loop and turn the workpiece over and make a column in the first stitch of the base, knit five air loops.
- Skip three air loops, and in the fourth tie another column.
- Then make a pico of three air stitches and knit five air stitches again, skip three and knit the fourth with a column.
- Thus knit the entire line.
- In the third row, make five air stitches and a single crochet in the middle of the loops of the arch of the previous line.
- Again, make five air loops and a single crochet in the next arch.
- Knit a picot of three air stitches again, make five air loops and again a single crochet in the middle of the loops of the arch.
- Repeat the pattern until the end of the row, and at the end of it, make a pair of air loops.
- Start the next row with a single crochet in the first stitch of the base.
- In the column of the previous row without a crochet, knit five columns with a crochet, and in the middle loop of the arch, knit a single crochet.
- After that, dial five air loops and make a column in the middle of the arch loops.
- This is followed by five double crochets to the single crochet of the previous line and a crochet to the acre.
- Continue knitting in this pattern until the end of the row.
- Now dial only four air loops, knit a single crochet column and dial three more air knots.
- Again, make a single crochet into the loop of the arch, dial three more stitches, make a column.
- Repeat the pattern until the entire line is completed.
- Knit a line in columns.
- Repeat in strict sequence the scheme from the second to the sixth row, until the scarf is the desired length.
- On the short side of the future scarf, knit a line by analogy with the second row, but without adding a picot.
- On the long side, make just a row of single crochets.
- Treat all sides in the same way.
- Make 28 chain stitches and insert the hook into the fifth stitch of the chain, knit in semi-columns without a crochet.
- Then knit another 20 air stitches and knit a single crochet into the loop of the arch.
- Continue the pattern until the end of the row.
- Long side tying pattern: three air loops, a pass and a single crochet.
Tie all sides in this manner.
Openwork scarf for beginners (video)
Children's scarf for a boy and a girl
In order to knit a scarf for a child, you need to choose the brightest threads. For a girl, you can additionally add a floral pattern to give a more sophisticated look.
What you need:
- 100 g of yarn;
- hook;
- scissors.

In order to knit a scarf for a child, you need to choose the brightest threads
Progress:
- cast on stitches, the number of which should be a multiple of nine, add seven more.
- Double crochet in the fourth and three subsequent stitches of the chain.
- Skip four stitches and double crochet in the next five.
- Continue the pattern until the end of the line.
- For the next row, dial the chain according to the same principle as in the first line, thread it into the holes of the previous row with a wave.
- Knit a row by analogy with the previous one, but given that the chain was threaded into the holes of another line.
- Changing colors, knit by analogy with the first two lines and all subsequent ones.
Decorate with yarn tassels.
Crochet trumpet scarf
Such an original product can compete with a classic neckerchief.. After all, a scarf-pipe not only warms in the winter cold, but also looks very stylish.
What is necessary:
- 3 skeins of yarn;
- hook number 8.
Such an original product can compete with a classic neckerchief.
Progress:
- With a chain, cast on 136 stitches.
- Connect the last to the first.
- To lift and continue the line, make four stitches.
- Knit the columns, while making a crochet on the stitches of the previous row.
- According to this scheme, knit the entire line and close it in a circle with a semi-column.
- Knit the next row in the opposite direction.
- Alternating direction, knit a scarf of the desired height.
Close the first and last loops, pull the thread and fasten off.
Crochet vivian scarf
A voluminous scarf, for the manufacture of which the largest knitting can be used, looks incredibly impressive. This is not just a winter accessory, but a real decoration that can create a truly perfect image.
Easy and convenient to crochet baby scarves. Do not be afraid to take a crochet hook for the first time: scarves are not so complicated accessories that knitting them causes difficulties. A scarf for a baby is the most rewarding job: it is done quickly and does not require a lot of thread. If the child has grown up, then the yarn will take more, but you can save on openwork patterns or choosing thick hooks for work. "Economical" in terms of time and material costs will be children's scarves-snoods. After all, they do not have hanging ends, on which the threads go, and additional time is spent.
How to crochet a baby scarf - instructions for beginners
You need to start crocheting baby scarves with:
- choice of model and pattern;
- preparation of tools;
- yarn selection.
The choice of yarn depends on the child's susceptibility to allergies. Sometimes it is better to stop at synthetics when the baby complains that woolen things “bite” him. Today it is not difficult to find yarn from bulky fibers that have appeared thanks to space technology. Such threads are safe, store heat well, and are resistant to abrasion. Usually these are acrylic yarns, from which it is convenient to make children's scarves.
You should not immediately start crocheting thin children's scarves, because it is more difficult to work with a small diameter tool for the first time. If you are an experienced knitter, then even scarves with the texture of Vologda lace will be within your power. Beginners should try hook number 3 or 4. The tool number is equal to the diameter in millimeters.
The color scheme for children's scarves is selected according to the tone of the clothes with which the accessory is planned to be used, according to the color of the eyes or hair of the child, etc. A certain color scheme can simply go to the baby: it must be used. Boys should choose either muted shades or bright, but cold ones. Warm colors are great for girls. The most catchy colors can be used in babies' wardrobes when gender differences are not so pronounced.
We knit a crochet scarf for a boy - diagrams and photos
Very practical children's scarves for boys - snoods. These are circular scarves that do not have ends. A boyish scarf-snood is not bad to perform with a relief pattern. This will give the product expressiveness.

You need to start crochet circular scarves with a chain equal to the length of the ring. The chain of air loops closes in a ring, lifting loops are made and the first row is knitted with single crochets. So you can knit several rows. Sometimes it is proposed to knit in a spiral, sometimes in turning rows with the obligatory closure of them in a circle. Having knitted the base of the scarf with several “deaf” rows of single crochets, go to the relief. To do this, alternate embossed double crochets - front and back. You will get some kind of rubber band. The width of the circular scarf will increase. After such a relief “path”, you can make another two to four rows of single crochets, then again proceed to the implementation of the relief elements.

You can diversify children's scarves of this kind by varying the number of rows connected with embossed columns. The relief elements themselves can be staggered or one above the other.
In a similar pattern, you can crochet ordinary children's scarves in width. So that the edge from which knitting began does not look tight, the initial chain should be knitted with a larger hook.
It is good for boys to crochet children's scarves, which are a collar. Usually crocheting is stiffer than knitting, so you need to think about the clasp for the collar scarf. Otherwise, it will be difficult to put on such a narrow scarf over your head.
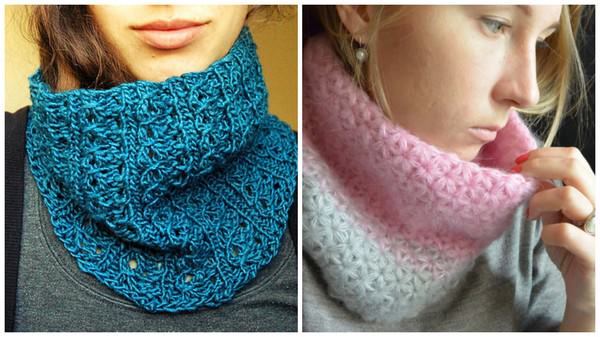
Crochet children's scarf for a girl - diagrams with a description
Children's scarves for girls allow you to express your imagination as much as possible. Circular scarves-snoods will also serve in good stead. They are easy to make beautiful, besides, the child is more likely to lose an ordinary scarf than a collar.


Circular children's scarves for girls can be knitted from threads of several colors. Variants of the spectrum are often exploited, but it is possible to arrange the colors in a contrasting order. Children's scarves look good with a gradient from one bright shade to another, as well as to black or white.
You can crochet embossed children's scarves. We collect a chain of air loops for the base of the scarf. We knit for the estimated length of the product. If our task is to tie a snood to a girl, then we connect the chain and make three lifting loops. The first row of the scarf is knitted with double crochets. Next, we turn the knitting, perform three lifting loops, knit a double crochet, skip two loops of the bottom row, while knitting one air loop, and knit three double crochets from the next top of the column. Again, we skip two columns and at the same time we knit an air loop. So to the end of the row. In the third row, a double crochet is knitted. A loop is skipped at the base, two double crochet stitches are knitted into the next one, then one double crochet stitch, two double crochet stitches are knitted again from one. After - an air loop, then the same expanding triangles are knitted to the end of the row. It will end with two double crochets. The fourth row is made from single crochets alone, similarly to the first. The pattern is repeated. The last row of the scarf consists of double crochets. This is necessary so that the edge does not turn out loose.

Also, children's scarves connected with a mesh have proven themselves well. When crocheting warm children's scarves, it is good to choose a 1 x 1 grid. For the summer version, the step should be chosen larger. The 3 x 1 and 4 x 1 grid looks great. You can diversify such knitting by introducing the checkmark element into some cells - with a certain step. A check mark should be placed in the middle of the cell.

Each new row of cells should be knitted in a new color: this will give originality to the scarf-snood for the girl. The accessory will look complete if it is decorated with a knitted flower, leaves or a bell. It is appropriate to place the muzzle of a kitten, dog, owl, bear cub or bunny on children's scarves. You can also tie a funny bug - as fantasy tells.
If you think that circular children's scarves cannot be decorated with pompoms, then you are mistaken. It is good to put a few small pom-poms along the edge of the snud. You can also decorate the bottom of the scarf with tassels.
Crocheting children's scarves is to hone your own skills over and over again, to invent something new, interesting, beautiful.
An excellent accessory for the clothes of a lady of any age is a home-knitted openwork scarf. Show all your skills in crocheting will turn out when creating such a product. It is worth choosing both the classic options used in Orenburg shawls and stoles, as well as the new, original ones offered by knitters on the Internet. An original, artsy or modest women's scarf in the summer version will become self-expression, and in the winter version it will also warm you well, protecting you from the piercing wind.
Women's openwork scarf - the freshest and most unusual ideas
Today it is not fashionable to hide a scarf under clothes, whether it is “arafatka” or a voluminous snood, it is customary to flaunt it. Let's take advantage of this trend and crochet an interesting openwork scarf. The accessory has the right to be large, covering not only the neck, but also the shoulders, even if worn over a fur coat.
A scarf in bad weather can be used with any item of clothing without regard to style. The openwork version of the product is not suitable for a sporty style, however, it is permissible to wear such a scarf with some styles of down jackets. A felt hat and a drape coat are excellent "allies" of an openwork accessory. A jacket and knitted hat in the same style is not the only option: a scarf will become a stylish headdress when made like a snood. When this attribute is worn over clothing, it is easy to combine with a hood.


An openwork scarf with a summer or demi-season cardigan will not be superfluous. Do not be afraid that all products will turn out to be knitted: they can really be combined beautifully with each other. The play of color is important here - contrasting or matching.


An aged lady may well combine an openwork scarf with a pillbox hat, a fur hat, and a beret. It’s nice to throw such an accessory over a knitted dress for warmth.


How to knit an openwork scarf - diagram and description
The advantages of openwork scarves are that they are quick to knit. The thinner the accessory, the more airy knitting, the faster it will be possible to cope with it. Naturally, it is most convenient to knit an openwork crochet scarf. Finding patterns for this is not difficult, the main thing is to figure out where to start knitting a scarf. Even openwork products can be warm, they will require woolen or mixed threads. Summer scarves can be made from cotton or fully synthetic yarn. In air accessories, the use of lurex and other decorations is encouraged.
Knitted women's scarf
An interesting pattern will turn out with a warm scarf if it is done with a snake. The pattern begins with a chain, however, after knitting 10 loops, you begin to connect the next four loops with the beginning of the chain with double crochets:
- The 11th loop is connected to the 4th;
- 12th - from the 3rd;
- 13th - from the 2nd;
- 14th - from the 1st.
Six loops of the chain remained free. Now, on the other hand, we knit 6 air loops and from the 7th we begin to connect in a similar way. You get two arches from different sides of the work. We perform the entire sequence several times until we get the width of the scarf. This is where the turning element starts. First, three lifting loops are made. Then an additional ring of thread is made, large enough to string 8 loops on it. The loops of the lifting chain are passed into this ring. You can fasten them on it and add three more loops. We connect the loops with the previous columns, first with a half-column, then with a column, then with two columns with a crochet. Thus, through the ring, we knit three elements from chains and columns, getting a turn. Next, knit in the opposite direction to the other edge of the scarf. We perform the turn again, etc.

Such a scarf will have not only an interesting texture, but also unusual embossed edges. So you can crochet an openwork scarf, and even a stole. To get a snood, it’s easy to guess how best to loop a snake pattern.
Openwork summer scarf
The original openwork scarf will be crocheted using an additional device. They can be a wide range, a medical spatula for examining the throat, or a discount card. First, an additional tool must be tied with a thread of the same color. As you work, you can carefully lower the loops from it, knitting a “snake” the length of a future scarf. Set aside the finished “snake” and knit a similar one in a different color. Crochet alternately need to twist ten or more long loops of each of the snakes to get a semblance of a braid. On one of the sides, loops are again typed in the third color - with an additional tool strapping. "Oncoming snake" is knitted separately, as in the first case. Next, a similar weave is performed. So it is worth continuing until you reach the desired width of the scarf.

Alternatively, some other openwork pattern can be knitted between the two-color braids, which will give originality to the idea of \u200b\u200ba summer scarf.


 Pattern "Gossamer"
The classic version of a weightless summer scarf is crocheted “pineapples”, “shells” and “cobwebs”. In order for the scarf to have interesting symmetrical edges, knitting must be started from the middle, knitting a chain that is a multiple of 40 loops. The second row is arcs of 7 air loops, periodically attached with single crochets to the initial chain with a step of 4 loops. In the second row, a “shell” is knitted from every fifth arc: seven columns with two crochets. The remaining arcs are knitted in a checkerboard pattern. Between the "shells" there should be three arcs. In the third row, “shells” are performed as follows: * double crochet, air loop * - 6 times. At the end of the shell, after the 7th column with two crochets, the air loop is not performed, since there is a column for capturing the lower arc. In this row, only two arcs are performed between the shells. In the "shells" of the fourth row, two air loops are already being made between the columns with two crochets. Between the "shells" there is already one arc left. The fifth row is a border of "shells". There, 5 double crochets are knitted from two air loops. And between them - a single crochet is knitted at the top of the double crochet. The only arc of the previous row is captured by a single crochet - the only element between the shells.
According to this principle, one half of the openwork scarf is crocheted. Then you need to return to the original chain and tie the same thing in the other direction. Then you get a ready-made scarf for the summer.
Video: crochet openwork scarf for beginners
Also on the network you can find many video tutorials on how to crochet an openwork scarf for beginners. If it’s hard to immediately take on the execution of “shells”, then you can make an elementary air scarf from arcs alone. It is not bad to create an openwork scarf from round arc motifs, combining them together. Each element is knitted separately: a ring is typed, tied with a row of single crochets, then arcs are knitted. Each arc consists of a chain of air loops, ending with a single crochet, knitted into the base. With each row, the length of the arc increases proportionally so that the motif is flat.

Otherwise, the openwork scarf will not come out flat, and such a product may look ugly.