DIY wedding card quilling. Wedding quilling: invitations. Master class. Happy wedding day card using scrapbooking technique
Handmade crafts are priceless, because they are made with love, they contain a piece of the master’s soul. That is why many of us strive to present our family and friends with handmade cards, souvenirs and gifts rather than purchased ones for any holiday. The quilling technique is an excellent assistant in this matter. >>
Works using the quilling technique are distinguished by their grace and beauty. They can be either flat or three-dimensional, which makes the composition “alive” in its own way. A postcard made using the quilling technique for your wedding day will help you make sure of this. In practice, you can see that you can do this kind of work yourself in a few hours. But this particular card will bring maximum pleasure to its owners, warming them with the warmth and love of your work.
For work you will need:
- Colored double-sided cardboard (yellow and pink)
- Quilling strips (3 and 10 mm wide)
- Quilling tool (can be replaced with an orange stick)
- Scissors, regular and curly
- PVA glue and stationery glue with glitter
- Congratulatory speech transferred via printer to paper
Making a postcard:
First you need to decide on the shape of the postcard. In our case it will be rectangular. Therefore, we take yellow cardboard as a basis and fold it in half in the center of the sheet. We cut out a square from pink cardboard and paste it directly in the center of the front of the future postcard.

Using a blue quilling strip 10 mm wide, we go over it (right in the middle) with curly scissors. In this case we get 2 identical curly stripes. Glue them along the edges of the pink canvas - top and bottom.

We print out the inscription “Happy Wedding Day” on white paper, cut it out with curly scissors and glue it onto yellow cardboard. We cut it out again, leaving a yellow edging around the inscription, and glue it onto the pink canvas. We place the future postcard under a press (you can put it in a thick, heavy book) so that the glue dries well and the card does not become deformed.

Now let's move on to quilling. We roll loose rolls with a diameter of 15 mm from strips of yellow and pale light green flowers. We glue the edges. Number of yellow rolls - 6 pcs. (give them the shape of a drop), green - 6 pcs. (drops) and 12 (crescent shape).

We roll roses from strips 10 mm wide: we begin to wind the roll onto the tool as usual. Then, after twisting 10-15 mm from the edge, bend the free strip at an angle of 90 degrees and continue twisting. Using the same pattern, we twist the rosette to the required size, and glue the edge, preventing it from unraveling. We twist roses of different colors and different sizes.


From the crescent rolls we begin to form flower petals 6, glue them together in pairs, getting 8 petals.

Glue the petals onto the card sheet and place the rose in the center.

Next to the complex flower we place a simple one: we glue drop rolls onto the canvas.

Using the same pattern, glue all the details of the postcard.

From rich green strips 3 mm wide, we twist loose rolls with a diameter of 20 mm and give them the shape of an eye.

Glue these eyes onto the postcard canvas, imitating leaves.


Apply glitter glue to matching card elements.

On the spread of the card we place a congratulatory speech, printed on pink cardboard and cut out with curly scissors.

Don’t forget to carefully glue it and press it with a press so that the paper does not deform.

Let the card dry thoroughly, after which you can safely present it as a gift.


Happy creativity!
The master class was prepared by Yulia Agalakova
AnapaMama.ru
Thoughts about what to give the newlyweds begin to worry the invitees immediately after they receive invitations to the wedding celebration. You can give a gift to the newlyweds yourself, and you won’t have to waste your free time looking for a gift. The most original gift can be DIY wedding cards. How to make such a postcard will be shown in master classes.

Materials for making cards with your own hands
To create greeting cards for your wedding day, you need to have the following materials on hand: thick paper (usually 2-3 sheets are needed per card), a stationery knife, half beads of different sizes or beads, satin ribbons, rhinestones, and other decorative elements depending on what is planned depict it on postcards (wedding-themed plot or pattern). Postcards are made using various techniques, for example, quilling and scrapbooking. Everything you need can be purchased at stores selling arts and crafts supplies.


Postcard – envelope for money
A gift for newlyweds that you can’t go wrong with is money. Make an envelope where you can put money. Such an envelope is easy to make using the scrapbooking technique. To make a postcard or envelope you will need scrap paper, satin ribbons and other decorative elements.
You will need the following materials:
- Double-sided scrap paper with a wedding-themed pattern
- Creasing tools.
- Cutter, mat
- satin tape
- Double sided tape
- Decorative elements.
Let's get to work:
- Place colored scrap paper on the mat, cut out a square with sides of 28 cm. Cut in half diagonally.
- Mark the folds indicated in the photo with a pencil.
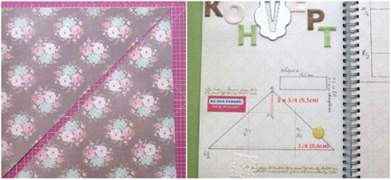
- We cut two thin strips of tape measuring 0.5 cm and glue them onto the resulting triangles.

- Fold a line along the base of the envelope. We glue tape on it. The protruding edges must be cut off.
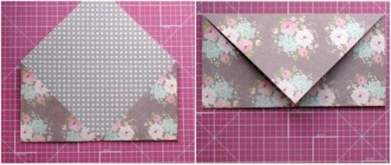
- The sides of the envelope must be folded and the top line and base secured. If everything is done correctly, the envelope will turn out neat and even.
- We glue a satin ribbon 45 cm long onto the tape so that it goes around the envelope from the back and front. A card will be tied to the free edges of the ribbons that remain.
- The envelope can be decorated with beads, hearts, and other decorative elements
- Additionally, you can make an insert for congratulations. It can be decorated with drawings. The money envelope is ready.

Wedding invitation card
In preparation for a wedding celebration, everything should be carefully thought out. Once the wedding date has been confirmed, you can start compiling a guest list and then sending out wedding invitations. You don't have to buy invitation cards. A master class on creating such a product, which is given below, will allow you to make a postcard yourself.
Necessary materials:
- Thick colored paper - 2 sheets
- Cattle two-way
- Ribbon,
- Beads,
- Printer
- Stationery knife,
In order to make a postcard you need to do the following:
- Cut out a square with a side of 12 cm (for the outside)

- Cut out a card of the required size from a sheet of paper and apply a pattern. You can draw it, or select the necessary drawing on the Internet and print it.
- We divide the postcard into three parts: the name of the guest to whom the postcard is addressed should be written on the left, and the text of the invitation itself should be written in the middle. Since the paper is quite thick, it is better to use a ruler to bend it.

- Cut 2 strips of tape approximately 16 cm long. Glue the strips to the base as shown in the photo.

- Now, using glue or double-sided tape, glue the postcard onto the square.

We string a bead onto one of the ribbons. We tie the ribbons into a bow. The invitation card is ready.

Invitation card options
Here are some options for invitation cards:
- An original and beautiful postcard - the invitation will come out in the form of a scroll. To make them look like antique ones dipped in strong coffee or tea, you can scorch the edges with a candle flame. You can put wedding symbols on the scroll: rings, hearts, figurines of the bride and groom. The scroll can also be decorated with lace, beads, and ribbons.

- Guests will undoubtedly appreciate invitations in the form of a poster. You can make such an invitation yourself or order it from a printing house. You can place funny, interesting photographs from your personal archive on the poster. After the poster is printed, it must be placed in an envelope and sent to the addressee.

- Invitations can be made in the form of chocolate packaging. To do this, you need to purchase chocolates according to the number of guests, and change the factory packaging for packaging with an invitation.

Video selection on the topic of the article:
A wedding celebration is an event that everyone looks forward to: the newlyweds themselves, their relatives and friends. Relatives of newlyweds, as a rule, spend a lot of time choosing a gift, a holiday bouquet and a postcard where they write wishes to the newlyweds. Not a single congratulation is complete without the last thing, and therefore the invited people always go to specialized stores in search of it. An alternative to this is making an original postcard with your own hands. Let's figure out how to make a greeting card yourself.
How to make a beautiful wedding card with your own hands?
If you decide to make a card for the newlyweds with your own hands, there is no doubt that it will be treasured by the newlyweds, because such gifts are valued much more than purchased ones. Thick paper or cardboard is used as its base and decorated using a variety of techniques - scrapbooking, quilling. Decorate a wedding card with rhinestones, beads, ribbons, lace, dried or artificial flowers, drawings, patterns. The master classes below will help you create an original product that the heroes of the occasion will love.

Greeting card using quilling technique
Quilling or “paper rolling” is a technique used in many areas of needlework. Craftsmen create greeting cards by folding and rolling narrow strips of paper. They are also used to make photo frames, albums, jewelry, and paintings. Thanks to a large selection of paper of different colors and weights, you can easily find materials that are ideal for designing a wedding card.
Necessary materials
- A sheet of thick white paper (or another light shade).
- Sheets of thin paper that will be needed for rolling the “rolls”. You can use special quilling kits, which include the original material, already cut into thin strips. In this case, the postcard making process will go much faster.
- Scrapbooking paper with patterns or designs that match the color.
- Satin ribbons.
- Beads pre-cut into halves.
- Pencil.
- Scissors.
- Ruler.
- Stationery or other knife.
- Paper rolling tool. This part can be replaced by toothpicks, matches, and empty ballpoint pens.
Stages of creation


Happy wedding day card using scrapbooking technique
Greeting cards made using the scrapbooking technique turn out cute, airy and touching. Such cards can be minimalistic, using only two or three colors and a small number of decorative elements. It is extremely important for scrapbooking to correctly combine shades, patterns and designs on scrap paper so that the finished product does not turn out to be too tacky. The harmonious selection of details of such a postcard guarantees its magnificent appearance.
Necessary materials
- Thick paper or sheet of cardboard (A4 format).
- Two sheets of scrapbooking paper, matching colors.
- Stationery knife.
- Scissors (curly ones can be used for edges).
- Ruler.
- Double sided tape.
- Glue.
- Lace.
- White satin ribbon.
- A decorative “bouquet” that must first be made independently or purchased in a specialized store.
- A small printout with the inscription “Happy Wedding Day!”
- Halves of pearl beads.
Stages of creation


Postcard in the form of an envelope for money
An excellent gift for newly-made spouses is money. Newlyweds have a lot of expenses at the beginning of their married life. There are many options for wedding cash envelopes on the shelves of souvenir shops, but it’s even better to make such a thing yourself. In addition to the gift amount, guests can include a card with congratulations. Let's look at how to make a wedding envelope using scrap paper, satin ribbons and other beautiful decorative elements.
Necessary materials
- Double-sided scrapbooking paper with a matching design.
- Creasing tool.
- Mat, cutter.
- Satin ribbon (organza ribbon will do).
- Curb hole punch (stationery knife).
- Glue.
- Double sided tape.
- Decorations.
Stages of creation


DIY wedding card ideas
When making a wedding card yourself, you can safely experiment with shape, size, and colors. The main thing is that all elements of the greeting card look appropriate and harmoniously combine with each other. Rectangular, square, round cards, products in the shape of a heart or two doves look good. Check out the photos below for some fun wedding card design ideas.
In the form of a bride and groom's outfit
Decorating a wedding greeting card with the outfits of the bride and groom is a cool and unusual idea that the newlyweds will definitely like. To make such a product, paper, satin, lace, chiffon fabrics, various beads, decorative flowers, and quilling rolls can be used. Two gold rings will look good.

Heart shaped
The heart shape is perfect for making a wedding card. This is a symbol of sincere love between spouses. The greeting card can be created in the shape of a heart, decorated with one or more such elements. This version of the card will look good in red or any other color that matches the theme of the celebration.

Bouquet of flowers
Delicate flowers are an excellent solution for decorating a wedding card. This could be a small bouquet, as in the master class above, or a real “flower meadow”. As decorative elements you can use natural dried flowers, artificial plants, paper elements, flowers made of polymer clay, fabric or plastic.

Video: master class on making a wedding card
Creating a wedding card for newlyweds is a fascinating process that will bring pleasure to the giver, and subsequently pleasant emotions to the newlyweds. To make a truly beautiful greeting card and not miss anything, watch the video master class below with detailed step-by-step instructions. The presenters will help you create an elegant beige and snow-white card using thick paper for the base, elegant lace, satin hearts, a voluminous butterfly painted with gold paint, ribbon and a small piece of paper with an inscription for decoration.
Hello, quilling lovers! Making a card - a DIY wedding card - is a very fun activity. Using paper strips you can create a unique work of art. A homemade wedding card will be a unique gift that will warm the soul of the recipient. After all, a handmade wedding card contains everything gentle and kind from its creator. Autumn is the season of joining two loving people into one family. And it was precisely for these wonderful holidays that I wanted to make a wedding card with my own hands using the quilling technique. I placed two hearts in the center of the ring of roses, thus showing a single whole and indestructible feeling of love. Making a wedding card with your own hands is very simple. Use my master class - a DIY wedding card using the quilling technique with a detailed description and step-by-step photographs of production.
Materials:
- Paper ribbons 7 mm, length 29.5 cm, density 80 g/m: white, red and pink
- Paper ribbons 3 mm, length 29.5 cm, density 80 g/m: dark green and light green
- Paper ribbons 1.5 mm, length 29.5 cm, density 80 g/m: yellow
- Scissors
- Quilling ruler
- PVA glue
- Glue gun
- Twisting tool
- Pink cardboard
- White cardboard
- Scrapbooking paper
- Pink self-adhesive openwork tape (width 1.5 cm)
- Double-sided tape
- Two hearts
- Inscription
- White paper napkin (diameter 90 mm)

Cut out a 19.7 x 23.7 cm rectangle from cardboard. Fold it in half.

Cut out a 19.7 x 2.5 cm rectangle from scrapbooking paper.

Glue the rectangle with double-sided tape.

Cut out a 17x20 cm rectangle from white cardboard.

Glue the rectangle with double-sided tape. We also glue a pink lacy ribbon.

Cut out a 1.5 x 19.7 cm rectangle from scrapbooking paper.

Cut out a 15.7 x 20 cm rectangle from scrapbooking paper.

We glue the scrapbooking paper with double-sided tape.

Glue pink lacy ribbon around the scrapbooking paper to the front of the card.

Take a purchased white paper napkin (diameter 90 mm).

Glue the napkin to the front of the card.

Take two wooden hearts, pink and red.

Glue the hearts with a glue gun as in the photo.


We make the leaves into a droplet quilling element from light green paper ribbons 3 mm wide (the diameter of the loose roll is 9 mm).

We also make the leaves into a quilling element using a droplet of dark green paper ribbons 3 mm wide (the diameter of the loose roll is 10 mm).

We roll the daisies into a roll from half a yellow ribbon 1.5 mm wide and half a white ribbon 7 mm wide with cut fringe.

From ready-made flowers and leaves we glue a ring around the hearts as in the photo.

We cut out the inscription from prepared phrases on sheets of scrapbooking paper. You can, of course, print your phrase on a printer.

Attach the inscription to the bottom of the card with double-sided tape.


Your DIY wedding card using quilling technique is ready!
Make cards with your own hands and give joy to your loved ones.
Thank you for your attention!
A wedding is usually called the sacred sacrament of uniting two people into a strong family. This event is awaited not only by those getting married, but also by their relatives and friends. Holiday guests, as a rule, choose not only a gift for the newlyweds, but also flowers and a postcard. Wishes are written in a wedding card in prose or poetry. It is probably impossible to imagine a single wedding gift without a card. You can buy a similar item at a book and souvenir store. You can create your own wedding day cards at home without much effort. Many people are interested in making cards for a wedding or anniversary with their own hands; templates are presented in all their variety.
Ways to create a homemade postcard
The main advantage of the postcard, which is made with love with your own hands, is memory, creativity, love, as well as a piece of the soul of its performer. Agree, not a single printed publication can boast of such advantages. DIY wedding anniversary cards can be made from cardboard or thick paper. But you can design a postcard using:
- Applications.
- Quilling.
- Scrapbooking.
To decorate homemade congratulations use:
- Various designs and patterns.
- Beads and rhinestones.
- Lace and ribbons.
- Dried or fresh flowers.
Making a gift using quilling technique
Quilling is used not only to design postcards, but also to create unique paintings or decorate gifts, photo albums, and jewelry. Using rolled pieces of paper, you can create a creative greeting card. It will be one of a kind and will certainly appeal to young people. As for materials for work, modern stores offer a wide range of paper of different densities, textures and colors. There is room for your imagination to run wild.
To make a greeting product you will need:

Work progress:

Such greeting cards turn out to be touching and very cute. Such cards can be made of several colors and decorated with a small number of elements. Scrapbooking involves creating a product in a discreet style. To do this, you need to select the details wisely.
To complete the work you will need:

Work process:

DIY money envelope
Money is considered a good gift for newlyweds. At the beginning of their life together, young people will have to spend a lot of money to improve their everyday life and organize a wedding celebration. Of course, you can find many envelopes for money on the shelves of supermarkets and bookstores, but it is better to make such a congratulatory element yourself. The envelope may consist of a greeting card and cash. This envelope can be made using scrapbooking paper, beads, lace and other decorative elements.
So, To make a money envelope you will need:
- Double-sided paper with a pattern for scrapbooking.
- Cutting and mat.
- Organza or satin ribbon.
- Stationery knife.
- Glue.
- Scotch.
- Various decorations.
Work progress:

With such a beautiful card given for a wedding or anniversary, your gift will definitely not go unnoticed.