Romanian lace patterns in full size. Crochet Romanian lace: knitting technique, life-size patterns, MK video. Little lace leaf
Every craftswoman who knows how to knit wants to create works of stunning beauty. And, perhaps, any of them knows that there is such a unique technique as knitting Romanian lace. But not everyone, even recognized masters of knitting, dealt with this technique. However, many had at least once an irresistible desire to try their hand at this type of needlework. Therefore, dear needlewomen, a master class with patterns for beginners is presented to your attention.
Crochet Romanian lace: weaving a cord
Since Romanian lace is based on the technique of lace lace, we propose to start by considering the methods of weaving cords necessary for the execution of this type of knitting.
For our cord we need:
- hook;
- threads (cotton is best).
1) To get a simple caterpillar cord, we perform the following series of actions: 

This type of cord looks good both from cotton, and from silk, woolen and mixed types of threads. This cord is considered the main one and is most often used in the manufacture of products using the Romanian lace technique.
2) Another version of a simple cord that can be done like this: 

3) To get a more complicated, openwork cord, we follow the following instructions: 

Such cords have many modifications, for every taste, and have a good basis for the flight of fancy of any needlewoman.
4) There is also a technique for making a cord, which in itself is a lace pattern.  It is performed as follows:

Making lace
Romanian lace is also referred to as coupling lace, and all due to the fact that the intended pattern of the desired pattern is laid out with a home-made cord along the contour applied to the fabric for convenience, and inside it is filled with various couplings and patterns that are made with a needle.
So, we already have a cord. Let's move on to knitting the lace itself.
For work you will need:
- embroidery needle (with a thick eye to pierce the cord without any problems);
- sewing needle (for attaching a basting);
- any durable fabric (for the backing);
- pencil (to transfer the desired lace pattern to the fabric);
- we knitted cord;
- threads (preferably a much thinner diameter than those used to make the cord);
- the threads are thick, of a contrasting color with respect to the future lace (to secure the cord along the contour of the future embroidery).
Crochet Romanian lace: a master class with photos
You can move on to the full-fledged production of Romanian lace, and the Romanian lace master class will help beginners in this technique.
Little lace leaf
 Flower in the technique of Romanian lace
- We draw the cord to the contour of the future lace applied to the fabric


- Repeat the same steps with other petals
- We finished with the petals, we admire the result

- Filling the center of the flower


- We detach the resulting flower from the fabric by cutting off the basting

Using the Romanian lace models and patterns, we move from simple lace products to more complex ones. For example, to the manufacture of lace napkins.
Beautiful napkins in Romanian


Also one of the most simple techniques fillings most commonly used by craftswomen:

- Beautiful edging lace patterns

Now we have an idea of how Romanian lace is knitted and we understand that their diversity has no limits. Romanian lace is a great way to apply all the immensity of the needlewoman's imagination in practice!
Crochet Basics
Romanian lace refers to traditional ways making decorative fabrics. Along with tatting, Irish and traditional lace, crocheted, this technique is extremely popular.
What is Romanian lace
The Romanian technique of making lace is also called "lacing". The reason is that the crochet cord becomes the main element for creating compositions.
Laid out and fixed in the desired sequence, it is complemented by openwork fragments made with a needle. In this way, webs of various configurations and degrees of filling are obtained. Often, lace lace includes elements associated with berries, voluminous or flat motifs.

The classic use of Romanian lace is in the manufacture of napkins, tablecloths, curtains and similar interior items. Also, Romanian made, as a method of making collars, bags, belts, vests, boleros, skirts, has become quite widespread. Often, when creating clothing models, it is combined with some other techniques. This is due to the fact that Romanian lace has a rather high density and stiffness. And these qualities are not suitable for all types of clothing.
A favorite technique of many craftswomen was the equipment of products with openwork inserts, wedges and coquettes.
Cord weaving
To create Romanian lace, the most popular cord is called "caterpillar". Its weaving is not difficult, however, it is required to strictly follow the instructions given in the diagram below.

The correct sequence of actions will allow you to get the cord of the required shape. A feature of weaving is the constant turns of the report.
Romanian lace can be made on the basis of cords of other shapes: wider, flat or convex. Schemes for their manufacture are easy to find in specialized publications.
Cord Methods
The cord is knitted in two ways:
- No thread break. A long finished cord is wound into a skein.
- Measure the length of the fragments and knit them according to the pattern.
When choosing the first method, you need to take into account that in the process of work the cord will have to be cut. In this case, it is impossible to measure the length of the fragment end-to-end. Leave a margin to unravel a small section of the cord and use the resulting piece of thread to sew parts.
Following the second method requires the craftswoman to accurately measure the fragments. Or she can knit sections of the cord a little longer than the required size, so that it can also be loosened a little and adjusted to the scheme.
Romanian lace for beginners: the principle of creating a canvas
To get a lace element made in accordance with all the rules, it is necessary to follow the generally accepted technology:
- The drawing, which will serve as the basis for the ornament, is applied to the fabric (you can use the old one). Then a cord is pinned to this blank. Some craftswomen recommend drawing or printing a pattern on paper, covering it with transparent polyethylene, and then laying out and fixing the cord. Polyethylene is needed so that light yarn does not get dirty on the pattern.

- Attach the cord to the fabric with a contrasting thread. However, colors that are too dark should not be used, as after removing these rough fasteners, lint may remain on the light cord.
- When the main contours of the pattern are laid out, you can proceed to stitching the ends. Accuracy in the execution of all stitches distinguishes really high-quality Romanian lace. Schemes can be simple or consist of a large number of elements.
- Matching the edges of the cord is done end-to-end, not overlapped. All seams must be very strong.
- Having taken care of the correct connection of the main elements, you should proceed to embroidery. For convenience, the drawn filled Romanian lace (diagrams and sketches) can be immediately marked on the fabric.
- Embroidery is done with a thread of the same color as the cord, but a little thinner. It is tucked into a needle and a lacy filling of the gaps is created by attaching them to the turns of the cord.
Specificity of needle lace
The most frequent and convenient for creating lace lace are the following:
- Darning.
- Scalloped.
- Cardone seam.
- Nodular.
- Looped.
To get a really beautiful Romanian, you should draw, taking into account the thickness, composition and density of the thread. Otherwise, the filling of the gaps will be loose and unstable or excessively dense.
When making seams with a needle, you should avoid pulling the threads too tight, otherwise the shape of the lace will be deformed. The same thing happens when there is insufficient tension: the threads sag, and the cord does not hold its shape.
Shutdown
It should be noted that all the work described above is carried out according to wrong side canvases. Therefore, when all the activities are completed, you can take out the pins and draft contrast thread, and look at the front side.

You should carefully examine what happened, and check if there are too large gaps. They are undesirable because of the possible sagging of the cord in this place. If, however, flaws are found, they should be eliminated, and all tips should be firmly sealed.
To give the product perfect look Other improvements may be required, but the end result is worth every hour spent.
Romanian lace will look more impressive and even if starched.
It was Romanian lace that distinguished its country from other countries, but in order to start working with this lace and do wonderful work, you do not need to immediately go to Romania. You can make interesting and unusual products with your own hands, the main thing is to be patient, because the result is definitely worth it. Not only Romanian lace, but also other similar products, for example, Hungarian lace, or Vologda lace, captivate with their beauty, attract and sharpen everyone's attention. I really like to watch video tutorials on creating lace and a variety of new items that craftswomen generously share on the Internet.
Such laces have long been considered decorations and do not cease to please people. There are many different ways and techniques to create lace, such as whooping cough or shuttle weaving, knotted macrame or simple knitting, fork or crochet. Our instruction is devoted to the creation of corded Romanian lace, which is often used to create floral motifs, leaves and butterflies.
What materials and tools will we need to work.
In order to create Romanian lace, you need to prepare special tools and materials:
- Durable fabric.
- Thick and thin threads with one shade.
- Crochet hook.
- Needle for embroidery with a thick eye.
- Sewing threads of a similar color as for making a cord.
- Needle for sewing.
- Sharp scissors.
- Thimble.
First you should take a drawing to create a thing, for a beginner in this business, it is best to take a simple napkin
. You can choose a picture or come up with your own. You can take the following ready-made specimens, for example, cutwork or a pattern for bobbin lace.
If we do the drawing ourselves, then it is worth considering the width of the finished cord, and put the picture on paper. When the image is ready, the paper with the image, fabric and polyethylene are combined, this will help protect the cord from contamination.
Romanian lace patterns, mk.
You can tie a cord different ways . In the first option, you can make a very long cord, which gradually winds up into a ball as you knit, and in the process of work it needs to be cut in certain places, where necessary, in accordance with the image.
We do the circumcision with a small margin of cord so that it can be unraveled and with these threads we connect the details of the lace in some places. In the second method, we immediately make a cord of the desired length, in the process of this we constantly apply it to the image and work according to the scheme. Many craftswomen choose the second option for creating lace, because this way the work seems more exciting.
After preparing the cord, it is attached to the fabric, in accordance with the outline of the pattern. You need to sew it firmly to fix it firmly. Important! The last particles of the cord are sewn together at the junction; they cannot be superimposed on each other.
In the process of work, unlike the ends, the cord can intersect, making, in this way, different curls. Therefore, at the intersections of the product, it is sewn with the same threads, firmly and imperceptibly.
At the end we do embroidery.
Gallery: Romanian crochet lace (25 photos)


Lace lace master class and detailed description
 Romanian lace is lace lace. The lace is crocheted. The lace is quite beautiful. Lace, because in the manufacture of this lace, different cords are used, which are placed on the pattern.
One of the popular cords that is used in the manufacture of Romanian lace is caterpillar cord.
Some parts in Romanian lace are interconnected. Brides created with a needle are used to connect these parts. And the empty spaces between the details of the lace are also filled with a needle.
Step by step creation process and description:
- Step 1.
First we need to find an image for our future thing. For the first time, you can take a regular napkin. You can come up with any drawing, you can take samples for cutwork or chips for bobbin lace.
- Step 2.
After choosing a pattern, we sew together the fabric and paper with the image, and then the polyethylene.
- Step 3.
We start knitting a cord. There are two options for the process itself. You can create a long cord by winding it into a ball as you work. When you tie a large ball, and you start sewing the lace to the base fabric, it will need to be cut in one place according to your image. It is necessary to cut off with a certain margin in length.
Another way is to create a cord of the desired length at once, periodically applying it to our pattern.
Now for the strings:
The most commonly used cord, known to everyone with the name "caterpillar". The second type of product is the "wide caterpillar". They knit it in much the same way as a simple caterpillar. The main difference is that an ordinary caterpillar is knitted on two loops, and a large caterpillar on three loops. Before connecting the two side loops together, we make a regular column for both walls.
These two cords are quite enough for laying out the image itself. For tying the finished thing, you can use all openwork cords.
- Step 4.
You need to sew quite firmly so that the cord is fixed. Remember, the ends of the lace are never laid on top of each other, they are joined end-to-end.
We may be indebted to Romanian lace for the glorification of our country, but even better is the fact that you can learn this type of needlework not only in Romania. In our article we will talk about Romanian lace, for beginners step-by-step instruction below will be very helpful.
You can create interesting, unique products yourself, but this will require a lot of patience. We can definitely say that the time and effort spent is worth it to admire the result. This needlework technology appeared a long time ago and has been pleasing others with amazing decorations for decades and even centuries. There is more than one method by which you can create lace, one of them will be shown in our master class.

Historical facts
The information that has come down to us from our ancestors tells about the extraordinary Romanian products that were used to decorate houses, household items and clothes. This diversified houses, women's outfits, added sophistication and beauty. Each lace was made by hand, so the product was considered completely unique. The craftswoman first wove the threads at home, and then proceeded to create lace.
Today, you can no longer waste time creating threads, because they are sold in large quantities in specialized stores and there will be no problems with the choice. If you are interested in the classic look of the product, then it comes in tapestry, woven lace or flower-like shapes.
For manufacturing, both before and now, a certain canvas is used, either nylon or canvas, the main thing is that there is no pattern on it. The choice of color combination is a separate matter, you need to take into account the bulge of the forms, the pattern, the desired realism, all depending on the chosen scheme and model.
Before starting work, the canvas was processed so that it would not decrease after work was completed. If the pattern was made on a tapestry, then a non-standard needle was used, which had a large eye. Of the threads, floss is excellent both in thickness and quality. Weaving methods are completely different - from bobbins to macrame and crochet.

Few features
As you can see in the video, lace is used to make Romanian lace. An ordinary needle connects the contours with the help of hitches or various elements. Therefore, we can say that Romanian lace products are called coupling.
Particularly attractive is that finished goods quite voluminous, it depends on the particular model. Some use linen, silk, wool, or even cotton and viscose threads.
Crochet cord, it is quite simple and fast. If you take a larger hook, you will end up with voluminous lace. Even the fact that Romanian lace is a bit heavy in finished form does not change the fact that it looks elegant and elegant in the interior. In a house with such interior items, a warm and romantic atmosphere is created.
To make clothes from such lace, some knowledge and skills are needed. But if you decide to make yourself some piece of clothing the first time, having tried, you will succeed.
Lace is used to create various designer items, such as clothes, bags, napkins in this technique also look cool.
A simple lesson
We will bring to life the original model with a clear technique. Step by step, we will begin to disassemble the sequence of actions from the very beginning. We will make the product, as in the photo:

To begin with, we will make a dummy of fabric in order to approximately understand how the finished product will sit.
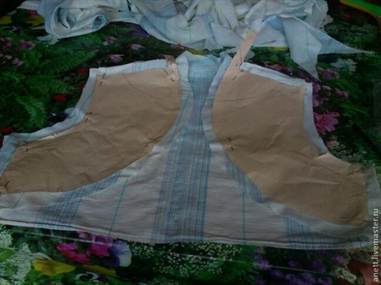
For work, we need a cord, from which the product, fabric, threads, needles and a hook will be weaved. This thing is not made in one piece, but in parts, and then sewn together.

You can search for any ornaments that you like on the Internet or books and use tracing paper to translate it, and then on the prepared canvas we lay out the appliqué in shape with a cord and fasten it with pins.

The cord is completely sewn to the base. You can make the first element just for testing.

It is most convenient to work with the hoop. If you have been embroidering, then these hoops are perfect for you. The main thing is that they keep the fabric in the right tension.

With a thread, the cord is sewn onto the canvas exactly according to the pattern.


And so gradually fill the entire figure.


In total, you get 12 finished parts of the same size, and one for a larger back.


 Romanian lace from Natalia Sazonova.
Link
Romanian lace from Natalia Sazonova.
Link
Blog
Album 
Lace, made on the basis of a knitted cord, is called lace, or Romanian, because it came to us from Romania
To make lace, you must have:
1.Durable fabric. The fabric may not be new. The main requirement is strength. It is better not to take a very thick fabric, as it will be difficult to work with it.
2. Threads like "Iris", "Chamomile", "Snowflake". It should be noted that for knitting a cord and for subsequent embroidery, threads of different thicknesses are needed: thicker for a cord, thinner for embroidery. The color of these two threads should be the same.
3. Knitting hooks No.; 1.0
4. Needle for embroidery. She should not have a very thick eye so that it is easier to pierce the cord.
5. Sewing threads in a contrasting color for basting the cord. It is advisable not to take black or other dark colors, which may shed on your product.
6. Needle for sewing.
7. Small scissors with sharp tips.
8. Thimble.
Step one
First we need to find a pattern for our product. As a first experience, there may be a simple napkin. You can come up with a pattern yourself, you can use samples for cutwork or chips for bobbin lace. If you draw the sketch yourself, then you need to take into account the width of the finished cord. Drawing is applied to paper
step two
So, we already have a drawing.
We sew together the fabric paper with a pattern and polyethylene (so that the cord does not get dirty from the paper during work)
Step Three
We begin to knit the cord. There are two ways of the process itself. You can knit the cord very, very long, winding it into a ball as you knit. When the big ball is knitted and you start sewing the cord to the base fabric, it will need to be cut in the right place according to your pattern. You need to cut it off with a small margin in length, in order to slightly unravel the cord and sew the cord in the right place with the formed tip of the thread.
Another way is to knit a cord of the desired length at once, periodically applying it to your pattern. Personally, I like this method more, because the work becomes not so monotonous, as if you first knitted the entire cord, and then did everything else.
Now for the strings:
Basically, a cord is used, known to everyone as a "caterpillar".

First we knit a caterpillar cord


Here is the diagram of our butterfly

For work we need: a piece of fabric-drawing on paper and a piece of polyethylene

We sew it all together

Now we sew our cord strictly according to the pattern and it is desirable to make smaller stitches so that the cord is sewn firmly. This is necessary so that when we embroider, the pattern is not deformed

This is how it should turn out. 
We fix the end of the thread and sew the ends with it

Getting started with embroidery

Embroidery samples. Embroidery can be done any way you like. 
Here is our almost finished product.

Now we need to separate the tissue-paper and polyethylene. We pull out the strings 
And our butterfly is ready 
What else can you do with this technique?
romanian lace 


