How to sew a men's tie. Master class on a kanzashi tie for a girl to go with a school uniform Mk school tie for a girl made of fabric
First of all, decide on the style, shape and size of the tie. We'll show you how to sew a standard tie that is 145cm long, 9cm wide (measured at its widest part), with facings at the top and bottom edges.
Attention: the most suitable material for sewing a men's tie is thick plain weave silk.
You will need
- Silk fabric 90 x 90 cm (enough for two ties - one standard size, see above, and a second narrower one)
- Woolen fabric 80 cm long (the width will depend on whether you will reinforce the tie with 1 or 2 layers of interfacing: to strengthen the tie, you can take a regular plain dress woolen fabric, but the ideal option is 100% combed wool fabric, elastic and dense)
- Template for cutting to the shape of the front side of a tie from thick cardboard or thick film (for production, see step 2)
- Sharp scissors () or roller cutter ()
- Cutting mat
- Silk pins ()
- Ruler ()
- Pencil
- Marker()
- Needle and thread for sewing
- Tape measure ()
Description of work
Step 1: Prepare tools and materials
Prepare everything you need for cutting and sewing in advance so that everything is at hand. Determine the length of the tie using a cord, which you then attach to a measuring tape. When calculating the length of the tie, take into account the additional allowance for tying the knot. Choose the width and shape of the tie.Step 2: make a template
On thick cardboard or film, draw the bottom part of the tie (widened downwards or straight) with a length of at least 30 cm, and preferably more, up to 70 cm. Draw the bottom corner, as shown in the photo, or any other shape (you can, for example, draw the bottom edge in a straight line).Note: The width of the template should be 3 times the width of the finished tie, since you will be tucking the long sides of the tie toward the middle three times. Plus add 3mm for the fold overlap in the middle of the tie.
On the bottom corner of the tie, draw 2 parallel seam lines along the edges at 5mm intervals. At the bottom corner, draw a transverse seam line through the intersection point of the inner seam lines so that the distance between the ends of the transverse line and the bottom corner is the same.Make a template for the top edge of the tie in the same way, and also draw the seam lines, but the template should be narrower than the template for the bottom.

Step 3: cut out the main part of the tie from silk
Carefully lay the silk out in a single layer, right side down, and smooth it very evenly with your hands onto the surface. Place the template of the lower edge of the tie on top of the silk, at a certain distance (having calculated the required length of the tie), lay the template of the upper edge of the tie - the sharp-angled ends are directed in different directions - and connect the points of the ends of the templates in a straight line (if they do not dock).Be careful: the template must be laid exactly at an angle of 45 degrees relative to the straight thread. Its acute angle should lie either at the intersection of the lobar and transverse threads, or on both sides at the same degree relative to the lobar and transverse threads.
Now run a roller knife along the outline of the template and along the marked line, or cut out the part with sharp scissors. True, it is still more convenient to cut out on a special mat with a roller cutter, but be sure to use a new, sharply sharpened blade for cutting.If you have a piece of silk measuring 90 x 90 cm - as in our version, do not refuse the opportunity to sew a second, narrower, less formal tie at the same time. Cut and sew it using exactly the same technology as described for a classic tie.
Step 4: Transfer the seam lines of the facings
Now, on the wrong side of the silk, draw the seam lines for stitching the bottom edge facing - these are exactly the lines that you drew on the template (including the cross line). Next, repeat the same operation with the upper end of the tie.
Step 5: Cut out additional parts
In addition to the main part of the tie, you will also need to cut out 2 facing parts: one for the bottom edge, the second for the top. They represent the lower (upper) corner and part of the tie with a height of at least 30 cm. For lining, additionally cut out 1 or 2 pieces of woolen fabric. If the wool is thin, then it is better to cut out 2 parts, baste them over the entire surface with long stitches (do not use adhesive pads!) and then process them as a single-layer part. For cheaper options, you can use non-woven fabric. It is better to cut out the spacer piece after grinding the facings of the upper and lower edges of the tie; for dimensions, see step 8.From silk you also need to cut out a strip for fastening with a length = the width of the tie minus 2−3 cm and a width of 6−8 cm - in finished form it is 2.5 - 3.5 cm wide.
Be sure to iron all cut parts, setting the appropriate heating temperature. Do not iron directly on silk to prevent it from becoming shiny; iron silk only through an ironing iron.
Step 6: Finish the top and bottom edges of the tie
Now comes the most important part of the job: you need to flawlessly finish the top and bottom edge of the tie with a facing. The hemming of the edges gives the tie a beautiful look on both sides, which is very important when, for example, it flutters in the wind.Attention: do not overcast the edges of the tie!
Place the facing on the bottom of the tie, right side to right side, precisely aligning the beveled edges and the bottom corner, pin, or better yet, baste. Check that the fabric of both parts lies flat.First stitch from the top edge of the facing to the first corner. Then stitch along the second side from the top edge of the facing to the first corner.
Now sew along the marked line of the outer seam to the very bottom corner, raise the machine foot, turn, lower the foot and sew to the other corner. Similarly, make a second, parallel seam down to the lowest corner and then up. Finally, stitch across to form a sharp corner on the finished tie.
Tip: To perform this operation very accurately, use a piece of whatman paper cut exactly in the shape of an equilateral triangle.
Experienced craftsmen sew the corner of a tie “by eye,” but it will be difficult for novice sewing enthusiasts to perfectly perform this important operation without templates and markings. Finally, cut the corner along the cross stitch at a distance of 5 mm. Trim the remaining seam allowance close to the outer stitch line.
Step 7: Turn inside out and iron
Now turn the top and bottom ends of the tie right side out. Carefully pull out the corners, straighten the seams - there should not be a single wrinkle on them. Gently press the seams on both ends so that they are not completely flat.Step 8: Install the Gasket
Place the wool (or non-woven) part on the wrong side of the tie exactly in the middle. The spacer piece should be of such length that one end fits exactly with the top end of the top edge facing and the other end fits exactly with the top end of the bottom edge facing of the tie. The width of the part is exactly equal to the width of the finished tie. Cut the top and bottom edges in a straight line.
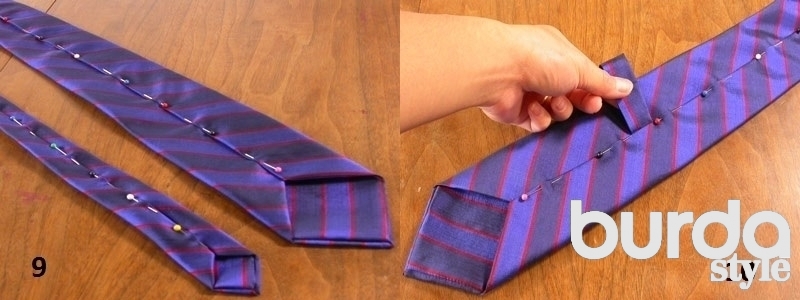
Step 9: Fold the long sides to the middle
Fold the long sides of the silk tie inward by a sixth of the width, then fold it inward again so that both folded halves meet exactly in the middle of the tie on its inner side, with one half overlapping the other by 1-3 mm. Pin the edges together.Tip: use special silk pins, ones that won't leave holes in expensive fabrics.
Step 10: Sew on the bartack
Fold the fastening strip in half with the wrong side facing in and stitch the long edge. Turn the strip inside out and iron it so that the seam is at the bottom. Fold the bartack in half and place the open edges inside the fold of the tie, as shown in the photo. Fastening will allow the tie to retain its shape longer and better.Hand sew the bartack carefully under the fold, then spread it into a cross strip shape (see photo), lay it flat on the inside of the tie and hand sew it to the tie on both sides with blind stitches. Do not pierce the needle on the front side!
Step 11: Start stitching the middle fold from the bottom of the tie
Now, using blind stitches (as in our case) or sew both folds of the fold in the middle of the inside of the tie.Step 12: Finish the seam in the middle of the inside of the tie
Do not pull the thread too tight so that the seam remains elastic and does not pull the right side of the tie. Sew slowly and carefully from the bottom edge up, gradually removing the pins. Make sure the seam is even. Finish the seam on the top side of the tie, which should look the same as the bottom.
Step 13: Custom Label - Proof of Handmade
Do not forget to sew your own label just below the bartack: sew it not with several stitches in the corners, but with small stitches on both short sides, of course, without piercing the needle on the front side.Step 14: Iron and try on
Iron the tie again using the iron. Now your handmade tie is ready! All that remains is to try it on with a new shirt.
Photo: BurdaStyle, PR.
The material was prepared by Elena Karpova
A popular detail, the butterfly, is actively used as the finishing touch to a beautiful and fashionable look. Making your own bow tie is quite easy. The entire work process will take a minimum of time, and you will receive original decoration for your clothes. Any woman can buy a tie for her man in a special men's accessories store. However, it is much more pleasant for any person to receive gifts that are made with their own hands.
Bow ties are created in different ways and fall into two main categories:
- A traditional stylish model a la a tie that needs to be tied around the neck;
- A wonderful accessory that can be attached using special fastener.
According to the form, our product is divided into four types:
- Traditional products, the width of which is no more than 6 cm.
- Large bow ties with a width of only 8 cm.
- Butterflies-diamonds, made in the form of a rhombus;
- Ties with round ends.
If you want to sew a butterfly yourself and give it to your man, follow the step-by-step instructions. First you need to decide which material is best suited for the future product. If you use silk or corduroy, the bow tie will have a decent and business-like appearance.
Considered a more inexpensive option polyester, which is similar to satin models. Another economical option is paper. The first product should be sewn from inexpensive material, so as not to worry too much if everything turns out badly. If you want the product to keep its shape, take a thick fabric to work with.
How to make a paper butterfly for your neck
 If you don't have fabric, you can make a butterfly out of paper. You can use the origami technique, because then you don’t need to glue or stitch anything. To create a butterfly it is better to use colored paper, then your accessory will look brighter and more beautiful. To create what you have in mind, you need to take a piece of paper measuring 15x15 cm. The sides of the material must be different from each other.
Master class on how to sew a butterfly for a boy:
First, turn the sheet wrong side up, bend it horizontally, and then turn it over again. In the center, bend each corner in turn. Fold the top and bottom edges toward the center as well. Fold the material in half, starting from left to right. Fold the corners on the right towards the center and straighten them out. Straighten the material.
Along the folds you made, fold the center in half so that it turns inward. Bend the top part of the left corner to the right, bending it down from the top right corner. Fold the left side back so that the corners on the right and left begin to match. Bend the top of the left corners towards the center. Fold the left corners towards the center. Slowly straighten the material, carefully straightening the center.
 How to create a bow tie from fabric, Master Class.
Main part The official style, called a tie, does not have to be ordered for a lot of money. You can sew the product yourself using pieces of unnecessary material. This decoration is suitable for adults and children. Perhaps, after creating a butterfly for the first time with your own hands, you will want to replenish your wardrobe with a whole collection of these products for each outfit for your child or husband.
How to sew a tie with an elastic band
There are many options for tailoring a stylish product. There are complex and easy ways that require very little time. You can make a product without a machine, but if you have sewing equipment, will be simpler. For work you will need:
- A simple piece of thick fabric.
- A sewing machine for work or just a needle and thread;
- Special ruler for measurements.
- Sharp scissors.
- Buttons.
- Rubber band.
 Instructions on how to sew a butterfly around your neck with your own hands.
We cut out a square of the appropriate size from the necessary materials, then fold it in half and stitch along three edges.
We turn the product inside out, creating a butterfly with our fingers, fix the middle with thread and stitch it with a piece of fabric.
Sew an elastic band and a button to the tie to secure the tie around the neck. We select the length of the rubber band based on the circumference of the neck.
Butterfly pattern
We build a pattern according to the diagram.
- First we need two pieces of fabric (main and lining), the pattern we made and a fastener.
- We attach the pattern with pins to the wrong side of the base fabric, outline it and add an allowance of 7 mm.
- Cut out the first piece from the pattern.
- We place it on the second piece of fabric, trace it again and cut out another piece.
- We attach the parts made from the main fabric to the lining.
- Cut out each one.
- We create a line on these parts. We make a hole for turning it inside out.
- We cut off the corners so that when turning the pieces of fabric inside out, they do not spoil the appearance of the product.
- We create cuts along the bends.
- Using a narrow stick, turn the tie inside out.
- We start work from the narrowest place. We sew the hole in the inside out parts with a special seam.
- We receive the finished parts. Although our product is homemade, we will also attach a clasp to it.
- We put a hook on the tip of one part and sew it.
- We attach the regulator to the next part.
- We thread the tip of the strap into the regulator.
- We sew the end.
That's all, our butterfly is done.
A tie is a product that is tied in a knot or bow around the neck, collar of a shirt or blouse. Made from fabrics and knitwear.
theknot.com
A tie does not have a clear gender and age characteristic; it can be either an addition to a classic men’s suit, or part of the collar of a children’s shirt, or a detail of a woman’s blouse.

pinterest.com
A special version of the neck accessory is a men's bow tie. A plain silk bow tie is worn on special occasions when the dress code requires it. The colored and textured model emphasizes the stylistic features of the image.

wordpress.com
A men's classic tie is quite standard in appearance. It is a narrow strip of two-layer plastic fabric that expands downward in the shape of an angle. Depending on fashion trends, the length of the product, width and lower angle change.
If a classic tie made of jacquard silk or satin can be purchased ready-made, then a fancy, unique one can be easily made by yourself.
Preparing to make a tie
Basic principles that help you create an accessory that ties beautifully in a knot.
- Properly selected dense but flexible fabric of plain, diagonal or jacquard weave.
- The placement of the cut parts is oblique, that is, at an angle of 45 degrees to the grain thread.
- Some sewing operations must be done by hand.

wordpress.com
Materials and tools
- Tie pattern.
- Main fabric measuring at least 90x90 cm.
- Thin sliding fabric for the inside.
- Ruler and chalk.
- Pins.
- Sewing machine.
To understand how to sew a silk tie, the reverse side looks a certain way.

blogspot.com
Stages of making a tie
- Using a measuring tape and an existing tie, estimate the length of the future product when untied.
- Draw a tie pattern on paper: a triangle approximately 9.0 cm wide at the bottom (depending on the model), up to 50 cm long (finished - at least 145 cm). Line up the corners of the bottom edge at a slope of 45 degrees (on the fabric they will correspond to the warp and weft threads).

rukikryki.ru

Do not forget that a tie, like any item of clothing, must correspond to the overall style of the image and be appropriate in a particular situation.
For everyday wear, choose a tie made of colored fabrics, patterned or knitted. In situations of business meetings and negotiations, an elegant monochromatic option that does not stand out from the overall tone of the suit will help. If there is a speech coming up, a bright accessory will focus attention on the speaker’s persona. For a black tie situation, choose a formal suit with a bowtie as defined by the uniform's dress code.

Sewing a classic men's tie with a loop should be entrusted to experienced tailors, but sewing a tie with an elastic band is not as difficult as it seems. And it is very easy to use. An elastic tie can be in the shape of a butterfly, or it can be something like a classic men's accessory; it is also called a “herring”. An elastic tie can decorate both a child's outfit and an adult's outfit.
Preparing materials for sewing a tie
To sew a tie, we need:
- - a small piece of non-elastic material: suit, cotton or silk fabric will do, depending on the image you have in mind;
- - a piece of adhesive interlining to seal the main fabric of the accessory;
- - sharp scissors that will allow you to make high-quality cuts;
- - threads to match the fabric;
- - hat elastic or elastic for straps;
- - ruler;
- - a special marker or chalk for marking.
If you want to sew a classic tie, then you will need a piece of lining fabric. If the fabric you choose is quite dense, then the adhesive sealant may not be used.
Now you need to create a pattern, this can be done directly on the fabric. It is better to pre-print a pattern for a classic-shaped tie on paper.
Sewing a butterfly with an elastic band

To sew an adult bow tie, you should take a strip of fabric measuring 24 by 13 cm. By the way, to sew a bow, you can take a scrap of a similar size. Another strip, measuring 4 by 7 cm, needs to be cut to sew the connecting ring of the accessory. Cut a piece of the same shape from non-woven fabric and iron it to secure it.
Pin the workpiece together and apply a stitch at a distance of 0.5 cm from the edge along the long side.
Fold the workpiece so that the seam is in the middle, go over the seam with an iron.
Fold the piece in half so that the long seam is on the outside. Place a straight stitch along the short side, thereby sewing the element into a ring.
Turn the workpiece inside out and iron the seam.
The jumper should be sewn in the same way, but on the right side of the fabric, without turning it inside out. You should have both seams inside the ring. Turn the workpiece inside out.
We thread the main part into the ring and add folds. To fix them, you can lightly walk over them with a stream of steam. Although, thanks to the non-woven fabric, they will keep their shape.
We measure the neck and cut off the required length of the elastic to complete the accessory. We pass the elastic through the ring and grind it off. We hide the seam in the jumper.
We sew a strict men's tie

Elastic ties can be useful for a theme party or a children's party. Don't forget that in addition to the main materials, you will need a piece of lining fabric so that the tie does not cling to the shirt or blouse and lies nicely.
So, the pattern. The easiest way is to find a ready-made pattern on the websites of needlewomen and print it out. This way you will save time and avoid mistakes in creating the accessory. Do not forget that you should make a small indent from the edge of the pattern for the seam, about 0.5 - 0.7 cm.
- Cut out the parts from the main and duplicating fabric, iron.
- For the bottom part of the herring tie, divide the pattern crosswise into 2 halves. The lower part is made of lining material. Connect the part into a single whole.
- Pin the workpiece with the right side inward, apply a straight stitch a little further from the edge. Turn it inside out and iron it.
- To form a knot in a tie, make a simple pattern:
- - a strip of base material should be equal to the length of the top of the product, multiplied by two. Don't forget to leave just under 1cm for seam allowance. The width of the knot depends on the size of the tie, on average 7-10 cm. Be sure to seal the element with non-woven material;
- - fold the part facing inward;
- - sew the element along the long side and turn it inside out;
- - fold in half so that the seam is in the middle;
- - slightly sharpen the corners of the rectangle to make a trapezoid,
- - fix the workpiece on top of the product, attach the elastic band and turn the finished tie through the ring, you will get a knot on top.
A tie is an important part of a business wardrobe, a sign of good taste and “importance” of its owner. A good tie costs a lot, so the question of how to sew one with your own hands is always relevant.
This article is intended for persons over 18 years of age.
Are you over 18 already?
Making an elegant tie with your own hands: basic tricks
Before you begin the step-by-step production of this popular accessory, you need to decide what exactly you want to get in the end. There are quite a few variations on the theme of a tie, and each type comes with its own master class on how to make it. The most common accessory options are the classic “noose” and an elegant bow tie. But this is not the entire list, because there is a narrow herring tie, a brooch tie, a bolo, a lavalier, a Windsor, and a neckerchief. By the way, many contradictions arise with the latter type of accessory, because the word “tie” itself has French roots and when translated into Russian sounds like “neck scarf”.
Patterning a tie is a simple matter, because it can be done even without special tools and templates at hand. How? - you ask. Yes, it’s very simple - just undo an old unnecessary tie along the seam. It will be the same pattern that you can transfer to the selected fabric.
When preparing, it is important not to forget about the “understudy” fabric. It is needed so that your future product keeps its shape and does not wrinkle with every touch. For the “understudy” role, you can choose regular lining fabric or fleece - these are the most inexpensive and accessible options. You can also buy self-adhesive fabric - friezeline. In order to attach it to the fabric, you just need to apply it to the wrong side of your workpiece with a shiny layer and carefully walk over it with a hot iron. Just a few movements and your product will achieve the desired rigidity.
Sewing a tie is also a very simple process, accessible to even the most inexperienced needlewoman. At the same time, it doesn’t matter at all whether we sew an accessory on a sewing machine or with a hand stitch, the main thing is to know how to fold it beautifully and secure it (and the rest is a matter of technique).
Another important question when sewing a tie (as, in fact, when designing any product) is how to properly prevent unwanted “shrinkage” of the fabric? In order to have an idea of how the sewing material will react to washing and ironing in the future, all these processes should be carried out before cutting it. At this stage, you should know exactly what to prepare for in the future and what you should pay special attention to.
A tie is an everyday wardrobe item; this is very important to consider when choosing what fabric to make this accessory from. Products made from cotton, linen, silk and satin are considered the most practical - these are the fabrics you should choose (for holiday options there are no restrictions on the choice of materials).
Universal accessory: a little history
As mentioned earlier, the word “tie” is of French origin, but it was the British who made the accessory itself world famous. It was with their light hand that it became a very important “status” detail of a business wardrobe. This men's accessory has long ceased to be just an accessory - it is also an indicator of the status and social position of its owner. Even today, neckerchiefs have a fairly wide price range - from several hundred rubles to a couple of thousand dollars.
The popularity of the adult tie was soon repeated by its children's counterpart. Wealthy families sought to buy it for the boy, so that from childhood he would get used to a rather inconvenient but necessary accessory.
After the sexual revolution, which took place in the middle of the last century, women's ties also appeared. Contrary to popular belief, it did not give its owner masculine features. On the contrary, a woman with a “noose” around her neck is always stylish, sexy and a little daring.
Thus, the tie gradually became part of everyday life for almost the entire population of the world. No one now sees anything reprehensible in tying a ribbon for a girl in the form of a tie or an elegant bow tie.
Among all the variety of children's ties that are usually worn to school, I would like to highlight the option with a zipper. Its feature is convenience, because you don’t need to tie it (tighten or loosen the zipper and that’s it). Therefore, if you want to make a convenient school accessory, pay attention to this model. As for the colors of children's ties, these can be either strict blue or black options, or more cheerful colors (from Harry Potter, for example).
How to make a tie out of paper?
If you need to make this popular accessory very urgently or you need it for some kind of competition, then plain paper can be the ideal material. The simplest option is a bow tie made from a napkin. For him, you just need to take a regular napkin, fold it like an accordion and fasten it in the middle.

Products made in the origami style are no less popular. Just a few correct movements - and an elegant tie is in your hands (you can easily find detailed instructions on how to do this on the Internet).

You can also make a herring tie from regular cardboard and elastic. Draw the silhouette of the future product, cut it out, attach an elastic band and... Done!
How to make a tie from ribbon?
Making a fashionable product from a satin ribbon is not only very simple, but also inexpensive, and the result is simply excellent. The uniqueness of this material is that it looks equally beautiful in any version, be it a classic noose, butterfly, brooch or “herring”. Whatever you choose, a product made from satin ribbon will look very dignified. You can also make a cute tie from scraps of satin fabric. However, when sewing a product from this material, do not forget to process the edges - without this manipulation they may “crumble”.
In addition to quite “human” options, ribbon also makes excellent bottle decorations. Cute felt or satin ties can be used to decorate champagne at a wedding or “masculine” drinks at a corporate party. By the way, when preparing a birthday cake for your beloved man (brother, friend, boss), you can also decorate it with a cute mastic tie. It will look incredibly stylish and will definitely please the hero of the occasion.

How to sew a bow tie?
A “butterfly” or bow is a classic form of tie, without which it is impossible to imagine an evening version of a business suit (and not only). It's very simple to make - take a small rectangle of fabric and pull it in the middle. This way you will get a bowtie that can be worn with an elastic band or simply pinned to your shirt with a safety pin. This is the easiest way to make a bow, but far from the only one.

You can use both simple sewing and more complex techniques such as kazanshi and origami. The first option is to compose a whole composition from individual flaps, the second is to obtain the desired result by repeatedly folding the fabric. The Internet is replete with various lessons on the proper use of these techniques.
On the World Wide Web you can also find a pattern for a classic “butterfly”, which you need to tie yourself (similar to a pioneer tie). Many of us know firsthand how to make a beautiful, correct knot for such an accessory - once upon a time, a red piece of fabric was the real pride of a Soviet child.
If you want to stand out from the crowd, try a bolo tie. This is an unusual product made of a thin cord, which is fastened with a large brooch. A bolo can be a great addition to both an everyday look and a festive one - it all depends on the outfit you choose.
The tie will also suit a New Year's suit. For a corporate event, for example, you don’t have to wear a boring office look. For such an occasion, cheerful models for a clown, elegant neckerchiefs for a stewardess, and slightly provocative bows for a dude would be equally appropriate.