We knit an openwork hat for classmates. We knit openwork hats for girls. Universal hat with earflaps for women
Online survey
534 users took part in the survey.
So, after wandering around the Internet, here’s what I found on knitting this model... The original hat is knitted from threads that include cotton + viscose + polyacrylic.


(a girl from another site helped with the diagrams, for which I thank her very much! With her permission I am sharing with you)... The diagrams were handwritten, I tried to compile them using the program on tamica.ru..
Patterns for circular knitting!!!.. if you knit with a seam, then the purl rows must be knitted in reverse!!! Attentively!!
Scheme No. 1 of the central pattern. We knit the first 6 rows according to this pattern. Rapport 25 loops

Next we knit according to pattern No. 3, starting with 3rd row. Rapport 25 loops, including the first purl! We need it!!! (the diagram says 24 stitches - this is without the first purl) 
empty and filled-in cells - purl-knit
Scheme "2 sides.. Rapport - 10 loops. But in the diagram I drew how to distribute the patterns of the cap on the left and right (the diagram of the left part is a mirror image of the right), the central pattern is highlighted in red..

Something like that...
I really hope for the collective wisdom and experience to understand how the ears fit on this hat in the original))..
So, I’m describing the process itself as I understood it)))
The hat can be knitted either in the round or with a seam. Patterns are given for circular knitting!!!
I started this way and that way! Knits easily and quickly, especially after the first ten rows)). This means I got 4 repeats on the left and right + 25 central loops..., i.e. we get 8 repeats x 10 loops (in each repeat) = 80 loops + 25 loops (center) = 105 loops and MANDATORY + 2 loops for symmetry of the pattern (so that there is a beautiful seam at the back).. In total, we get 107 loops in total (for circular knitting, without edge stitches)
In diagram 2, I highlighted the rapport in blue, but you need to start knitting from the first loop of the Front
, and we must also finish with the front one, these are those + 2 loops for symmetry...
As a result, we start the first row after the 1x1 elastic band: 1 person P., then the first rapport 10 loops - 1 purl. p., 2 persons p., 2, together with a tilt to the right, yarn over, 2 knits. p., 1 p. p., 2 persons p., then repeat 25 loops - pattern No. 1 (after knitting these 6 rows according to pattern 1, we knit according to pattern 3, starting from the 3rd row, continuing the pattern that was knitted according to cx1), then the second repeat of 10 loops - 2 persons p., 1 p. p., 2 persons p., yarn over, 2 together with a tilt to the left, 2 knits. p., 1 p. P., 1 person P.
Schematically it looks like this:
We knit the first 6 rows like this - pattern 2 + pattern 1+ pattern 2
We knit the subsequent rows like this - pattern 2 + pattern 3 (starting from the 3rd row! to continue the pattern) + pattern 2
I hope I described it clearly... if it’s not clear, ask, I’ll answer if possible!
This is what I get... Sorry for the quality of the photo - it was taken from a phone..
Jeans threads, knitting needles for elastic 2mm, for pattern 2.5mm.. OG - 50 cm, cast on 107 loops. Loops were cast on with Italian cast-on,
http://www.valentina.ru/school.php?act=0&gr=20&lv=1&pc=7&statid=89
Next are two rows of hollow elastic (I would have knitted the entire elastic double if I knew that it would hold its shape so poorly), then 1x1 elastic, rows 10-13. and then the pattern itself.. 
Knitting needles 2.5 mm.. Kartopu Crystal threads - a trial version, a lot of loops, it turned out to be a bit big, I’ll probably re-knit
This is what the girls found on the Internet, only the hat is crocheted


This is what I have for today.. 19.03.16
I knitted one repeat of the pattern up. Now we need to determine the place for the ears.. I have 4 repeat “Tracks” from the central pattern.. I think the ears need to be formed after the first “Track”, it turns out that in the second “Track” I knit 8 knit stitches. The photo of the original shows that the ears are knitted in stockinette stitch gradually, diagonally, so to speak, and knitting begins with 8 loops, then in every second row you need to knit one or two loops with knit stitch.. most likely until the end of knitting the desired height of the hat.. that's how - so... These are my assumptions. I haven’t tried knitting like this yet.. I can’t figure out the decreases in the center of the eyelet yet ((
I like this idea with ears!! thanks for the link!
I’m thinking of trying this.. I’ll probably knit according to the patterns (openwork) until the required height of the hat, and then I’ll have to sew the top of the head and form the ears.. I think it’ll be fun that way too...
03/20/16
I’m sharing my idea with you)) as they say, I thought and thought and came up with it))) So, I’m thinking, what if I try like this: I have the total quantity 107 loops.. Take the central 25 loops of the openwork + 2 knits each. loops on the sides = 29 loops.. 107-29= 78 n. remains.. Separate the central ones at the back 30 loops (30 loops so that there is an even number of loops left on the ears). We get 78 - 30 = 48p. : 2 = 24 p. - we leave 24 loops for the ears.. I hope I explained it clearly.."!?? And then we knit in the center front and back according to the diagrams, and knit the ears with knit stitches..
Here's what happened...
Front view
back view
side view (ear formation)
and fitting
came out 15 cm high
Girls, Alena from OK drew us a diagram of the ears (for which a special THANK YOU to her!), I hope everything is clear... Here's how she explains: Everyone has their own cap height. Knit to the middle of the height and start knitting the eyelet. You start the ear with 6-8 faces. loops and gradually add 1-2 knits. loops in each row or every other row, as you like. The eyelet is knitted the same way both front and back. Knit 3/4 of the height of the cap and in the ear you begin to knit a “path” of purl loops in each row or shifting the purl through the row. loop to the center of the eye (as in the diagram). In the original hat, the loops in the central pattern (rapport diagram 3) are decreased. A pattern of rapport decreases along with a pattern with ears. At the back of the hat, the loops are decreased the same way as in the front, only there you decrease the loops as you like best, but the number of decreases is the same in the front and back. 
If anyone has any more ideas - write!!!
Bows - video https://www.youtube.com/watch?v=jqUjP6PkqKM
https://www.youtube.com/watch?v=1PsZZ8Lc8LQ
Snood 

 - instead of a row with double crochets, knit a row with just knit stitches and move each wave half way through the report
This is how it turned out for us))) the height of the whole cap turned out to be 18 cm 
Album for your incarnations!
Girls, I will post more photos as soon as my laptop is working... I knit slowly... so that everyone will have time to join!)))
Easy loops everyone!!
Winter is coming soon. It's time to crochet a new warm hat. You shouldn't walk in cold weather without a hat. And at the same time I want to look beautiful. Therefore, we present to you a selection of knitting patterns with descriptions of crocheted winter hats with patterns and descriptions so that you have a choice to suit every taste.
Spectacular crochet winter hat
Warm cozy set for winter
The first option is a bright knitted hat for the winter and... The set is knitted from thick section-dyed yarn, so you can knit it in a few days, even if you are a beginner knitter. The principle of knitting embossed columns is shown in the photo step by step, the pattern is completely simple.
You will need:
- yarn with parameters 100met/100g - 200 grams;
- hook No. 8;
— faux fur pompom with a diameter of 15 cm.
Scarf pattern: (multiples of 4)
1st row: 3 air loops (VP), then s/n columns;
2p.: 2 VP, * 2 embossed columns s/n (RSSN) behind the front wall (the hook must be inserted in front around the column s/n of the bottom row), 2 half-columns * - repeat from *, finish 2 RSSN behind the front wall, 1 half-column.
3p.: 2 VP, * 2 RSSN behind the back wall (insert the hook from behind into the bottom row), 2 half-columns * - repeat from *,
complete 3 half columns.
4p.: 2 VP, * 2 half-columns, 2 RSSN for the front. wall *, 3 half-columns.
5p.: 2 VP, * 2 half-columns, 2 RSSN behind the back wall * 3 half-columns.
Repeat the pattern the first time from rows 1 to 5, then from rows 2 to 5.
Elastic band (for hat): (circular rows, multiples of 4)
1st row: 3 VP, then column s/n, finish 1 connecting column in the starting point;
2p.: 2 VP together with the 1st p/st, * 2 RSSN for the front wall, 2 p/st *, finish with 2 RSSN for the front wall, 1 RSCH, 1 connecting column. to the second initial VP.
Density: main pattern 7 p. = 10 cm.
Description of knitting hats:
- Cast on 36 VP, close it in a circle with a connecting column.
- Continue working with a 14 cm ribbed pattern.
- Begin rounding the cap to form the crown. In the first r. knit all the half-stitches together (=27 stitches). In the second r. knit raised treble stitches together (=18 stitches). Next, knit a row of treble crochets, knitting them 2 at a time (=9p.). One more r. without decreases and pull the remaining ones together with a working thread. Strengthen it firmly.
- Make 1 row along the edge of the hat. in a crayfish step (place dc/n from left to right).
- Sew on the pompom.

Loop scarf: Start with a chain of 24 ch and 3 ch for the rise. Continue with the pattern for a 170 cm scarf. Sew along the short side.
Source: Little Diana magazine.
Hat made of bulky yarn for the winter

Many girls and women love small, neat hats. But in the winter cold you need to dress warmly. An excellent solution for this case is knitting from bulky wool yarn. The headdress will look stylish with fur coats and down jackets.
Size: 56-57 cm
Required:
- two types of yarn 1 - from Lana Grossa: Famoso dark gray (45% wool, 55% polyacrylic, 38m/50g) - 100 grams;
— 2 — Uno gray-black color (52% wool, 48% polyacrylic, 65met/50g) — 50 grams;
- hook No. 12.
Density: 5 p. = 10 cm
Crochet hat description:
- Start at the top of the cap with two chain stitches using thread #1. In the 1st circular row, knit 6 columns of b/n into the second chain stitch.
- In the 2nd r. continue with the same stitch and double the stitches (=12 stitches). At 3 p.m. double after 1 p. (=18 p.).
In the 4th - after 2 p. (= 24 p.). - From 5 to 14 p.m. knit without additions. Finish with a row of connecting posts.
- Use yarn number 2 to make a pompom.
Source: Filati magazine
White winter hat with lapel and openwork scarf

White is always a popular color for winter
It’s good when the hat is warm, but if there is also a flap, then in winter it will be even warmer. And it will look great over a jacket, fur coat, or down jacket. Let's look at a warm winter crochet knitting pattern. But only those who know how to crochet and knit can knit it.
Size 56 cm
Required:
— 450 g of yarn with parameters 190 met/100 g;
- knitting needles No. 3.5;
- hook No. 3.5.
Density: 23 p. = 10 cm
Scheme for making a women's hat:
- Cast on 96 stitches on the knitting needles and knit 23 cm in stockinette stitch in the round (all stitches are knit).
- For the crown of the hat, knit every second r. All loops are two together. Pull and fasten the remaining 24 stitches.
- At the bottom of the cap for an openwork lapel, crochet 10-12 cm of the pattern according to the pattern. Fold the lapel twice, laying out a beautiful openwork pattern.
- For a scarf, dial 51 air stitches. and knit 180 cm with a pattern according to the pattern (= 12 repeats and 3 stitches for symmetry). Make 46 tassels (23 per edge) by cutting 8 30 cm long threads for each tassel.

Crochet blue hat with pompom for girl
Crochet a bright hat for winter weather and you will immediately feel warmer. The stripe effect is created by the sectional dyeing thread.
For head circumference 50-54 cm.
Required:
- yarn with characteristics 250m/100g with color change - 100 grams;
- hook No. 4.
Pattern for the hat: double crochets in a spiral without connecting stitches.

Blue color for blue winter
How to crochet a hat?
Work starts from the top of the cap.
- Cast on 10 chain stitches, join in a circle and work 10 treble crochets.
- Second row: double the number of loops, inserting the hook twice in each gap (=20 stitches).
- In the third r. increase every 1 p. (= 30 p.), in the fourth - after 2 p. (=40p.), 5 and 6 rubles. - no increase, 7 rubles. - add after 1 p. (=60p.), at 8 p. double every 6th stitch (=70 stitches).
- Then continue without increments until the height is 22 cm.
- Finish with one p. Art. b/n.
- Make a pompom from the leftover threads and sew it to the hat.
Source: Little Diana magazine
Delicate winter hat made from mohair crochet
If we talk about winter knitted fashion, then it is impossible to ignore products knitted from mohair. The yarn is soft, fluffy and warms well during the cold season. The presented version of the hat is very simple. Even a novice craftswoman who has picked up a hook for the first time can knit it. So, a step-by-step pattern for crocheting a winter knitted hat for women.

Mohair charm for winter
Head circumference: 54-56 cm, hat height without pompom - 21 cm.
You will need:
— Mochairlana yarn from Lana Grossa (42% mohair, 33% merino wool, 25% polyamide, 137 met/25g) — 50 g gray-lilac color;
- hook No. 4,5 and No. 5.
Density: 18 half. = 10 cm
How to knit a half-stitch: make 1 yarn over on the hook, pull out a loop, then with one new yarn over close all three stitches on the hook. Knit half stitches in circular rows, each circle starting with 2 chain stitches. rise.
How to add loops: from one half-column of the previous row. knit two at once.
How to decrease loops: Yarn over the hook and pull 1 stitch through two loops, then use a new yarn over to cover all stitches on the hook.
Step-by-step instructions for beginners:
- Make a chain of 4 chain stitches with hook No. 5, close them in a circle with a connecting stitch. Next, knit the hat in half-stitches.
- We make additions: 1 circle - dial 2 air.p. for lifting and increase the number of half-columns to 10.
Round 2: double each half stitch (=20 stitches);
Round 3: add every other stitch (= 30 stitches);
Round 4: double every third half-stack. (=40p.);
5th round: doubling every fourth half st. (=50p.);
6 circle: every fifth half-column (= 60 p.);
7 circle: every sixth half-column (= 70 p.);
8 round: every seventh (= 80 p.);
9th round: - » - eighth (= 90p.);
10th round: - " - ninth (= 100p.);
11th circle: - “- tenth (= 110 p.);
12th round: - » - eleventh (120p.)
Round 13: knit without increments.
At this point you have knitted the flared part of the hat. - Now you need to decrease the loops:
Round 14: Cast off all 9th and 10th stitches 12 times. together (=108p.);
15 round: 12 times all 8 and 9 sts. together (=96p.);
Round 16: similarly knit 7 and 8 stitches together. - 12 rubles;
17th round: 12 r. all 6 and 7 half-columns (=72p.);
4. Next, we will knit the stand-beads with crochet number 4.5:
Circles 18-23: single crochet 72 p. - Make a bomb with a diameter of 5 cm and sew it to the hat.
Several models of winter hats for experienced craftswomen
For those knitters who already have considerable experience in crocheting patterns, there is no point in providing step-by-step instructions, as for beginners. Enough pattern diagrams. You can do all the calculations yourself and figure out the pattern of the pattern.

Pattern for experienced craftswomen

Another crochet pattern for a women's winter hat

Star pattern for hat

Knitted hat with colored stripes 


Incredibly beautiful crochet pattern for a hat:

For lovers of exclusive hats

Stylish women's hat style for women
When talking about winter knitted hats, it is impossible to forget about caps. There are two with a beautiful pattern for your choice.

You will need:
— Patons Canadian threads (100gr/187met);
- hook No. 5;
- 2 buttons.
Density: 14 tbsp. — 10 cm
How to knit a hat:
- Dial 3 v/p and close it in a ring. Knit from 1 to 14 r according to the crochet pattern. Expansion stage.
- Next, repeat rows 13 and 14 until you reach 20.5 cm from the top.
- Let's move on to making the plank: 1p. - 1 v/p, 1 column b/n in each column, connecting. pillar. (=64p.). Repeat this row again.
- Visor:
1st row: 1 single stitch, (1 double stitch in all columns) - 46 times, turn the product;
2-10r.: repeat 1r. turning rows “back and forth”. - Unscrew the side edges of the visor as in the photo. Secure them with buttons.
Voluminous knitted model for the winter
Development of the Urbu Garn style, adapted from the Swedish by Marina Lindberg.
You will need 100g of medium thickness yarn and a No. 4 hook.

A classic beret is always in fashion
Knit a chain of 3 stitches and combine into a circle. Each new r. start with an air loop. From the ring, knit 7 columns. (STBN)
1st row: * 1 STBN, 2 columns each. in every 2nd column. previous p. *;
2p.: * 2 STBN, from one column. - two *;
3rd: like the second;
4p.: * 3 STBN, from one column. - two *;
5 and 6 rubles: like the fourth;
7p.: * 5 STBN, from one column. - two *;
8 rub.: * 6 STBN, from one column. - two *;
9p: knit in the same way, increasing the loops in every 7th loop;
10p.: add in the eighth p.;
11p.: add in the ninth paragraph;
12p.: add in the tenth p.;
13r.: increase in the eleventh paragraph;
14 rubles: increase in the fifteenth paragraph;
15-18 rubles: no additions;
19p.: 13 STBN, * pull out a stitch from the next column. (=2 sts on hook), pull sts out of next stitch. (=3 sts on hook), pull yarn through all 3 sts, 13 sc*
20r.: * 7 STBN, one on three points as in 19r. *
RUR 21-27: knit according to the pattern.
Next we knit a bar: from 70 STBN - 5 rows.
Visor: along the edge of the strip, tie 34 STBN - 2 rows. Then at the beginning of each r. skip 1 p. Such decreases must be made 8 times.
Finally, tie the entire hat with STBN around the entire circumference.
Perky hat with columns

Morning fashionable color - Bay of Biscay
A cheerful crocheted model of a winter hat in this season's trendy Bay of Biscay color will diversify your wardrobe. The color looks especially good when combined with dark chocolate.
Size: 52-54 cm
Required:
— section-dyed yarn with characteristics of 90 m per 50 g;
- hook No. 6.
Pattern for the hat: circular r. in a spiral - * 1StBN, next st. pass with air. * - repeat from *. Knit the next rows of stitches from the air stitch of the previous row.
Work progress: make a chain of 64 sts, close in a circle using a connecting stitch. and knit with a pattern for a hat. When you knit 14 cm, knit all 7 and 8 sts together (= 56 sts). In the second decreasing p. - 6 and 7 at once (= 48 p.). Decrease in the same rhythm until 8 stitches remain. Pull them together with a working thread and secure. diameter 8 cm.
Charming women's knitted hat with a bell
The knitting pattern has already been given on our website, there is no need to repeat it, follow the link under the photo.


The combination of a beautiful pattern and sectional yarn is incredibly beautiful!
Head circumference: 54 cm
Required:
— section-dyed yarn Kid Royal Missisipi (62% kid mohair, 38% polyamide, 500 met/50 g) — 100 grams;
- hook No. 1.5
— clasp for a brooch.
We knit with thread in two folds.
A chain of 6 chain stitches close it in a ring. Then we continue according to pattern 1 until the desired diameter of the hat, then we knit straight. Along the bottom edge of the hat, knit a pattern according to pattern 2. Schemes 3, 4 and 5 show how to make 3 flowers. Connect them together. Using a pin, pin onto the hat.

Two models of winter hats. Please note that the green cap is double.

Video master class on knitting hats for winter:
There are a great variety of hats - for all occasions, for any weather and age.
- Panama hats and skullcaps, caps and berets, helmets and caps, caps and hats.
- Scarf hats, scarf hats, transformable hats.
- Hats with small and long ears, with a visor, ponytail, and braids.
- Decorated with embroidery, rhinestones, ribbons, beads;
- with an emphasis on the back of the head, plain, with multi-colored ornaments, asymmetrical
- etc.
Elegant and flirty, feminine and funny, romantic and stylish hats will tell more about their owner than a service or neighborly characteristic.
First cap
The openwork hat is the third topic in the crochet teaching program. The first is knitting elements: loop, chain, stitch. The second is a small cloth: an oven mitt, a collar, a scarf. The third is a hat.
A simple hat, starting from the bottom, with a modest pattern, knitted easily and quickly, remains to live with the owner forever. Even if it turns out to be too small/wide, they won’t dissolve it or throw it away. It will serve as a small relic of the first independent creativity, and inspire the creation of new openwork masterpieces - for daughters and sons, for mothers and mothers-in-law, for girlfriends and bosses.
No to market Panama hats! Yes – to lacy hats and hats!
An openwork hat is a decoration for a woman’s head, regardless of age. It's easy to decorate yourself with a hook. Once the basics of knitting hats are mastered, fantasy and inspiration come.
Old, saggy Panama hats are becoming a thing of the past. Magic hats made from natural threads with small or large openwork brims appear, which make your head feel so good. The husband is delighted, the neighbors are jealous, and instead of the aunt, a beautiful, elegant Woman appears.
I found the hat pattern on the Internet. The pattern is very simple and easy to knit, so I knitted everything together very quickly. I wear it with pleasure. Yarn - 25% wool, 75% acrylic.


Hat size: 54-56. Knitted to order with crochet No. 2 from wool blend yarn 340m x 100g. in two threads. Consumption about 50 g.
If you add a lining to it, you can wear it in winter. I have been knitting and wearing this pattern for several years. Friends will see and order.
Crochet hat, description of the knitting process:
The hat is knitted from the bottom in circular rows. The drawing consists of arches made of air. loops and single crochets.
1st row - In a ring of 15 air. loops we knit arches from 15 air. loops attaching into a ring st. b. n. There are 16 arches in total. We knit the 17th arch like this: 7 air. loops + double crochet stitch.
(Adding another arch of 15 air loops will result in a hat size 56-58.)
3 row-4 air. loops + st. b. n. inserting the hook into the middle of the st. b. n. previous row.
4th and 5th rows - 5 air. loops + st. b. n.
6 row-2 connection loops, inserting a hook between the 3rd and 4th rows we knit “1 tbsp. b. n. + 5 air loops"
7-8-9th rows-6 air. loops + art. b. n. in the middle of the column of the previous row.
10 row-3 connection. loops and inserting a hook between the 7th and 8th rows we knit “stitch b. n.+ 6 air. loops"
Repeat from “and to” until the end of the row.
11-12-13th rows - According to the figure 6 air. loops + st. b. n.
14th row - The pattern is repeated from the 10th row to the 28th row.
29th row - Knit in one thread.
In arches of 6 air. knit loops 6 tbsp. b. n. + 1 tbsp. b. n. in Art. b. n. previous row.
30th row - Along the entire row of art. b. n.
31st row - Apply an elastic band 3mm wide. (See pictures) and tying the elastic we knit st. b. n. +
pico from 3 air. loops
We tighten the elastic slightly while knitting. It is so that the product holds when worn.
form.

Cap size: 56-58 cm.
You will need: 50 g each of Vista yarn and viscose silk; some dark yarn for finishing; hook number 2.
Sequence of knitting a hat
- Tie 1 circle with a diameter of 15 cm according to the pattern.
- Next, continue knitting without increasing to a height of 4-5 cm.
- Knit the fragments separately according to pattern 2, connecting them to each other and to the bottom while knitting the last row.
- Tie the edge of the cap with 3 rows of sc. In the last row of sc, knit a picot.
Are you planning to make a splash at the resort? Forget wide-brimmed hats. Better knit a pair of fashionable berets or hats. They will look good with both dresses and shorts.
You will need: VIOLET yarn (100% cotton) - 50 g purple and 10 g beige, hook No. 1.5.
Basic pattern: Crochet according to the pattern.
Openwork crochet beanie hat, description
- Use a purple thread to make a chain of 210 chain stitches. p. + 2 air. lifting point.
- Knit the 1st row with b/n stitches. 2nd row - *st. s/n, air. p.*, repeat *-*.
- 3rd row - art. b/n.
- Then step back 36 sts to tie and then knit, repeating the pattern from the 1st row. At the same time, at the end of the 4th row, leave 36 stitches unknitted for tying.
- Starting from the 6th row, knit in the round.
- In the 8th row add 1 repeat, in the 9th row - 2 repeats.
- Knit the 11th row with beige thread.
- Then knit 6 rows with purple thread, 1 row with beige thread, 6 rows with purple thread, 1 row with beige thread.
- After this, knit 6 rows again with purple thread, and in the 6th row, decrease 1 air. etc. in each rapport.
- Then knit 1 row with beige thread according to the pattern and 6 rows with purple thread, decreasing 1 stitch in each repeat.
- Knit all remaining rows in st. b/n, gradually decreasing to 6 loops. Tighten the remaining loops with thread.

Openwork crochet hat for girls
In summer, hats are worn not only by women, but also by our little children. Be sure to knit your child an openwork hat for the summer using our patterns.
Summer set for girls. Work by Marina Stoyakina
Hello everyone! And I present my new work made of 100% cotton.
The hat is knitted according to the attached pattern and tied according to the yoke principle. The decorative motif is the same “African flower”.
Openwork strapping of the cap:
- we knit an even number of arches, 5 in each.
- In the next row we knit 4Dc, 3VP, 4Dc in the first arch, then connect. loop with the second arch, in the third arch again 4СН, 3ВП, 4СН... and so on until the completion of the tying circle.
- The third row - with a contrasting thread - we knit RLS, and above 3VP we make a picot.
I will be glad if you are inspired by my work and create bright summer outfits for your wonderful girls!
Many people like my panama hats and they ask me to conduct a master class. Now the warm season is approaching, when mothers will want to knit such a hat for their little ones. This hat can also be knitted for adults. This hat is knitted with an openwork pattern that will protect you from the sun and morning coolness.
The pattern is not perforated. The brim of the cap protects the eyes from the sun and is a decoration of the cap.
Calculation of hat sizes
To accurately determine the size of the cap, we determine the dimensions of the bottom and depth of the cap, you need to know the length of the head circumference or the age of the child. We determine the head circumference with a centimeter so that it passes at the back along the most protruding point, at the front 1.5 - 2 cm above the eyebrows:
If it is not possible to take measurements, we can approximately determine the head circumference using the table: 
We calculate the diameter of the bottom of the hat as follows: divide the head circumference by pi equal to 3.14 and subtract 1.5 - 2 cm (you don’t have to subtract 1.5 - 2 cm, then the hat will be freer and you can adjust its size using the drawstring) . The diameter of the bottom is a flat circle to which we will expand.
The depth of the cap is determined by the formula:
Divide the head circumference by 3 and add one cm (to the middle of the ear). It is better to do a fitting; if it is not possible to do a fitting, we take the depth of the cap from the table.
Master class of hats and panamas for the head with a diameter of 51 cm.
Threads 100% cotton 550 m per 100g. Hook 1.25.
1. Make an amigurumi loop: 
2. Three air lifting loops at 19 s.n. , close the row s.s.
3. Three vp raises, one vp, one dc, repeat 18 times. At the end of the row s.s.
Knitting pattern for a hat
4. Three ch. lifting, in the first v.p. rise. One v.p. repeat 19 times. At the end of the row s.s. 
5. Three ch. lifting, one s.n. in s.n. previous row, two v.p., two d.c. in s.n. previous row, two v.p. repeat 18 times, at the end of the row s.s.
7. Next we knit the crown without adding to a depth of 9.5 cm. 
8. We knit two rows of sc.
9. One row d.n. in one v.p. repeat to the end of the row. 
10. Two rows of s.b.n. repeat to the end of the row.
11. Next we knit the brim of the cap. 


Knitted from 100% Begonia cotton, hook number 2. The openwork cap is knitted with a basic pattern, its volume is adjustable with a ribbon. Beads - tied wooden and mother-of-pearl beads. Set size - for 3 years.
Hat - Bunny. We start knitting a hat from the top of the head, cast on several loops - a chain, connect it into a circle and then knit it according to the attached pattern.
We tie the resulting circle with 12 double crochets.
- 2nd row - increases by 2 columns, in each lower column = 24
- 3rd row increase through one column = 36 columns.
- 4th row increase in every 3rd column = 48 columns.
- 5th row increase in every 4th,
- 6th in every 5m, etc., until our circle is evenly increased to the bottom diameter you need (table attached)
We knit the bottom with a relief elastic band. (diagram attached)
It is also called convex and concave.
We decorate with the BUNNY applique :) AND SEW ON THE EARS (two circles, double stitch).
This summer hat is knitted from Alize Forever yarn. Work by Elvira Tkach. Yarn composition: 100% microfiber acrylic, 50 g, 300 m. Head circumference 40 cm. The hat is knitted from top to bottom according to pattern 1. From the 1st to the 17th and 21st to the 22nd rows we knit with turquoise yarn. From the 18th to the 20th and from the 23rd to the 25th row - in white. After the 25th row, I repeated the “stripe” again with turquoise, white and again turquoise. Then I completed the work with the edge according to scheme 2.
Set “Bell” - a hat with a hole for a ponytail or braid and a handbag! Incredibly convenient option for long hair!
Crocheted set made of 100% cotton CHARM (pink) and COCO (green) from VITA. We cast on 36 VPs, close them in a ring and then knit according to the approximate pattern with ticks from DC (I knitted without stitches between the ticks, but whoever likes it!).
We knit a green pom-pom with a DC - in each row we double the loops and so on until the desired length. For example, you tied a hole with 36 double crochets (dc). In the second row, make an increase in each column - knit 2 Dcs, for a total of 36 * 2 = 72 Dcs. In the third row - 72 * 2 = 144 SSN. In the fourth row - 144 * 2 = 228 Dc. 4 rows will most likely be enough.
The hole for the ponytail is adjustable with a cord made from VP. The lace decorations can be anything! The handbag is an inverted cap, we use the same pattern; handle - any version of ribbon lace.
Patterns for knitting an openwork hat and handbag
The size of the knitted hat is head circumference 54 cm.
To crochet a hat you will need: 100 g of blue yarn (100% cotton), hook number 2.
The bottom of the cap is made according to pattern No. 1. Next, knit in the round with a pattern according to pattern No. 2 without increments to the desired depth of the cap.
Tie the edge of the cap with a picot.
You will need: leftover 100% cotton yarn of different colors (240 m/50g): light green, orange, turquoise, white, yellow, hook number 2, safety pins, pattern paper, needle and thread to match the yarn for sewing.
Patterns: flowers and leaves according to patterns, single crochets.
Sequence of knitting an openwork hat
- Cut out a circle with a diameter of 35 cm, pin it with safety pins to a soft base. The basis can be a thick pillow.
- Next, we knit flowers and leaves from various yarns according to the patterns. You can choose other color schemes. We hem the ends of the yarn to create an even element, and steam the finished products.
- Then we lay out the steamed flowers and leaves on the pattern face down, in any order, and attach them to the base with safety pins.
- We sew closely adjacent elements together using a needle and thread, and fill the gaps with an irregular mesh (chains of air loops). There are several types of joining motifs: you can first knit the warp mesh using a hook, and then attach the flowers or connect them while knitting, although this method is more suitable for more experienced needlewomen.
The spring model of the cap is made in bright colors.
Video tutorials on crocheting openwork hats
Beautiful spring crochet hat
The openwork hat is crocheted from Chinese yarn, 70% bamboo, 30% cotton. 1 skein was enough, thread length 110 m. Hat for a 14 year old girl.
Crochet spring hat for beginners
The hat is not entirely lacy, but not warm either. Knit in the round from bottom to top, starting with rib. Milk cotton yarn 150m/50g, hook 3.5 mm.
The video should load here, please wait or refresh the page.
Long openwork hat for spring/summer, crocheted
Hook 3.75. Yarn Kamtex BAMBINO 150m/50gr Consumption 80 gr. Color "005 beige". Size 56-58.
The size can be easily adjusted by hook size and/or yarn selection.
The video should load here, please wait or refresh the page.
Master class Crochet openwork hat
The hat is knitted in the shape of a tube with a cord.
Yarn 100g/200m and hook No. 2.5 and 3.75 mm.
The video should load here, please wait or refresh the page.
Crochet hat with openwork pattern
- This short and high-quality master class will help you knit an openwork hat.
- We will need 1 skein of VITA “ALPACA WOOL” yarn (100g, 300m) and hooks No. 2.5 and No. 3.
- Yarn VITA "ALPACA WOOL", as well as hooks to choose from.
The video should load here, please wait or refresh the page.
It’s not difficult to knit a hat if you have any yarn and comfortable knitting needles. This article offers you many patterns of original designs for winter, autumn and spring hats.
A hat is the most important item of a winter wardrobe. Besides that it should be warm, she should definitely be beautiful. Of course, shops and markets are full of a choice of hats, but it’s much nicer to have an individual hat, tied with my own hands.
Both experienced craftsmen and novice needlewomen can knit a hat. It will be useful for this high quality yarn and detailed pattern. It's also helpful to look at a few video lessons and master classes to understand all the intricacies of knitting a product.
The easiest way to knit a hat is on knitting needles. You can absolutely use any number of knitting needles, and circular knitting needles, which greatly simplify knitting in the round. Each hat is knitted “in decreasing order”, that is: the closer you get to the “bottom” of the hat, the fewer stitches you cast on.
A hat knitted with knitting needles has an elastic band. “Rib” is a type of knitting that involves a set alternate knit and purl stitches. This knitting allows the product to tighten and stretch in a certain area.
Scheme:
Simple version of hat No. 1  Simple version of hat number 2
Video: “A simple knitted hat”
How to knit a warm winter hat for women?
Women's hat immediately different from a man's hat. She has a more delicate pattern, which is easy to create with knitting needles. The most popular: openwork patterns, braids, cones. You can also decorate a woman’s hat with flowers knitted from threads, brooches, pom-poms and even ears.
A winter hat should be knitted either from thick yarn, either from wool threads. Large yarn will help create a dense product, does not allow cold to pass through and does not “release” heat. Wool thread, due to its naturalness, retains heat better.
Scheme:
 Option #1
 Option No. 2
 Women's openwork knitted hats for spring: diagram with description
A spring hat must be knitted from thin and light threads. If you have a special knitting skill, create floral or openwork motifs will not prove problematic.
Additionally, you can create large knitting with abundance "holes" in the pattern. This will prevent the spring cap from being too hot, but at the same time keep warm.
Scheme:

 Option #1
  Option No. 2
 Video: “Lacy hat”
How to knit a beautiful, simple women's hat for beginners?
To those who only starting to get acquainted with knitting, it will be useful to know about simple diagrams that simplify the work process. Such diagrams clearly explain knitting each loop and at the same time allow you to knit a beautiful hat. If you don’t knit often, it’s best to start your practice from garter stitch.
The hat is knitted in garter stitch and fits securely and “tightly” on the head. It's quite dense. Depending on the pattern, you can choose any headdress design.
 Garter stitch
 Video: “Knitting a hat in garter stitch”
Hummingbird - fashionable women's hats: knitting, pattern
Hummingbird hat differs in original knitting. It has a thick elastic band that “sits on the forehead” and free bottom of the hat hanging back or to the side. The hat goes well with sports and business style clothing, it allows do not spoil women's hairstyle and effectively warms your head during the cold season.
Often the hummingbird hat is decorated with decorative elements to add femininity to it:
- Tied flowers
- Brooches
- Hairpins
- Fur
- Rhinestones or beads
Scheme:

 Option #1
 Option No. 2
 Women's hat with a visor: diagram with description
Hat with visor somewhat similar to a professional headdress. In this case the visor plays a purely decorative role, adding charm to the product and complementing the female image. This hat goes perfectly with jeans, trousers, high boots and cropped coats.
You can decorate such a hat with original openwork knitting or attach decorative elements to it.
Scheme:
 Option #1
 Option No. 2
 Option No. 3
 Women's winter drop hat knitted: diagram with description
Word "drop""translated from English as "droplet". The “drops” hat is visually somewhat similar to the “hummingbird”. She features a longer and hanging bottom, which falls back.
Such a hat can have tight or loose elastic. It is often decorated with beautiful openwork knitting or complemented with decorative elements: brooches, embroidery, rhinestones and beads. The hat goes well with any style.
Scheme:
 Option #1
  Option No. 2
 How to knit a beanie hat for a woman?
A cap "beanie" Very popular with today's youth. It has a baggy shape that is easy to fold in your preferred way: back, inward and even upward (if the knitting is tight).
Typically "beanie" has a knitting called “rubber band”. This method of knitting allows the product to sit “confidently” on the head and take a given form. The hat goes well with a sporty or casual clothing style.
Scheme:

 Option #1
 Option No. 2
 Cross pattern for a hat
 Women's hat with knitted lapel: diagram description
A hat with a lapel is a classic version of a headdress. Such a hat suits any face shape and goes with most outerwear options. Often the cap with a lapel is decorated with a bubo. The bubo is knitted from threads or made from a piece of fur. This cap Suitable for adults and children. Depending on preferences, it can be made with garter stitch, elastic or any curly stitch.
Scheme:

 Option #1
 Option No. 2
 simple knitting
 How to knit the lapel of a hat with lush columns?
Knitted hat "lush column", this is a beautiful headdress. It adds originality to her “lush knitting” with the passing of certain loops. There are a lot of patterns of “lush loops”; everyone can find simple and complex patterns according to their desire. With lush knitting you can knit a hat of almost any design.

 How to knit a puffy stitch?
 Women's hats knitted with braids and rollers: diagram with description
Braid - classic knitting pattern, which is present on most products: scarves, mittens, sweaters and hats. The braid can be large, small, from large “strands” or from small ones. At the same time, the knitting may contain one or many braids.
You can decorate a hat of absolutely any design with a knitted braid. To do this, you should study each proposed scheme in detail and practice your skills. The braid will add volume and elegance to the headdress. A hat decorated with braids looks very feminine and gentle.
Scheme:

 Option #1
Knitted Kubanka hat for women with description
The Kubanka hat is distinguished by its original style. It is made in the form of a folk Kuban headdress with a high stand. The cap covers the ears, forehead and back of the head, and has the shape of a short cylinder.
The advantage of such a hat is that it suits almost every face shape and even full, round faces can be visually “stretched out.” This hat is “acceptable” various decorations:
- Figured knitting
- Volumetric knitting
- Openwork knitting
- Multi-colored knitting with patterns
- Decorative elements
Knitting patterns for a “Kubanka” hat are very simple and understandable. Depending on your preference, you can choose a large or small “kubanka” scheme. You can knit a hat from simple and unusual threads: “grass”, “terry”, “thick yarn”.
Scheme:

 Option #1
 Option No. 2
 Hat made of thick yarn with knitting needles: knitting pattern
Thick yarn is a special type of thread for knitting. It has one thick thread, which consists of many small ones. Thereby the product always turns out voluminous, lush and warm. Knitting with such yarn is difficult only at first. If you get used to it and study knitting patterns, you can discover many beautiful patterns. The advantage of large yarn is that the product knits faster due to “large” loops.
You can use plain threads, but melange threads with many bright shades or colors that move from one to another look much more impressive.

 Scheme
 Video: “Hat made of large yarn”
In fact, there are very, very many variations for hats, all of them are limited only by your imagination and needs:
- hat - cap or beanie. It came into fashion not so long ago, but has firmly taken its position. Everyone wears such hats: men, women, children, teenagers and even grandmothers.
- a cap - a beret has been fashionable to wear for decades. But if earlier berets were on a leg with a crown of not very large size, now they wear voluminous berets.
- hats with ears on the top, imitating a cat or any other animal.
- hats with ear flaps, for small children.
- cap that fits the head.
- hats – hoods, snoods, etc.
Not all of these models are appropriate to knit with openwork patterns, for example, the same hats with earflaps; an openwork pattern will not protect the child from wind and cold.
How to knit an openwork hat?
The hat can be knitted in the round or with a seam, from top to bottom or from bottom to top; in the description of each model, they must indicate which method is preferable to choose for a given pattern.
Pay attention to the elastic; in many models, the elastic and the hat are knitted in one fabric. It looks neater than sewing on elastic. But there is always a chance that such an elastic band will stretch during wear. Therefore, it is recommended to include a hat elastic in the harness. Even if this is not indicated in the description, think about the moment of designing the elastic band in advance.
When to wear a fishnet hat for a girl
Openwork hat for a girl from the Internet
Openwork hats are necessary for girls both in spring and summer. Therefore, we have collected several interesting models and invite you to knit a baby hat.
interesting selection for the site 20 easy summer hat patternsHead circumference length 50-52 cm.
Materials:
- Needle size 4mm – US 6 (Circular, Double-pointed |Hosiery|)
- Yarn: 25 grams of white yarn - 50% cotton, 50% acrylic (105 m per 50 grams)
- 25 grams of pink yarn - 50% cotton, 50% acrylic (105 m per 50 grams)
Openwork hat for girls with ears

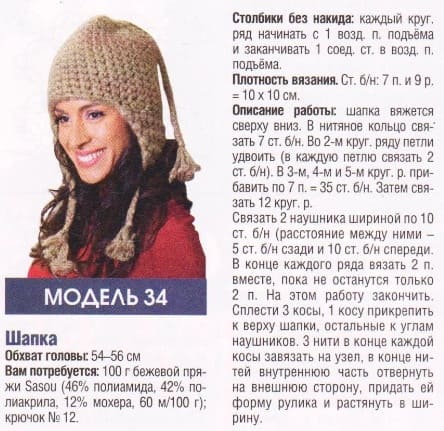
The original hat is knitted from threads containing cotton + viscose + polyacrylic.
The patterns are for circular knitting! If you knit with a seam, then the purl rows must be knitted in reverse!!! Attentively!!
Scheme No. 1 of the central pattern. We knit the first 6 rows according to this pattern. Rapport 25 loops.
empty and filled-in cells - knit with purl
Scheme "2 sides.. Rapport - 10 loops. But in the diagram I drew how to distribute the patterns of the cap on the left and right (the diagram of the left part is a mirror image of the right), the central pattern is highlighted in red..
This hat can be knitted for both girls and boys. For knitting we will need summer yarn (100% cotton, cotton + bamboo, cotton + viscose, microfiber) 150-180 m. in 50 g. Yarn consumption is 20-40 grams, depending on the thickness of the yarn and the size. Stocking needles (sock needles) 5 pcs. and circular 40-50 cm. No. 2.5. Hook No. 2.
Hat for girls “Kristina” with “openwork umbrellas” pattern
The hat is knitted with the “Lacy Umbrellas” pattern from 100% cotton.
The pattern of the cap is quite “holey”, so it is ideal for both cool summer and early autumn and late spring.
To protect my little one’s ears from the icy wind in relatively warm weather, I knitted a wide, thick elastic band.
However, in my opinion, this pattern would be more advantageous when combined with a narrow elastic band of 2-3 cm or in the shape of a beret.
Materials used:
Yarn ONline Linie 165 Sandy 100% mercerized cotton 120m/50g, consumption about 70 grams.
Circular knitting needles No. 2.5 for the rib and No. 3 for the main pattern.
The hat is knitted in the round.
Size 1-2 years (head circumference 48-50 cm). The height of the cap is about 18 cm.
The hat is knitted very easily and quickly.
Yarnart jeans, knitting needles No. 3.
We knit every second, fourth, sixth and eighth rows completely with purl stitches.
I knitted the last two front rows every 2 adjacent loops together, and through the remaining ones I pulled a thread and tightened it and it turned out to be a hat.
Openwork hat - beret for a girl
In the picture the pattern seemed complex, but in practice it is very simple and quick to knit.
Here is a diagram of the main pattern (I drew the diagram, but the pattern itself is not mine, I spied):
And here is a diagram of how I made the eyes smaller to get a flower on the top of my head:
Explanations for the diagrams:
- vertical line - front loop;
- horizontal line - purl loop;
- arc - yarn over;
- triangle facing to the right - knit two stitches together behind the back wall;
- triangle facing left - knit two loops together behind the front wall;
- all lines on the diagrams are only odd (that is, only those on the front side);
- the number of loops must be a multiple of 14, plus 2 edge loops;
- what is shown in red is knitted like this: leave 2 loops on 1 auxiliary knitting needle, and 2 loops on the second auxiliary knitting needle while working, 2 knit stitches, then knit the loops from the second auxiliary knitting needle purlwise and knit the loops from the first auxiliary knitting needle.
How to knit an openwork hat for a girl, models from our website
On our website we also have good models of openwork hats for girls and their mothers.
My little niece really loves hats both in winter and summer. These are the hats I knitted for a fashionista. Size for 2 years. I knitted with melange threads. Valeria's work.
Hat for girls, description
I cast on 70 loops, knitted 10 rows with an elastic band 1*1 and switched to the main pattern.
The main pattern is knitted like this: 1st row – *knit 2 together, yarn over* (repeat from * to * until the end of the row)
Row 2 – knit all stitches.
3rd row – knit, *knit 2 together, yo* (repeat from * to * until the end of the row), 2 together (the second loop of these two is the first loop of the next row, to maintain the pattern).
4th row – all knits. Repeat from rows 1 to 2, maintaining the pattern to the desired height.
Then we decrease the loops evenly. Crochet a thread through the remaining 10 loops, pull it off and disguise it on the wrong side. Wash the hat in hand wash mode and dry. All that remains is to choose the decoration to your taste. In one hat, I sewed a large bead onto the top of the head, and left the second hat without decoration.
The hat was knitted for my 1.5 year old daughter for the winter. For knitting, 2 skeins of yarn, 50 g each, were used. Tatiana's work.
I knitted with double thread on knitting needles 5. First, you need to measure the head circumference, we got 47 cm. Determine the knitting density and cast on the appropriate number of loops, I got 70. We knit 5 cm with a 2 by 2 elastic band, go to the faces. stitch, knit another 7 cm.
Then every 10 stitches in k. row knit 2 knits together, purl. row we knit purl. We continue to close the loops, in the last row close three loops at once and stretch the thread, pull it off. Sew. To determine the height of the cap, you need to divide the head circumference by three.
Decorate with beads and knitted flowers.
See how to knit a flower with knitting needles.
Hat with a spider. The yarn is from Moscow region. Knitting needles 3.5 in two threads, the consumption is almost a skein.
Size 50-52, set 60 stitches. Italian method, 4 rows with a handkerchief, then pattern according to the pattern, in places of decreases, English knit, i.e. through 14 loops.
Decrease of four blades: decrease 8 stitches in a row through a row: 2 purl together, 1 knit together, 2 purl together. Work by Svetlana Sofronova.
Knitted hat
Hat for spring! Knitted from 100% acrylic yarn. Light as a feather. Delicate and soft. I took the model of the cap from the internet.
The pattern is very simple and knits up quickly! I have attached a diagram of the hat. The only thing in the legend is that it says to remove four loops on an additional needle. I started knitting like this, but the pattern didn’t work out! Either I somehow misunderstood, or there was an error in the diagram. I removed three loops on an additional knitting needle, and the rest was everything as in the diagram and description! Try it yourself, maybe you will succeed as written. Work by Valentina Kaldysheva.
The model is designed for a woman's head, but it seems to us that such a hat would be perfect for a girl.
To knit a hat you will need: 80 g of medium thickness yarn (100% cotton) fuchsia color. SPOKES No. 3,5 and 4.
Garter stitch (plate, knitting): all stitches.
Knit stitch (knit stitch): knit. R. – persons P.; purl R. - purl P.
Knit a fantasy pattern using knitting needles according to the pattern.
KNITTING DENSITY OF THE HAT 10 x 10 cm = 20 p. x 26 r.
DESCRIPTION OF THE HAT'S OPERATION
On knitting needles No. 3.5, cast on 107 sts and knit 2 cm of boards. viscous. Continue knitting with needles No. 4 in the pattern according to the pattern for 18 r. and then repeat the 17th and 18th rows. At a height of 15 cm from the boards, knitting, decrease the trace. way: 1st r.: 1 chrome. p., 2 persons. p., 2 p. together persons. with a tilt to the left, *1 purl. p., 2 p. together knit., 3 knit. p., 2 p. together persons. with a tilt to the left*, repeat from * to * 11 more times and finish with 1 purl. p., 2 p. together persons. with a tilt to the left, 2 persons. p. and 1 chrome. p. = 81 p.; 2,
3rd and 4th rows: knit according to the pattern; 5th rub.: 1 chrome. p., 1 persons. p., 2 p. together persons. with a tilt to the left, *1 purl. p., 2p. together persons., 1 person. p., 2 p. together persons. with a tilt to the left*, repeat from * to * 11 more times and finish with 1 purl. p., 2 p. together persons. with a tilt to the left, 1 person. p. and 1 chrome. p. = 55 p.; 6th row: according to the drawing; 7th rub.: 1 chrome. p., 2 p. together persons. with a tilt to the left, *1 purl. p., 3 p. together persons. with a tilt to the left*, repeat from * to *11 more times and finish with 1 purl. p., 2 p. together persons. and 1 chrome. p. = 29 p.; 8th row: according to the drawing; 9th row: knit 2 stitches together. along the river = 15 p.; 10th row: knit 2 stitches together purlwise. along the river = 8 sts. Cut a long enough thread and thread it through the open sts of the last p. and pull them off.
Assembling the cap: Make a seam. Moisten the finished product and let it dry.


A summer openwork white hat will go with any outfit!
Cap size for OG 48-52 cm
Description of work: cast on 98 sts on stocking needles and knit 30 rows in circular rows with an openwork border according to the pattern.
Openwork border: the number of loops is a multiple of 14 + 1 + 2 chrome. (in circular rows the number of loops is a multiple of 14). Knit according to the pattern, which shows only persons. R. or odd circular rows, purlwise. R. Knit loops and yarn overs purlwise, in even circular rows – knit. Start with 1 chrome. and loops before rapport, repeat repeat loops, end with loops after repeat and 1 chrome. Repeat rapport loops in circular rows. Perform 1 time from 1st to 30th r.
Then knit in stockinette stitch, in the 14th row mark every 14th row. (= 7 p.). 1 time every 25 minutes, then 8 times every 3rd day, 2 times every 2nd day. and knit the marked loop with the previous loop together 2 times in each row. After 18.5 cm = 55 r. Pull the remaining 7 stitches from the cast-on edge with a working thread.