Pictures a hook. Joe Hamilton - knitted patterns Volumetric crochet panels
Today we will plunge into a truly amazing world of knitted things - these are crocheted portraits.
An amazing woman, an artist by education and a wonderful needlewoman. Knitted patterns Joe Hamilton amaze the eye and excite the imagination!
I am familiar with some basics of drawing, but I can't imagine how to tie a whole portrait! And you?
Meet Joe Hamilton!
Joe is from Scotland. As I said, Joe is an artist by training. This played one of the most important roles in creativity. Her latest works are crocheted portraits.
When I first saw the portrait in the process of knitting, I did not understand that this picture was crocheted. Only after an approximate examination it became clear what was the matter! 🙂

She is able to sit for hours and crochet huge pictures. These are landscapes and portraits of friends and relatives. The still unfinished portrait comes out about three meters. Fiction!

Hard work and amazing color reproduction. It is amazing! All shadows and shades are conveyed using a huge number of colors. The most amazing thing is that Jo does not make separate sketches and examples before work, she just knits creating everything as she goes.

We have already talked about the proper organization of the workplace. So Joe is a real role model. All colors are grouped. Warm and cold shades are separated and each skein of yarn has its own separate place.

Seeing these photos, most needlewomen probably think: “I want the same amount of yarn!” 🙂

I present to your attention some of the work. There are many more works, they can be seen on the official website of the artist.


It will require perseverance from you, a great desire to receive beautiful thing and attentiveness. Such things are always relevant, and for the holidays as a gift, and just for yourself. From such a product you can make a picture by placing it in a frame. Or you can just use it as a large table napkin. It consists of 131 rows sirloin knitting plus 2 rows of strapping. The size of the finished picture when using the same yarn and hook turned out to be 48-50 cm wide, about 60 cm high.
For work you will need:
- 137 grams of yarn from Troitsk Aster 100% mercerized cotton (610 m per 100g) white;
- Hook 1.0.
Note that in the process of knitting, the thread twisted strongly and very often. At the same time, it doesn’t matter where you take the thread from - from the inside of the ball or from the outside. Just fasten the thread to the ball with a hair clip or elastic band, and unwind. Perhaps, when choosing a thread from another manufacturer, this will not happen. The situation was saved a little by rewinding the thread onto the tube from paper towels, the thread began to twist much less.
Legend:
- ZK - filled cell;
- PC - empty cell;
- CCH - double crochets.
Crochet Pattern:

The rows in the diagram are read like this: odd - from right to left, even - from left to right.
You can knit both from the bottom up and from the side, then, accordingly, the number of loops in the initial row will be much larger, but the work time will not be reduced from this. We knitted from the bottom up. You can use the knitting pattern, but it was more convenient for us to paint everything cell by cell at once, in which case it is unlikely to miss any cells.
Description of the process of knitting a picture using the loin knitting technique:
- 1st row: 244 CCH
Further, ZK and PC will alternate, the rows will always begin and end with ZK. Therefore, in the rows we will write the designations in this way - 1 (4) -4-5 (16) -6-7 (22) -3-1 (4). This will mean that the rows start with filled cells, in this case - one, then 4 empty, 5 filled, 6 empty, 7 filled, 3 empty, and the row ends with one filled cell.
In brackets is the number of CCHs that you should get. This is for control. You can count yourself, for this you just need to multiply the number of ZK by three and add one.
Each row starts with 3 incline sts and work dc from the second st.
- 2nd row: 1(4) - 25 - 1(4) - 10 - 2(7) - 3 - 1(4) - 4 - 4(13) - 2 - 8(25) - 19 - 1(4);
- 3rd row: 18(55) - 2 - 8(25) - 3 - 8(25) - 3 - 9(28) - 4 - 2(7) - 4 - 3(10) - 5 - 3(10) - 2 – 1(4) – 1 – 1(4) – 3 – 1(4);
- 4th row: 3(10) - 1 - 1(4) - 1 - 1(4) - 23 - 1(4) - 2 - 6(19) - 5 - 6(19) - 3 - 8(25) - 2 - 2(7) - 1 - 1(4) - 1 - 2(7) - 1 - 8(25) - 1 - 1(4);
- 5th row: 1(4) - 1 - 1(4) - 1 - 1(4) - 1 - 3(10) - 3 - 1(4) - 1 - 1(4) - 1 - 11(34) - 8 - 1(4) - 1 - 1(4) - 13 - 1(4) - 12 - 3(10) - 2 - 2(7) - 1 - 6(19) - 2 - 1(4);
- 6th row: 1(4) - 2 - 2(7) - 2 - 2(7) - 1 - 2(7) - 5 - 1(4) - 23 - 3(10) - 1 - 7(22) - 2 - 7(22) - 3 - 1(4) - 1 - 5(16) - 2 - 1(4) - 2 - 1(4) - 1 - 1(4) - 1 - 1(4);
- 7th row: 1(4) - 1 - 1(4) - 1 - 1(4) - 2 - 1(4) - 3 - 2(7) - 1 - 1(4) - 5 - 2(7) - 1 - 1(4) - 3 - 3(10) - 31 - 2(7) - 4 - 1(4) - 1 - 5(16) - 2 - 2(7) - 2 - 1(4);
- 8 row: 1(4) - 2 - 1(4) - 5 - 3(16) - 1 - 1(4) - 2 - 6(19) - 31 - 1(4) - 4 - 2(7) - 9 - 1(4) - 6 - 1(4) - 3 - 1(4);
- 9th row: 1(4) - 1 - 1(4) - 3 - 1(4) - 3 - 2(7) - 7 - 1(4) - 1 - 1(4) - 1 - 5(16) - 18 - 6(19) - 3 - 5(16) - 1 - 7(22) - 2 - 2(7) - 5 - 1(4) - 2 - 1(4);
- 10th row: 1(4) - 8 - 2(7) - 2 - 1(4) - 4 - 4(13) - 3 - 1(4) - 3 - 1(4) - 2 - 5(16) - 20 - 1(4) - 1 - 2(7) - 9 - 1(4) - 7 - 1(4) - 1 - 1(4);
- 11th row: 1(4) - 2 - 1(4) - 6 - 1(4) - 8 - 1(4) - 1 - 1(4) - 9 - 6(19) - 5 - 7(22) - 1 - 1(4) - 1 - 4(13) - 4 - 1(4) - 1 - 1(4) - 4 - 1(4) - 2 - 1(4) - 9 - 1(4).
If you liked our way of reading the diagram, then you can find a description of all the rows in the attached file.
This is how your picture will grow:


We do the strapping
Without interrupting knitting, we make 1 VP and begin to knit counterclockwise on the side walls of the CCH, 2 single crochets each, until we tie the whole picture, at the same time we hide the protruding threads along the way. Why exactly? So that all the binding is on front side canvases. And now, in the opposite direction, we knit a reverse single crochet in each loop, i.e. " step step". Insert the hook into the loop behind, grab and pull the thread, then again grab and pull the thread through the loops on the hook, and again into the next loop behind.
And this is how your painting should look at the end.

We hope everything worked out for you.
Share with us your result and leave comments.
Author Tatyana
Good afternoon, dear readers!
Today I want to tell you what I have been doing for the last two months and offer you colored knitting knitting needles, namely to knit a picture with knitting needles!
No, I haven’t knitted pictures myself yet, but knitted a pullover for my son.
The pattern with squares of different colors of yarn was borrowed from a Japanese website. The pattern is the front surface. The knitting pattern was not required here, she simply calculated the number of loops in squares herself.
Complexity simple knitting consisted only in the fact that several hanks were used at once in one row. This technique of colored knitting is called.
Once upon a time, in this way, I knitted both myself and my family pullovers and jackets from yarn not only of different colors, but also of different textures (for example, cotton with mohair). Such models were taken from the SHIK album, which combines interesting design solutions from French and German fashion designers.

While I was knitting a pullover for my son, I was also engaged in blogging, of course, I participated in the “We Eat at Home” project, virtual magazines “” and “”, I took and continue to take part in various competitions, visited many other sites and once I saw a picture knitted with knitting needles.
Beautiful pictures are most often crocheted, made from threads, painted, of course.
And the pictures knitted I didn't find much. Still, it's pretty hard work.
But how beautiful it is! Not very different even from a watercolor painting, and not inferior to an embroidered painting.

Isn't embroidering hard work?
Knitting a picture with knitting needles is not difficult at all, as it may seem right away.
The main thing is to choose the shades of yarn, you can try knitting from floss or acrylic threads.
In one row, many different hanks are used so that they do not get confused with each other, after knitting a part of the pattern with some one color, I shift this hank from left to right. And at the beginning of knitting the next row, I shift all the hanks back from right to left alternately, strictly observing their sequence.
Threads of different colors are connected to each other from the inside by crossing.
Having knitted a row, you need to mark it on the diagram with a pencil, so you won’t go astray and you will knit all the following rows strictly according to the pattern.
Crocheted panels are a great alternative to ordinary wall paintings: they look more unusual than store-bought products, and everyone can create such a "masterpiece" with their own hands
The interior design of the room provides not only beautiful furniture, wallpaper and curtains. Small decorative elements are important. They help to create a special atmosphere in the home. Today, crocheted panels are very common and are considered stylish.
Do-it-yourself sirloin panels are created by alternating empty and filled cells. It is thanks to this technique that a kind of play of light and shadow is obtained. Cloths made with fillet knitting technique keep their shape well. In this way of knitting, you can create with your own hands not only tablecloths, napkins, bedspreads, curtains, dresses, but also beautiful decor items for the room, including New Year's paintings on the wall. It can be a panel of braids, flowers and simple patterns.

Knitting technique is accessible to everyone and there is nothing complicated in it. Even those who have never picked up knitting needles or a hook can make beautiful little things.
Fillet nets are alternating double crochets and air loops. But there are also different variants combinations. The number of air loops can also be different. Usually, empty cells are indicated in the diagrams, they correspond to the empty cells of the picture, and the shaded ones correspond to the filled cells of the pattern. Each knitting pattern has a description, so knitting is quite simple and easy. It is advisable to use cotton yarn or linen, viscose fibers for crocheting.
How to crochet (video)
Panel on the wall "Birch"
To create such a panel you will need:
- White, gray, light mustard, dark mustard, green yarn;
- Hook;
- A sheet of thick cardboard (the base on which the related product will be attached);
- Linen fabric.

If you want to glue the "Birch" panel in the kitchen, then it is advisable to use as many green tones as possible: this color stimulates the appetite
The birch trunk is made with a single crochet with white yarn. Branches - chains of air loops with black fibers. Light and dark mustard threads are used for birch earrings. Each earring consists of 21-23 air loops and a double crochet. Green threads are used to create leaves. After all the components of the panel are connected, they are sewn or glued to the fabric. In the future, it is stretched onto a cardboard sheet.
You can decorate a connected panel around the perimeter with linen thread lace.
In the same way, it is possible to tie an oak, a willow looks very beautiful.
Crocheted pictures and panels: schemes
The main thing is to show maximum imagination and follow the scheme.
We knit a New Year's panel.
Need:
- Red and white threads;
- Hook;
- Sheet of cardboard.

The panel consists of three squares - two depict a deer, the third - a Christmas tree. Each square consists of 25 air loops made with white thread. The drawings are knitted with a double crochet. Be sure to tie each of the squares with red threads in 5 rows with a single crochet. The connected elements of the panel are connected to each other by a chain of air loops.
The loin knitting technique is simple, even a child can learn it. Making a beautiful and original panel, having a diagram at hand, is not difficult and does not take long.
With a child, you can make large crocheted panels with images of animals or make a flower meadow. It is enough to tie 10-12 small flowers different shades, make a column of stems and stick all the elements on a colored fabric. Get a beautiful, bright panel.
In the same way, you can tie a snowman, a Christmas tree, draw a winter forest glade, houses on paper and attach related details to the drawing. It will turn out an excellent knitted decor element for New Year's Eve.
Panel of crochet flowers
To create a crochet panel on which flowers will flaunt, you will need thick light threads, a frame from a photo or picture, a hook, white, pink, green threads, a needle.

Glass and cardboard are removed from the frame. The frame is tied with light thick threads that are tied into knots. Then a ball is threaded alternately with a thread up and down. This must be done until the threads begin to fit snugly against each other. In the middle part of the interlaced threads, an intersection will be obtained.
Flowers are made with five air loops, after which the column is connected into a ring. How many rows there will be in a flower depends on how big it will be.
Knitted petals are fastened together with threads. Flowers are further attached with threads to the prepared panel.
Panel "Owl crochet"
Panels crocheted not only with patterns, but also with animals and birds look original and beautiful.
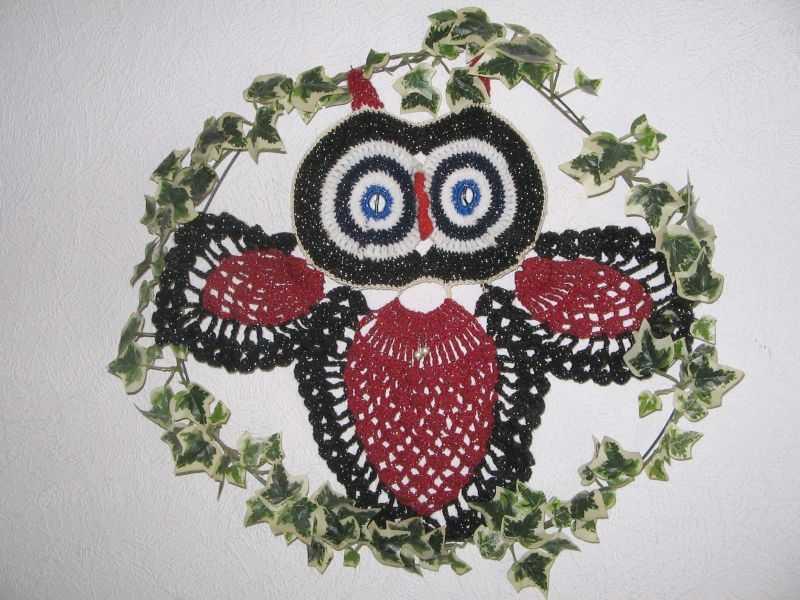
The panel "Crochet Owl" is created from several separate parts: the product itself can be decorated with beads or other decorations
To create a wall picture "Owl" you will need:
- 200 g of white thread;
- Hook;
- Rings that serve to assemble curtains.
The ring is tied with single crochets, three rows are knitted according to the existing pattern. The second ring should be done in a similar way. The first 12 double crochets are sewn together. The rest remain free. The first row of plumage of an owl is made of 4 air loops, and is knitted in the forward and reverse direction. Next, the body of the bird is knitted, and two wings end, but separately. Ears tied with single crochets are tied to the head.
The large ring is tightly tied with single crochets, the owl is attached to the frame by the tips of the wings, ears and middle part torso.
Such a crocheted panel can be used to decorate the hallway, children's room and even the living room.
Knitted panel "Jug"
The jug is knitted with loin technique, and a knitted mesh should be obtained. Empty cells are knitted with single crochets and two air loops.

The crochet pattern is:
- I row: 10 empty cells, filled;
- II row: 8 empty, 4 filled;
- III row: 6 empty, 6 filled;
- IV row: 4 empty, 8 filled.
The beginning of the row (the first column) should be replaced with 3 air loops.
The jug is knitted with white threads, it is better to use cotton yarn. In order to make the panel brighter, the outline of the jug should be tied, for example, with red threads. You can decorate the product with flowers, leaves, beads, beads.
Crocheted panel in the interior of the room (video)
At the end, the knitted product is attached to a dense fabric and inserted into the frame. This panel is a great way to decorate the kitchen.
Examples of crocheted panels (photo)


The interior design of the room provides not only beautiful furniture, wallpaper and curtains. Small decorative elements are important. They help to create a special atmosphere in the home. Today, crocheted panels are very common and are considered stylish.
How to make a crochet panel
Do-it-yourself sirloin panels are created by alternating empty and filled cells. It is thanks to this technique that a kind of play of light and shadow is obtained. Cloths made with fillet knitting technique keep their shape well. In this way of knitting, you can create with your own hands not only tablecloths, napkins, bedspreads, curtains, dresses, but also beautiful decor items for the room, including paintings on the wall. It can be a panel of braids, flowers and simple patterns.
Knitting technique is accessible to everyone and there is nothing complicated in it. Even those who have never picked up knitting needles or a hook can make beautiful little things.
Fillet nets are alternating double crochets and air loops. But there are also different combinations. The number of air loops can also be different. Usually, empty cells are indicated in the diagrams, they correspond to the empty cells of the picture, and the shaded ones correspond to the filled cells of the pattern. Each knitting pattern has a description, so knitting is quite simple and easy. It is advisable to use cotton yarn or linen, viscose fibers for crocheting.
Panel on the wall "Birch"
To create such a panel you will need:
- White, gray, light mustard, dark mustard, green yarn;
- Hook;
- A sheet of thick cardboard (the base on which the related product will be attached);
- Linen fabric.
If you want to glue the "Birch" panel in the kitchen, then it is advisable to use as many green tones as possible: this color stimulates the appetite
The birch trunk is made with a single crochet with white yarn. Branches - chains of air loops with black fibers. Light and dark mustard threads are used for birch earrings. Each earring consists of 21-23 air loops and a double crochet. Green threads are used to create leaves. After all the components of the panel are connected, they are sewn or glued to the fabric. In the future, it is stretched onto a cardboard sheet.
You can decorate a connected panel around the perimeter with linen thread lace.
In the same way, it is possible to tie an oak, a willow looks very beautiful.
Panel of crochet flowers
To create a crochet panel on which flowers will flaunt, you will need thick light threads, a frame from a photo or picture, a hook, white, pink, green threads, a needle.
