Paper drawing of a church. Architecture in paper plastic for elementary school students. Master class with step by step photos. How to make a church out of matches - step by step instructions with photos
We present step-by-step photo tutorials that will teach you how to make a church out of a plastic bottle, plasticine, toothpicks, paper, and even pasta.
If you know how to make a church, then you can make this craft from various materials. Not only cardboard, colored paper, but also matches and even pasta will be used.
How to make a paper church

To make it, take:
- whatman;
- cardboard;
- acrylic paints;
- a plastic bottle with a domed top;
- acrylic paint of different colors, including gold and silver;
- scissors;
- glue;
- blue colored paper;
- marker;
- ruler;
- icons scanned on paper.
Before you make a church, provide a pedestal for it. Make it from a sheet of thick cardboard, and cover it with paving stones printed on a color printer on top. Now let's start painting the details. To make the walls, you will need to cut out four such blanks by connecting them.

Cut out rectangles from blue paper, using a ruler and a black marker, draw these future windows as follows.

Cut out the door from brown cardboard, glue both rectangular and semicircular elements on top of it so that this part becomes more voluminous and it is clear that there are stones or bricks on it.

Cut out two door handles from yellow cardboard. To make steps for entering the church, you will need to cut semicircles of different sizes from cardboard, then glue them in order, starting with the smallest ones, ending with the largest ones at the bottom.

To make a dome for a church, cut the top off a matching bottle. All of it needs to be pasted over with plasticine, close the hole in the neck area and make this part more elongated. Then glue the dome with pieces of newspaper, wetting them in PVA glue.

Prime the dome using a real primer or white paint.


By this time the primer has dried, now you can paint the dome with gold acrylic paint in two or three layers.

Glue the windows to the appropriate markings. Glue the dome on top.

See how you need to assemble and arrange the workpiece. After gluing windows to the walls, attach a brown tape with small windows to the bottom, then glue the church layout to make it voluminous. Do not forget to stick on the appropriate places and icons. Glue the paper on top to become the roof.

Paint it with silver paint interspersed with brown. And with the same composition, mark the forged elements above the visor of the first door, and the column of the other must be painted with brown paint. Glue a silver cross to the dome, then glue the tower in the center of the composition.

Here's how to make a paper church. The process is very interesting, and you and your child will create such a significant thing from improvised materials. This is a model of the church, which is called "Hodegetria of Jerusalem", and it is located in Taganrog.
The next master class will also be easy for the child if you help him.
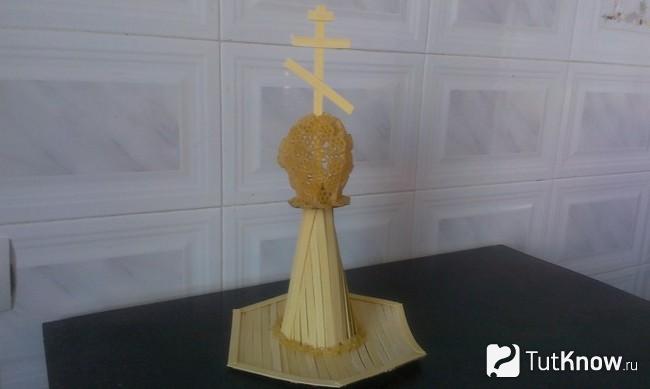
DIY pasta church
It is from this material that the next church will be built.

These flour products will create walls, openwork pasta will become decoration elements. Here is what you will need to take:
- pasta of different textures;
- scissors;
- pencil;
- ruler;
- long cover;
- foil;
- hot gun;
- cardboard.

Create a hexagon out of cardboard, then use it to make walls of this shape. Cover it with pasta.

Attach flat noodles at the corners and at the top to complete the finish. And with openwork elements you need to steal the top of the walls and make columns by folding this pasta in a pile.

From a sheet of cardboard, cut out a hexagon, as well as a cone. Glue the elements together. Using a hot gun, attach flat pasta on top. Decorate the junction of these two figures with semicircular pasta.

Make a dome from openwork vermicelli. To give it a shape, you can glue the top of a plastic bottle, which is made in the form of a dome, with these flour products. Glue a cross made from flat pasta in the center. Attach this dome to the created roof.
From cardboard, cut out the porch of the following shape, glue it on the outside with pasta.

Decorate the corners of this product with flat noodles, and use these pasta and horns to decorate the roof over the porch.

Cover the elongated cover with plasticine, and then glue this part with foil.

You have a bell. Use a glue gun to stick it in place. Here's how to make a DIY pasta church.

If an adult needs such a thing, then he can use matches as a material. The work is more painstaking, but very interesting.
How to make a church out of matches - step by step instructions with photos

To create such beauty, take:
- candy box;
- toothpicks or matches;
- PVA furniture glue;
- copper wire with a cross section of 0.33 mm;
- for the base - fiberboard, chipboard or plywood;
- floral candy foil;
- veneer.
Here are the tools you will need:
- ruler;
- sharp knife;
- eraser pencil;
- curved or straight scissors;
- bar;
- tweezers;
- compass;
- clothespins;
- carnation 2 mm.

The Lazarevskaya church of the 14th century was taken as the basis.

The master used this photo, making markings here. Redraw or reprint this drawing to know what dimensions will need to be considered when creating a church with your own hands. Calculations are given in millimeters.
To make it easier to make a temple, keep in mind that you need to conditionally divide it into 3 parts. The central one is the church itself, the refectory is located on the right, and the altar is on the left.
Here's how to make a church. To do this, take a thin cardboard and draw four walls, which are a square with sides of 5 cm.

As you can see, you need to draw windows in two walls, then cut them out with a thin knife or scalpel.
You can use matches, toothpicks or a wooden stack to build walls.
The next step is to determine the length of the wooden blanks. If you took a long stack, you will need to cut off parts from it. If toothpicks are used, cut off the sharp ends.

Now you can start making the temple. First decorate the wall on which there is glass.
See how you need to arrange wooden blanks, gluing them.

As you can see, these logs need to be moved through one - then to the left, then to the right. Now cut a strip of cardboard measuring 5 by 2 cm. Bend it approximately in half in the middle.

Make 4 such corners, and with their help assemble the frame of the future structure. As you can see, these corners need to be placed vertically and glued to each of two walls.

Measure the width of the wooden log so you know how much bigger the wall has become. Initially, it is 5 cm, if the thickness of this wooden blank is 3 mm, then it turns out that now the wall is 53 mm. But since the “logs” protrude in both directions, it means that now the wall width is 56 mm. Therefore, it is necessary to cut out two triangles of exactly this width for the pediment. If you have other calculations, then simply attach the wall to a sheet of cardboard and cut two triangles along its width.

Now you will need to glue these two triangles with wooden blanks.

Then attach these gables on both sides to the log cabins, glue them, fix them in this position with clothespins until the glue is completely dry.

Here's how to make a matchstick church next. While the main building dries up, you will be engaged in the manufacture of the refectory. Also make four cardboard walls for it, mark windows on three, and a door on one. The windows must be cut with a sharp knife, and the door must be cut on three sides so that it opens.

Also, start gluing matches, pieces of a wooden stack or toothpicks to this blank, moving them either to the right or to the left.

From this strip, make such a box, glue its two opposite walls to make a log house. For a while, also fix this place with a clothespin.

Then, as in the previous case, attach and glue the gables. Please note that one of them is fixed from the side of the door.

Make the third room in the same way, it should be slightly smaller than the first two.


To make a roof, you need to measure the length of the refectory, the altar, the church. Add 4mm.

Now, according to the marking of each building, cut out the roofs from cardboard, bend these blanks in half.

Glue these roofs onto each of your buildings. Now we need to cover them. To do this, cut the semblance of boards from veneer.


Make a cutout on the central roof, glue this pipe here. Cut the veneer into wider and longer pieces, glue them so that they cover the cardboard roofs.

To make a cross, you can use the following device. On such a bar, you need to fill 3 groups of nails on the reverse side. Now start wrapping them with copper wire from above.

Here is the cross.

To make a dome, cut circles. The largest will be 19 mm in diameter, the next 17 mm, 15 mm, 13 mm, 11 mm, 9 mm. The smallest is 5 mm. Glue them like this.

Punch a hole in the center of the round blanks with a nail. Now take a strip of colored foil 10 cm long, put a dome on it, drop glue into the recess, put a cross inside.

Now twist the foil, making the dome in this way.

Cut the foil at the bottom of the dome so that you can glue it later.

From fiberboard, plywood or chipboard, cut out two layers of church bases and glue them together. Glue this blank over so that the surface resembles masonry. Pour glue inside, put the church here and attach it.

It will remain on the made pedestal in the form of a pipe to glue the dome. Here's how to make a matchstick church to look like the real thing.

Sometimes a week of Orthodox culture is held in schools, you need to bring crafts on this topic. If you make such a beautiful blue and white church with your child, he will surely take a prize.

Before you make a church of this kind, you will need to prepare:
- plastic bottle;
- cardboard cover from the box;
- wire;
- rope;
- lace and braid;
- blue and white plasticine;
- cotton wool;
- a strip of roll synthetic winterizer;
- PVA glue;
- foamiran or colored cardboard;
- double sided tape;
- scissors;
- brush;
- white paint.
First, take the lid on which the craft will be located, paint it with white paint. While the drying process is in progress, you will cut strips of cardboard or foamiran. They will help arrange a fence around the temple.

Sharpen the top ends of these strips to make them look like a picket fence.

In the meantime, the white paint on the box has dried, so it's time to glue the planks to the raised edges.

Let the glue dry, in the meantime, take the bottle, cut off the bottom.

You need to take a bottle whose upper part resembles the dome of a church, for example, from mineral water.
Also cut off the top of this container. But here the plastic is durable, so it is better to heat the knife and gradually cut off the excess part.

Now measure 2 cm from the edge of the bottle and cut this part into strips. Then such a trick will help to fix the church on a horizontal surface.

Cover the top of the bottle with plasticine, making a pointed tip out of it here.

To make a cross, take the wire in the winding. Here it is in blue. First, bend it in half, make a loop here, then bend two more loops on the right and left sides.
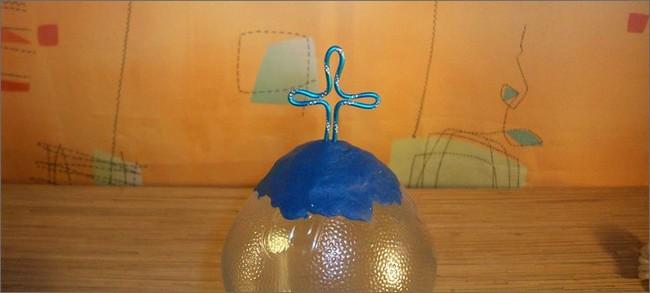
Stick the resulting cross into the plasticine dome cap.
Tape the bottom of the bottle with double-sided tape. Now start peeling off the top paper layer gradually. First, remove it from the bottom coil of tape. Wrap here with the yarn of your choice.

Thus, you need to arrange the entire lower part of the bottle. Now glue strips of lace here. Above and in the middle they can be blue, and below silver.

Now there is another interesting work to be done, which will also shed light on how to make a church. You need to decorate the dome. To do this, together with the child, roll up balls of blue and blue and make cakes out of them. Start gluing them from below in a checkerboard pattern. The second row should be slightly shifted to the right and the subsequent ones too.

Now attach double-sided tape to the bottom of the cut strips from the plastic bottle and stick it onto the box.

You can cover the horizontal surface of the box with grass, glue trees and flowers made of rubber, plastic or other materials here. But in this case, a white and blue composition, so snowdrifts made of cotton wool would be appropriate. Put them on the box by gluing them. And in the center place a strip of padding polyester. It also needs to be glued. Here's how to make a church look so amazing.

If you are interested in learning how to make a church out of matches, then the following master class will help.
An interesting idea is to make a paper temple using origami art. In just 12 minutes, you will acquire the skill and be able to make a church out of this material.
![]()
An original gift for Easter with your own hands
Master class on making panels with step by step photos.
Decorative cord panel, using the do-it-yourself quilling technique "Church of Christ the Savior".
The master class is designed for school-age children, teachers, both kindergartens and schools, additional education, as well as for the parents of our pupils, and just for those who love to craft and decorate their world around them!
Target: Making a panel from a decorative cord, making flowers using the quilling technique.
Tasks: Learn the quilling technique. Develop fine motor skills of hands, accuracy in doing work, creativity, imagination.
Purpose: the panel can be used as a gift, souvenir, interior decoration.
Baizan Elena Leonidovna, physical education instructor.
Municipal budgetary preschool educational institution of a general developmental type with priority implementation of the artistic and aesthetic direction of development of pupils kindergarten No. 6 "Vasilek", Krasnoyarsk Territory, town. Shushenskoye.
Majestic, solemn, wonderful
The temple stands over the Moscow River,
golden reflection in the morning
Dark waters disturbing peace.
Amazing temple! You are a holy creation
Masters and people of Rus'.
Like Christ, endured humiliation
To God you cried out "Save me!"
And your prayer voice was heard.
Again you are standing over the river.
And about what? Probably a secret
Majestically and proudly silent.
Cathedral of Christ the Savior built from 1839 to 1883 The idea of erecting a grandiose temple in Moscow in honor of the victory over the French and their expulsion from Russia arose already in 1812, and on October 12, 1813, the solemn laying of the foundation of the Cathedral of Christ the Savior on Sparrow Hills was carried out. Byzantine was chosen as the basis of the style of the temple. The facades of the temple on all four sides were the same in shape and decorated with bas-reliefs depicting pictures of the Holy Scriptures. The sculptures for the bas-reliefs were made by the sculptors Klodt, Loganovsky and Ramazanov from Protopopov marble (a very strong and beautiful stone that can be easily polished). The huge central dome was placed on a high light drum with mirrored glass resting on an octahedron. Widely spaced small four domes crowned four quadrangular bell towers. It took 422.2 kg of gold to gild the heads, crosses and balustrades of the roof, and 176 tons of copper. There were 14 bells hanging from the bell towers, the largest of which weighed 27 tons.
In connection with the approach of Easter, I offer a master class on creating a panel "Temple of Christ the Savior".

To create our panel we need:
- Frame 21x30cm.
- Pencil
- Ruler
- Scissors
- Stationery glue
- Glue "Moment"
- Color office paper
- Decorative cord (gold, silver, black)
- Oil pastel
- Nail scissors


And so, let's get started. We take a sheet of paper, the color that you will have a flower. I took a sheet of light purple office paper. Using a ruler and a pencil, draw strips 0.5 cm wide.

We cut strips

We take one strip and twist it into such a roll. We fix the edge of the roll with glue.

We pinch one edge of the roll, it turns out such a petal

Glue the rolls into one inflorescence with the sharp edge of the petal

We take a strip of a different color and also twist it into a roll, fix the edge of the strip again with glue

We pinch, roll on both sides, it turns out such a petal

Such inflorescences are obtained. You can use different color of paper, you will get very cute flowers

We create "Forget-me-nots". To do this, twist the blue strip into a very tight roll.

As in the first case, we pinch one edge of the petal. We connect together 5-6 petals in an inflorescence

Each flower has a center, so to speak, stamens. Our stamens are obtained from a strip of yellow paper. Finely chop along the edge of the strip - stamens

Roll into a tight roll

We glue the stamens to each flower with Moment glue

All flowers have leaves. We cut strips of green paper 0.5 cm wide

We perform the same as the petals, twist into a roll

Pinching on both sides

Another roll, slightly bend into the shape of a "month"

Sheet blanks are ready

We glue the three parts of the sheet together, then take a green strip and glue the sheet completely, as if fixing all three parts together

We are also experimenting with leaves, bending the roll in different directions

We also connect the rolls together using a strip of paper

I took a sheet of paper and drew the outline of the temple

Now the most interesting…. We take a decorative cord of the “gold” color, and begin to glue the dome of the temple in a circle

Similarly lay out the other two domes. We glue the cord with glue "Moment"

We take a silver-colored cord, and lay out the base, so to speak, the walls of the Temple. Windows are highlighted in gold. With black cords we draw the outline of the towers of the Cathedral of Christ the Savior. Cut out


Cut out the temple, glue on the finished background. With a golden cord we form crosses on each dome of the temple

Our flowers and leaves, made using the “quilling” technique, are laid out at the “feet” of the Temple. Fasten the finished panel to the frame

The panel is ready, we decorate our interior with it!

Oh Cathedral of Christ the Savior, you again
You stand, having risen to former heights!
My enthusiastic word to you,
My soul's enthusiastic flight!
How majestic and how beautiful you are
In unimaginable beauty
Golden crosses, and domes, and towers,
Figures, and walls in their snowy purity!
How the hand of the "creators" of the evil ones rose
Blow you up - the sanctuary of Christ,
Museum of the Great Borodino Glory,
Here created by the will of the Creator?
Praise be to him and to all who by the will of God
I gave this Temple to Russia again!
And let the road lead us all here
To the Divine speaking lips!
Russia to be and be reborn again
Her great righteous deeds!
The pledge of this is rising in the capital
Christ the Savior majestic Temple! (
Master class on the implementation of the Gothic cathedral in the "Kirigami" technique.
Dumler Tatyana Petrovna, teacher of fine arts, MAOU gymnasium No. 56, Tomsk
Purpose: This work is intended for small artists who like to use different materials; for their teachers and parents.
Target: execution of the facade of the Gothic cathedral from paper.
Tasks:
- introduce the technique of kirigami;
- develop accuracy and perseverance;
- develop fantasy, spatial imagination, love of creativity.
Materials: sheet of white paper, scissors, pencil

Today we will get acquainted with the features of Gothic architecture.
The words "Gothic", "Gothic" came from the name of the warlike barbarian tribe of the Goths, who dealt a mortal blow to the great Roman Empire. Medieval art began to be called Gothic because people then thought this art was rude, barbaric, not like the usual antique.
In the Middle Ages, the power of the church was so great that even kings were forced to obey it. Religion required a person to renounce everything earthly, he had to think only about God. And people began to build temples of unprecedented architecture. The high vaults of cathedrals, colored stained-glass windows through which rays of light poured, the solemn sounds of the organ - all this struck the imagination of people, inspired them with the idea of the sanctity of divine power, and turned them to religion.
Gothic originated in the middle of the 12th century in northern France, in the 13th century it spread to the territory of modern Germany, Austria, the Czech Republic, Spain, and England.

The main decoration of the city was the cathedral, which was built for decades, and sometimes even hundreds of years. Gothic cathedrals seem light and transparent from many huge windows. They seem to be woven from stone lace. Steep roof slopes, lancet arches, high towers crowned with thin spiers - everything creates the impression of a swift rush to the heights. The height of the towers of the largest Gothic cathedrals reaches 150 meters.

Buildings in the Gothic style were usually built in large cities - they are easily recognizable by their pointed arches, high pointed towers, large windows with stained-glass images on biblical themes. And the sunlight, penetrating through them into the temple, created unique lighting effects.


In the Middle Ages, the skill of masons greatly increased, which made it possible to create complex architectural forms and huge buildings. Typical early (French) Gothic buildings had a central portal with large rosette windows above them.

I propose to my students to complete the facade of a Gothic cathedral using the Kirigami technique. Kirigami is a type of origami that, unlike its other types, allows cutting out individual paper parts with scissors. In Japanese, this word means nothing more than cutting paper (kami - paper; kiru - cut).
This unusual and fascinating art is quite young. Its founder is the Japanese architect Masahiro Chatani, who was the first to make a couple of cuts on a paper figure to make it easier to fold. The kirigami technique is widely used by many designers in interior design, creating various decor, as well as when decorating gifts.
For work, we need foxes of white paper, scissors and a pencil. We repeat the rules for working with scissors and proceed!
Fold the sheet in half. Got a book. It will need to be divided into three equal parts (you can use a ruler) and bend.

The fold lines are well smoothed.

Then unfold the sheet, and fold it into an accordion along the fold lines.

Take the central part of the harmonica in your right hand, and twist the side parts and connect them together. They are on the left.

With the help of a pencil, we outline the contours of the tower of the central part and the side ones.

Cut along the contour, combine the side parts for a neat symmetrical cut.

Now we will outline the portal - a decoratively decorated entrance to the cathedral. The arc line on the right side is marked with a pencil.

We make an incision along this line. We bend. It is important to smooth the fold line, bend it in one direction and in the other.

We return the door to its place and make two more parallel cuts to the fold line.

Let's do the same on the left side. We outline the arc line, make an incision, bend.

It is better to make an incision at once of two lateral parts together. Then add two parallel arc lines, cut to the fold line.

Now we will outline window openings - high, narrow, arched. Above the portal we outline two lines - a straight line at the bottom and an arc at the top.

We cut, bend, smooth the fold line well.

Let's make more windows on the left side, a little more complicated. Two pairs of lines, one larger, the second inside a smaller one.

We make cuts along the lines, bend in different directions, smooth out.

And let's try to depict a rose - a large round window, often found on the facades of Gothic cathedrals. We outline a semicircular line.

The easiest pattern to cut is triangles. We outline them, collect them in the center of the window.

Cut out.

We have outlined the most basic architectural elements. You can further complicate the facade, add a pinnacle (decorative turrets), cut through a vimperg (pointed tong over a portal or window opening), any appropriate cuts. But this is at the request of each author individually. And we unfold our workpiece and prepare for the next stage.

If all the fold lines have been smoothed out well, then the folding process will be easy and fun. Press on the middle of the central window and bend inwards.

Do the same with the side windows.

Bend and doors inwards. Smooth out the fold lines.

We made cuts above the doors, this is an imitation of numerous arches above the portals. Push one in.

Consider how you can make a window of a more complex shape on the sides. We press on the center, bend, smooth.

From the inside, we press on the center of small windows and bend, smooth.

The children really like to work in this technique. The guys themselves help to cope with the difficulties of classmates. The end result is a wonderful result!
There are several options for creating a church out of paper. Any of them requires a certain skill and perseverance. For example, to glue a temple out of paper with your own hands, it will take a lot of time and effort. This is a rather complex, voluminous work that requires knowledge and skills in working with paper, as well as with scissors and glue.
How to make a church out of paper?
First you need to find a scheme according to which the process will take place. It is advisable not only to find it on the Internet, but to print it. Ideally, if there is also a step-by-step instruction for the scheme. Before proceeding, study it carefully.

Preparing to Establish a Church
Before you actually start cutting anything, you need to free up your workspace by removing all unnecessary things and papers. This must be done to avoid the possibility of losing small parts. Before cutting out the components from the sheet, lightly press all the folds with a ballpoint pen with a dried rod, or something similar. The main thing is not to scratch the surface of the paper. Such a simple solution will help make the bends along the line much neater.

Advice
It's a good idea to use a ruler when you fold the paper in straight sections. To create an inner crease, lay the ruler so that it is along the fold line. And then lift the paper, pressing it against the edge of the ruler.
A church made of paper is an excellent decoration, as well as a great gift in which you can put all your warmth, care and love. The first thing to start with is to draw the so-called “building pattern”. It is advisable to do this on thick white paper. Next, all the components must be carefully cut. You can find a pattern on the Internet - there are a great many different options. If you have no experience, start with the simpler one. When all the details are successfully cut, bend them along the pre-marked fold lines. Thus, the walls of your church are ready, it remains to carefully glue them to the cardboard platform - the foundation of the church.

Domes are an obligatory element of any temple. So, paper construction needs them too. Their “pattern” can be found on the same drawing as the “patterns” of the walls for the church. Alternatively, you can simply search for it separately on the Internet. It goes without saying that church domes should not be white. It all depends solely on your imagination. So, blanks for domes can be pasted over with yellow or orange paper, or you can use silver and gold foil for this.

Be careful
When gluing white paper to colored paper or foil, you should try to make the whole process as smooth as possible. You shouldn't have any folds. Do everything so as not to accidentally crush the workpiece, because the quality of the domes and the appearance of the entire structure directly depend on its quality. When the paper patterns are ready, you will need to carefully cut out the windows in the paper walls. If there is no desire to cut them out, then you can do it easier - draw with pencils or paints. Lastly, all the details are assembled together and glued. It is necessary to smear the seams with glue so that it does not protrude and is not visible, otherwise the church will not look neat.

Paper church gluing sequence
The “patterns” of all the walls will need to be bent along pre-planned lines, then the walls should be glued to the cardboard platform. When all the walls are glued to the site, and the glue dries, you will need to “attach” the domes from above. You can glue them with the same glue that fastened the walls. Alternatively, you can paint the cardboard area with colored pencils or paints, or go even further - glue small pebbles and sand to it, and also, for greater realism, make a fence out of matches or toothpicks. Creating an environment entirely depends on your imagination and capabilities. Any paper craft involves a wide flight of imagination and creativity.

Conclusion:
A paper temple can be a worthy decoration of any interior, as well as a great gift for a friend or loved one. Its creation is a fascinating, but also difficult task that will require accuracy and endurance, as well as perseverance. You need to choose a time when you are not in a hurry to go anywhere, arrange a workplace for yourself, and then, in fact, take on the temple itself.
Origami paper church
paper church
Origami Church - simple paper crafts
Crafts from plastic bottles are very simple and easy to do with your own hands. In this article, we will tell you how you can make church models from ordinary plastic bottles.
It is worth noting that many bottles already have a domed shape, which makes it very easy to make models of churches.
As you can see in the photo, the tops of the bottles are used in this composition.
The pictures are printed on self-adhesive paper using a conventional inkjet printer and glued on top of the bottles, sprinkled with glue and glitter. In addition, beads and foil were used in the manufacture of crafts from plastic bottles.
Quite affordable materials for making DIY crafts, right?

And this craft from a plastic bottle is made using papier-mâché technology, when the paper is torn into small pieces, the bottle is coated with glue and pasted over with pieces of soft paper in several layers.
After that, homemade crafts can be painted with acrylics or gouache.

This plastic bottle mockup is even easier to make. Acrylic paints were used. You can buy “gold-like” paint at the artist’s store, but otherwise, all items for crafting are sold at the stationery store.

This installation uses cutting windows in plastic bottles, the domes are made of polymer clay, we wrote about it in the article. You can take already a golden color, or you can paint it.
As you can see, there is nothing complicated in making homemade crafts from bottles! This is a very simple activity and you can do it with your child.
More crafts from plastic bottles:
A helicopter from a plastic bottle - we make a model of a helicopter.
Water rocket - we make a rocket on water-air fuel.