Crocheted square blanket: a cozy bedspread according to old traditions. Bright blankets connected with squares "from the corner" Knitted bedspread of squares
Hello.
There is very little time left before the New Year 2017. And it's time for me to report on the work done on the project "Veil for the Year".
Here it is - crocheted from squares:
As I already wrote, this event was organized at the beginning of 2016 by Lenochka Tvorogova, the author of the blog "Create - do not be lazy." Here here is a detailed report about knitting her bedspreads.
I'll tell you a little about mine...
My bedspread (or blanket) consists of such squares, crocheted according to the pattern shown below.
If you have any questions about knitting such a square, then Lena has a blog detailed master class.
Now about yarn.
In order to save money, I chose 100% acrylic Semenov Souffle yarn (100g - 292 m). I crocheted No. 2, 5, so the squares turned out to be not very large (the side is about 12 cm). In total, 120 square motifs were connected.
The size of the resulting bedspread: 190 x 100 cm.
I can't tell you the exact amount of yarn. I only remember that at first I bought 10 skeins, and then bought more a few more times))) 
And now I want to say a few words about my method of knitting many squares for a blanket.
I crochet square motifs in stages: first - the middle. No need to think))), hands knit themselves ...
Then each small center was tied with yarn of a different color. At the same time, she hid the ponytails in the process of knitting (she tied them together with the central motif).
Well, then I knitted each square to the end. She tied the flowers with blue yarn, without breaking the blue thread, knitted 1 row of beige, and then continued tying with blue thread.
When all the squares were ready, I decided to connect them diagonally.
I connected square motifs like this: I alternately knitted a single crochet and an air loop into every second column of one square, then the second.
It didn't turn out too tight and was pretty quick.
By the way, I drew a rectangle on a piece of paper and divided it into diagonal stripes in order to know the number of these stripes and squares in them.
Later, when connecting the strips into a single fabric (spread or plaid), it was necessary to connect the corners of the squares with connecting posts and single crochets so that there were no holes.

Good afternoon friends!
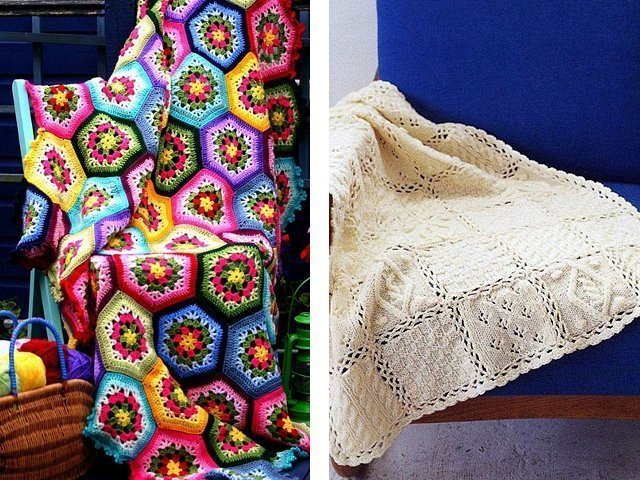
Somehow I posted in my groups a photo of a bright crochet blanket made of squares (the one on the right). Everyone loved this blanket. And although it is connected from ordinary plain squares, but of different sizes, therefore it looks very interesting and unusual. In addition, the colors are very well chosen. So bright, just like an autumn blanket.
Since there are many beginner needlewomen among us, and they once asked me why even corners do not work for a square, I made a description of how to crochet a plaid from squares for beginners according to a simple pattern.
How to crochet a plaid from squares
If you have learned how to knit columns and air loops, then crocheting a plaid from squares will not be particularly difficult. Of course, it will take a lot of time. I have repeatedly mentioned that my friend knits blankets in less than a month! There would be a desire. By the way, here is her work.
If you try, then in two months it is quite possible to knit a blanket. And if it is boring to knit every day, you can do one motive a day and imperceptibly in a few months the plaid will be ready.
For a blanket measuring 120 x 200 cm, you will need about 1800 grams of yarn (125m / 50 gr. in a hank). Since our blanket consists of squares of different colors, you will need to purchase hanks of 6 colors of 300 grams.
It is important that the colors harmonize well with each other, it can be either only warm tones or only cold ones. Attach the hanks to each other and see how they fit together.
Half-woolen yarn is suitable for blankets, and acrylic is generally wonderful.
With such threads on the plaid, we will choose a hook with the number 4.5.
A bright plaid is connected, as I said, from squares of different sizes. We will knit these in the required quantity, which can be estimated according to the layout of the squares in the plaid.
Crochet plaid patterns from squares
On such a crochet blanket, we seem to have a double pattern: for squares of different sizes.
How to crochet a square for a plaid
So, we knit a crochet plaid from squares.
We collect 8 air loops, close them into a ringlet, connecting the first and last loops with a half-column (connecting loop).
We tie the ring, inserting the hook inside it, with single crochets. First we knit 2ch to lift the row, and then 11 sc. We connect the first and last loops.
We knit all subsequent rows with columns with one crochet.
In the 2nd row we knit 3Ch at the beginning, then 2S1N in each column of the previous row, 2VP to form the corner of the square, 3S1N, 2VP, 3S1N, 2VP and another 3S1N and 2 VP.

Before connecting the first and last loop, we attach a thread of a different color, and then we pull out the loop and make the connection. If the thread is attached at the beginning of the next row, then the thread of a different color will show through in the second row, and this is ugly and will ruin the appearance of the blanket.
3rd row: 3CH, 2C1H in the columns of the previous row and 2C1H under the air loops of the previous row, 4CH in the corner of the square, 2C1H under the air loops of the previous row, 3C1H in the columns of the previous row, 2C1H under the air loops, 4VP and so on.

We knit the 4th as the 3rd row, increasing the number of columns in the corners and changing the color of the yarn.
On this, the first small square can be completed, it remains only to tie it with single crochets: 2VP for lifting and a single crochet in each column of the previous row, we knit 5СБН under the air loops in the corners.

In the same way, increasing the number of rows and the number of columns in the corners, we knit other large squares.
Do not forget to knit 4ch in the corners. If the corners of the square do not turn out to be even, most likely air loops are missed somewhere. And a lot depends on the thickness of the yarn and the density of your knitting. Therefore, it is not always necessary to follow the pattern and description exactly, try to correct the knitting, for example, knit not 4, but 5VP in the corners.
Another such moment. If an even number of loops are knitted in the corners, then the corners are pointed and straight, since the loops are distributed evenly: 2 on one side of the corner and 2 on the other, as in our case, and a clear angle is formed between them.
If the number of loops in the corner is odd, then there is one more loop between the pairs of loops on both sides of the square, which gives a somewhat rounded look. It looks even more interesting that way.
But after ironing and stitching, these corners still straighten.

We tie each finished square with single crochets.


You can, of course, knit all the squares of the same size, you get an equally interesting blanket (as in the photo on the left).
Assembling a knitted plaid from crochet squares
When all the squares are connected, you will need to iron them from the wrong side through a damp cloth, and then sew them.
First we sew small squares together, and then we sew this assembled structure with larger squares. You can arrange them like this:
To sew the squares together, fold them in pairs face inward and sew with a needle and thread or crochet, capturing only the back walls of the loops. If you sew along the face (folding the squares inside out), you will get a beautiful scar on top. But I think that this is only appropriate for a blanket of squares of the same size.
Tie the whole blanket with a row of single crochets (in the corners along 3СБН) and then knit a row with a step step (who doesn’t know, when knitting a step step, the hook is inserted into the loops from left to right, i.e. we move in the reverse order.) When knitting a blanket, it’s enough with thick threads, you need to insert the hook through one loop of the base, otherwise the edge will not be even, but wavy.
It remains to hide the ends of the threads, it would be even better to do this procedure when knitting each square.
That's all, a wonderful bright plaid crocheted from squares will warm you both in autumn and winter. Now the cold days are coming, and in the absence of heating, soon the blanket will come in handy!
I hope that crocheting a square blanket for beginners according to my description will be clear to you. If you have any questions, write in the comments.
Creative success to you and all the best!
Some craftswomen prefer to crochet large items only, since the peculiarity of this method allows you to achieve beautiful openwork patterns on blankets, and thin, almost jewelry work is very to the liking of lovers of creating beautiful things from details.
Crocheted blankets will perfectly warm adults and the smallest children, the main thing is to choose the right yarn. Another important function of plaids is to decorate the home and create the right mood. All this directly depends on the shape and method of crocheting, which we will examine in detail in this article.
Crochet a plaid with diagrams and descriptions
There are a huge variety of crochet blankets, as well as knitting styles for these warming bedspreads. Even the simplest patterns look interesting on rugs and are always associated with the stepfather's house, warmth and care.
But you won’t surprise experienced needlewomen with simple patterns; interesting openwork motifs have been invented for them, patchwork-style blankets of incredible complexity and beauty, thin and delicate bedspreads for newborns, over which it is so interesting to pore over. In this type of needlework, there is work for every interest and request. But let's start learning from the basics - the simplest patterns and patterns for crocheting plaids.
Master class for beginners
In any business, you need to start somewhere in order to learn. And to learn how to crochet a plaid - a master class for beginners is ideal. Such a blanket, completely made in the style of "grandmother's square", will please both adults and children. Consider how it is knitted using the example of step-by-step instructions.
Tools:
- Yarn (in this case, bright green, yellow and brown);
- Hook;
- Needle.
Abbreviations for the knitting pattern:
- VP - air loop;
- RLS - single crochet;
- SSN - double crochet;
- SS - connecting column.
Progress with step-by-step photos:
You need to start knitting with the main color of the blanket. We close six loops in the ring, then we make three VPs and knit two more CCHs into the ring. We make two VPs (photo 1). After that, we crochet three CCHs into a ring and make two VPs. We repeat two more times, as a result of which a square is knitted (photo 2).

After that, we make three VPs (this is the first CCH) and in the corner in the arch we will perform three CCHs, two VPs and again three CCHs (photo 1). This is what we will knit in the remaining arches. We will finish the last with two CCH and SS (remember that the first column at the very beginning was knitted in the form of three VPs) (photo 2).

We knit a new row of the square and make three VPs from the arch in which we have the hook. We knit two CCHs into it. Next we move on to the corner. And we knit everything in it that was knitted in the previous row: three CCHs, two VPs and three CCHs (photo 1). In the next arch we knit just three CCHs. And so in a circle (photo 2).


In the corners you will always need to knit the same thing. And in the arches that are on the sides of the square, we always knit just three CCHs. As a result it turns out the so-called grandmother's square. We knit several rows for the desired size of the blanket. And, completing the grandmother's square, we will change the color of the thread to yellow (photo 1). Knit two rows in yellow. And another row in green. And then we will make the binding of the edges. In one arch we will knit seven CCHs, in the other one RLS. And so we alternate the strapping throughout the blanket (photo 2). Finish tying in green. We will make three VPs and knit one sc in each loop (photo 3).

Plaid decoration
To decorate this simple, but no doubt cute plaid, you can crochet a small decorative element, for example, a butterfly. This is how it can be created:
- We knit five VP and close in a ring. Next, we knit three VP and one more CCH. We make two VPs. And two more SSNs. In total, we need to knit eight times like this. That is, we get sixteen CCH.
- We pass to the arch from the VP. SS We knit three VPs and here we perform two SSNs. We perform three VPs and under the same chain we knit three CCHs. So we knit under all the arches from the VP.
- Now attach the brown yarn. Under the chain of the VP, we knit six CCH. We make one VP and here we perform six more CCHs. Skip the bottom three dc and knit sc.
- And in the next chain we knit everything the same as we knitted before.
- We tie our butterfly with yellow yarn. We knit one sc in six underlying loops and one sc under the VP. We make a pico of three VPs. And so we tie the whole butterfly.
- We fold it in half and fix it with a chain of brown VP. Now it can be sewn to one of the corners of the finished plaid.


How to knit a baby blanket with a simple pattern
Very often, people resort to knitting only to create a crochet children's blanket with an original pattern for their baby. Many try to crochet a plaid with a pattern and color that will not look like any other plaid. And this is a completely doable task, because when you make a crochet blanket, you will definitely get an interesting and beautiful product, even if it is made with the simplest pattern - for example, embossed columns.


Tools:
- 8 skeins of 50 g of wool mixture or white bulk synthetic yarn (A);
- 8 skeins of 50 g of wool mixture or blue bulk synthetic yarn (B);
- hook number 3.5.
Knitting density: 20 loops x 11 rows = 10 x 10 cm (embossed columns).
Size: 75 x 100 cm.
Main pattern
The embossed crochet stitch is knitted like this: we make a yarn over, insert the hook (from front to back) under the stitch (leg) of the previous row, pull out the loop, grab the thread and pull it through the first 2 loops on the hook. Yarn over again and pull through the remaining 2 loops.
Work progress and knitting pattern


With white yarn we knit an initial chain of 145 VP.
Base range: 1 dc in 3 chs from the hook, 1 dc in each ch to the end, 144 loops are knitted. 1st row: 2 VP for lifting, * relief. Art. around the loop of the previous row, dc in the dc of the previous row, repeat from * to the last loop, 1 relief. Art. around the loop of the previous row.
We turn the work around.
Next, we knit according to the scheme of 7 rows. Cut the thread (A). We knit the thread (B) according to the scheme of 8 rows. Cut the thread (B). Next, knit according to the pattern of 8 rows of thread (A). Repeat the stripes until 96 cm is knitted.
strapping
To tie the edge of the finished product, use the thread of color (B).
1st-4th rows(wrong side): 1 VP, RLS to the end of the row. In the corners of the finished product, knit 3 sc in the sc of the previous row.
Then knit 1 row in a crab step (SC is knitted from left to right, not right to left) around the entire outer edge of the product.
Finish knitting PBN (half crochet) in the 1st sc. Fasten the thread.
From soft yarn for a newborn
A very responsible job is to crochet a blanket for a newborn. A warm blanket for a baby should be gentle, warming and always beautiful. The airiness and delicacy of the yarn for the newborn will give the product a special look that young parents will remember for a lifetime, because they will remember the crumbs during discharge from the hospital in this blanket, created by caring hands. This blanket is suitable for both girls and boys. It can be used both at home and for walking with a stroller.


Tools:
- 325 g of white yarn for knitting children's clothes;
- hook number 3.5.
Knitting density: one motive = 4.1 x 3.8 cm (fantasy pattern in the central part).
Work progress and knitting pattern
central part
knitted as follows: a chain of 171 loops is dialed and 73 rows are made with a fantasy pattern in accordance with the diagram and explanations for the symbols accompanying it. 

strapping
At the end of the 73rd row, without cutting the thread, knit the 6th circle. rows with shells (2 CCH (double crochet), 3 VP (air loops), 2 CCH), performing additions in each corner, as shown in the diagram. Replace the last 2 VPs of the 1st and 2nd round. rows 1 dc (semi double crochet), knitted in the 3rd of 3 VPs, replacing the 1st dc. Close the 3rd - 6th circle. rows 1 SS (connecting column) in the 3rd VP from the beginning, and move forward, knitting additional. SS on the arch of the 1st shell.
After that, knit 4 circles. a row of arches of 6 loops without additions and decreases, 1 circle. a row of simple shells (1 SSN, 5 VP, 1 SSN), separated by arches of 5 loops. Run fans of 13 dc in each simple shell. Replace the last 3 VPs of the 7th - 9th circle. rows of 1 CCH, knitted on the 1st RLS, and 4 last VP of the 10th circle. row - 1 C2H, close the 11th and 12th circle. rows like 3rd round. row, and perform another SS in the 1st arch at the end of the 11th circle. row. Finish 1 lap. next to the “crawl step” pattern, as stated in the explanation, close 1 SS in the 1st RLS and cut off the thread.

Openwork from motives
Lovers of beautiful designer things will like an openwork plaid of crochet motifs, which is exciting and interesting to work on. The result is a very beautiful product that will decorate a sofa in the living room or a bed in the bedroom, while warming and giving warmth on cold evenings. For example, you can knit a blanket of large floral motifs, which then need to be combined into a single whole.

Tools:
- Novita Isoveli yarn (75% wool, 25% polyamide, 65m/50g) - 2300g yellow-green (334) or Novita Napko yarn (50% cotton, 50% acrylic, 104m/100g) - 1800g blue (013);
- hook number 5-6.
Finished product dimensions: Isoveli yarn plaid -140 x 210 cm; Napco yarn plaid -110 x 180 cm.
Knitting density: the diameter of one motif is 17 cm.
Progress and schemes
The plaid consists of separately connected full and half motifs. For a complete motive, dial a chain of 6 VPs, close it in a SS ring. 1st row - cast on 3 ch lifts, knit 1 dc, 2 ch, * 2 dc, 2 ch * in the center of the ring, repeat * - * 4 more times, close the sl-st row. Next, knit according to scheme 1 from the 2nd to the 5th rows. Cut the thread and fasten off. Knit 104 motifs with Isoveli thread or 67 motifs with Napko thread.


For a half motif, dial a chain of 4VP, lock into a SS ring. 1st row - VP, 2 CCH, 2 VP, 2 CCH. Next, knit in straight and reverse rows according to scheme 2 from the 2nd to the 5th rows. Cut the thread and fasten off. Tie 8 such motifs with Isoveli thread or 6 motifs with Hanko thread.
Assembly
Lightly steam each motif. Connect the motifs to each other in accordance with scheme 3 (motifs from Hanko yarn are highlighted in gray). For the Isovely yarn plaid, crochet the fringe. To do this, cut the threads 45 cm long, fold them into 3 pieces and tie around the edges. Run 7 brushes for each motif.

Knitted plaid from squares

A very fashionable phenomenon that designers and housewives with taste love - crochet plaid from squares. There are a huge number of crochet patterns for a wide variety of geometric patterns for a patchwork product, most of which look very interesting in their hodgepodge of colors and patterns, while others are elegant in one color but made with different complex motifs. Such a playful and uplifting plaid will look good not only in the nursery, but also in the living room, and in an armchair on the balcony. In addition, you can give it to friends or relatives - let them also rejoice.
Consider here such a plaid of squares, which is easy to knit according to step-by-step instructions.

Tools:
- yarn - 200 g dark blue SMC BRAVO;
- 100 g each of beige, orange, red, lilac, green, blue, brown, yellow and pistachio SMC BRAVO yarn;
- hook number 3.
Main pattern - square
Link a chain of 6 VPs and close it into a ring with 1 SS. Knit a circle. rows. Every circle. the row starts with 3 VP lifting and ends with 1 SS in the VP lifting of the previous row. Attention! 2 CCH + 2 VP + 2 CCH are indicated in the instructions as a group of CCH.
1st circle. row: 3 dc, 2 ch, * 4 dc, 2 ch, repeat from * 2 more times.
2nd circle. row: 3 CCH, in an arch of 2 VPs, tie a group of CCHs, * 4 CCHs, in an arch of 2 VPs, tie a group of CCHs, repeat from * 2 more times.
3rd circle. row: 5 CCH, in an arch of 2 VPs, tie a group of CCHs, * 8 CCHs, in an arch of 2 VPs, tie a group of CCHs, repeat from * 2 more times, 2 CCHs.
4th circle. row: 7 CCH, in an arch of 2 VPs, tie a group of CCHs, * 12 CCHs, in an arch of 2 VPs, tie a group of CCHs, repeat from * 2 more times, 4 CCHs.
5th round. row: 9 CCH, in an arch of 2 VPs, tie a group of CCHs, * 16 CCHs, in an arch of 2 VPs, tie a group of CCHs, repeat from * 2 more times, 6 CCHs.
6th round. row: 11 CCH, in an arch of 2 VPs, tie a group of CCHs, * 20 CCHs, in an arch of 2 VPs, tie a group of CCHs, repeat from * 2 more times, 8 CCHs.
7th round. row: 13 CCH, in an arch of 2 VPs, tie a group of CCHs, * 24 CCHs, in an arch of 2 VPs, tie a group of CCHs, repeat from * 2 more times, 10 CCHs.
8th round. row: 15 CCH, in an arch of 2 VPs, tie a group of CCHs, * 28 CCHs, in an arch of 2 VPs, tie a group of CCHs, repeat from * 2 more times, 12 CCHs.
9th round. row: 17 CCH, in an arch of 2 VPs, tie a group of CCHs, * 32 CCHs, in an arch of 2 VPs, tie a group of CCHs, repeat from * 2 more times, 14 CCHs.
10th round. row: 19 CCH, in an arch of 2 VPs, tie a group of CCHs, * 36 CCHs, in an arch of 2 VPs, tie a group of CCHs, repeat from * 2 more times, 16 CCHs.
11th round. row: 21 CCH, in an arch of 2 VPs, tie a group of CCHs, * 40 CCHs, in an arch of 2 VPs, tie a group of CCHs, repeat from * 2 more times, 18 CCHs.
12th round. row: 23 CCH, in an arch of 2 VPs, tie a group of CCHs, * 44 CCHs, in an arch of 2 VPs, tie a group of CCHs, repeat from * 2 more times, 20 CCHs.
Cut and fasten the thread.
Assembly of motifs in a plaid
Knit 54 multi-colored squares. Connect the edges of the squares to each other by completing the faces. side 1 row RLS with a dark blue thread. For the blanket, collect 6 x 9 squares in the desired order.
Make a circle around the perimeter of the blanket. a row of dark blue thread border. Every circle. the row starts with 3 ch lifts instead of 1 dc (or 2 ch lifts instead of 1 sc) and ends with 1 sl-st in the last ch of the rise of the previous row. Attach the thread to the beginning of the corner square and knit as follows.
1st circle. row: ** 2 dc, * 4 ch, skip 2 sts of the base, 4 dc, repeat from *, before the next corner, tie 4 ch, skip 2 sts of the base, 2 dc, then tie the group of dc into the arch of 2 ch of the previous row, repeat from ** on each side of the bedspread.
2nd circle. row: work 1 sl-st in the next loop, ** 4 dc, * 4 ch, skip 4 sts of the base, 4 dc, repeat from *, before the next corner, tie 4 ch, skip 4 sts of the base, tie the group of dc into the arch from 2 ch of the previous row , ch 4, skip 4 base sts, repeat from **.
3rd circle. row: ** 1 dc, 4 ch, * 4 dc, 4 ch, skip 4 sts of the base, repeat from *, before the next corner, tie 4 ch, skip 2 sts of the base, tie the dc group into an arch from 2 ch of the previous row, 4 ch, Skip 2 base sts, 3 dc, repeat from *.
4th circle. row: ** 1 sc, * 4 dc, 4 sc, repeat from *, 4 dc, 2 sc, 4 dc into the arch from the 2 ch of the previous row, 2 sc, 4 dc, 3 sc, repeat from **. Cut and fasten the thread.
You will need
Remains or several skeins of yarn of different colors (sectional dyeing yarn can also be used) with threads of equal thickness and, preferably, similar in composition; a pair of double-edged (stocking) knitting needles of a suitable size; stitch markers that are attached to the knitting needles.For this product, the remains of sock yarn of different colors and knitting needles No. 3.5 were used.
Garter stitch
Loops in all rows knit facialDimensions
Finished plaid - 105 x 140 cm.The model consists of 165 squares, the size of each square is 9.5 x 9.5 cm.
Completing of the work
1st square (lower right square of the bedspread)
Row 1 (= WS): Cast on 48 sts. For the 1st row, purl 24 sts, fasten a marker on the knitting needle, knit another 24 sts. Turn knitting.
2nd row and remaining RS rows: Knit a row until there are 2 stitches left before the marker, knit them together with the front, slide the marker, also knit the next 2 loops together with the front and continue knitting to the end of the row.

Row 3 and purl rows: Knit.


2nd square
The 2nd square will join the left edge of square 1.Start knitting this motif by turning the 1st square to the right side towards you, knit the 2 loops remaining on the knitting needle with a thread of a new color that you will use for the next square. You have formed the 1st loop on the needle.

Now cast on 23 sts along the left edge (= 24 sts in total on the needle), place a marker.

Cast on an additional 24 sts.


Please note: while you are picking up stitches around the edge of the 1st square, you can hide the tail left after the end of the 1st square by knitting the first 7-10 loops with a double thread (new and left tip). This will save you from having to fasten the threads at the end of knitting.

But, if it is more convenient for you to do this later, you can only cast on loops with a new thread.
Knit the 1st (purl) row, and then continue knitting in the same way as knitting the 1st square, repeating the 2nd and 3rd rows until 2 stitches remain on the needles.

Transfer these loops to a pin or thick thread in a contrasting color and cut the thread, leaving a tail about 20 cm long.

Square 3
This square will be attached to the top of the 1st square.With yarn of the 3rd color, type 24 sts on the knitting needle, set the marker.

Cast on 24 more sts along the upper edge of the 1st square, trying to insert the needle into each loop of the garter stitch. Here you can also remove the tip left when cast on for the 1st square.

Try to finish the set in such a way that the 24th loop, cast on the edge of the 1st square, falls on the same place where the 1st and 2nd squares are connected.

Square 4
Knit the 2 remaining loops of square 3 (= 1st loop), then cast on 23 more sts along the left edge of the 3rd square, place a marker, cast on 23 sts along the top edge of square 2, and for the 24th st. pins left loops and knit them together with the front.

Continue knitting the motif in the same way as squares 2 and 3.

Next, for knitting, you need to repeat squares 2 along the bottom line (they will determine the width of the product), along the right side line - squares 3 (they determine the height), and all internal squares, for which two sides will already be connected, you need to knit as square 4.
If necessary, if you did not do this during the work, fasten the left ends of the threads and cut off the protruding ends.
You can tie the finished product with a row of single crochets or with a crochet step.
In this way, you can knit not only a blanket, but also a pillow cover, a scarf, or any other product for which squares or rectangles are suitable.
It's so cozy to wrap yourself in a blanket on a winter evening..
Beautiful patchwork blankets. To crochet such blankets, you need to master knitting motifs from the corner.
Let's consider three options.
Option I
Such a beautiful plaid is knitted from very simple square motifs. 
Knitting pattern: 
We make a ring of 4 air loops.
2nd row: columns with two crochets in each column of the previous row, and in the corner of the motive above the arch of air loops: 2C1H, 2VP, 2C1H.
And so on, we knit all the following rows to the desired size of the square, changing the color of the yarn if necessary. 
To make a crochet patchwork plaid, we tie all the finished square motifs around on four sides with single crochet (or double crochet, whichever you prefer) yarn of the same color. In this case, black.
You can, of course, connect motifs to each other in the process of knitting. But for a large product, this is not always convenient.
I like to sew all the motifs already connected with a needle and thread, or crochet. (How to crochet motifs with a beautiful scarf)
Option II: squares can also be arranged diagonally:

BLANK CONNECTED WITH "GRANDMA" SQUARE

A variant of knitting "grandmother's square" from the corner. 
In the first two rows, we knit a small square in a circle.
1st row: 3VP, 2S1N, 3VP, * 3S1N, 3VP * - repeat two more times. We connect the first and last loops.
2nd row: in each arch of air loops we knit 3S1N, 3VP, 3S1N.
From the 3rd row, we knit in reverse rows only on two sides of the square motif: three double crochets each, introducing a hook between the groups of columns of the previous row. There are three air loops in the corners.
Having connected the motif to the desired size, we knit the last row already round on four sides. 
Knitted plaid in patchwork style, presented in the next photo, made according to the same principle of knitting in reverse rows on both sides alternately: either from above and to the right, then from below and to the left. 
This photo is without a knitting pattern. 
Here we use knitting with double crochets, and a "knob" pattern.
First, we knit a small orange square.
Then we knit from the left and bottom a row with single crochets with white yarn, two rows with double crochets and another row with single crochets.
We attach the brown melange yarn and also tie it with single crochet and double crochet on the right side and on top.
Again, knitting from the left-bottom with white yarn with a “knob” pattern.
Then a bump pattern with burgundy yarn on top and on the right.
With beige yarn, we knit three rows with double crochets on the left and bottom.
And the last stage is brown yarn on top and on the right with a “bump” pattern.
Option III
Another cute motif, knitting of which starts from the corner, for a children's blanket. 
First we knit a chamomile:
1st row: * C1H, 2VP * - 8 times.
2nd row: over the arches of the air loops we knit 5 C1H each, between them - 5VP.
The 3rd and 4th rows of the motif according to this scheme are knitted in a circular fashion in a spiral, here one row passes into another.
And from the 5th row we knit in reverse rows on both sides of the square motif.
I connected the motif with a granny square pattern with a chamomile in the corner.

By connecting the motifs, you can knit both a plaid and a cheerful pillow cover.
It will look something like this 
As you can see, patchwork style blankets are very easy and fun to knit.