Patterns of fabric tacks. Do-it-yourself kitchen potholders made of fabric with patterns, photos and explanations. Do-it-yourself mitten, master class
Potholders come in a wide variety of shapes: round, standard square, in the form of a berry or mushroom, in the form of a mitten, and also for two hands at the same time. It is quite easy and simple to make beautiful do-it-yourself potholders from improvised material.


Fabrics for potholders should be taken natural, such as linen, chintz, cotton, and so on. It is highly not recommended to use synthetics, despite its cheapness, the quality of such tacks leaves much to be desired. The beautiful appearance of such a product is short-lived, as many should be aware that synthetics ignite very quickly. And if we talk about security, then this is definitely the most unfortunate choice.
So, we decided on the material, now let's figure out how to make potholders for the kitchen with our own hands.
Patterns and description of sewing beautiful potholders with your own hands
Our first work will be a potholder in the form of a cat's paw. First you need to make a pattern.

We select fabrics in advance. Then we put a cut-out tack template on it and circle it with a pencil 0.5 - 1 centimeter more than the template itself. This difference will go into tucking the edges inward when stitching. The main parts will need two pieces - this is the mitten itself. From pieces of fabric of a different color, cut out the footprint. You will also need any fabric for sealing and inner fabric, it should be cut according to the above pattern.
We study the whole process step by step
Let's get down to the manufacturing process. Since our tack will consist of three layers: outer, sealant (any pieces of unnecessary fabric will do) and inner, then all the elements are pre-cut according to the pattern. We put all the parts together in order. First, the outer layer, face down, lay out the sealant on it and cover it with the inner layer of fabric. We repeat the same in reverse order: the inner layer, sealant and outer. Then we cut off unnecessary protruding shreds and baste with a thread. Then we wrap the edges with an inlay and sew. Near the hole for the hand you need to make a loop to hang on the wall.

There is also such an interesting and unusual option as do-it-yourself knitted potholders for the kitchen made of fabric. If someone has ever knitted rugs from fabric strips, they will understand what I mean.
First you need to cut the fabric into strips and tie their edges together to make a long thread. Then roll it into a ball for convenience. It is most convenient to use knitwear, as it does not fray.
You can knit according to the usual crochet pattern in the shape of a square. This is an easier option for beginners.

The motive is performed in a circle, starting with six air. loops, then you need to close them in a circle and tie them with single crochets.
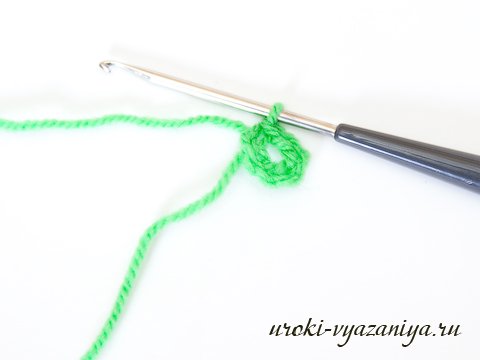


As you can see, the whole process consists of repetitions of air loops and single crochet arches. Knit round and round to the desired size. At the end of knitting, the product, if desired, can be sheathed with a border. Do not forget to make a loop and the potholder is ready.
We make an interesting patchwork kitchen product
Let's look at an example of making a patchwork-style potholder, or patchwork potholders, as they are simply called. This is an option for lazy needlewomen, but who always have a certain amount of unnecessary shreds; we can use even the smallest ones. Do-it-yourself kitchen potholders in this style look like a mosaic, fit well into any kitchen design with an appropriately selected color scheme.
To begin with, we need shreds. They can be the remains of pillowcases, trimmings from trousers or skirts, an old apron, and so on. As well as thermal insulating material, for example batting.

We take a fabric for the base, preferably made of cotton, 20 * 20 in size, put a piece with five corners in the center.


After that, we take the next shred, which we apply next to the first face to face. Compare the cuts and sew.

Then we turn it back and iron it with an iron. Repeat the same with the rest of the patches until the square is filled.
Do-it-yourself kitchen potholders
Kitchen potholders are a nice piece of interior, associated with home comfort in general, and with the decoration of the kitchen. And buying them is sometimes harder than doing it yourself. Do you know what kind of fabric the oven mitt should be made of, what shape, what exactly in the kitchen should it be combined with?
Preparation of materials
Before you start sewing with your own hands, you need to prepare materials. The selected new fabric must be washed and ironed. Washing is necessary for the fabric to shrink. Otherwise, shrinkage will occur already in the process of using the product. After washing, the potholder may deform.
Important: Do not use new and old fabric together without first washing the new one.


Before sewing potholders from a new fabric, it must be prepared for work
For sewing potholders using the patchwork technique, you can use old flaps
Choice of motives
The next step is choosing a tack pattern. It can be done in different ways.
So, what kind of tacks can be:
in classic patchwork style,
with application
with embroidery.
Combinations of these styles are quite appropriate. The simplest is sewing potholders in a simple patchwork technique. And only having mastered it, you can start making applications from shreds. The appliqué can be made up of different patches, or a ready-made motif cut out of fabric is sewn on top of the panel sewn using the patchwork technique.
There are many patterns and techniques for sewing a classic patchwork potholder.
Application can be:
flat,
bulk.
The voluminous application looks especially impressive. It is not difficult to make it with your own hands from scraps - just put a synthetic winterizer or holofiber under the sewn parts
Tack patterns
Ready-made schemes can be searched on the Internet. Today there are a large number of them. But not all patterns are suitable for sewing patchwork-style potholders.
Let's take a look at the schemes.
The most basic patterns:
"Squares"
Ohio Star,
"Carousel or mill",
"Hourglass"
"House",
"Solomon Star"
"Vortex",
"Russian".
Sewing from squares is a universal patchwork that can be used to make do-it-yourself potholders. This is the easiest way, so in order for the potholders to turn out original, it is worth applying additional tricks. For example, you can place embroidery in each square or sew an appliqué over the base.

Crazy patchwork does not imply the drawing up of certain patterns, only the sequence is important there
For sewing tacks, the remaining patterns can be used as a separate independent element. Particularly good in this sense are schemes such as the Ohio star, the mill, the Solomon star, Russian, where combinations of triangles and squares are used. This patchwork technique allows you to achieve interesting effects.


The simplest patchwork tack can be sewn according to the pattern of "hourglass", "house" or "squares"
"Ohio Star" - a classic pattern for patchwork products, which requires certain skills in working with fabrics
In the patchwork style, only the front part of the product is sewn, located on the outside of the palm. The back side is sewn from a single-colored fabric.
The tack itself consists of the following parts:
patchwork sides,
sides of mittens made of plain fabric,
gaskets or insulation
two inner lining pieces that can be sewn from the same plain fabric.
The gasket is designed to make the product thicker and help it perform its main function - to protect against high temperatures during operation. As a gasket, you can use synthetic winterizer, batting.

For any potholder using the patchwork technique, you need a dense base.

A dense lining can serve as the basis for the pattern being made.
A pattern is preliminarily made in the form of a regular mitten. Further on the pattern, the front part is sewn in the patchwork style. If the simplest patchwork technique of sewing with squares is used, then a panel is sewn, and then a detail is cut out of it according to the pattern.

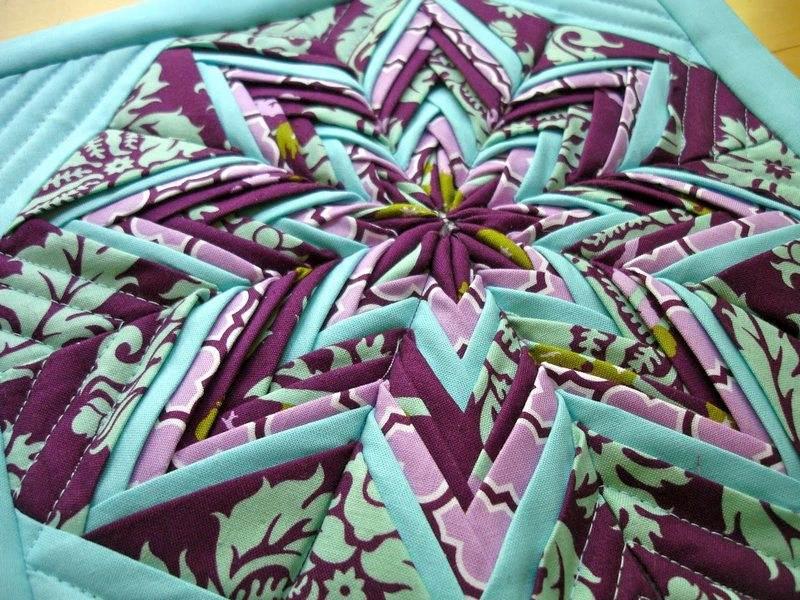
Assembling the artichoke-style potholder is done in stages
Tack assembly
Tack assembly is done last.
First, sweep the following details together:
front side, lining and inner lining,
reverse side, padding and inner lining.
It is not difficult to sew a patchwork-style product with your own hands. For the simplest potholders, you can choose a bright, colorful material and the simplest technique. Even a novice craftswoman will cope with this work, and such a product, sewn with her own hands in patchwork technique, will always look spectacular.

You cannot sew such things without a pattern, if schemes are offered, strictly follow them.
Examples of original tacks:
Knitted patterns in the form of animals.
Washing is problematic, at least you need to wash it carefully so that the thing does not change its shape. But if there are children in the house, they will also be delighted with such tacks.
A jar of jam.
Well, these are very cozy tacks! I just don’t want to take them off the wall, let them hang and please the eye. And if you can’t not use it, let such a tack jar be intended for kids who find it difficult to bring their cup of broth to the table, but they really want to act on their own. And if the decor of such crafts has something in common with the decor of the curtain on the window, the ensemble will turn out beautiful. Patterns can be found on the Internet, but the pattern can be so simple that you can handle it yourself.
Owl.
Such a tack can be called original only because owls are the most modern design object now. Well, place such a cloth owl within your kitchen. You can make a pot holder out of felt (check out the examples in the photo gallery). And some craftswomen "settle" a whole family in the kitchen - an owl with its owlets (according to the number of family members).
Maple leaves.
These are seasonal potholders, it would be nice to decorate the interior of the kitchen with them only in the fall. If the thing is strictly decorative, make it out of felt (you can find many similar photos).
Knitted mittens never go out of fashion. Make them with your own hands, and teach children how to make them - they will become attached to needlework for a long time.
Knitted potholders for the kitchen, patterns
Link, by the way, you can the same jar of jam. What knitted tacks are good for is their immediately felt warmth. Soft, gentle, warm little things in which your energy is invested - in every thread and every loop.

The choice of the type of knitted pot holder is not limited by the flights of your imagination
Knitted tacks of this type are good for the kitchen:
Berry;
Grandma's square;
small house;
heart;
Mittens (yes, and knitted ones also look great);
Animal faces;
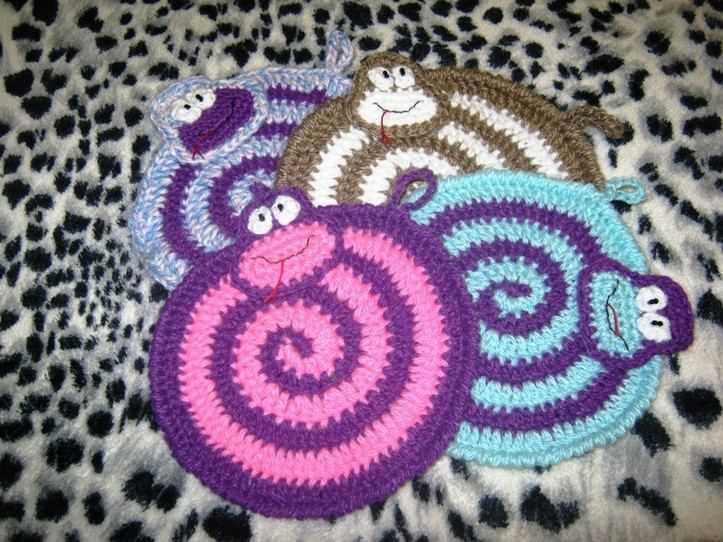
Snail;
Fish;
Rose square.

Knitting charts describe each step in detail, and photos show the final version.
You just have to experiment with color. But it will be difficult for potholders made of fabric and knitted together in the kitchen to “get along” - it’s better not to mix different types of potholders.
Cross stitch: potholder patterns
Cross-stitch is always beautiful, delicate and handmade "delicious". Of course, such tacks will have to perform almost only a decorative task. But that's good too. Embroidery patterns, simple and complex, are easy to find. Photos are usually attached.
If you want to make a potholder as a gift, you can embroider:
Any traditional symbol that means some wish (look at embroidered shirts and the meaning of their elements);
With a cross, you can embroider the initials of the person to whom this gift is intended;
Berries are always cute and uplifting;
Embroidery of desserts on fabric - for the kitchen it is always on point;
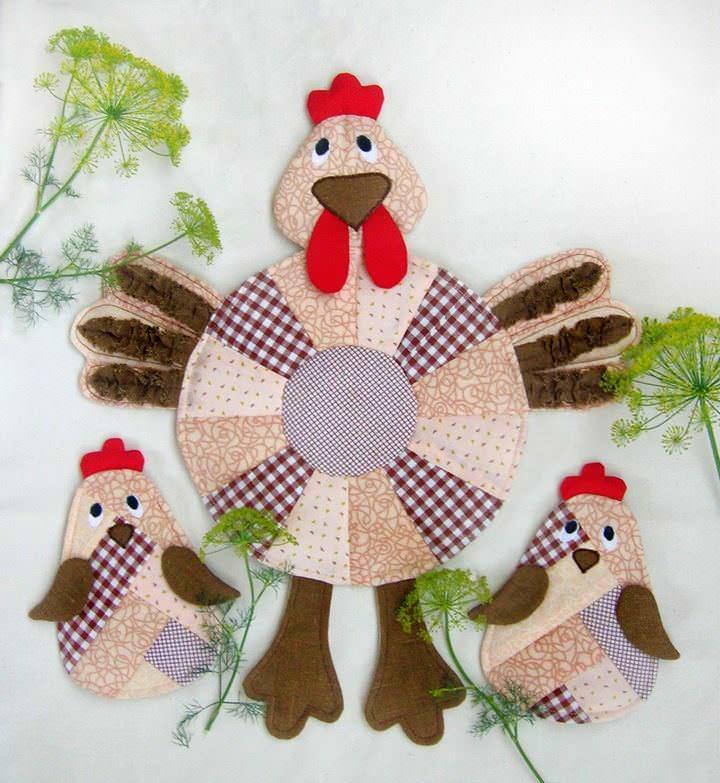
Hen with chickens - they say this is to wealth in the house.
Embroidery is always some kind of coded message. Therefore, think about what your embroidery will mean, what it can bring to your home. Of course, it is better to embroider on a special fabric so that the pattern is even. Even a child can make simple embroidery with his own hands. And such embroidery on a potholder can be the first handicraft work of a child.
What potholders are in fashion now
Interior fashion, of course, tirelessly dictates, but ... Handmade is such a thing that style is more important here than trend. Traditional mittens are not a tribute to fashion, but to history. Respecting the tradition, sew such fabric mittens with the whole family, and teach new generations to sew such mittens with your own hands. Patterns are also passed on from generation to generation. Family and home love traditions, this is one of the means of bonding and an indicator of good relations.
A tack-mitt can be modernized - from felt, for example. Or it will be decorated with beadwork. It is clear that such mittens will become strictly decorative, but this, as we found out earlier, is not bad.

The design of the traditional "mitt" can be used for various design experiments
A mitten can be sewn from old material, a child's dress or a blanket, as something to remember. One suitable pattern, a little imagination and ... there was a dress - there was a mitten in the kitchen. Such a mitten will give a new life to a once beloved thing.
The butterfly mitten is also popular. Butterfly is a very convenient type of potholders, which certainly will not let you get burned. A butterfly mitten is more difficult to sew than a regular tack, but the butterfly looks fresher and more interesting.
If you have already made simple accessories with your own hands, such a butterfly will definitely submit to you.
When decorating your home, remember how much the little things decide in it. Well, the kitchen is a hearth, and the energy of your hands is especially important there. Good finds, discoveries and cute accessories that will decorate your home.


Hot potholders can be sewn in many ways
We sew a potholder in several ways, choose the one that seems more convenient to you.
Patchwork technologies:
Regular blocks.
For a pot holder, you will have to prepare several elements, usually these elements are squares that are easy enough to process on a sewing machine.
Pattern tailoring.
In this case, templates are used. It can be such familiar elements as a star, heart, sun, birds, leaves, diamonds, etc.
We sew on the base.
The elements are not sewn to each other, but to the base, which is prepared in advance. This is convenient, because the wrong side of the product will always be beautiful. But still, such tacks are only one-sided, and this is not a suitable option for everyone. Although for beginners in patchwork, this type of potholder may be suitable.
In any technology, you can make a beautiful tack, the main thing is to choose shreds that are suitable in color and take some kind of sketch as a basis. Be sure to work the edges of each patch, fringed edges are not the best story.
How to make a patchwork potholder: a master class
Funny patchwork potholders can be made from three types of fabric. It is important that the fabrics for tacks are uniform, of the same density. Such conditions are desirable, because the aesthetics of a thing, its integrity are very important.

Detailed diagram and final photo of the butterfly tack using the patchwork technique
Master Class. We sew a potholder from shreds:
You will need three types of fabric (cotton with three different patterns), threads, a roller knife, pins, a ruler. Armed with this, cut out several shreds from the fabric, the dimensions of which are the same.
Each square piece will have a side of 10 cm - these dimensions are the most optimal.
A pot holder can consist of four squares from the main fabric, and four squares from the remaining two types (two for each).
You cut out the elements yourself with a roller knife, 90 degrees - pressure angle;
Cut each of the cut out squares into two equal triangles;
As the sketch says, lay out the triangles, after which they need to be sewn together;
You have to sew the other two sides, not forgetting the lining in the middle. For example, it can be batting. Since it is a pot holder, the padding should not be thin to protect from hot.
Attach a loop to one of the corners.
This is the easiest MK (master class) in the patchwork technique. But any project needs to start with something small, and if you figure out how to sew such a potholder, then you can definitely master the more complex option with your own hands.
Potholders with appliqué
Recently, potholders with an unusual felt application have attracted special attention. Why from felt? This material and modern needlework are inseparable friends today. Almost any needlework project from felt turns out to be elegant, fashionable, warm. The texture of the felt itself is conducive to this.
And in a kitchen where warmth is so valued, such a pot holder would be very appropriate. And for beginners, experience with felt will be useful.
Actually, the basis of the potholder will be ordinary - cotton, necessarily bordering the band. But the application itself will be cut out of felt.

What pictures can be the basis of such an application:
The same heart. Cute, cool images can turn out, and as a gift to a loved one it will always be appropriate.
Star. We sew a star and make a wish for a year, why not? This option was proposed by one master who believes that needlework and similar practices are quite compatible.
Thematic application. For example, for Easter it can be Easter eggs, for the New Year - a snowman, for the holiday - a cake, etc.
Logo. Potholders with a family or corporate logo also began to gain popularity. They can come with an apron and gloves, which are also made by hand from felt. A pot holder with a logo will always find its place of honor, and besides, this is a very original project.
If you decide to make a beautiful potholder made of felt as a gift to a young family, or rather, a young housewife, it is very symbolic if there is a chicken on the potholder.

The chicken is a symbol of a strong family, well-established life, order, prosperity. This is a long history, and the chicken as a wish, as a kind of amulet, will be understood by everyone.
How to sew a potholder with a chicken? Most importantly, don't overdo it. The chicken should be stylized, simple. If you try, you can sew the simplest apron to boot.
Knitted pot holders: MK
Potholders can also be tied. It turns out cool, funny little things that you can master on your own in a couple of evenings. We usually crochet, for most housewives it is easier to knit this way. Many fundamentally knit from old threads, that is, threads from loose old things. This is such a kind of project for the reincarnation of things, when something worn out takes on a new life. And why not life in the form of an oven mitt, because it is easiest to tie it.

Even children have the crochet technique, so you can knit the original potholder without much difficulty.
What knitted potholders can be quickly made with your own hands:
Tack-matryoshka. Yes, in addition to quilted potholders, there is also a knitted version of the matryoshka. True, this is not the fastest tack, but you can find simplified options, a nesting doll is always cozy and warm in the kitchen.
Tack-heart. And even kids can handle it. They start with similar things on the circle “We knit with our own hands”, etc.
Tack-butterfly. The brighter the better. And if such a potholder is two-layer, in terms of practicality it will not yield to such types of potholder as a glove and mitten.
Potholder watermelon slice. Such knitted potholders have already become cult, every craftswoman should knit them at least once. And ideas can be updated - first we knit in one color combination, then we knit in a different size, etc.
In this case, the most important thing is to follow the scheme. Study any MK thoroughly, without missing the nuances. You can knit a simple two-color rectangular tack, and a complex tack with an unusual pattern.
Potholder Ideas
But if you are in no hurry to knit a potholder, take on another project. These can be unusual potholders from the remnants of jeans, or potholders with beautiful embroidery. A competent master class, your attention and diligence, and you're done. But you can go the more familiar beaten path. For example, sew a mitten that has already become traditional.
For a simple but bright potholder mitt you will need:
Bright, colorful cotton fabric;
Lining fabric;
Sintepon;
Threads;
Acrylic paints (especially for fabric).

The master class will be simple:
Cut out the template - what should be your mitten. Usually the mitten is made according to the size of the hand of the largest member of the family. Don't forget the seam allowances.
Fold the fabric that will be on top in half. Put the template on top, circle, cut out.
Do the same with the lining fabric.
If the mitten will be with an applique, do all the details for the pattern in advance. Details need to be basted on a mitten, and then stitched in the desired sequence. Seam - zigzag.
If the application is some kind of character, then the facial features can be painted with acrylic paints, it will be the highest class in such a seemingly simple tack. For example, there will be a cook on your oven mitt. You can designate an apron for him, and even gloves. But then make sure that the assembly of the parts goes perfectly, otherwise the project will not be so perfect.
Fold the parts of the tack with the right side inward, grind. Notches are made along the rounded parts of the tack.
Each part of the glove should be quilted with synthetic winterizer, then stitch the item.
Treat the sections of both blanks with an inlay. A loop is made from the same inlay.
The master class assumes that the assembly is carried out very carefully, the mitten must be neat on all sides.

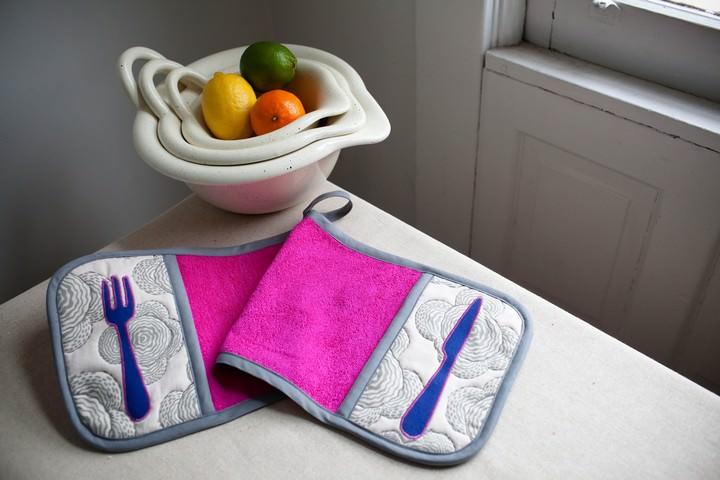
You can sew not one mitten, but a whole set
Use different decor ideas:
Mitten in retro style;
Owl mitten;
Mitten in the form of a fruit;
Mitten in the shape of a cat's paw.
The most rewarding DIY project you can make is an apron plus potholders. Standard store-bought gloves and the same typical apron are clearly not something that can surprise anyone. But, for example, a peacock potholder and an apron in the theme - you can’t think of a better gift if you are aiming for handmade presents.
The highest class is what is done with your own hands. Create your own art project, use internet ideas, and you can make your own apron, gloves, and potholders. Pay attention to such stages as the assembly of parts, the accuracy of tailoring, the selection of fabrics.


.jpg)

Why do it
This question can be asked by many - why sew potholders from fabric with your own hands, if you can buy them in a store. There is a simple answer to this. As a rule, fabric accessories now sold in stores are mostly made in China. And so many of them are sewn poorly and part at the seams a few days after purchase. And it is better to sew them with your own hands and be completely sure of the quality and long service life.
As a hand-sewn potholder, you can be one hundred percent sure
Moreover, do-it-yourself tacks perform a number of functions:
They play a practical role - they serve to pick up dishes standing on the stove;
Decorate the kitchen;
Create a unified style.


original ideas

The original potholder can become a real work of art, not only decorating your kitchen
You can turn your handmade potholders into a real work of art. It is enough to sew a couple of dolls out of fabric and attach them to the front side of the potholder. Such a potholder becomes mostly a decorative element of the kitchen.
You can do it differently - parts of the tack are knitted and sewn together by individual elements. Thus, you can make potholders in the form of vegetables, fruits, figures of people, animals, fish in the kitchen. Such potholders become a real decoration of the kitchen. Especially if they are supplemented with embroidery.
From the fabric, you can make various figures of animals, vegetables, berries, duplicate them with synthetic winterizer and sew potholders for the kitchen. They will create a special mood and positive in the kitchen.
It is not difficult to sew potholders with your own hands. Tastefully selected fabric, a couple of interesting ideas and ready-made things that can make the kitchen cozy and original. Handmade potholders can make any interior unique.


Do-it-yourself fabric potholders (video)
Since kitchen mittens and potholders are always in sight, they must be neat and beautiful. Therefore, it is better when there are a lot of them on the farm, so that from time to time you can change them.
- In addition, to sew potholders for the kitchen with your own hands, you do not need to have serious experience and needlework skills, so you can sew them together with your child.
- And also original homemade potholders are a great idea for a gift and even ... a small hand-made business on sites like the Crafts Fair or Etsy.
Choosing fabric and filling

The main thing in sewing potholders with your own hands is the right choice of fabric and filler.
- The best fabrics for potholders are natural fabrics such as linen, chintz or cotton. But try to choose dense fabrics - they will last longer.
Tip: You can also use scraps of old jeans.

- You can choose not only original fabrics, but also shapes - hearts and mittens, strawberries and Christmas trees, squares and stars. Also keep in mind that different forms of pot holders differ in functionality, which means that it is best to make a complete universal set: a few squares, a long pot holder, a mitten.

- Filler must be inserted inside the tacks. Most often it is a synthetic winterizer, batting, felt or drape. Batting and other dense, thick natural materials for sewing tacks are more suitable, since the synthetic winterizer has a high thermal conductivity and, at the same time, a low melting threshold.
Tip: You can use an old terry towel folded in several layers as a filler.
- Embroideries, appliqués, ruffles, etc. are used as decoration.

How to sew a potholder-mittens
So, how to sew a potholder quickly and easily? Let's first sew such a traditional mitten with a fringing and an eyelet.

There are many ways to sew mittens, but the principle is about the same - using 6 layers - 4 pieces of fabric and 2 pieces of filler.

- First we need to make a tack pattern. Place your palm on the paper (or directly on the fabric), indenting 2.5-4 cm from it, schematically draw the outlines of the mitten as in the photo on the right, and then cut out the resulting template.
- Cut out 2 pieces of lining fabric and 2 pieces of front fabric according to your pattern. You can cut all 4 pieces from one material, but it is better to choose a soft, natural, pleasant to the touch fabric for the inside of the mittens, and a dense, beautiful, colorful fabric for the front side so that the spots on it are less noticeable. We chose different types of cotton fabrics for the inside of the mitten and its front part - for originality and clarity of the example.
- Now, also in the shape of a mitten, cut out 2 pieces of filler. We remind you that it is better to refuse synthetic materials. In our case, ordinary white fleece is used, but it is better to take a denser and thicker fabric, for example, the same batting.
- And now you need to put all the details in a puff sandwich in the following order:

- We fold two blanks from the facial fabric to each other "face" as in photo No. 1.
- Now, on top and bottom of the already folded front parts, we put blanks-mittens from the filler (photo No. 2).
- And finally, we apply the purl fabric in the upper layer “face” up, and in the lowest layer we put the last blank (purl) “face” on the table (photo No. 3).
- Now let's start sewing. All edges are sewn with an indent of 5-7 mm, and as a result we get an inverted tack.

- Now we cut off the excess fabric at the edges (about 3 mm from the seam) and make cuts in all the fillets (photo below) so that our mitten turns out neatly.

- Now we turn the product inside out and decorate the sleeve with a piping - an oblique trim (preferably not satin, but cotton), a strip of fabric, braid or ribbon. Since our goal is to show the easiest and fastest way to sew potholders with our own hands, we use a ready-made bright inlay and simply wrap our mitten with it, fasten with pins and sew. If you are using fabric, then it must be attached with a folded edge. At the end, we sew a loop from the same inlay and our mitten is ready.

Here is another cute potholder, sewn according to the described method.

If you want to complicate the task a little and make the mitten quilted, then you need to slightly change the sewing process as follows:

First you need to “quilt” one three-layer blank simply from rectangular fabric cuts, folded in the same order as described in the instructions in paragraph 4, and then the second. Keep in mind that the threads should match the front material of the mittens. You will get 2 quilted rectangular parts of the future potholders, which need to be folded together so that the wrong sides look outward from the bottom and top of the “sandwich”. And finally, we sew the folded parts along the contour of the mitten template (see paragraph 1). Next, we process the edges of her sleeve with braid or fabric and sew on a loop.
We sew a square pot holder or a hot stand
Now let's start sewing a square potholder, which is very, very easy to sew - unlike mittens, here we use: 2 pieces of batting and 2 pieces of face fabric. Patterns are made for all parts measuring 20x25 cm (or any other). You also need a strip of fabric for the loop - 8x15 cm, and of course an ironing board, iron, needle and thread, a sewing machine and scissors.

Work is carried out according to the following algorithm:
- Again, a “sandwich” is made from the fabric: 1st layer - batting, 2nd layer - fabric face up, 3rd layer - fabric face down, 4th layer - batting. Such puff blanks need to be made 2 pcs.
- Two blanks are sewn together from 3 sides, while the lining should still be outward.
- The tack is turned inside out, ironed.
- The loop is sewn and takes root.
- The fourth side is stitched.
- a square tack can also be quilted if desired;
- you can also sew a pocket to one side;
- by the same principle, you can sew potholders in the shape of a heart, a circle, stars, etc. with your own hands.
Here are some ideas for sewing potholders with your own hands according to the basic principle described above (scroll the photo to the right).

Patchwork potholders

Patchwork potholders look unusual, but before you start sewing, you should decide on the technique of connecting patches. Here are 3 main ways:
- Building Blocks- you will need to make square elements, and then process them on a typewriter.
- Pattern sewing - pieces are cut according to special patterns. These are elements such as birds, leaves, hearts.
- Sewing on the base - here the elements are not sewn together, but sewn to a pre-prepared base.
To make a simple patchwork product, you need to prepare three colors of fabric, a knife, threads that match the color of the fabric, pins and a ruler. Then we prepare shreds - squares with a side of 10 cm. Each of the squares is cut into triangles, and they are already stacked as required by the schemes. All triangles are sewn together, and one side of the product is obtained. The second side is made according to the same principle, and lining material is placed between them. Then the edges are carefully sewn up, and a loop is attached to the corner - that's it, the tack is ready.
Potholders are an accessory that any family member can hardly do without. After all, it is the tack that will save your hands from burns and injuries when cooking. Whether you need to heat up water or heat up a bowl of soup in the microwave, a potholder is an indispensable tool. And it should be in the most visible place. In addition, these kitchen attributes can be not only functional helpers, but also an aesthetic decoration of any kitchen. A bright, original potholder will become a bright stroke in the interior, adding a special charm to it. A potholder made by hand (from a pattern) is unique and inimitable.
Potholders for the kitchen: what are they for?
Potholders are essential in every kitchen. It is she who will save your hands from burns when cooking. With the help of an oven mitt, you can remove a baking sheet and other hot dishes from the oven without the risk of getting burned. The tack will not protect only from boiling liquids - oil or water. But here you just need to be more careful and not be distracted when in contact with boiling water.
Product types
The shape of the tack can be completely different.
- The most common types of potholders are square potholders and mittens.
- If you show imagination, you can find a use for funny curly tacks in the form of rabbits, berries, Christmas trees, stars, hearts, butterflies and the like.
- A set in a single color scheme looks harmonious with, consisting of towels, pot holders, and hot coasters.
- Silicone tacks are also popular.
- There are large pot holders with pockets along the edges, which are convenient to get pots for roasts, as well as pastries.
If we consider these kitchen attributes with regards to their use, then potholders are divided into:
- Single. It has a high thermal conductivity. Ideal for small surfaces. It can be a lid from a pot, pan.
- Double. Thermal conductivity is average. She can get a hot pan, pan.
- Mittens are best used in pairs. Thermal conductivity is low. Suitable for pots, large containers, pans.
Own unusual, original ideas can be put into practice, it is enough to learn how to make potholders with your own hands. The scope for creativity is limitless.
A great idea is to create several sets of different accessories and change them depending on your mood.
How to sew
In order to create a beautiful and neat potholder, you need to take your time. Each stage of the work is very important.
Necessary materials
- To effectively protect your hands from burns, the tack must be tight. For its manufacture, insulating materials should be taken - felt, batting, synthetic winterizer or fabric from an old coat.
- From above, the insulation is covered with a beautiful cotton fabric. It is safe when heated and ignited, melting is excluded. This means that the risk of burns is minimized. In addition, natural materials (cotton, calico or linen) are much more comfortable for the skin than synthetics.
- An excellent solution for edging the potholder will be a slanting inlay. You can choose any of the dozens of shades that are in the needlework departments.
- The product must be comfortable. To do this, you need to correctly calculate the dimensions of the tack so that the hand fits completely inside. Ideally, not only the hand, but also the wrist should be protected.
- The choice of color should be taken seriously. The potholder should be made with soul and decorate the interior of the kitchen and be combined with.
- To create kitchen accessories, you can use both new materials and old scraps of expressive fabrics. Of these, you can sew the outer part or lining. In every closet there are many well-preserved things that are a pity to throw away. The pattern will give them a second life.
Before stitching the individual parts of the tack on the sewing machine, they should be connected to each other with a pin or needle.
How to make a pattern (diagram)
Let's consider the creation of a pattern using the example of the most popular three-layer mittens. Measures to take:
- thumb length;
- index finger length;
- wrist volume;
- palm length (10 cm is usually added to this number);
- palm width.
The pattern is made on special paper. The next step is to cut out the pattern and place it on a piece of textile. We turn the material with the outer part inward, lean the pattern, lay snares along the edge of the pattern. We cut carefully.
Do not forget about seam allowances, this is very important! If it is decided to process the edges of the tack with a piping, then only 1 cm should be left for allowances. If the edges are simply hemmed, then 2 cm.
Next, the edges of the pattern are bent. The threads are pulled, so the snares become basting. We cut the basting in the middle. As a result, we have two patterns for one of the sides of the tack. Everything is repeated again to make the second side.
After making patterns of the outer side, we proceed to two patterns of insulation. Repeat all manipulations again. Allowances to do the same.
Fabric work process
An insulating fabric is applied to the inside of the cotton pattern. The edges of the basting are aligned. The basting stitch will help to temporarily connect the elements. One side is finished. Parts of the tack are usually sewn together with some kind of. The same manipulations will allow you to build the second half of the tack. It also consists of two patterns of outer parts and insulation - a total of three layers. 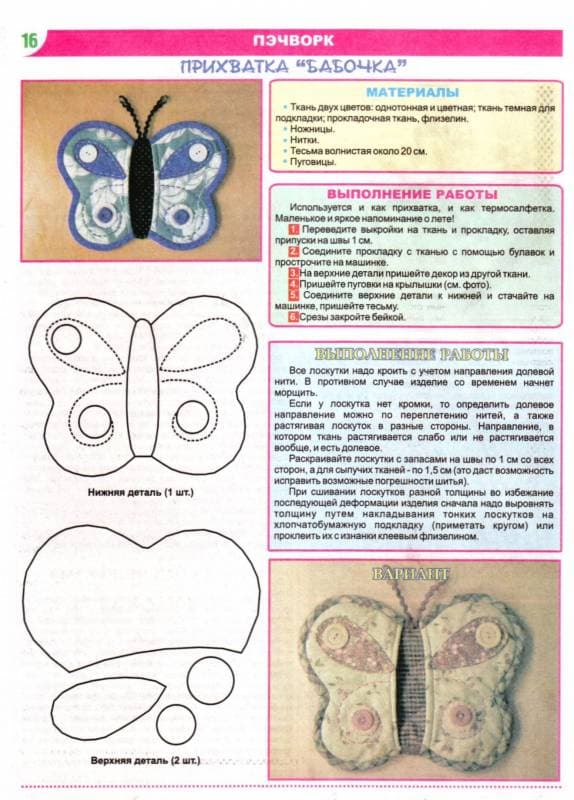
Next, you can connect the two halves of the tack to each other to get the finished product. First, you can sew them with a basting seam, then sew them on a typewriter or by hand. Now it's time to finish the edges with a piping.
The final step is to make a neat and small loop.
Design and decor of potholders
When making potholders for the kitchen, it is important to remember that this is not just a piece of cloth. This is an important interior detail, an interesting element.
Remarkably shows itself in everyday life double-sided tack. Its owners have no questions about which side to hang it to make it beautiful.
The size of the potholder is chosen individually by each hostess. Too small tack, the working surface of which is less than 15 * 15 cm, is unsafe. And too big - it will cause a lot of inconvenience.
Choosing a pattern for a tack is not an easy task. A large drawing must be able to correctly and beautifully position. If you are sewing a set of identical mittens, you need to place the pattern on both mittens symmetrically.
Beads, lace, braid and similar details can be used as decorative elements. The matter is limited only by your imagination. The main thing is not to overdo it. Still, the main function of the tack is to provide protection against burns. It is also important to firmly sew the decorative elements to the tack. No one likes to catch buttons or beads in soup.
Read about other DIY kitchen design ideas in ours.
How to sew a bright and good potholder in a few minutes, a master class:
Interesting ideas for original potholders (mittens) with your own hands
Extraordinarily cute and practical potholders - those that are crocheted or knitted. They are made quickly and easily. Even a beginner needlewoman will be able to master such a tack. Colored straws will additionally decorate the outer area of the pot holder.
Several options for how to tie a potholder:
The tack is easily and quickly sewn according to the scheme from the drape. There is no need to add an inner layer, since the drape itself is a fairly dense material. It is necessary to cut out two identical drape parts and connect them with an overcast seam of colored thread. Sew on button eyes at the end. Such pot holders can be made together with the child, or you can make a knitting, patchwork method.
Whatever your potholders are, do them with your soul, fantasize, experiment! Then they will give home comfort, warmth and comfort to your kitchen.
How to choose curtains for the kitchen can be found in this.
Potholders are special kitchen devices that protect the hands of the hostess while working in the kitchen. However, their practical purpose has long been somewhat forgotten, and this is not surprising, because their decorative function is also very important.
How to sew a potholder: instructions for beginners
To be honest, there are several ways to make practical and beautiful pot holders, but the most common of them is, of course, their creation from several layers of fabric. Layering is a must, because potholders must reliably protect the hands of the hostess from burns. Usually, 3 to 6 layers are used for a kitchen accessory - it depends primarily on what fabrics you have chosen. The simplest potholder consists of front and back fabric, as well as filler. As for the latter, it can be either a synthetic winterizer (1 cm thick) or several layers of cotton fabric.
Sewing a potholder is very simple, because you don’t need special patterns for this - you can safely do everything by eye. This activity is perfect for beginner craftswomen.
Making this kitchen accessory is easy. Fabric for sewing (as well as for decorative elements) should be selected natural. It is more practical, perfectly tolerates high temperatures (which is important, because synthetics tend to melt), and also easily tolerates frequent washing and other “charms” of kitchen life. If you want to decorate the pot holder with an appliqué, also give preference to natural fabric, because your safety will depend on how successful this accessory will turn out.
The step-by-step instructions for sewing this multi-layer kitchen “design” are extremely simple:
- Choose the shape of the future product. It can be any geometric figure, flower or animal (it all depends on your imagination and kitchen interior design).
- Draw a blank of the future product on paper - at this stage you can correct the lines, remove the asymmetry and finally decide on the size.
- Transfer the pattern to all prepared types of fabric - front, back and lining.
- Sew the workpiece with a sewing machine. Since the product often comes into contact with hot objects, it is recommended to sheathe the edges with a thick thread with a simple “over the edge” seam for greater strength.
- Sew on decorative elements, as well as a holder loop.
IN you as decoration you can use beautiful applications from fabrics or crocheted items.
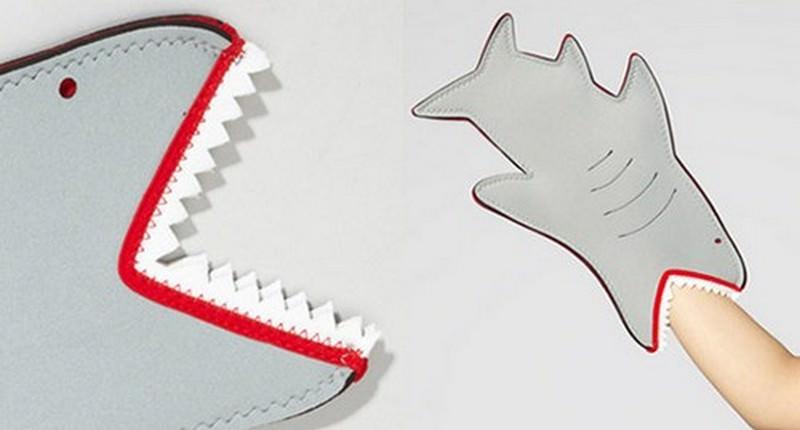
Do-it-yourself dog mitts
A dog is not the most common form of potholders, but that doesn't mean it shouldn't be used. By the New Year 2018, every hostess wants to have a decoration in the form of this cute pet, which is not at all surprising, because this is the best idea for New Year's decoration of the kitchen interior. Yes, and there is a sign that for the year of the Dog, prosperity and prosperity come to the house with its image. The potholder with a doggie has a double benefit - it honors the symbol of 2018 and protects your hands, so there is reason to work a little to make this useful accessory with your own hands (especially since it will not take you much time).
In fact, the shape of a potholder-dog can be quite ordinary - decorative elements will give a similarity. But if you want to work a little and make it as big as possible, draw a silhouette of a dog on paper or download a ready-made template from the Internet. Next, you need to duplicate the pattern on the fabric and sew the blank. The last stage is the patching of decorative elements (ears, eyes, nose, paws). If you are not good at applique, but like to embroider, sew an embroidered image on the front side.
Do-it-yourself potholders made of fabric: patterns and useful tips
As mentioned above, fabric kitchen accessories are a kind of classic. Therefore, you should not have any difficulties with tailoring them. For a pattern, you can use patterns drawn by yourself - it all depends on your abilities and imagination. Moreover, it is not necessary to draw your own templates - a ready-made paper model in the origami style, and an old unnecessary potholder, will do.
Tips for hostesses on making potholders:
- Try to choose cotton fabrics - they are the most heat resistant. Avoid synthetic fabrics - they can melt if they come into contact with a very hot surface.
- If you don't know what fabric to use, make a potholder out of jeans. Denim is a rather dense fabric, which means that you can be sure of the reliability of accessories made from it. Sewing cute potholders from old jeans is not difficult, and the result will be just great.
- Do not forget that the color of the potholder should fit into the overall interior of the kitchen.
- Be careful with the size: the potholder should not squeeze your hand, but also fall off.
- In order not to get burned when in contact with hot, use batting, synthetic winterizer, felt or cotton wool as a tack filler.
Now you can figure out what kind of potholder fabric you need.
Patch potholders
Probably, every hostess at least once tried to make products from shreds of fabric. Patchwork models look very stylish and are made simply. Patchwork-style potholders are sewn quite standardly - the top layer is sewn from the scraps of fabric of your choice, while the wrong side and lining remain unchanged. The only difficulty in this technique is to correctly combine colors. Usually, for the patchwork technique, fabrics of the same structure are used, but in contrasting colors.
Making potholders from scraps is good because you can collect unnecessary scraps of fabric and find a use for them. Add a little imagination and get an original accessory, for example, in the form of a heart!

Do-it-yourself crochet dog mitts
In the year of the Dog, every needlewoman dreams of getting an image of this cute animal in her creative piggy bank. If you like to crochet, this will not be difficult at all. Keep in mind that you should knit the practical thing first, so choose only natural threads that will not melt after the first hot pot. The diagrams will help you with this.
You can make knitted dog tacks single-layer or, in addition to the decorative layer, knit the wrong side with knitting needles. However, do not forget that you should decide what design the product will have at the stage of acquaintance with the schemes.
Do-it-yourself mitten
The shape of the gloves is very convenient for working with the oven. It is not difficult to make such a potholder - just choose the size and take a little more fabric than for sewing a regular product.
Making a glove template is very easy: just place your hand on a blank sheet of paper and trace around. Do not forget that you do not need to circle your fingers - the shape of the gloves is less convenient, and sewing them is much more difficult. Next, make the necessary tolerances, tweak the lines a little, and the pattern is ready. Transfer it to the fabric, cut out the blanks and sew.

Original do-it-yourself potholders for the kitchen: the best patterns
When you put love into your product, it will definitely be both beautiful and stylish. Interesting shapes of potholders show the creativity of your thinking and the ability to bring the craziest ideas to life. An incomparable plus of such models is that your kitchen will definitely not look boring with them!
Recently, you can find various master classes on how to make a butterfly tack with your own hands.

For the New Year, you can sew a model with Santa Claus (with the outlines of this character). Such products will bring an unforgettable New Year's atmosphere to your home and give a truly winter mood.
The fashion for interesting and unusual shapes of potholders does not mean at all that ordinary square or round products do not need to be made. Quite the opposite - these models are always in trend, out of time and fashion trends.
In any case, even the most inexperienced hostess can make potholders for the kitchen with their own hands. Working on these kitchen utensils will not take you much time, but the result will delight you for many years.