Autumn wreath on the door made of natural materials. Do-it-yourself wreath of autumn leaves: assembly options Do-it-yourself wreath on the theme of autumn
I really love autumn for its bright colors, abundance of vegetables and fruits, warm scarves and berets and, of course, for the comfort and special atmosphere. And I also really like to create interesting and beautiful home decor from natural materials.
In autumn, nature is generous with colors, and all the world is a riot of color. I constantly want to collect something, make bouquets, and also weave autumn wreaths of leaves, cones and other gifts of autumn. And then leave all this beauty in your memory for a long time, because ahead is the winter time, buying up paints.
DIY autumn wreath
The word "wreath" comes from an old Slavic word meaning "gift". This wicker decoration made of natural materials in the form of a ring is designed not only to decorate, but also to protect warmth and peace in the house.
Editorial "So simple!" prepared for you 21 delicious autumn wreath idea which are so easy to create with your own hands. Here it is - a symbol of the harvest, creating comfort.
- This wreath used a large number of different herbs and fruits of reddish hues. Such decor will become a fashionable and bright addition to your interior or house facade.
- Natural colors of wreaths from autumn leaves familiar to the human eye, they soothe, relax and harmonize.
Fresh and dry leaves are very beautiful and only once again confirm that the best artist is nature. So why not fill the space at home with her wonderful works, creating a special atmosphere of comfort.


- And this decoration is for lovers of everything unusual. If you think round wreaths are too boring, try weaving a wreath in the shape of a heart. It looks very stylish and original.


- This season, according to the Pantone Color Institute, red is in special favor. And this is a good reason to create a monochrome solution for your interior in red tones.


- All lavender lovers will appreciate this fragrant decor. Weave a lavender wreath and decorate the door with it, and happiness will definitely not pass by!


- You can also make very pretty wreaths from old newspapers, which are great to hang on the wall or use as table decorations.


- To create such a decor, you will need cones, hot glue, a pruner for cutting cones, a wreath hoop (can be twisted from branches or newspapers), burlap or linen.
Using a pruner, you need to trim the bumps, cutting off the tops. Work on such a wreath is laborious and with an abundance of garbage, but the result is worth it.


- In the simplest, but at the same time effective way decorate a wreath on the door decoration will be collected on the street or in the park with autumn leaves. A wreath looks beautiful both from leaves of the same type, and combined. For a decorative wreath, oak, maple and other leaves are suitable, the color is your choice.
Dry artichoke can be added to the leaves, Pine cones, chestnuts, acorns and rowan.


- And this is a wonderful autumn wreath using physalis fruits. How do you like this stylish front door decoration?


- This wreath can be used as table decor. Stylish and beautiful, isn't it?


- Maple leaf wreaths that can be woven are especially popular. in the usual way or come up with something more interesting.
For example, you can take birch, maple or other tree branches and intertwine them together. And then decorate the branches with leaves, ribbons, acorns or cones.


In autumn, you can also see a lot of orange physalis fruits, which stand out brightly from other plants. Thanks to his natural property persist for a long time without water, physalis is an excellent basis for decoration. So I suggest you get inspired by another couple of physalis.
Autumn wreaths made from natural materials can be hung on a wall or a door, put around a candlestick, a vase and other decor items, and they will create an atmosphere of comfort, warmth and harmony in the house.
Let your imagination fly! And may your autumn wreath be bright and sunny. To create it, you can use both natural and artificial materials. So on the way home, do not forget to collect an armful maple leaves, cones, mountain ash and get to work soon.

In addition, to create such decorative wreaths children can be involved. They will be able to select leaves, cones and acorns that match in color, as well as weave them into a wreath on their own.
Nastya practices yoga and loves traveling. Fashion, architecture and everything beautiful - that's what a girl's heart aspires to! Anastasia is engaged in interior design, and also makes unique decorations with a floral theme. Dreams of living in France, learning the language and keenly interested in the culture of this country. He believes that a person needs to learn something new all his life. Anastasia's favorite book is Eat Pray Love by Elizabeth Gilbert.
In autumn, you really want to bring a bunch of fallen leaves home, but what to do with them later? We offer you an article with master classes on how to make a wreath of autumn leaves with your own hands.
Easy option
We will need:
- twigs;
- autumn leaves;
- wire;
- ribbon.
We form a circle from twigs, fasten with wire. Then we begin to wind the leaves in a circle, they should overlap.
To hang a wreath, make a loop of ribbon.
royal flower
Let's make a rose from the leaves. To do this, they must be slightly damp.
When a certain number of flowers are ready, we prepare the base from a thick wire, folding it into a ring.

Now we can connect the roses in threes and start attaching these blanks to the base with a thread or thinner wire.


This is the wreath we end up with. Also use ribbons for hanging.

craft with children
Most often, we go with children to the forest or park to admire the fall of the leaves. We offer you a master class on how easy it is to make a beautiful wreath by introducing a child to the creative process.
It all starts with the collection. Choose colorful leaves: red, yellow, green. different types: maple, rowan, birch, etc.
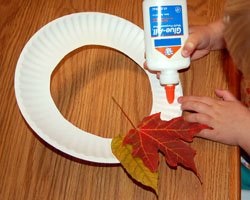
From a disposable plate, cut out the base, how to do it, shown below in the photo.


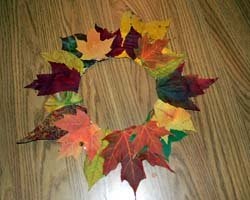
Now it's the turn of the child's hands and his imagination. Let the kid apply glue and place the leaves on the base in the order that his imagination tells him.

If the branches stick out, they must be cut.
If you and your child have collected not only leaves, but also various cones, then make the next wreath.

For it, you can also use the base of a disposable plate, or you can cut it out of cardboard. The leaves must be glued in several rows and in a checkerboard pattern. For convenience, you can draw several circles.

When you get to the inner circle, start gluing the rest of the decor. To begin with, let it be large acorns, and between them small cones (for example, alder).

On top, let the small acorns into the space between the large ones.

When all additional materials are glued or you are satisfied with the existing result, we will begin to make the loop. To do this, cut out two rectangles from cardboard, and a loop from woolen thread, string or ribbon. We place it between the cardboard boxes and glue it.


We glue the loop on the back of the wreath and that's it, it's ready.

From the leaves and berries of rowan

To create it you will need:
- leaves, it is better to take birch or similar;
- rowan berries;
- dried flowers to choose from;
- thin branches;
- cardboard;
- newspapers;
- twine or ribbon;
- masking tape;
- glue.
Cut out a circle from cardboard and cover it with several layers of newspaper using masking tape. We impose so much paper until we get the desired thickness.


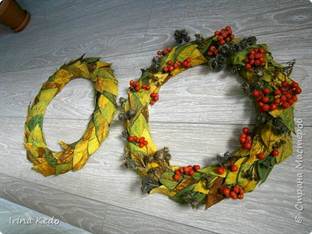
With the help of the same adhesive tape, we begin to cover the surface of the base with overlapping leaves. You can also use glue.


In principle, such a wreath looks beautiful on its own, but let's continue decorating it. To do this, we distribute branches with berries, branches of dried flowers throughout the wreath.


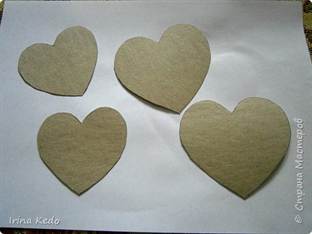
Now put the wreath aside and cut out four hearts from cardboard.
You can make them the same size, or you can make one of the pairs a little smaller than the others, as you decide.
We glue in pairs, not forgetting to put a loop of twine (or ribbon) between them.

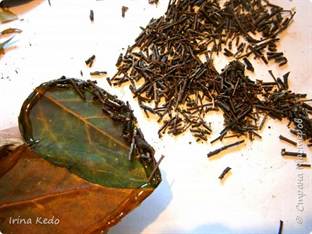
Now we close each side of the hearts with leaves. We cut off the excess.


We apply glue to the edges of the hearts and sprinkle these places with crumbs from twigs.
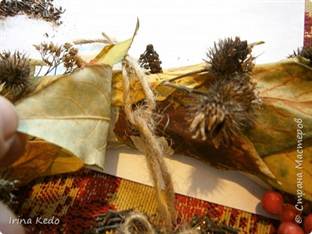
We decorate the central part with rowan berries.

We attach the hearts to the wreath, hiding the loops under the leaves.

This wreath can decorate your home. And since it is made with your own hands and labor and warmth have been invested in it, it will become a kind of amulet for your family.
paper decoration
But what if, for example, the weather does not allow you to collect live leaves or you live far from the park? What now, to abandon the idea of \u200b\u200bcreating an autumn wreath? Don't despair, help will come to you colored paper. Here you can also involve children, this will certainly develop not only fantasy, but also fine motor skills. After all, we will make leaves using the origami technique.

Prepare:
- colored paper;
- scissors and stationery knife;
- glue;
- cardboard, preferably thick;
- stapler.
From paper cut out squares with sides of 10 centimeters. We will have 10 pieces for each sheet. The number of leaves will depend on the size of the base.
Take six squares and fold them diagonally. Next, fold both corners to the fold line. We have formed corners at the bottom, we also bend them to the center. For the other three squares, we perform only the first stage of adding the right and left corners. But the tenth will serve as a cutting for the leaves.


When we prepare all the details, we begin to glue them in threes, as shown below.

Then we connect all the triplets together. We place them side by side.


We paste the tenth square on the reverse side, cut it along the edge of the sheet, but not the end. We fold this protruding part into a stalk.


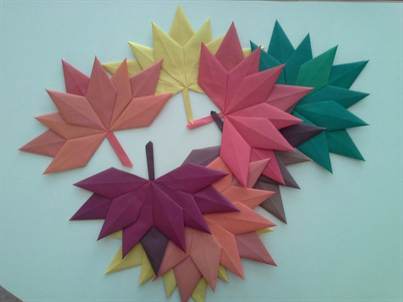
Now we cut out the base from the cardboard and begin to place our leaves. We impose one on the other with an overlap with cuttings inside.


Our autumn wreath is ready. Here are a variety of wreaths that can decorate your home in the fall.
Video on the topic of the article
With the advent of autumn, yellow-red carpets made of fallen leaves and flowers are spread in city parks, squares and in the forest. The leaves collected in the park are an excellent material for creating various compositions, fakes and paintings that can serve as an excellent gift or become an element of decor in any room. Bright autumn leaves pair well with dry flowers, cones, dried berries and fruits, acorns, twigs and other decorative details, allowing you to make unique design arrangements.
Decorative wreaths made from autumn leaves are a bright and spectacular design element that is usually placed on walls, doors, near vases and candlesticks. Such wreaths are made both from leaves of the same type and color, and from different leaves - a combined method. Wreaths look especially good, on which there are as many different elements as possible: cones, wheat ears, acorns, many small leaves and branches, and at the end red clusters of mountain ash and decorative pumpkins or apples are attached.
To create an autumn wreath of leaves on the door, you must first prepare the following materials: twigs from bushes, trees or vines, dry yellow and red leaves, viburnum clusters, dried physalis, glue gun, scissors, twine, gold threads and decorative birds for decor. In handicraft stores, you can often find ready-made bases for creating decorative wreaths, but everyone can easily find everything they need in the nearest park without spending extra money;
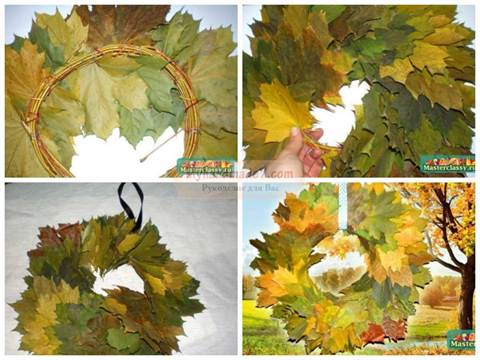
After all the materials are selected, you should proceed to the creation of the wreath itself. The first step is to twist a wreath from the prepared branches. The process is quite simple: the branches are collected in an armful and gradually tied with twine, trying to form a circle or an oval. Small sticking branches can be left, this will give the finished wreath a natural look;

When the shape of the wreath is fully formed, you can start decorating the wreath. At this stage, you should decide what the wreath will be like: with one front side or bilateral. Here the process of making a one-sided wreath will be shown. We wrap the wreath several times with gold thread;

Let's start gluing the leaves: apply hot glue to the leaf and place it on a suitable branch;

We do the same with the other half of the wreath, but we already stick a little less leaves. The result should be a slightly asymmetrical wreath, as shown in the picture:

We make a small bouquet from several rowan berries and leaves and glue it with right side wreath;

We connect two physalis buds together. Glue the flowers at the base of the wreath;
Natalya Guk
Here is a maple leaf on a branch.
It looks like new now!
All ruddy, golden.
Where are you, leaf? Wait!
V. Berestov
Dear colleagues, now is the time autumn matinees and we all know how many attributes are needed to make the holiday go with a bang.
I bring to your attention Master Class"autumn wreath"for beauty Autumn.
To make a wreath need:
two sheets of A4 paper
double sided tape
twine thread
artificial leaves, apples, acorns, hazelnuts, flowers, etc.
Let's start by making the base. We take paper, twist the bundles.

We connect, we get a circle (adjustable according to head size).Wrap around with double-sided tape (you can use regular tape with the sticky side up)

Then, we wrap the entire base with a twine thread.


So it's time to use artificial leaves, apples, etc.

Let's get to the most interesting part. master class. Where you can show all your creativity, imagination.

Related publications:
This is how I made an Easter wreath for the Easter holiday. I rolled a wreath from a branch and dry grass, I still need openwork napkins(paper).
To decorate the group, I propose to make such a wreath. Looks great in the interior. And also can be used to decorate the musical.
To implement your plan, you will need: sheets of A-4 paper, a simple pencil, colored pencils, scissors, PVA glue and a little imagination.
The holiday of all women - March 8 is approaching. How many poems, songs need to be learned, to prepare the necessary costumes. That's with them, probably all.
Material: - aluminum wire; -ceiling tiles; -scotch; - green garland - cellophane package. - facade acrylic paint;
Master class "Wreath on the head" Rosehip ". Here is such a wreath for hair I got. For this it took: artificial flowers, berries.
Master class "Golden Autumn Wreath" (craft made of colored felt) Now it has become very fashionable to make different wreaths from different materials.
Autumn wreaths made of natural material are most often made on the basis of ears of valuable and weed cereal crops. You can make a spectacular autumn wreath with your own hands from natural materials next plan: straw and ears of wheat and rye, oats and buckwheat, etc.
Materials:
- ready-made wicker willow wreath;
- dry ears of wheat and oats;
- lace braid;
- glue gun.
Progress
- Prepare the cereals for use - group them into small bunches and trim them. You can fix the bundles with a teip tape of a suitable color.
- The wreath turns out to be not very thick, in some places the base will shine through, so the ears are glued directly to the base. Try, if possible, to mask the places where the ears are glued to the base, since the hot glue, when dried, becomes noticeable and may look unaesthetic. Alternatively, you can use thin fishing line instead of glue to secure wheat and oats.
- Glue in a circle first bunches of wheat, then bunches of oats. Try to evenly distribute the cereals over the surface of the wreath.
- Tie a beautiful lace braid to the finished wreath for hanging.
Advice:
Such a wreath will organically fit into a country-style interior, the main elements of which are lace, wickerwork, natural materials, etc.
A wreath can be made from almost any cereal. You can dry your favorite cereals yourself or buy ready-made ones.
It is possible to make a wreath from fresh ears. Bunches of cereals are also glued with hot glue. But be prepared for the fact that as the plants dry, they lose their color. For example, ears of oats, green initially, become faded over time.

Before you make a wreath from natural material and meadow herbs, you need to prepare all the tools and materials:
- corrugated cardboard base;
- various dried meadow herbs;
- sisal;
- plaid material;
- teip tape;
- glue gun.
Progress
- Cut out 2 circles from cardboard, glue them together. Cut a strip of fabric and wrap the base, secure the tip of the fabric with glue.
- Cut the herbs, leaving a stem length of about 1-2 cm. Form small bunches, secure each bunch with a teip tape.
- Heat the glue gun and start gluing the bundles in a circle in this order: first the longest ones are glued, then the shorter ones and the shortest ones. Each subsequent beam should cover the previous one a little. Thus, it is possible to mask the places where the grass sticks to the base.
- Use green sisal fiber to decorate the base. Sisal is also glued with hot glue.
- Tear off a few sisal fibers and twist them to form a rope. The tourniquet should be strong enough, as it will be used as a suspension for a wreath.
- Attach the hanger to the wreath.
Tips:
- For this wreath, it is better to use several types of herbs, then the wreath will turn out to be more spectacular.
- The same plant, collected at different times, will have a different color when dry.
- Straw can be used instead of sisal.
- The base can be wrapped with linen cord or braid.
We continue to make wreaths from natural materials, using various plants harvested since summer for the creative process. Graceful and fragrant wreaths of natural flowers, which have been dried and properly prepared, heal the atmosphere in the apartment, free the air from unpleasant odors.

Materials:
- dried buttercup flowers;
- willow branches;
- fishing line;
- glue gun;
- green teip tape;
- yellow lace.
Progress
- Make a ring from willow branches, wrap it with fishing line for strength. Leave to dry for 2-3 days. After drying, the twigs will retain the shape of the ring.
- Before you start, you need to prepare the flowers. To do this, they need to be cut and divided into small bunches.
- Using floral tape, wrap each bunch around. The teip tape will securely fix the flowers.
- Start gluing the bunches of buttercups prepared in the above way using a heated glue gun. Moving in a circle, gradually fill the entire space of the base. Apply the bundles in layers, and the next bundle should only slightly cover the bundle lying below, masking the places where the flowers stick to the base.
- Pick up a beautiful lace braid, it will serve to hang the wreath on the wall.
Tips:
- Flowers do not have to be glued, you can use thin wire and attach each bunch of wire to the base.
- A wreath can not only be hung on a wall, a door, you can simply put it on a shelf, leaning it against a support.
- Dried buttercup flowers are completely harmless, but you can replace them with other flowers. Try to dry and then make a wreath of small inflorescences of bird cherry, apple, lilac, chamomile, etc. The wreath will turn out not only beautiful, natural, but also very fragrant.
- Such wreaths of dried flowers will perfectly fit into country-style interiors. Country style is a rustic style, which is distinguished by simplicity, naturalness and naturalness of materials.

Materials:
- vine wreath;
- 3 artificial sprigs of lavender;
- fishing line;
- glue gun;
- ribbon.
Progress
- Disassemble the branches into small inflorescences, if necessary, use wire cutters to cut the wire.
- Using a hot glue gun, glue the branches to the base, moving in a circle. Do not apply too much glue to the branches, otherwise the work will look sloppy.
- Tie a matching ribbon to the wreath.
Tips:
- If you want to get a thicker and more lush wreath - use 5-6 artificial branches.
- Twigs can be attached using thin colored wire for beads. It comes in different dvetov, it will not be difficult to choose the right one in color.
- A wreath can be made using natural lavender sprigs. You can weave a wreath using live twigs and dry the lavender in the wreath, or make a wreath from already dried lavender flowers.
- Apply a dash of lavender essential oil on artificial twigs, you will also be planted with the delicate aroma of blooming lavender.
- Such a wreath can be made for a Provence-style interior, which is associated with a bright sun, the sea and huge fields of blooming lavender. Provence is the southern region of France. The very word "Provence" is translated as "province", and the interiors created in this style correspond to the style of provincial houses in the south of France.
Craft "A wreath of natural material"can be made by hand together with children of different ages. The creative process develops thinking and fine motor skills of the hands. We recommend choosing crafts such as a wreath made of natural material for creativity with children and decorating interiors. Following are some ideas.

Material:
- willow branches.
- mimosa branches;
- feathers of yellow and blue;
- decorative small blue testicles;
- thin wire;
- yellow ribbon in a box;
- glue gun.
Progress
- Tie willow branches with a ring, tie the ring with wire.
- Glue the mimosa sprigs to the willow base. Place the mimosa at an equal distance from each other.
- Glue the feathers first yellow, then blue.
- Make a few bows from the braid in the cage and glue them to the testicles.
- Glue the testicles to the wreath, placing them between the feathers.
- Make a wreath hanger from the same ribbon used to make the bows.
Your original wreath is ready!
Tips:
- Such a wreath will look beautiful not only on the wall, but also on the festive Easter table.
- A wreath can be made from both living and dry branches of willow and mimosa.
- If you cannot find ready-made eggs for decoration, then you can make them yourself (from clay, plastic, salt dough, papier-mâché) and color them.

Materials:
- preparation of a round wreath (polystyrene, cardboard, branches);
- fabric (tape);
- dried flowers (lagurus) pink and red;
- teip tape;
- sisal pink and red;
- decorative braid;
- glue gun;
- sticks for the glue gun.
Progress
- Cut the lagurus, collect bundles (5-6 pieces each), fix the ends with a thread of the appropriate color or teip tape so that the bundle does not fall apart. Such bundles need to be made 30-40 pieces.
- Roll sisal balls in the amount of 20 pcs.
- Wrap the wreath blank with a ribbon or strip of fabric.
- Heat up the glue gun and carefully glue the lagurus bundles onto the base, alternating colors. Apply glue only to the stems.
- After the dried flowers are glued, mask the glue points with sisal balls.
- Tie a decorative ribbon to the finished wreath.
- Make a bow and glue to the braid.
A beautiful decorative decoration for your home is ready!
Tips:
- Instead of lagurus, you can use other dried flowers grown in your garden (helichirizum, statica, yarrow, Chinese lantern, etc.).
- A wreath made up of a mixture of dried flowers and herbs will look very nice.