How to make a chicken out of colored paper. Master class “Carton craft “Chicken is the baby of the symbol of the coming year. What do you need for an Easter craft?
The proposed craft can be considered Easter, because a little chicken is rightfully called a symbol of a wonderful holiday. He hatched from an egg and squeaks cutely, looking for his mother. The proposed option is a craft for kindergarten, crafts for the little ones, because it is not difficult to make it. How to make a paper chicken, described in this article. Using the same technique, you can make an Easter bunny, just use paper of a different color (for example, pink or blue) and attach long ears instead of wings.
Prepare to make a cute yellow-mouth paper chicken:
- yellow paper;
- orange paper;
- scissors;
- glue in a pencil or any other.
How to make an Easter Paper Chicken?
The chicken must be yellow for the craft to be believable. If you use paper of a different color, then you will get some kind of different chick. Take a thicker sheet (maybe even cardboard) and cut out the central part from it. This will be a strip of arbitrary sizes, about 4 cm by 20 cm. The denser the paper, the better, then it will keep its shape well in the finished product.

Lubricate one end of the prepared strip across with plenty of glue. Form a ring. Press down both ends of the paper with your fingers at the gluing site and hold in this position until the glue dries. The resulting round part is the main workpiece. This will be the head and body of the chicken at the same time. Here is an unusual technique we will use.

Cut out from another piece of paper red or orange color small rhombus. Bend it in half. Get a small beak for the chick. Glue it to the side of the ring. Coat with glue and gently press down, you can help yourself with tweezers. Thus, the front part of the figure will be indicated. Also stick white paper eyes on the muzzle or just draw them. The muzzle of the chicken is formed.

Cut out two oblong (oval) blanks for the wings. You can use thinner plain paper at this stage. Make wings in the form of leaves. Taking scissors in hand, make longitudinal notches on one side and on the other to show soft feathers. Details like the weightless and airy feathers of a small chicken.

A similar craft for children:
Lubricate the wings with glue and attach to the body, turning the rings inside and pressing with your fingers to the front of the paper.

Similarly to the wings, make a tail and glue it on the back. In shape and size, the third part can be the same as the previous two or smaller.

The cute chicken is ready. It remains only to attach flat paper paws from below so that the torso-ringlet does not roll forward.

Another craft for the interior:.
That's all. The Easter chicken will be happy to peck at the delicious grains that you pour him. Now it remains to paint the eggs for Easter, put them on a dish, and next to sit a miniature craft made by the hands of a child. Meet the brightest family celebration fully armed, prepare a few gifts for family and friends, doing it with your own hands with your children is so exciting.

Share the master class "How to make a chicken out of paper" with your friends and followers on social networks. Click the buttons below!
- Bend the workpiece in half.
- Raise the corners, stepping back a little from the fold.
- Put the figure on the paws. Wings. From two small squares, fold the kite blank.
- flip both blanks.
- Glue the wings to the body.
- Bend (same) all corners.
- Bend the piece in half.
- Bend the corners from the side of the fold as much as the corners of the rectangle were bent.
- Bend the corners and bend them inward.

Download the template for this Easter craft. Cut it out, color the chicken. Place a colored egg inside the Easter hen.
From a small sheet of paper, you can make a simple and cute origami chicken, a child can handle this task. To make these figures, we need colored paper in yellow and orange shades (you can make a black chick with a white breast):

Progress:


(The idea and description of the work are taken from this source).
There are a lot different ways paper work. In preparation for Easter, paper is a wonderful material for crafts. Paper chickens can also be made in different ways. I offer several options in my answer.
1 option.

Here is such a very simple chicken. It comes with a cutting diagram.
- Cut out strips for the head and torso, fold into a circle and glue.
- Cut out the beak, wings, paws and glue to the chicken.
- Eyes can be made from paper, plasticine or bought.
Option 2.

Also a simple version of a paper chicken. We cut out the template diagram, make cuts in the required place, bend along the fold line and - make a chicken.

3 option.

I couldn't pass by such a friendly family. A very cute piece. In addition, you can put Easter eggs and she, thus, serve as a decor for the festive table.
To perform such crafts, you can use the template, having previously increased it, or you can draw the base yourself.

How to do.
- Bend the product along the dotted lines and glue the bottom to the sides (wings in our case).
- We attach pockets for chickens (you can glue paper pockets on the reverse side and only cuts on the front side as on the template).
- We make chickens from yellow paper.

The bottom of such crafts can simply be covered with green paper, you can decorate with homemade grass (cut strips from corrugated paper and crush them a little) - and put a treat on it.
You can also see:
- Easter crafts for kindergarten.
- Air Easter eggs from threads.
- Easter wreath with your own hands.
- Easter wreath with hares.
- Easter baskets with their own hands.
- paper Easter baskets.
- How to make an Easter card.
You can make a chicken out of white or yellow paper. You can cut out triangles (feathers) from paper and stick them on the package from the kinder egg, then draw the eyes. And you can make a chicken using the origami technique. In the video tutorial, you can see the options for making such a paper chicken.
Do-it-yourself paper chicken can be made using the origami technique.


There is also an idea for such a fun paper chicken. It will not be difficult to make it with the children. You can draw it yourself or print a picture.


The cockerel, along with the mother hen and colored eggs, is one of the common symbols of Easter. In different European cultures, the image of the rooster signifies good health, prosperity and fertility. It is a protection from evil forces. This workshop will show you how to make a paper Easter cockerel using the kirigami technique.
Crafts in the form of paper chickens can be made both simply in the form of applications, and in the form of volumetric figures, as well as master a new technique of volumetric modular origami.
The latter will require a little patience and perseverance, but the video explains in detail all the stages of making crafts in this slightly complicated technique. But it turns out incomparably beautiful.
Crafts in the form of chickens are especially relevant for Easter and New Year- Year of the Rooster.


There is such a great and not difficult idea how to make chickens from a paper egg tray. To do this, we need to cut out two halves of the box (round, an egg shape), glue it on one side, paint gouache with yellow paint, cut out a small beak, eyes, wings and paws from paper and glue it to our workpiece. Such chickens can also be used to pack small sweets.
A paper chicken is a craft that any child can handle, you just need to choose the level of difficulty for his age.
For example, for younger children preschool age you can offer to make such a chicken out of paper:

We cut out a circle from yellow paper, fold it in half - this will be the body of the chicken. Then we cut out the wings - also from yellow paper in the form of droplets. Then we cut out the triangle and fold it - this will be the beak. For the peephole, we need to cut out two circles from black paper. We glue all the details and our chicken is obtained.
And for older children, you can offer to make a paper craft - a chicken in an eggshell:
paper chicken
Prepare from yellow paper: a square 15 * 15 cm in size, 2 squares 7.5 * 7.5 cm in size, and also take a red square 5 * 5 cm in size, glue.
Torso. Bend the square bigger size scarf in half.
Head. Place the remaining yellow rectangle with the white plane facing you (if the paper is colored on only one side).
Beak. Fold the red square into a basic kite shape.

The egg has long been a familiar Easter symbol, and chicks for easter- a natural continuation of this theme. Have you ever held in your hands this little fluffy miracle of the color of a sunbeam? It is impossible to remain indifferent, so it is not surprising that everywhere among Easter decorations we will meet chickens.
There are a lot of ways to make them, and every year something new is added. Materials can be very different - threads, fabric, paper, felt. You can choose what is closer to you, and your children will be happy to take part in such creativity.
Easiest make chicks for easter from paper. The material is simple, cheap and affordable, always available in the house, especially if there are children. It can be a figurine, a gift box, an application in the form of a panel or a postcard. Finally, for kids, you can print cute pictures on a printer - they will color them with pleasure.
The same patterns can serve as stencils for appliqué if cut into pieces. Moreover, for the application, you can use not only colored paper, it will turn out no less beautiful. For a paper stencil, you can make several printouts: cut some into templates, and stick colored paper parts on others. By the way, colored printer paper is also quite suitable for this.
Small postcards work well if you take a multi-colored block for notes. Something will serve as a background, and from those that are yellow, we will cut out the details of the application. Gift wrapping is made in the same way. It's just that when you print out the contour, there should be two, looking in different directions with a distance between them.

As always, skillful hands will find use for empty toilet paper tubes. If there are such foil tubes, then they can simply be cut with a sharp knife into pieces of the desired length. We glue the tube with yellow paper, cut the square diagonally for the wings, make small details of red paper for the scallop and beak.
It remains to glue everything in the right order. It is best to use a glue stick for this. Even the thinnest paper will not get wet from it, and there is no danger of spilling glue if you are doing crafts with the kids. funny handmade chicks for easter obtained from cardboard egg trays.
You need to carefully cut out the cells. For each box, we will need two of them, so a company of five chicks will turn out from a standard tray. Let's paint the cells with the paint you have: acrylic, gouache or watercolor, trying to keep the cardboard from getting wet. Let the work dry.
We connect the parts of the box by gluing a strip of paper on one side. Decorate the toy with a red beak and paws. Inside you can put a painted egg, candy or a small cookie. In general, something that will allow you to put inside the size of the resulting product. We draw the eyes of our birds with a felt-tip pen or stick them made of black and white paper.

Chickens for Easter
Fairly easy to make and handmade chicken from threads for Easter. Of the materials, we need cardboard for two circles, on which we will wind the threads, the threads themselves (acrylic, wool or wool mixture of medium thickness, of course, yellow, is suitable), as well as red paper for the beak. We make circles of the size we need, differing in size.
The small pom-pom will be the head, and the larger one will be the torso. It is better not to spare the threads so that the pompoms come out not sparse, but rather dense. You will find in detail the manufacturing process of this in the corresponding master class. In principle, a cute chick is obtained from one pom-pom.
The main thing is to decorate it with imagination. Bows, hats, a box in the form of a half of a broken shell or other entourage - and your bird will acquire originality and individuality. You can hang your crafts on a chandelier or on branches and put such a bouquet on the table.

Make chickens for Easter
Always popular felt chicks for easter, and this is not surprising, because even inexperienced craftswomen can do such work, if only they could hold scissors and a needle in their hands.
There are many variations. For example, a mother chicken with a baby in a basket looks great. The pattern is provided, so you need to print and cut out the templates of the parts, or simply copy them, increasing the size to the desired size, directly from the screen using tracing paper or loose paper. Then we cut out the details from felt, sweep them along the front
side, stepping back a little from the edge. First, we will make small parts: a scallop and paws, filling them with synthetic winterizer or holofiber, and then we sew the large ones, inserting the small ones inside with an allowance when sewing. with kids can be made from fabric.

And as a substitute for felt, thin viscose napkins, which are sold in hardware stores and are quite inexpensive, are suitable. Individual chicks also look good.
The shape of the body can be different: a circle, a triangle with rounded edges, an oval or an egg. Before sewing the halves of the figure, sew to front side all decoration: aprons, wings, bows, grass and other things that you decide to use, and also make eyes.
You can make them yourself using beads, buttons, beads, although ready-made eyes are usually available in needlework stores. We do the same with the eyes crochet chicks for easter. After sweeping the halves, leave a small opening for stuffing. Felt or viscose napkins are not very stretchy, so don't stuff too tightly, just give a hint of volume. Such a bird will serve as a decoration of the house, it will a good gift child, can be used as a keychain on a school bag. A pom-pom or felt chick can be placed inside a filament egg.

Crochet chickens for Easter
And finally knitted chicks for easter- This is aerobatics. They are usually knitted from fairly thin threads, so you need to take the appropriate hook or knitting needles, so a person for whom she is at least not the first, and he has some knitting skills, can take on such work.
In principle, if you had to knit a hat, then you can cope with a spherical body and head, because you can imagine how to make decreases and increases, the difficulty is only in a very small size of the product. But it is very difficult to deal with legs and other small details due to the small number of loops and the thickness of the tool and material. Exit - in mixed media.
That is, if you are not sure that you can handle the paws, knit the head and body in the form of balls with knitting needles or crochet, you can also make wings, but make the paws, for example, from chenille (fluffy) wire or ordinary wire that is wrapped with threads , corrugated paper on glue or teip tape of a suitable color.
Felt is suitable for the beak and scallop, however, it is not so difficult to crochet them. Believe me, if everything is done carefully, appearance toys will not be harmed in any way. Roughly knitted limbs look much worse if they lack skill.

Amigurumi chickens for Easter: scheme
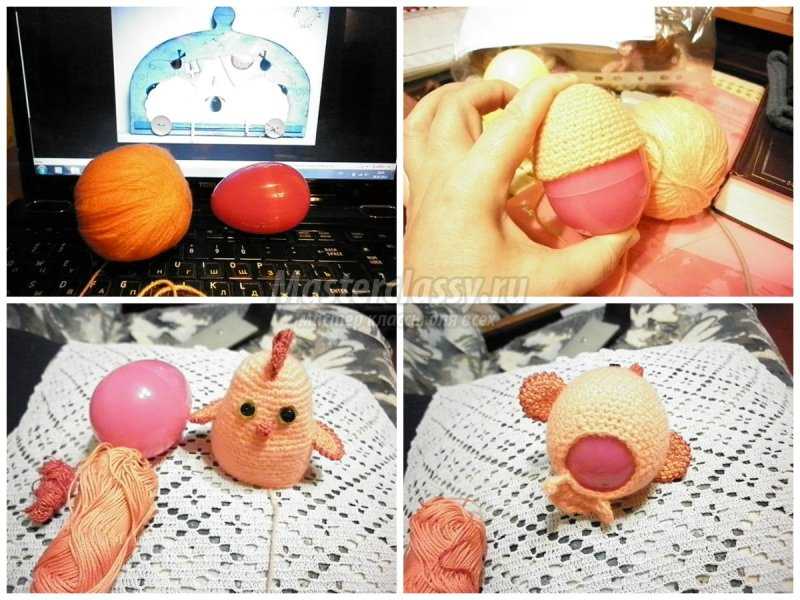
Crochet chicks for Easter it's best to start with a simple enough model to get the hang of it, as they say. We will make only a hatched chick with the remains of the shell, proposed by the craftswoman Anastasia. It consists of a head and a body, connected according to the same principle, but differing in size. We will also have to knit the upper and lower shells, wings and beak.
For the manufacture we need materials:
knitting threads yellow, white and a little red, preferably of the same thickness
factory eyes or beads of a suitable size
synthetic winterizer, silicone or other filler
and tools:
sewing needle
glue gun or instant glue
a hook that matches the yarn number (it is better that it be no more than 2.5 thick)

We start knitting from the head and torso. First of all, we knit an amigurumi ring from six single crochet stitches. You can see the sequence of its implementation in the photo. This way of starting knitting allows you to tightly tighten the circle, so that there is practically no hole left. fit in chicks for easter crochet single crochet. In the second row above each st. b/n
we knit two tbsp. b/n
In the third row, we make an increase in every second st. b/n
In the fourth row, an increase in every third st. b/n
Fifth row: in every fourth st.b / n we knit two
By the sixth row, we have a knitting width of 30 columns, we do not increase for four rows (we knit a column over a column for 6-10 rows)
Eleventh row: an increase in every fifth column

Twelfth row: in each sixth column we will knit two of one. Next, from the thirteenth to the twentieth row inclusive, we knit evenly without increments of 42 columns in each row, and from the twenty-first row we make decreases, knitting through one column: in the 21st row we knit five columns, and then the seventh, leaving the sixth untied
Further in descending order: four and decrease, three and so on, until we have 18 loops in the twenty-fourth row. Through the resulting hole, we tightly fill the figure with filler, after which we continue to reduce the number of columns until there are six of them in the 26th row. Having finally pulled the hole, we fix the thread, and push its tip inside the chick.

Others knit in exactly the same way. amigurumi chickens for Easter, scheme increase will be the same. The design of the legs, details may differ, but the principle is the same. The wings are knitted in the form of an amigurumi colza circle with one increase in each column in the second row. Third and fourth rows: 12 tbsp. b / n without increments. We fold the finished circle in half and knit along the edge, connecting it into one. We do not cut the thread, but leave a sufficient tail to use it for sewing on the wing.

We knit the upper shell, making increases from the second to the sixth row, in the same way as we knitted the head. Should be 30 tbsp. b/n. We knit the seventh row, alternating groups of columns with a crochet and without a crochet. They can be three or six loops. The edge, thus, turns out to be jagged, uneven.
The lower shell is knitted in the same way, but it is larger in height than the upper one, so we make increments until 42 columns are formed in the seventh row. We knit the next four evenly, without increments, and finish with a scalloped edge. For the beak, we make a ring of six sts, in the second row we evenly add two more and then we knit eight sts again. b / n, leave the tip of the thread for sewing. The assembly remains: sew on the beak and wings, and also glue the shells to the head and body.

Can knitted chicks for easter be made on knitting needles. The difference is small. Since the fabric in this case is more elastic than crocheted, it does not require such a rigid scheme of increases and decreases.
The height of the row is smaller here, so we decrease or add loops through the row or even less often. If the threads are thin, then you can finally tighten not six loops, but from six to ten. But the beginning of knitting is also carried out from the amigurumi ring, we only collect eight loops, and then distribute them on four knitting needles.
If the thread is thick enough, you can start with six, spreading them over three knitting needles. We can get a jagged edge like this: we knit in the face, knitting two facial ones together and then a yarn over. A hole is formed under the crochet, and if the fabric is folded, the edge will be jagged. Another beautiful easter idea- do
funny hat "Chicken" made of paper- stylish and useful accessory, which can be used in many ways. Firstly, it protects the head from the sun's rays - while it looks brighter and more interesting than a regular cap. Secondly, it can be used as part of a carnival outfit to play a scene from the life of village animals in front of parents.
It seemed to us that if you add eyebrows above the eyes, the chick will look like the hero of the famous game and the recently released cartoon - an angry bird. If your child is a fan of these characters, he will love to play the action game Angry Birds: Action Game based on the computer puzzle. Wearing your new hat, of course!
Mask-hat "Chicken" made of paper: do it yourself
To make an original hat, take:
- colored paper
- scissors
- ruler and pencil
- PVA glue and double sided tape
STEP 1. For a paper panama hat, you will need a blank about 50x30 cm in size - these are 3 A4 sheets glued together. Mark the base as follows: leave a 3 cm wide strip along the bottom edge, and draw vertical lines from it at a distance of 2 cm from each other. Cut the strips through one.
STEP 2. Glue the edges of the workpiece. In order for the craft to keep its shape and sit tightly on the child’s head, reinforce the rim with additional strips - for best result take thicker paper or cardboard.
STEP 3. Start weaving the tulle. To do this, alternately take strips opposite each other from each edge and glue them on the inside of the rim.
STEP 4. Time to give the character character traits. Cut out paper and decorate decorative elements: wings, scallop details, beak, eyes and eyebrows.
STEP 5. Give the bird a finished look. Relive the muzzle, glue the wings on the sides, and decorate the top of the head with a tuft. To do this, you need to bend the strips in half and put them in a wave on top of each other, aligning the edges.
A little chick will be the main decoration of the Easter table, an excellent keychain and a wonderful reminder of the pleasant moments of the holiday. And if you make a whole family of chickens, they will surely outshine at the school exhibition.
Today I will show you how to make two chickens:newborn(and therefore very surprised) and older, on short thin legs.
To make a newborn Easter chick, you will need:
- yellow threads (acrylic, cotton, wool),
- round artificial eyes (or two black beads),
- red cardboard (for scallop, paws and beak),
- two circles cut out of cardboard.
Let's start making chicken!
1. Take two circles with cut out centers. The outer diameter is the size of your future chick, and the inner diameter determines the density of the pompom. The larger the cut out part, the more threads can be wound, and therefore, the pompom will come out denser.
So it's time to decide whether you will have a tiny chicken or a rather impressive broiler =)

2. Put two circles together and wrap them with thread.


But if you have a large pompom, unwind 15 meters of thread, fold them in eight, and only then get to work. That will be much faster.


3. Cut the threads as shown in the photo. The scissors should go between two cardboard circles.

4. Having cut the threads to the end, take new thread 20 cm long, wrap it between two cardboard boxes and tie it tight so that the pompom keeps its shape well.

5. Now cut the cardboard circles out of the pompom with scissors - they are no longer needed there.

6. Done? Well done! It's time to visit the beauty salon and give your chicken a chic hairstyle.
Align the pom-pom, straighten the threads, cut in the right places, and you're good to go.

7. Cut out comb and paws from red cardboard.

Glue them to the chicken. Like this:


8. Now glue the eyes and the beak, consisting of two red droplets. Beauty!

We take on the second chicken, which can already walk.
For work, additionally prepare:
- glue Moment Crystal,
- wire,
- red threads,
- two black beads
- red cone bead.
1. Make 2 pompoms (You already know how): one is small and the other is bigger. Do not cut the threads with which you will tie the pompoms - they will come in handy when tying the parts of the chicken's body.

2. Now cut the threads. From a thin wire, make legs for the chicken: three fingers will be in front and one behind.


3. Lightly smearing the paws with glue, wrap them with red thread.

4. Glue the red cone bead. This is a chicken beak. Glue two black beads in place of the eyes.

Here are our two beauties. Sit them in and soon to a friend - Happy Easter and!