Children's crafts on the theme of the workshop of Santa Claus. Contest of crafts "Workshop of Santa Claus. Santa Claus from a napkin is ready
Favorite holiday is coming New Year. I want to create a fabulous atmosphere and a festive atmosphere, and creative crafts will help us with this. In this article we will look at: how to make Santa Claus and Santa Claus with your own hands.
You will need: foam ball with a diameter of 6 cm, faux fur, shabrak, bias binding, holofiber, hemispheres for the eyes, pattern, snowflake sequins, sewing machine, iron with a sleeve block, scissors, textile glue, crepe satin of blue color, white, nude and blue fleece, staff stick, silver braid.
Master Class
- Cut out 2 parts of the body from the shabrak, glue the crepe satin, then process the long sections with bias binding.
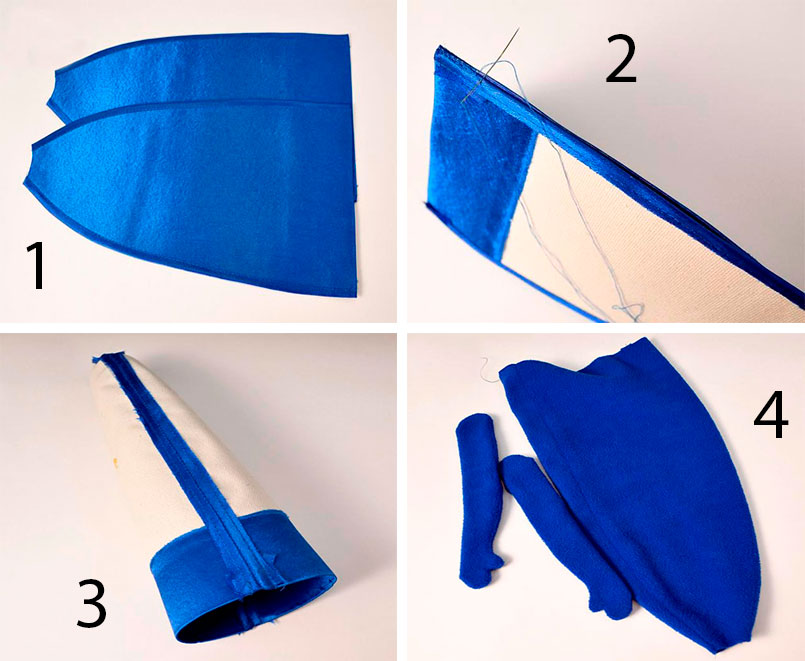
- Fold the crepe satin pieces together and sew the long sections with a seam over the edge.
- Form a rounded shape using an iron and a sleeve last.
- Cut out the details of the fur coat and handles from blue fleece.

- Sew, turn on front side and leave holes in the handles for stuffing.
- Cover the ball with flesh fleece and make a neck by wrapping the thread around the excess fabric.
- Make and attach the nose, then attach the hemispheres as eyes.

- Put the fur coat on the shabrak blank, insert the head into the opening of the body, then sew.
- Make a hat in this way: cut a rectangle around the volume of the head from blue fleece, sew the short side and wind the top with thread.
- Prepare the strips of fur for the lapel of the cap and the trim of the fur coat.
- Pin the blue hat with a basting stitch to the head, then sew the blue fleece fur strip butt and turn the fur up.

- Stuff the handles with holofiber, sew up the holes, decorate the wrists with fur and sew on the hands.
- Make a beard in this way: cut several rectangles of nude fleece with a difference in length of 1.5 cm. It is worth noting that the rectangles need to be cut so that the fleece stretches along the long side of the rectangle. Cut the fringe.
- Sew the details of the beard to the head, starting with long blanks, gradually rising to the nose.
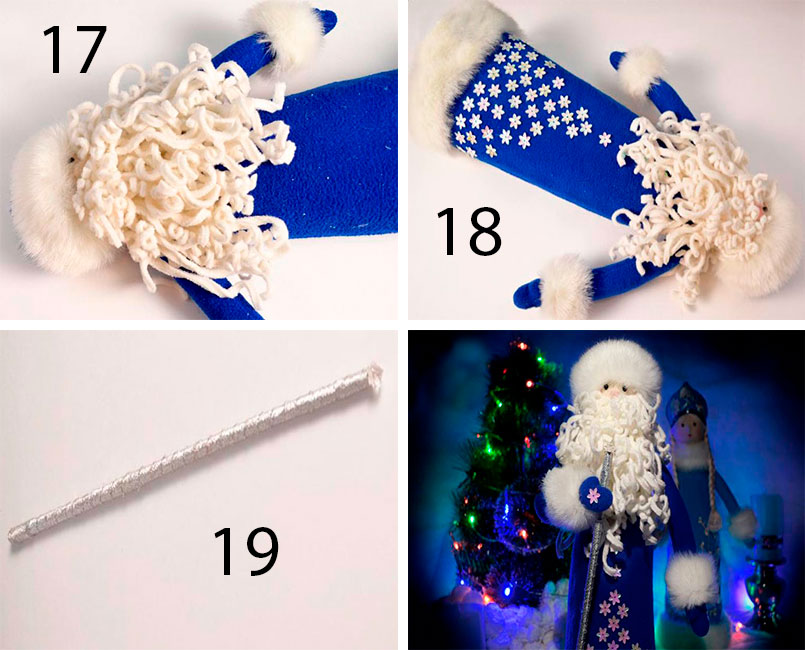
- Relax and curl your beard into curls.
- Decorate the fur coat by attaching snowflake sequins.
- Wrap the wand with silver braid to make a staff.
Gorgeous Santa Claus is ready!
You will need: red napkin, template, marker, glue, scissors, paper, printer, hole punch, twine.
Master Class

Napkin Santa Claus is ready!
You will need: cotton wool, ice cream sticks, red felt, decorative eyes, red pompom, glue gun, flesh-colored paint, brush, scissors.
Master Class

Santa Claus from cotton wool is ready!
You will need: felt 1 mm thick in beige, white and black, white felt 3 mm thick, thick cotton fabric beige colour, white felting wool, synthetic winterizer, wire, template, black beads for eyes, black and beige threads, scissors, pencil, glue gun, small bell and other decorations.
Master Class
- Print the template.

- Cut out the body of Santa Claus and transfer it to thick white felt.
- Cut out the body of Santa Claus from felt.

- Cut out the same part of the body, only from thin white felt.
- Cut out boots from thick white felt, then cut the same boots from thin black felt.
- Cut out boot cuffs from thin white felt.

- Draw the mittens and cut them out of thick white felt.
- Cut out the details from thin beige felt - the trim of the fur coat and hat.
- Cut out 2 circles from a beige cotton fabric.
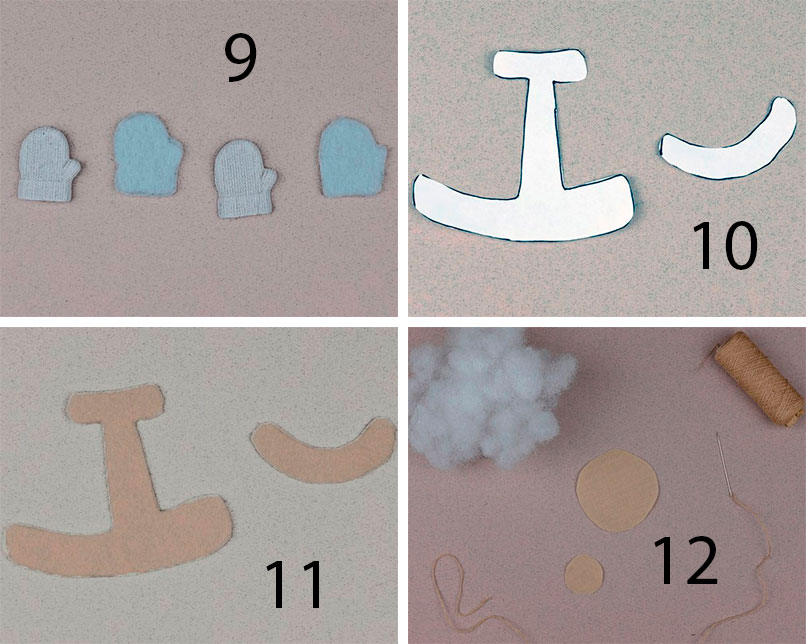
- Make a nose out of a small circle: pull off the thread, fill it with padding polyester and sew the nose to a large circle.
- Sew on black beads for eyes.
- Sew the face onto the thin felt body. It is worth noting that during sewing, you need to add a little padding polyester for volume.

- Make eyebrows and a beard from felting wool, then attach with a glue gun.
- Glue the trim of the hat and fur coat.

- Prepare 4 pieces of wire, twist them onto a pencil, giving them the shape as in the photo.
- Glue the details of Frost's body from thin and dense felt, gluing a wire between them in place of the arms and legs.

- Glue the mittens and boots to the twisted pieces of wire.
- Twist the holder for the bell from the wire and glue it to the mitten.

- Sweep the figure of Santa Claus with a beige thread.
You will need: a bottle of champagne, a hook, a yarn, a centimeter, an edge, a filler, ordinary threads, a needle, doll strands, glue, jewelry.
Master Class
- Knit the head in single crochets with beige yarn, according to the principle of knitting a ball. It is worth noting that the number of rows without increases and decreases should be two rows less than for the ball.

- Make the base of the doll with red yarn: knit a circle with double crochets, fold it in half and make knots at a distance, as shown in the photo.
- Knit the arms and torso in circular rows that taper towards the bottom.

- Tie the nozzle on the bottle with beige yarn and do not forget to constantly try on so that it does not sit too tight.
- Connect the bottom of the nozzle and the blank with your hands on the bottle.
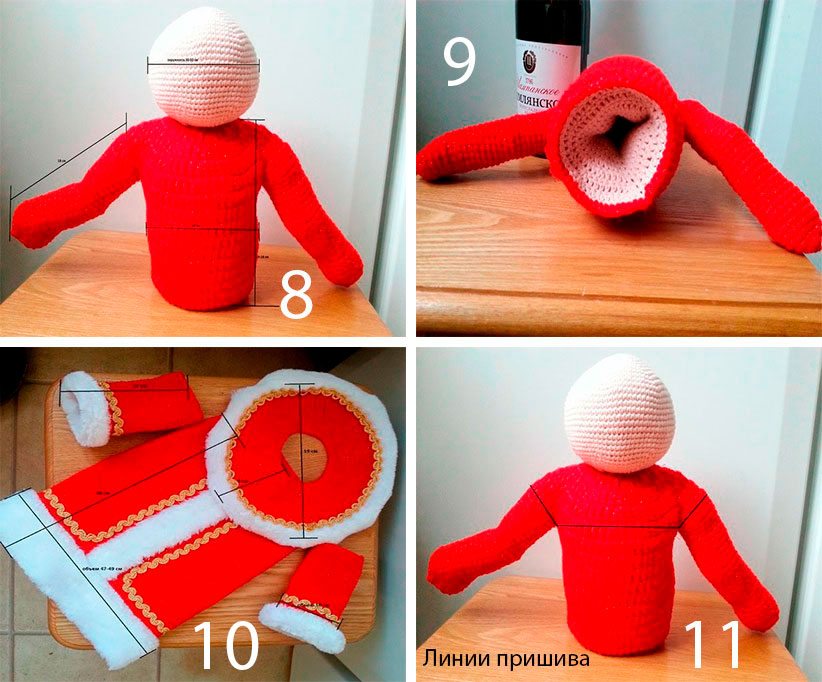
- Stuff the handles of the red blank and the empty space with filler.
- Dimensions: head circumference 30 cm; arm length 18 cm; body width 30 cm; body height 16 cm.

- Knit and decorate clothes.
- Clothing sizes: cap blank diameter 10 cm; sleeve length 12 cm; coat length 28 cm; sleeve volume 18 cm; fur coat volume 47 cm; the circumference of the finished hat is 32 cm.
- Sew the clothes with ordinary threads, the sewing lines are indicated in the photo.

- Attach the doll strands to the yarn and fix with glue. Make a beard from long strands, and take a shorter one for a hairstyle.

- Glue the hat to your head.
You will need: red cardboard, flesh-colored paper, 2 lace napkins, scissors, marker, pencil, glue.
Master Class
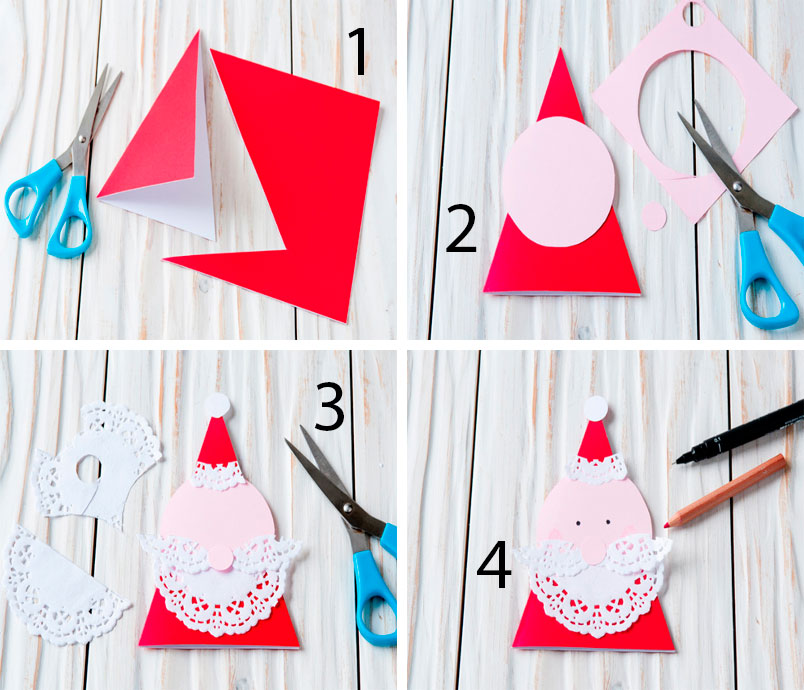
Santa Claus from openwork napkins ready!
You will need: bright and flesh-colored cotton fabric, white and red fleece, felt, synthetic winterizer or holofiber, combed tape (wool for felting), foam rubber, felting needle, thick and thin wire, glue gun, Moment-Crystal glue, thick cardboard, acrylic paints and brushes, wire cutters, pliers, stationery knife, buttons, beads, beads, floss threads.
Master Class
- Make a pattern out of cardboard: a cone with sides of 13 cm; circle with a diameter of 6 cm and handles (optional).
- Draw a line through the center of the circle and divide into 3 equal segments, then make holes for the wire at their junctions.

- Lay a synthetic winterizer circle and a slightly larger cotton circle on the cardboard circle, then pull the fabric around the cardboard using a thread and a needle, as shown in the image.
- Bend a thick wire into the letter P, then insert it through the holes in the cardboard, synthetic winterizer and fabric.
- Bend the ends of the wire so that you get stops.

- Prepare a piece of thin wire 25 cm long and screw it to a thick wire, then glue it with hot glue. At this stage, make sure that the structure is stable.
- Prepare 2 pieces of cotton fabric with a length of 22 cm and a width of 4 cm. Fold in half lengthwise, sew, turn inside out, pull on the legs and sew with a blind seam to the bottom.
- Make a cone pattern from flesh tissue, fold in half, sew, leaving 2 mm of the top unsewn, fold the edge around the circumference, baste and turn the cone inside out.
- Put the cone on a thin wire leading its end through the hole in the top. Stuff the cone with holofiber so that the wire is in the center of the body, then sew the folded edge to the body around the circumference with a blind seam.
- Cut out large feet from cardboard, then glue them to the wire feet with hot glue.
- Cut out the boots from the foam rubber, and make a hole in the back for the ankle wire, then attach them.

- Cut out 2 ovals from the red fleece, cut a triangle in the upper part, fit the foam boots, sew the heel with a blind seam and pull the fleece around the cardboard sole.
- Cut out 2 ovals of felt a little larger than the cardboard sole, glue to the sole with hot glue, cut off the excess and sew the felt to the fleece with a blind seam.
- Mark on the cone the lines of the top of the jacket and the bottom of the cap, then roll up the ball from the synthetic winterizer, cut out a circle from the fabric, pull it along the edge and sew it in place of the spout.
- Draw a face to your liking.

- Open the red fleece jacket in the form of a truncated cone, fold in half, sew along the edge, then turn it inside out.
- Sew red fleece and cotton fabric handles and gloves as shown.
- Pull the jacket over the body-cone and sew on the bottom and along the neck with a hidden seam.
- Cut out figurines from felt - Christmas trees, at home, then glue them on the Crystal glue and only then sew them on as desired.
- Sew a snowdrift ribbon of white fleece with a blind seam and decorate the composition with beads and buttons.
- Cut the lapels and cuffs from the white fleece, fold in half, sew along the edge, stretch over the arms and legs, then sew by hand. Make a wavy collar in the same way.

- Sew the arms to the body using a button fastening: pull off a little thread, tie a knot and glue with Moment.
- Tear off 10 cm of wool from the combed ribbon, gather it into a bun and attach a beard with a felting needle.
- Tear off the bundle 2 times thinner and 2 times longer, then roll it in place of the mustache.
- Tear off 2 more bundles as for the beard, then roll on both sides of the face.
- Roll the hair on the sides and on the back of the head in the same way.
- Cut out from cotton fabric on the basis of half of the cone an elongated and narrowed to the top cap, sew it, leaving a hole at the top.

- Turn the hat inside out and put it on, pulling the wire through the hole and sew along the edge to the head. Loop the end of the wire.
- Make a pom pom and a lapel with white fleece, then sew them on.
- Make a small felt Christmas tree and glue it to the hat as a decoration.
You will need: colored paper red and white, scissors, glue, marker, pencil, wooden bead.
Master Class

Santa Claus from a plate
You will need: paper plate, colored paper, scissors, glue, marker, printer, eyes, hole punch, rope.
Master Class

You will need: box, colored paper, scissors, glue, marker, pencil, button, elastic band, envelope.
Master Class

You will need: plastic bottle, paints, colored paper, pompom, scissors, buttons, 2 sleeves, glue, cotton wool, white and black lace.
Master Class

Santa Claus from the bottle is ready!
You will need: white and red paper, scissors, template, printer, pencils or felt-tip pens.
Master Class

Creative grandfather is ready!
You will need: cotton pads, plastic spoon, glue, red yarn, buttons for eyes, ribbon or thread for hanging, red felt-tip pen, scissors.
Master Class
- Take a cotton pad.
- Bend its side to the center.

- Make cuts along the edge of the circle.
- Draw a smile with a marker.
- Take a plastic spoon.

- Apply glue to the spoon, leaving its tip without glue.
- Wrap the yarn tightly.
- Apply glue on both sides to the tip of the spoon and glue the face of Santa Claus to the convex part.

- Glue a clean cotton pad to the concave part of the spoon.
- Cut out a circle from cotton pad and glue it to the tip of the spoon handle.
- Cut out a circle from a cotton pad, color it with a felt-tip pen and glue it as a nose.
New Year is a time of joyful fairy tale for both children and adults. However, most of all, the atmosphere of magic and celebration delights little children, so Santa Claus with his beautiful Snow Maiden, sparkling multi-colored garlands and a decorated Christmas tree always bring children a feeling of a real miracle.
A special joy for preschoolers is the meeting of the new year in kindergarten. Indeed, in the kindergarten you can hold real, large and numerous round dances, receive gifts from the hands of Grandfather Frost and the Snow Maiden. Pleasant memories from the holiday spent in this way remain with the child for life.
An important role in preparing for the New Year is played by a variety of crafts made together with parents.
Children are always happy to make crafts. And those creative works that are being prepared for the New Year are especially interesting. And if a mother, father, grandmother or grandfather, whose participation is especially dear to the child, also works together with the child, then this joint work turns into a real holiday! 
In our kindergarten, on the eve New Year,
was announced competition for parents and children for making crafts "Workshop of Santa Claus".
All contestants were able to show their imagination and creativity. It was difficult for the jury experts to choose the winners among such a variety of works, the works of the winners will participate in the regional competition. 
As a result of the competition, an exhibition was organized under the title " winter fairy tale”, where you can see unusually beautiful creations of children and their parents. The purpose of this exhibition was to create the necessary conditions for the creative activity of all participants, to promote and strengthen ties between the kindergarten and the family, to create a festive, magical, New Year's atmosphere.
Senior teacher Nazyrova G.A.
Elena Evgenievna Doronina
Help on the results exhibitions of crafts on the topic
Targets and goals:
Creating a festive atmosphere in the group
Support for the creative activity of children and their parents
Introducing preschoolers to artistic creativity
Formation of aesthetic taste in children.
In the winter of 2015, a traditional competition was held in our kindergarten - Exhibition family creative works from improvised material » . The parents of our group, together with the children, created wonderful works from improvised material. houses, Christmas decorations, panels, Christmas trees - this is only a small part of the rich imagination of children and parents.
I really want to mention the Chuchkov family, who prepared the original under the tree(Christmas tree of pasta).
The jury, which included kindergarten teachers, decided award:
1st place - to the family of Buzlaeva Anfisa for under the tree"Christmas story"
2nd place - Danila Chuchkov family for under the tree"Herringbone - green needles"
3rd place - Danila Kryuchkov's family for under the tree"Winter forest"
To the family of Polina Lisakova for under the tree"New Year's wreath"
To the family of Igoshina Polina for under the tree"Horse"
Thank you to all participants in this competition. The winners will be awarded sweet prizes.


Related publications:
Photo report. Competition New Year's crafts"Workshop of Santa Claus" Hello, dear colleagues! In our kindergarten, it has become a tradition.
Here comes the winter. Not far off is the best, brightest, most favorite holiday - the New Year. This beautiful tree in every home, bright.
In anticipation new year holiday in our group "Pearl" was organized together with the parents of the exhibition "Workshop of Santa Claus".
The month of December has arrived. All people began to prepare for the meeting of the New Year. Here we are with the guys preparing for the holiday. Figured out how to decorate.
Workshop of Santa Claus. photo report. In every kindergarten, on New Year's Eve, one of the most beloved exhibitions "Workshop.
Workshop of Santa Claus Until the most favorite holiday of children and adults, there is a little bit left. Your bright, beautiful, original publications.
The eve of the holiday, the most beautiful and bright New Year. The exhibition was attended by parents - 1 junior group and special group. Our parents.
In this article, we offer you various DIY crafts for the New Year holidays.
In the New Year, it is customary to decorate not only, but the whole house - with snowflakes cut out of paper, garlands of animals or symbols of the year stretched along a thread and attached with a serpentine.
Can be funny and original decorate the apartment if you draw white branches and silhouettes of Christmas trees on the glass windows and on the mirrors in the house with a piece of soap. When the holiday is over, all this art can be easily washed off with a damp cloth.
Here are some origami can be performed on the eve of this holiday.
Christmas basket.
From a paper accordion, you can make a universal craft that will look appropriate both on a Christmas tree, and in a garland, and when handing it as new year gift. Especially if you put candy in it.
How to make such a basket
First, let's learn how to make a paper accordion. This craft is not quite simple, it requires diligence, therefore, its implementation requires a certain amount of practice, dexterity and patience. The process of its manufacture is conditionally divided into two stages.
The first stage is "Accordion". A sheet of paper is folded in half lengthwise. So that the edge of the resulting rectangle does not diverge, two bends must be made on it, each half a centimeter wide. The folds are firmly ironed. The resulting strip is folded along its length - exactly in half. It turned out a blank for an accordion. From one short edge, stepping back 3-4 cm for the handles of the accordion, we begin to make "furs" of the accordion, folding the strip into small folds 8-10 mm wide. At the opposite end, you also need to leave a segment of 3-4 cm for the handles.
Got it? Strongly iron the resulting part, squeezing it with your fingers. Now we proceed to the most crucial moment. The compressed strip unfolds back. Now let's explain how this is done. Trying as much as possible to preserve the indicated cloves, lay out the strip along its length. It turned out a double strip with cloves. Now we carefully push one of the edges of the strip where the teeth were not picked up, because these 3-4 cm are left for the accordion handles, and blow strongly into the folded strip.
Now you should get a voluminous quadrangular blank for an accordion. She needs to carefully fold all the furs along the folds indicated earlier. On each side, helping ourselves with a pencil from the inside, we fold the cloves. This is a very painstaking part of the work, but without it, neither the accordion itself nor the basket will come out of it. Folded? Now admire - it turned out a real accordion. Her “handles” must be carefully folded, and the harmonica is ready, you can carefully open and close her furs, as if playing on it.
The second stage is the execution of a basket from an accordion. The accordion furs must be compressed, you get a blank that resembles a well. On the sides of the “well”, the places where it will be necessary to make cuts are indicated, due to which a basket is obtained from an accordion. The incisions are made on opposite sides of the "well". One incision is made on one side of the "well". It is performed across the "bellows" of the accordion - to the center of the "well". It is necessary to cut through the accordion furs clearly in the middle with scissors, but not cut the accordion handles in half. On the opposite side of the accordion, two of the same incisions are made: in the middle of the “bellows” with an interval of one to one and a half centimeters, this will be the handle of the future basket.
They made incisions, took a deep breath and made the last gesture. Turn the "well" so that the edge with one cut looks up. In the place where this incision is made, you need to firmly grasp the sides opposite from it with your fingers, spread the incision and turn the basket inside out, making it so that the underside with the corrugated handle extends upwards from the incision. The handle must be pulled out to the end and draw the bottom of the basket. The bottom of the basket will be the handles of the former accordion, which must be folded one on top of the other. For strength, they can be fixed with a drop of glue.
This basket, although it takes a lot of time to make, is the most elegant. Congratulations if you have mastered its implementation.
A simple basket.
Another version of the basket - from a square sheet of paper is made by folding this sheet. We fold the square of paper diagonally, then again from corner to corner. Further, cuts are made from each edge of the workpiece parallel to its upper edge, alternately from each edge. Let's open the basket. And for her to buy desired shape, it will be necessary to put some kind of load into it, say an apple. The cuts will stretch, and the craft will become what it should be. It is good to make such baskets for presenting any gifts to a child or the child himself, for example, for family holidays.
Panel "Snowball".
Take thick cardboard, paints, a brush, a piece of white paper and glue. A piece of thick cardboard is painted with watercolor or gouache paint in blue. While the cardboard is drying, make blanks for stickers.
From white paper, cut thin strips no thicker than 0.5 cm wide and 4-6 cm long. Three strips will be needed for each blank. Lubricate each of them in the middle with glue, and glue three strips together for these centers. The resulting six tips should diverge to the sides, like rays of snowflakes. Place the finished fluffy snowflakes beautifully on the cardboard and glue to it. Several snowflakes can be glued on one cardboard sheet. They may be in contact with each other.
Beautiful Christmas tree
Take shreds of different sizes and colors, scissors, a needle and thread, templates for tracing the contours of the cone, stuffing material.
Herringbone is a traditional tree for the New Year. In addition, a festive Christmas tree made of cones can serve as a decoration. doll house, after all, toys should have a real holiday. Our puppet Christmas tree will consist of three cones of different sizes. The lower cone is the widest and not very high. The middle cone is smaller. The upper cone is narrow and with a rather high crown.
The cones can be the traditional color - green. But you can make it more interesting. Choose fabrics so that each cone has its own shade of green. For example, the lower cone can be marsh, the middle one is light green and the upper one is emerald green.
The cones are cut out of fabric, sewn along the long sides on the wrong side and turned inside out. Each cone is filled with stuffing material. One note: the tops of 1-1.5 cm high remain unstuffed at the lower and middle cones: they are bent so that the upper part can be sewn to them. But the topmost cone is stuffed completely very tight. Then the cones are placed on pieces of matter and circled to cut out the bottoms. After that, the cones are sewn with the bottoms and with each other.
Our tree is ready. If desired, it can be decorated with sewn multi-colored balls or garlands made from the same balls. From round pieces of multi-colored fabrics, you can sew fabric balls. Place a ball of cotton wool in the center of the fabric circle, draw the edge of the circle onto the thread with a straight seam and pull it off. It remains to fasten the thread with a knot, the ball is ready.
Master class (grade 5).
"Santa Claus Workshop"
Goals:
1. Educational: to form the concept of the traditions and customs of decorating the New Year's holiday in various countries; learn how to perform various New Year's compositions to decorate your apartment.
2. Developing: develop communication and technical skills (creatively approach the solution of tasks, plan your work, evaluate its results); develop the creative potential of students, their initiative, aesthetic taste, self-confidence.
3. Educational: cultivate love, kindness and careful attitude to the environment; to instill the skills of a culture of work and accuracy.
4. Methodological: to promote the dissemination of modern promising technologies and methods of building a lesson by creating methodical piggy bank results-oriented lessons.
Tasks: introduce brief historical information about the traditions and customs of New Year's decorations; familiarize yourself with the materials and tools needed to perform Christmas decorations;
Lesson type : combined.Teaching methods : Conversation, practical work.
Cabinet layout: garlands with Christmas tree tinsel, snowflakes, New Year's compositions, an exhibition of students' creative works.
Equipment and materials: computer with multimedia system;Handout: Christmas tree tinsel, cardboard, multi-colored braid, Christmas decorations, tinsel, walnuts, gilded cones, PVA glue, scissors, brushes, gold cardboard, star templates, glue;
Vocabulary work: christmas, araucaria.
Musical row d: melodies from the collection of New Year's songs.
Interdisciplinary connections: history, MHK, fine arts, literature.
Preliminary work: prepare necessary tools and materials
Lesson plan:
Organizing time. (1 min.)
Theoretical section: explanation of new material, goals and objectives. (10 minutes.)
Fizminutka. (3 min.)
Practical section: student work. (20 minutes.)
Discussion, summarizing the lesson. (6 min.)
Final part. (5 minutes.)
During the classes:
Greetings.
Before starting the master class, I will talk with the guys a little on a different topic. This will help the children loosen up and start communication. I inspire confidence in myself with my radiant smile, that everything will be fine and our today's event will give everyone pleasure both from work and from communicating with each other.
Introduction . slide - 2
The round dance began
The songs are loud.
It means New Year
It means tree! The Christmas tree is dressing up -
The holiday is approaching.
New Year at the gate
The tree is waiting for the kids.
Guys soon the new year and Christmas,And what is Christmas without a Christmas tree!
Christmas tree is the main attribute of Christmas and New Year
Slide 3-4
Appearance story Christmas tree, toys and tinsel.
From ancient times to the present day, spruce has been of great importance in human life. Spruce is a symbol of courage and honesty. According to an old legend, spruce became a symbol of Christmas at the request of heavenly powers. When the Savior was born in Bethlehem, in a wretched cave, a new bright star lit up in the dark sky to the singing of angels. Heeding the divine sign, not only people, but also animals and plants rushed to the cave. Everyone tried to show the newborn their sincere joy and bring some gift. Plants and trees gave the Child their fragrances, flowers, fruits and leaves.
Spruce hurried to the joyful event from the far north. She was the last to arrive and, embarrassed, stood aside. Everyone asked her in surprise why she didn't come in. El replied,
that she really wants to enter, but she has nothing to give to the Divine Infant, and she is afraid to frighten Him or prick Him with needles. Then the plants shared their gifts with Spruce, and red apples, nuts, bright flowers and green leaves began to show off on its branches. El was very happy, thanked everyone, and quietly approached Jesus. The baby smiled when he saw a beautiful, multi-colored, kind Spruce, and then the Star of Bethlehem shone even brighter above its very top ...
The first Christmas tree in honor of the New Year appeared in Russia on the eve of 1700. By decree of Peter the Great, fire in tar barrels was burning at night in the main squares all week, fireworks were arranged, and the houses smelled of tar and spruce branches. Peter's daughter, Empress Elizaveta Petrovna, loved to arrange luxurious Christmas trees in the palace. Lush New Year's celebrations were also adored by another great empress, Catherine II. In 1852, the first public Christmas tree was arranged in St. Petersburg. By the end of the 19th century, this beautiful custom spread throughout Russia.
When there were no such beautiful and diverse toys as now, people decorated the Christmas tree with what they had. It could be apples, nuts. Then candles, gingerbread and cookies were added to the decorations. Later, more durable jewelry began to be made: people gilded fir cones, empty eggshells were covered with the thinnest layer of metal. There were also paper flowers and skillful crafts made of cotton wool, Christmas fairies, graceful stars, butterflies and funny figurines of animals appeared from silver foil, and tinsel was made from twisted tin wires.
There is a legend that tinsel owes its birth to a good fairy: allegedly, the sorceress turned an ordinary web into sparkling silver threads and gave them to children. A few years later, the craftsmen learned how to blow multi-colored glass balls, which decorated the thorny branches. But, unfortunately, not everyone could afford such decoration, it was quite expensive. And everyone wanted a miracle for the holiday. So they decorated the Christmas tree with foil snowflakes, felt balls, toys carved from wood, knitted mittens, and socks. After all, then many of these "decorations" could serve the children well. Not a single frost was terrible in such "decorations". Also, angels could appear on the branches. After all, each person believes that he has his own guardian angel. And, without forgetting about it, on the Christmas tree one could see angels made of fabric, paper, glass.
In addition to balls, craftsmen learned how to blow glass into other forms: cones, mushrooms, various animals and birds, vegetables and fruits, heroes of fairy tales.
slide - 5
Not far off the New Year
People go to the forest behind the tree,
And how many young trees
They will appear in big houses.
The candles will burn bright...
And we feel sorry for the beauties!
It takes at least 10 years to grow a Christmas tree or pine up to 1-2 m high;
It will take 100-120 years before the coniferous forest is capable of self-reproduction;
1 hectare of a well-working forest releases about 30 tons of oxygen per year;
1 hectare of forest in 1 hour absorbs the amount of carbon dioxide that 200 people exhale during the same time. Slides #9:10
Guys, is there an alternative to a live Christmas tree? (children's answers)
Yes, you are right, you can use artificial Christmas trees. Sometimes they look more natural than live Christmas trees - they are covered with frosty frost that shimmers in the moonlight. And you can grow a small spruce in a pot on the windowsill - araucaria, which for many years will serve as a decoration for the New Year's table.
Nowadays it has become fashionable to make small trees in pots, they are also called "Topiary", which means a tree of happiness.
Today we will make a Christmas tree topiary from tinsel and decorate it with toys, beads and sparkles.slide number 6
Let's remember the safety precautions at work.
Working rules withscissors
Work with well-adjusted and sharpened scissors.
Scissors should have blunt, rounded ends.
Place the scissors with the rings towards you.
Watch the movement of the blades while cutting.
Do not leave scissors open.
Pass the scissors rings forward.
Do not wave scissors, do not bring to your face.
Use scissors as directed.
After finishing work, put the scissors in the case.
Keep scissors always in a certain place.
Practical part. The story is accompanied by a slide show.
Those children who coped with the work quickly can be offered another task " Christmas ball from tinsel"
Conclusion. Outcome.
So, our dear craftsmen, we have finished making Christmas tree and tinsel toys. I hope you enjoyed it and teach your friends how to create beautiful Christmas crafts and toys with their own hands. I congratulate you on the coming new year and wish you creative success.