How to make a chicken from colored paper. Master class “Craft from cardboard “Chicken is the baby symbol of the coming year. Chicken made from pompoms
Summary: Children's crafts for Easter. Easter chicks. Easter chickens. Easter chick. DIY Easter souvenirs. Children's crafts for Easter. Easter chicken.
Easter is family celebration When many friends and relatives gather at one table, children run around. At Easter, it is customary to make and give each other small gifts (DIY Easter gifts): Easter baskets with painted or decorative eggs, Easter cakes, Easter souvenirs - Easter chicks, hens, bunnies. It is especially interesting for children to participate in preparing for the holiday and making Easter crafts with their own hands.
In our previous articles, we talked about how to paint eggs for Easter, how to decorate Easter eggs, and how to make Easter baskets with your own hands. Read our articles:
In this section you will find instructions for making children's crafts for Easter. Together with your child, make DIY Easter souvenirs for relatives and friends.
1. Easter master class. Easter chickens. Easter chicks

2. DIY for Easter. Easter chicks
Option 1.
It's super easy to make an adorable Easter chick using pom poms. You can make an Easter chick from two or one pompom.

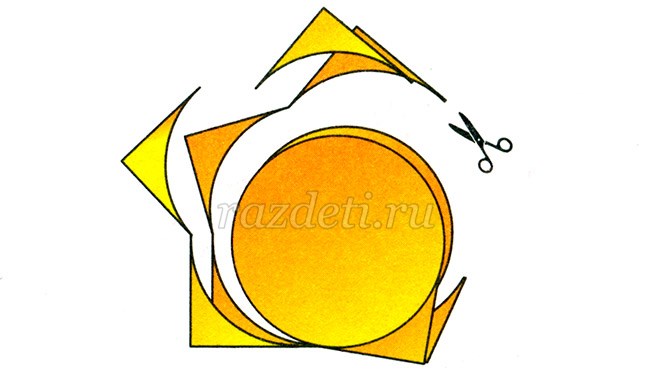
How to make a pompom from yarn? To do this, cut out two identical rings from cardboard. Place them together and wrap them in a circle with several layers of yarn (see photo below). This is what you should get as a result.
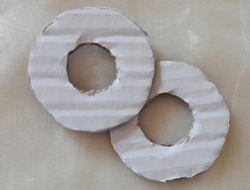


Now cut the pompom blank in a circle with scissors and tie it in the center with thread. All you have to do is trim the pompom with scissors so that all the threads are the same length, so that the pompom is even and beautiful.


If you are going to make an Easter chick from two pompoms, then you will need to make another slightly smaller pom pom for the head. But you can get by with just one pompom. Easter chicks made from one pom pom also look very cute. Judge for yourself!

For beauty, place the Easter chicken in a thoroughly washed and dried eggshell.

Interesting idea- stick to eggshells bamboo skewers, place store-bought or homemade Easter chickens in the shell. This craft can be used to decorate pots with homemade flowers or sprouted wheat for Easter.

Option 2.
You can also make an Easter chick from a cardboard egg carton. For a detailed Easter master class, see the photo below.


Option 3.
Paper craft for Easter - 3-D paper model chicken in an Easter egg from the Singapore website of Epson. You can download the template from the link >>>>


3. Children's crafts for Easter. Children's crafts for Easter
We continue to tell you about interesting children's crafts for Easter. These funny Easter chicks are made by hand using the papier-mâché technique. For those who are not familiar with this technique, we will tell you in more detail how to make them.

For this Easter crafts you will need:
Balloon
- plain paper or newspaper
- corrugated paper yellow and white
- PVA glue
- any fatty cream or Vaseline
- felt, satin ribbons
How to make your own Easter chick:
1. Inflate a small balloon. For ease of handling, hang it on a string.
2. Lubricate the ball thick cream or Vaseline.
3. Cut or tear plain paper or newspaper into small pieces.
4. Dilute PVA glue with water in a ratio of 2:1. Lubricating each piece of paper with glue, cover the ball with it on all sides in several layers. The pieces should overlap each other.
5. In the same way, cover the ball with several layers of yellow corrugated paper. Decorate at the end with circles cut from white crepe paper.
6. Leave the chicken preparation to dry for at least a day.
7. Deflate and take out balloon from crafts.
8. Use felt to make eyes, beak, comb, paws, and wings for the Easter chicken. Decorate it with satin ribbons.
The Easter chicken in the photo below is also made using the papier-mâché technique. Her head is made separately from paper and felt and glued to the body at the end of the work.

4. DIY Easter chick. DIY Easter chicken
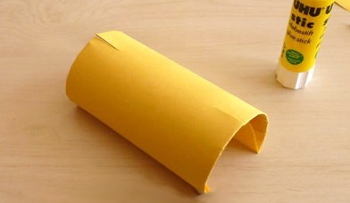
To make such an original Easter chicken you will need: a cardboard toilet paper roll, yellow cardboard, yellow double-sided paper, felt-tip pens, scissors, glue, M&M's candies.

Cut the cardboard roll lengthwise and cut off a small segment from it so that it becomes like an arch (or tunnel). Cover it on all sides with yellow paper or paint it with yellow paint. This will be the body of the Easter chicken.

Print out additional pieces for your Easter craft on yellow cardstock. You can download them
This craft can be used to create a layout that develops teaching aids kindergarten, as well as for decorating the Easter interior.
“Chicken Chick” made of paper with your own hands for children step by step with photos
Listen to the poem. What else do chickens eat?
Look at me -
I was three days old.
I'm sure now
I will defeat the worm!
Alexey Laptev
Step-by-step process for making crafts
Let's make a paper chicken yellow color.
1. Cut out a 5x8 cm rectangle. Fold it in half crosswise. This will be the torso. Round the lower part of the body on both sides.
2. Cut out a rectangle measuring 3.5 x 7 cm. Fold it in half. Round all the corners to make circles. This will be the head.
3. Glue two circles, gluing the body between them, as shown in the figure.

4. Cut out a 5 x 5 cm square of dark yellow or orange color, round the corners. Fold in half and cut along the fold line. These are wings. Glue them to the body.

5. Cut out strips of the same color as the wings. Wind them around a pencil and let go.

6. Glue the strips in place of the tail. Cut out and glue the eyes and beak.

Touch the chicken with your finger - it will swing and peck the grains. From a sheet of white paper bigger size make a mother hen for the chicken.
Children's crafts made from colored paper are always bright, beautiful and fun. What do kids like to depict in their “masterpieces”? Sunshine, rainbow, flowers, people, animals. In this master class, we want to introduce all boys and girls, as well as their parents, to the technique of making three-dimensional figures from paper cylinders. We will master this direction in needlework using the example of making a chicken. But, focusing on this master class, you can create any other animal, bird or fish you want.
Materials and tools:

Stages of work:
On a piece of checkered paper we draw sketches of the templates: body (rectangle 16x5 cm), head (rectangle 12x4 cm), paws, beak, wing.

Cut out the templates and transfer them to colored paper, corresponding colors: details of the body, head, wings (2 pieces) on yellow, beak - on red. We trace a larger button onto white paper (2 pieces). We trace the second button, smaller in size, onto black colored paper (2 pcs.). These will be blanks for the eyes.

Cut out all the details.

Apply glue to one short side of the large rectangle.

Glue it together in the form of a cylinder. This will be the body part.

We do the head part in the same way.

Glue a large cylinder onto the orange blank (paws).

We attach the chicken head part to it.

We bend the straight edges of the wing parts by 0.3 cm. We coat the folds with glue and attach the blanks to the inner surface of the body part.

We glue black circles into white ones, forming eyes.

Glue them onto the chicken's head.

Fold the beak part in half. Apply a thin strip of glue to the fold and attach the workpiece to the head in the right place.

The paper chicken is ready!

Useful tips for parents.
To make this craft, choose thick double-sided colored paper. Cylinders made of thin paper get wet from the glue and become deformed.
The details of the legs can be made of cardboard, then the figure will be more stable.
During the creative process, excess glue should be immediately removed with a napkin to prevent the paper from getting wet.
We wish you and your children pleasant moments of creativity!
How to make a chicken mask with your own hands.
You can make a beautiful and convincing chicken mask according to - I advise you to read.
Now let’s start making a specific mask: exactly what characteristic features do we need to convey? Fluffiness, alas, will not work, but we can take yellow paper or cardboard. The chicken's head is quite round; in cartoons, chickens are often drawn with chubby cheeks, but in reality this is not so - let’s do without likening it to a toddler. The eyes of chickens are medium-sized and black. And, you know, without eyelashes. But the forehead is really quite high, and the triangular beak looks completely cartoonish and quite funny in chicken age. In general, the view is touching.
Let's make a chicken mask out of paper
Cut out a standard half mask in the shape of glasses.

Using darts we round off the forehead. The beak will be small and diamond-shaped.


Now let’s try this beak on a mask put on a mannequin. There are flaps on both sides for attaching them, they should be turned inward. If you see that everything fits together, you can glue it.

Well, this cute and simple chicken mask is ready. However, you can supplement it with one more detail: the lower half of the beak. The pattern looks like this:

We will attach this part to the upper half of the beak, and not to the cheeks of the mask.

Well, the beak rests on the nose, but thanks to the cutout in the lower half, the actor can breathe freely.
Since the chicken’s “face” is round, it is better to attach the mask to the hoop. If you wish, you can complement the image with a comb - make it according to the same principle as.
Creative activities with colored paper - very exciting and useful activity. By engaging in this type of creativity, the child develops imagination and coordination of movements.
Even a preschooler can make this bright yellow chicken. This paper toy is easy to make from paper to decorate a child's desk. Our master class on making a chicken from colored paper for children will help you create a craft easily and quickly.
DIY chicken craft made from colored paper
To make a paper chicken you will need the following materials:
- yellow paper;
- red paper;
- black paper;
- White paper;
- scissors;
- pencil;
- glue stick;
- ruler.
Operating procedure:
- To make a chicken from colored paper you need to cut out 12 pieces.
From yellow paper we cut out:
- two strips measuring 5 x 14 cm;
- two wings.
From red paper we cut out:
- two paws;
- one scallop;
- one diamond-shaped beak.
From white paper we cut out two eyes in the form of small ovals.
From black paper we cut out two pupils in the form of small circles.


