Quick hairstyles for every day. Retro hairstyle for short hair. Delicate look with a high ponytail and flowing hair
Girls with short haircuts we are sure that because of this length they will never see beautiful and original styling. Meanwhile, hairstyles short hair at home can be simply luxurious. It is enough to show a drop of imagination and make a little effort.
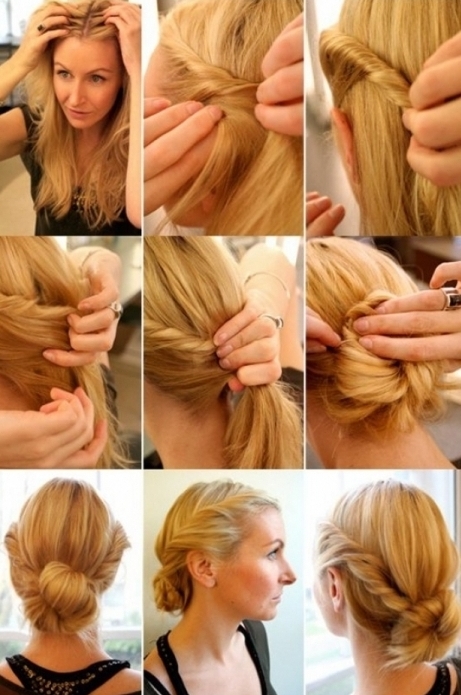
Romantic wreath for short hair
- We divide the hair with a side parting. We turn the hair on one side into a tight tourniquet, capturing loose strands.
- We braid the same tourniquet on the other side of the parting.
- We fix both tourniquets on the back of the head. Don't worry if there are loose strands left - it's even prettier.
- The hair left behind is divided in half, twisted into two bundles and fastened crosswise.
- To make the wreath more magnificent, lightly straighten the bundles with your fingers.
Stylish curls for a bob haircut
This is the perfect way out for a square or a bean. This styling is suitable for everyday life and holidays.
1. Spray your hair with a thermal protection spray. It will protect them while winding.
2. Gather the upper part of the hair at the crown and stab it with invisibility, placing them in a herringbone pattern.

3. We twist the shortest strands located at the back of the head with a curling iron. Hold the curling iron vertically and twist the strands from the roots to the ends.

4. Now let's move on to longer strands - they need to be wound in different directions (one strand - to the face, the second - vice versa). Do not strive to create perfect curls of the same thickness. On the head should be a creative mess.

5. It remains to twist the bangs. Hold the curling iron at an angle and pinch the bangs up. Try to pull the curl through the curling iron.

6. Fix everything with varnish and shake your head.
7. In the occipital area, we make a light pile and fix it again with varnish.

Perky retro hairstyle
Girls with oblique bangs will be just crazy about this retro styling.
- To add texture, spray the strands with dry shampoo.
- On the back of the head we make a small pile.
- We smooth the strands with a thin comb.
- We fix the bouffant with invisible ones, placing them crosswise.
- Also, take the hair near the ears back and stab it with invisibility.
- Lift the short strands at the neck up and also fix well.

Option with a scarf
1. We take a silk scarf and fold it into a wide rectangle.
2. We tie it on the head, placing a double knot at the top.
3. We hide the ends of the scarf inside.


Fishtail on short hair
If you have a bob haircut, it is not at all necessary to wear it in the usual way. Pigtails for every day - this is just what you need!
- We wash our hair and dry it with a hair dryer, pulling the strands with a hair dryer.
- We make a side parting.
- We begin to braid the French spikelet.
- Weave very thin strands into it.
- We braid a fish tail approximately at ear level.
- On the other side of the parting, weave an ordinary braid.
- Next we braid another one and connect it with the first one with a thin elastic band.
- We separate a strand of hair at the crown, lift it up and temporarily stab it with a crab.
- We cross thin pigtails and a fishtail at the back of the head and firmly fix it with invisibility. They must be motionless.
- We lower down the hair that was raised for a while.
- We wind the strands with a curling iron.
- We shake the hair with our hands.

Bundle with a rim of braids
How to make a hairstyle for short hair with your own hands? Twist them into a bun and braid a wreath of very beautiful braids.
1. Pre-wind the hair on the curling iron, holding it vertically.
2. We tie the tail at the back of the head. We leave the strands at the temples free.
3. We twist the tail into a bun and fix it with hairpins.
4. Loose hair is braided into the wrong side of the French pigtail.
5. We lay them over the beam, hide the tips in the middle and stab them with a hairpin.
6. Spray styling with varnish.

Elegant hairstyle for short hair
This styling option looks business-like and fits perfectly into the office dress code.
- We wash our hair and dry it with a hair dryer, lifting it at the roots.
- We collect strands at the crown and temporarily fix with a hairpin.
- We braid the hair at the temples into neat braids towards the back of the head. We collect them together and stab them into a bagel.
- We remove the hairpin and comb the strands, moving the comb from top to bottom.
- Carefully comb the top layer of the fleece and sprinkle it with varnish.
- On the sides, we select two thin strands and form bundles from them. We place them 1 cm above the pigtails, simultaneously securing them with invisibility.
- We twist the hair into a roller and lay it over a donut of braids.
- We cover the hair with varnish.

Braid headband for a very short haircut
Beautiful braids can be made even on very short strands.
- We make a side parting.
- We start weaving a regular three-row braid on one side of the parting.
- From the second weave, we add strands from the main hair to the braid.
- We braid the braid to the ear and tie it with an elastic band. And so that the braid does not get out, we fix it with invisibility.
- We braid the same braid on the other side.

See also: 3 simple hairstyles for every day
Boyish haircut styling
You need evening hairstyle, but the length of the hair does not allow you to create a complex styling? Try this simple yet very stylish option.
- We wash our hair and blot excess moisture with a towel.
- Squeeze out a ball of mousse and distribute it through the hair with a thin comb.
- We make a side parting.
- Dry the strands with a hairdryer, directing the bangs forward.
- We twist the bangs with a curling iron.
- We lay it on the forehead, forming separate strands with gel.

Greek variant
1. Curl your hair with a curling iron.
2. From above we put on an elastic band, bezel or bandage.
3. Starting from the temporal lobes, twist the strands up and put them under the elastic.
4. We continue in a circle until the entire head of hair is under the elastic band.
5. We fix the result with varnish.

Casual styling
To create casual hairstyles for short hair at home, you do not need a lot of time. But the result will be truly luxurious!
1. We divide the hair with a side or straight parting. Separate the strand on one side.

2. We braid a regular braid. We don't make it tight.

3. On the other side of the parting, take the strand a little wider.

4. We braid a free French braid from it.

When there are no opportunities to regularly visit the hairdresser and shine with the perfect professional styling day after day, there is no other way out but to start doing good hairstyles yourself. Of course, thanks to the Internet, today it is not so difficult to do this - a lot of step-by-step video tutorials on how to make this or that hairstyle without involving third parties; a lot of photos, also taken as the hairstyle was created.
The main criteria for a good hairstyle
So that the result of long torment does not become a nest on your head, you need to remember a couple of simple recommendations, following which, you will very soon achieve perfection in creating your own hairstyle.
1. Healthy hair. Get rid of split ends in time, restore chemically damaged hair (after the same hair coloring, for example), treat dry and oily hair, get rid of dandruff (URGENTLY!), if possible, laminate so that the hair is smooth and shines with a healthy color. Then the hairstyle will look beautiful, elegant and well-groomed.
2. clean hair. With the naked eye, you can determine whether the girl is clean or they have not seen shampoo and water for a week. Clean hair shines, it is light, soft and delicate to the touch, it smells good. Dirty hair is collected in separate disheveled strands, they are very easy to style, unlike clean ones - try to remove the bangs with your palm from your forehead, combing it up with your fingers - if the hair is in no hurry to return back to the forehead, then it's time to go to the bathroom. In addition, unwashed hair smells unpleasant and is hard, greasy to the touch.
What do you need to do your own hair?
First, a ready-made idea of what hairstyle you would like to make yourself. If you spin for hours, saying “my light, mirror, tell me what hairstyle I should do”, it will drag on for a long time, because the mirror cannot speak. First, let's decide what kind of hair we want to build on our heads.
Secondly, a set of tools for styling and fixing the result of our labors - mousse, curlers or curling iron (straightening iron, if necessary), hair dryer, massage and (or) comb, hairpins, invisible, hairpins, elastic bands, etc.

What celebration are we going to?
Depending on the type of celebration, hairstyles can be completely different - you won’t come to a business meeting with the same hair. Therefore, we treat the choice carefully and taking into account where we are going to go.

Hairstyle for short hair: 3 ways
Method one
Apply balm to washed hair and dry a little with a hairdryer. Dividing the hair into strands, randomly beat each of them with your fingers to make light curls. We fix each with foam or mousse. The hairstyle is ready. Strands can also be laid with the help of a round massager, so that the volume is more impressive. Now it remains to fix the entire result with varnish, preferably a strong fixation. Such hair is done in 10 minutes, and it is universal for almost everyone.
Method two
We separate the washed hair with a side parting and wind the strands on the curling iron. We lay the resulting curls in a certain sequence. Randomness, as in the first method, we do not need here. Accordingly, we fix the resulting beauty with varnish and you can go to the office and even to a party!
Method three
Moisturize your hair and apply a small amount of hair styling product to them. Apply mousse to the root area. After that, the hair will need to be dried with a hairdryer. We wind the strands on small curlers. A little later, we remove and, NOT combing the hair, we beautifully style the curls into a chic hairstyle, fixing it with varnish of any fixation.
How to style your own hair for medium to long hair

Curls
Curls look very elegant on medium hair. To do this, we wind individual strands on curlers. The larger the curls you want, the larger the diameter of the curlers should be. If you want cute curls, take the smallest curlers. If you want big waves - take the appropriate diameter.
After the curlers are removed, do not comb the hair, otherwise the nest on the head cannot be avoided. Instead, take a styling bottle (gel or mousse) and with your hands, carefully and carefully style the curls in any order. Do not forget about fixing the final result. This hairstyle takes about 30 minutes, but it is universal for any event.

Do-it-yourself bundle
Medium hair can also be collected in a bun. You need to comb well and slightly lift them in the parietal region. Now we make a pile there and form a high ponytail, leaving the ends of the hair in an elastic band. We divide the tail into 2 parts. We comb the left strand and transfer it to the lower right part of the ponytail, fasten it and fix it with varnish.
Unsurpassed Greek style
You can make a hairstyle with your own hands and in the Greek style. We make volume using curlers or curling irons. We put an elastic bandage on the head, it is not necessary to let the hair out from under the bandage, we dress it like a hat.
After that, we divide the hair into 3 parts (left, right and at the back of the head), and we fill each of the resulting strands under the bandage so that the tips also look out.
We improve the volume by slightly stretching the strands from the ring, and we fix the whole hairstyle. Choose the decorations according to your taste.

Feminine and gentle French waterfall
A good hairstyle is a French waterfall, also ideal for long hair. It is simple to perform, but the result is chic, and does not take much time for styling. We make a side parting on the whole head and with front side we begin to weave the braid in the direction down and obliquely. Having reached the ear line, let go of the lower strand, take a new one next to it and weave it into the braid.
And so every time, releasing the lower strand and weaving in a new one, we reach the second ear and fix the hairstyle behind the lobe with invisible or hairpins. The hairstyle is good for wavy hair, because strands hanging from under the braid look especially good in this form.
See photos of examples of a French waterfall in our article about it —
There are many different variations of the French waterfall - both with a bunch, and with a double oblique, and a symmetrical waterfall. The advantage is that the hairstyle is done quickly and securely holds the whole even without strong fixation. The whole beauty of the hairstyle is precisely in the fact that the hanging “waves” should flutter freely, and not look like stone because of the large amount of varnish. french waterfall should be light, airy and gentle.
Now it will not be difficult for you to make yourself a chic hairstyle yourself and go with it to any celebration or important event!
Photo-manuals how to do hairstyles
Long, thick and well-groomed hair have long been considered the pride of any woman. Moreover, such luxury opens up an excellent prospect for the realization of fantasies in order to create fashionable, creative styling. But how to do hair long hair short and easy?
Indeed, in the conditions of modern life, the fair sex cannot always devote enough time to the process of their creation. In fact, there are a lot of easy and attractive options that you can create on your own in a short time.
There is plenty for long hair beautiful hairstyles. It is quite possible to make them yourself.
Quick and easy styling techniques based on the tail
The easiest and fastest way to beautifully collect long strands is to make a tail. It never went out of fashion trend. Such a seemingly elementary hairstyle has a lot of peculiar varieties, so it will not look boring at all and will not get bored if you periodically change the tail to a low, careless in a braid, side, high.
So, how to make a hairstyle for long hair yourself, using this element as a basis? Let's consider more than one option.
Twisted into a rope

The photo shows a beautiful tail-rope of thick long hair.
This styling will take no more than 3 minutes, but it will create a look of grooming and accuracy. To build it, follow these steps:
- All long strands must be collected in a ponytail in the upper region of the back of the head, secured with an elastic band.
- Divide it in two in equal proportions.
- Roll each piece into a spiral.
- Twist all spirals into one cord.
- To prevent the tail from falling apart, comb the tip a little and fasten it with an elastic band so that it is invisible to the prying eye.
Stepped like Disney princesses

Such tiered tails will give the image of mystery and magic.
This option is also easy to implement. You can make it yourself very quickly:
- Create a high ponytail.
- Fasten with rubber band.
- We make a light pile.
- Lightly spray with varnish.
- Now it remains only to tie with strands taken from the tail along its entire length with steps. Or you can do it with rubber bands to match the color of your hair.
- At the last stage, the protruding elements are corrected. Each of the steps can be adjusted, giving the desired volume and size.
Complex with multiple tiers

Step by step process for creating a tiered ponytail for long hair.
In fact, the name of this styling is deceptive, since there is nothing complicated here. It is done quickly - only about 5 minutes.
The process goes like this:
- The curls are combed on the back of the head.
- A part is separated from the total mass at the top based on the number of future tiers.
- A tail is formed from the separated part and is fixed approximately at the crown with an elastic band (preferably under the existing color).
- The lower second part is selected.
- A tail is made from it in the middle of the occipital region, connecting it together with the previous element.
- Further, all subsequent tiers are formed into tails in the same way.
- The last lowest strands are connected to the resulting upper tail, and everything is fixed already in the lowest occipital region.
- At the very end, the tail along the entire length is carefully combed.
everted

Step-by-step creation of the tail "on the contrary."
If you answer the question of what hairstyles for long hair can be done every day so that they look unusual, then this option can be considered one of the simplest and most beautiful. This styling is done simply and quickly, but it looks just great.
It can be performed both from high and low tail. To create it, the following steps are taken:
- First, we determine the height of the future hairstyle.
- Next, we collect the entire long mass into a bundle and form the tail itself, which is then well fixed with an elastic band.
- Directly above it we form a "hole".
- We twist the tail into a rope to make it easier to thread it.
- We stretch it into the formed hole and fasten it again with an elastic band.
- Hanging strands can be left straight, wound on curlers or made into wavy curls.

With the help of many inverted elements, you can also create one such beautiful and unusual tail.
Weave styling for a quick hand
How to make a hairstyle for long hair using braids? It's easy if you learn the techniques of creating various options.
Headband of several braids

Step by step process of creating a rim of braids for long hair.
Every girl with long curls can do this styling. To do this, just follow these steps:
- We take the lower strand from one side in the area of \u200b\u200bthe ears and weave a tight braid (the thickness can be adjusted at your discretion).
- Weave a second similar pigtail on the other side.
- After that, we throw the braids in opposite directions over the head so that they lie in the form of a rim.
- We fasten their ends with invisible hair under the hair in the back of the lower part of the head.
That's all! Romantic styling is ready.
NOTE! If the rim is made on long hair without bangs, then the pigtails should be passed right along the line of their growth on the forehead or a little higher. They can also be placed higher above the bangs, if any.
Decorating loose curls with a hanging pigtail

Step by step process for creating a braid on long flowing hair.
This is very simple styling, but despite its simplicity, it still requires some skill and diligence. A braided braid must be neat, otherwise it will simply look out of place.
How to make a hairstyle from long hair with a decorative pigtail? Step-by-step instruction is:
- We select a small strand from the front of the head on any side and begin to weave a thin braid straight from the base, gradually directing it slightly to the side and back.
- We braid it to the very end, fix it with silicone rubber. It looks more beautiful if it is not made too tight.
- We leave it in free hanging along with a common mop.

And this is how you can remove the rest of the hair with this pigtail if they interfere. Get a tail wrapped with a scythe.
Spikelet "inside out"

In the photo, the options for spikelets are "vice versa" for long hair.
For some reason, it seems to many that this weaving is very complicated and takes a lot of time. In reality, this is not the case at all. Making it yourself is pretty easy.
Such styling looks romantic, feminine, strict and elegant. Suitable for romantic dates, and for business meetings, and for walks in the park, and outdoor recreation.
How to make a hairstyle from long hair with a spikelet "vice versa"? This weaving goes like this:
- We separate a wide strand in the front region of the head.
- We divide it into 3 parts.
- You need to start weaving at the very beginning, like with a regular braid, only the strands should be applied not from above, but from below, as if vice versa. The freer the weaving, the more openwork the hairstyle will turn out.
- Further, in the same way "inside out" weaving of the remaining curls is made. At the same time, each time, alternately on each side, you need to add new strands to the pigtail, grabbing them with your thumbs.
- Weaving can be completed at half of the braid by fixing the hair in this place with an elastic band. In this option, free curls will remain.
- Such a braid can be braided to the end with ordinary weaving, starting from the middle, after which its tip should also be fixed.

Step-by-step diagram for weaving braids "spikelet in reverse".
NOTE! This spikelet "on the contrary" can trail not only exactly in the middle of the head. This hairstyle also looks great when the weave is pulled to the side. In this case, initially the strands are taken in front of the head, either on the right or on the left, and the weaving itself is directed in the opposite direction. As a result, the braid will be located on one shoulder.
bundles

A bunch of long hair is done in 5 minutes.
Surely all women who have a long mop at least once, but did smooth beam, so the technique of performing it is known. This styling is appropriate not only in household use, in order to quickly collect strands so that they do not get into your eyes. It is appropriate in sports, and in the business sphere, and just in everyday life.
How to make a hairstyle for long hair at home based on a bun? There are several methods for creating such options.
Bundle of knots with a careless effect

Step-by-step process for creating a bun for long hair from knots.
Such styling, in addition to ease of implementation, gives its mistress perkyness, and here we are not talking about age at all. It is done like this:
- We comb the hair and divide it into 2 parts. To make them obedient, you can first apply a little foam on them.
- After that, a loose knot is knitted from two parts. It will look more beautiful on the occipital region. It can be done both in the middle and on the side.
- Further, from the remaining free strands, as many knots are again created as the length allows. For reliability, the resulting design can be fixed with studs.
- The protruding elements can be hidden, or they can be fluffed up a little, thereby creating an even greater impression of original negligence.
Air openwork bun with weaves

Step-by-step photo for creating an air bundle with weaving elements.
This styling is one of the latest trends in the hairdressing industry. It is appropriate for almost any occasion. Making it a little more difficult, especially for the first time, but the result is worth it:
- First, the sagittal parting is separated. In the frontal-parietal zone, interfering elements must be temporarily fixed with a clamp.
- Further in it, the entire mass is divided into 4 equal parts and pigtails are woven from each. All of them should be secured with rubber bands.
- To give more volume, the pigtails fluff up a little.
- After each of the weaves should be pulled to the base with two fingers (as if gathering), holding the tips with one hand. Moreover, each of these elements is fixed with invisibility so that the tips are hidden.
- Then, leaving a few free strands near the face, you need to braid 2 braids on both sides in the frontal parietal region using the reverse French weaving method.
- At the very end, 2 braids are located above the resulting air bundle and are fastened with hairpins so that the tips are invisible.
- The strands of the face can be twisted a little.
Bundle-bud

Elegant bun-bud of long hair.
This hairstyle is just super fast. To create it, you just need 5 minutes of time, an elastic band and hairpins.
The creation instructions are as follows:


The photo shows the third stage of creating a bunch-button.
Simple techniques for performing evening and holiday styling
Holiday hairstyles should always look amazing. After all, they, giving charm, femininity and elegance, make any woman more confident.
But evening styling is not always associated with a visit to a beauty salon or a personal hairdresser. If you know how to make your own hairstyle for long hair, then before the upcoming gala dinner or gala event, it is quite possible to do without the help of an expensive specialist.
elegant shell

The shell can be decorated with hairpins, curls and other elements.
This styling option is always an appropriate classic. With her, a woman of any age at a gala event will look elegant, feminine and attractive. It is done quite simply:
- We comb the curls back.
- We collect in a not tight tail so that it is located about 7 cm above the occipital region.
- We twist the shock of the tail into a loose tourniquet and, turning it inward so that the elastic band is not visible (it should be in the middle of the structure), we hide the tips there as well. Or, they can be curled and left to then decorate the side of the shell with curls.
- Formed neat smooth shell.
- We fix with pins.
- We sprinkle a little varnish on the finished hairstyle. To make it romantic, you can release a couple of strands at the temples by winding them with a curling iron.

The diagram shows a step-by-step process for creating a shell from long hair without using an elastic band.
ADVICE! To create voluminous futuristic hairstyles in the form of a shell from long curls, you can use the good old method - bouffant at the very beginning of creation.
Greek easy and beautiful option

Light Options Greek hairstyles on long hair made with decorative headbands.
To feel like a Greek goddess is the dream of many. Especially if a woman is going on a date or a romantic party. And it is Greek hairstyles for long hair that will help to give the image of mystery and grace.
Do-it-yourself styling in a similar style with your own hands is not at all difficult. Consider the simplest and most popular option - an air bundle at the back of the head and a bandage.

In this hairstyle, the main thing is accuracy, and even special skill is not needed, since it is done quite simply.
It is done in this way:
- Wash hair, dry and comb.
- We put a beautiful bandage on our heads (you can read about such accessories here). The height of its location can be adjusted to your liking.
- Next, we collect an air bundle on the back of the head so that it is, as it were, wrapped over the bandage. Additionally, you can fix it with studs.
- At the end, we fix the hair and sprinkle it with varnish.
Finally
As it became clear, there are a lot of easy options for long hair that you can do with your own hands. Of course, it is not possible to describe all of them within the framework of one article, so whoever this is not enough can watch the video.
Also, many of our readers will be grateful if you share your experience or ideas in the comments, because every woman is a “sorceress” who keeps her secret in her “chest” for this or that occasion.
Is it worth it to spend time and money in beauty salons before a solemn event, if you are able to create an individual look with your own hands, guided by your boundless imagination and styling tips?
We want to bring to your attention elegant, stylish and at the same time simple hairstyles for medium length hair to create your image at home.
Having mastered a few simple lessons, you can always make the right impression at any holiday, official event and in everyday life.
To keep any hairstyle perfectly on your hair, you should not forget about proper care.
Before choosing the right shampoo and hair conditioner, read the label carefully. If there are too many incomprehensible symbols and formulas painted in small print on the back, return such a tool to the shelf. It will not only not help your hair, but it can also harm.
Styling tools and products
In order to do your hair at home without the help of professionals, you will need a few basic accessories, tools and styling products. Their choice depends on your preferences and goals when creating an image. Fixation is done using well-known means:
- Varnish. Pick it up according to the degree of fixation that is right for you. Spray at a distance of at least 15 cm to avoid the effect of "sticking".
- Foam and mousse. Mousse is suitable for thin hair, and foam - for thick. Used for extra volume.
- Gel. Designed to model curls and waves. It is applied before drying, after which the styling is given the desired shape.
- Wax. With it, you can fix individual strands without weighing them down. It is used for very thick, very curly and unruly hair.
- Paste. It makes it possible to dramatically change the direction of the strands and perform any other manipulations due to the high fixation factor. Used for hairstyles that require long-term durability.
You will also need a few tools:
- curling iron;
- rectifier;
- hairpins;
- gum;
- invisible.
All of these tools cannot be used at the same time. To create each hairstyle, some of them are used. Which ones, depends on the choice of hairstyle.
15 quick and beautiful hairstyles
Doing your own hair is not that difficult. By mastering the basic styling techniques, you can always look new at no extra cost.
A few simple but elegant hairstyles that will not leave you indifferent:
Divide your hair into 3 sections, tying the middle one into a ponytail. We braid 3 braids and fix the ends with small elastic bands. We wrap each pigtail in a bundle and stab it with hairpins. It turns out a row of three beams.

Shell. We wind the strands with a curling iron approximately from the tips to the middle of the length. We make a small pile on the crown and tie the tail low. You need to wrap it up, passing the tip under the elastic band. We wrap a loop of hair with this tip and pin it at the back of the head with hairpins.

Tie the tail up. Divide it into several identical strands, twisting each of them into a tight bundle. Fold the bundles so that you get one volumetric bundle. We fix each strand with hairpins.

We divide the hair into 2 parts with a middle parting. We make bundles from the strands extreme from the face, twisting them in the direction of the back of the head. We collect the tail lower along with the harnesses. You need to make a small indentation above the elastic to turn it inside. We continue to wrap the entire length in the same direction, hiding the remaining strands in the resulting niche. We fix with pins.

Divide your hair into 2 sections so that one is higher than the other and directed to the right, and the other to the left. We tie the right part with an elastic band, and from the left weave a braid. We wrap the tail with the resulting oblique, fixing the tip with an invisibility at the back of the head. You can decorate your hair with an elegant hairpin.

It is necessary to comb, separating the extreme strands for braiding. We make two ordinary pigtails on the sides. We bring the finished braids together in the direction of each other, and we discreetly fix their tips with invisibility. It turns out a bezel from a double braid in the back of the head.

It is necessary to divide the hair into 4 equal parts, apply mousse or foam and secure them with elastic bands. We divide each section into several strands and alternately wind them onto a curling iron so that each is wound from the edge of the handle. We spray the resulting curls with varnish, after which we tilt our head and randomly straighten them with our fingers.

We throw the combed hair to one side. On the other hand, we leave the smaller part, which we divide by another 2. We twist them into a double bundle, gradually weaving additional strands from the larger part that was originally separated. Continue like this until we reach the opposite edge of the head. Then we fix it with an elastic band near the ear.

Separate the strand above the ear and braid the braid. Then wrap it around your head and secure it with an invisibility near the opposite ear. At the end, make a small bouffant on the crown to give expressiveness to your rim.

We collect the hair with an elastic band. We make a hole above it to pass the tail through. We perform fishtail weaving or regular weaving, securing the tip with a small elastic band. Then we raise the braid, hiding the end at the base. We pierce with pins.

It is advisable to do this hairstyle at night after washing your hair. We divide wet hair into small strands (the thinner the strand, the more magnificent the curls will be) and twist them into bundles, fixing them with invisibility. In the morning, straighten your hair with your fingers. In this case, you can use the gel.

We divide the hair into upper and lower parts. We collect the upper lobe in a bundle with a beautiful hairpin or elastic band, the lower one in the same way, but with a small elastic band. We lower the top and get a voluminous tail.

Bow. We tie the tail higher, in the area of \u200b\u200bthe crown. We pass the tip through the elastic in the direction of the face. We divide the resulting bundle into 2 equal parts, and the tip will be a partition, which we fix at the back of the bow.

You will need a hair straightener. Select a few strands and twist the bundles. Along the entire length of the tourniquet, starting from the roots, we stretch the strand with a straightener. Get a light wave.

The thinner the hair, the faster the curls and bouffant lose their shape, so you can’t do without means for fixation. Using the proposed schemes, improvise, experiment, create a new daily unique image!
A few more options for beautiful hairstyles:


Medium length hair is the most versatile and easy to style. It is very easy to make hairstyles for medium hair at home and it will not take much time. The most popular and medium in the last few seasons are various weaves, braids, curls and waves. So . And so, we do hairstyles at home for medium hair.
Elegant ponytail
Easy to do and very cute hairstyle. To make it, you need to prepare curling irons, a comb, a thin rubber band and hairpins to fix the hair.
Video instruction - how to make such a hairstyle for medium hair.

Step 1.

Step 2

Step 3

Step 4

Step 5

Step 6

elegant hairstyle
Beautiful and simple hairstyle for medium length hair. All you need to assemble it is a comb and a few invisibles. This might be an option.

Hairstyle for medium hair with curls
Pretty simple hairstyle, very feminine. This hairstyle can be done in the office and at a party and on a date. This styling immediately emphasizes the oval of the face, hides flaws if any. For example, for owners of a rectangular, elongated or narrow face she will be perfect.
Second hairstyle: braid for wavy hair
A very interesting hairstyle that can be done in a few minutes. This hairstyle combines trendy bun and pigtail. First, a pile is made on the hair, then a braid is braided on the side, then the braid is gathered into a bun and stabbed with hairpins.

High hairstyles for medium hair
The hairstyle is very simple, a great option for walking, going to the movies, for relaxing. Done in a few minutes. High hairstyles are ideal for bad weather, because the collected hair retains its shape in the wind and high humidity.
Love loose hair, but don't want it to get in the way and climb into your face? This hairstyle will suit you. For starters, you can wind your hair, or you can make a hairstyle from even hair.

A naughty and romantic hairstyle is a high bun. You can decorate it with a hairpin, a scarf, or you can just leave your hair without any decorations.

Easy hairstyles for medium hair
Another option for loose hair with a trendy pigtail. It is done in a couple of minutes, it looks very beautiful. Simple and very romantic.
Retro style curls are a great option for a date, an evening celebration. This do-it-yourself hairstyle for medium hair is very easy to do, but it looks stylish and feminine.
Simple braided hairstyle. The pigtail here is like a headband or a hair band, it looks very beautiful.
DIY quick hairstyles for medium hair
A few more options for quick hairstyles. If you need to be in a hurry, go for one of these hairstyles.
Another option with a pigtail.
What other hairstyles can you do to yourself on medium hair
Stylish hairstyle for medium hair with a bandage

Easy hairstyles for medium hair
Beautiful hairstyles for medium hair using curling irons and hairpins.

These are interesting, stylish, but simple hairstyles for medium hair at home can be done in a few minutes.