How to make a paper money box. We make a money box with our own hands. The shape and style of the money box
As astrologers warned, the economic crisis does not subside, alas - everything is more difficult with finances. But after all, the crisis does not mean at all that there is less wealth in the world: both oil is in place and gold has not disappeared anywhere. There is simply a complex process of redistribution of resources - both in the global sense and in the domestic sense. And, of course, this process occurs at the energy level. Right now, if you tune in correctly, and even get good luck, you can negotiate with the Egregor of well-being.
LUCKY WALLET.
Whatever money is made of - shells, gold or paper - it must be stored somewhere. And the storage place should be properly equipped: away from prying and unkind eyes, and even so that neither water nor fire spoil them.
But this is not enough: the money must be arranged beautifully, conveniently - so that they, the money, “want to be found” in your vault, so that they themselves lie quietly there, and even invite and attract “friends” to themselves. This is where the decorated caskets, caskets, richly embroidered wallets came from: the more luxurious the house for money, the more likely it is to get rich.
This belief has come down to our days in a somewhat simplified form: few people today put their savings in chests with gems, but we are attentive to the choice of a wallet. The color is important (preference is given to green, black and red), size (so that the bills do not wrinkle, lie flat), the number of compartments (the more the better), the quality (a serious amount is unlikely to be held in a crookedly stitched leatherette wallet). It is essential at what moment the wallet is bought: there are special, lucky days for acquiring a wallet. In general, there are many subtleties, and you need to know them.
But even the most "correct" wallet is not a magnet for money, but only their keeper. Want to get a real talisman?
Then let's do money box.

SECRET CASKET.
Of course, you first need to choose a box. You can buy it, you can take the one that is in the house: family or purchased for jewelry. The main thing is that you like it and associate it with wealth, prosperity, be a symbol of a decent, beautiful life. It doesn't matter what the box is made of: it can be stone, wood, metal, or covered with fabric. But, of course, not plastic or tin: consumer goods are inappropriate.
And one more thing: if this is a family heirloom, make sure that there are no unpleasant stories associated with it; if you buy a box, spend money on it with pleasure. Regret about the amount spent will “poison” the box and it will not attract any wealth to you.
On the growing moon, fumigate the box with incense. While the incense is smoldering, look at your box: you must envelop it with your admiration, joy. You can stroke her, talk to her like a living being. She really comes alive: you breathe life into her! Put your favorite decoration in it and leave until the full moon.
During this time, several stones or gems should be prepared (money green stones are especially suitable: serpentine, malachite, aventurine, tourmaline, jade, etc.), a golden little thing (ring, chain), silver jewelry (or a spoon), several coins of any denomination and bills.
Special mention should be made of the banknote for the money box.
UNEXCHANGEABLE BILL.
Take out all the banknotes available and examine them carefully. Each has a series (two letters) and a number (seven digits). The ideal fiat banknote is nominal: the letters match your initials (first and last name or first and middle name), and the numbers represent your date of birth. Let's say you are Elena Ivanova, which means that the letters EI should be on the banknote. You were born on March 14, 1967. Therefore, the banknote series is the numbers: 1431967.
Of course, the chance to find a talisman banknote from the very first visit in your own wallet is small. It's not scary: look for the one in which there are at least some matches. For example, the series coincided - and your initials - excellent, set aside the money. On another one, at least a few numbers match the date of your birth - and this one is fine.
Suppose you have found one or even two or three more or less suitable banknotes. We are waiting for the full moon and proceed to the rite of initiation of the money box.
FULL MOON MAGIC.
In addition to the box itself (the decoration must be removed from it for now), gems, coins, gold-silver and fiat bills, you will need a green scarf, four thin green wax candles, four crystal glasses or glasses, incense, a saucer of salt and a cup of water.
On a table arranged so that you, sitting in front of it, face the east, spread a handkerchief, place a casket in the center, place the objects that you put there in front of it, salt and water on the sides, put the casket on inverted crystal candle cups. Burn incense.
Refer to the candle, standing to the left of the box. Light it and say: "To the glory of the Guardian of the North." Now bring the fire to the candle located opposite the "northern" and say, lighting: "To the glory of the Guardian of the South." In the same way, light candles to the glory of the Guardians of the East and West. Focus, imagine how your desire comes true: you live in abundance, and this fills your life and the life of your loved ones with harmony. You no longer have to be nervous because of financial difficulties: you enjoy both work and leisure, live in harmony with yourself and with the world. Realize: the main thing that you will get is not banknotes and not new things, not even new opportunities - but peace of mind, the joy of life.
With this feeling, proceed to the continuation of the ceremony. Take an unchangeable bill (or bills, if there are several of them), hold it between your palms, filling it with your energy, dip it in salt, then sprinkle it with water, carefully pass all the candles in turn through the flame in the order in which you lit them. At the same time, contact the Keepers with a request to charge the banknote, turn it into a talisman. Put the bill at the bottom of the box.
Similarly, initiate all prepared items: stones, coins, jewelry.
After putting everything in the box, wait until the candles burn out. Now the box can be removed: you should not hide it, but make sure that no one touches it.
From time to time, on the growing moon, open your money box, lovingly sort out the contents, whisper your requests, and each time you receive money, thank you and make a small offering: add jewelry, a pebble, a coin.
As soon as you come across a bill that matches the ideal one more than the one in the box, swap them. After loading the new one (perform the same ceremony for her), put it in a box, and take out the old one, hold it in your hands, thank you for your service and give it as alms or buy a gift for someone close to it.
Vika DeeA gift to newlyweds for a wedding is increasingly given in monetary terms. So young people will be able to purchase the necessary items to their taste. If a magnificent celebration is planned with a large number of guests, then the best solution for putting money in will be accessory - box for envelopes and small gifts such as jewelry or keys to an apartment, car.
Such a box can be made in the form of a chest, casket, reticule of a beautiful geometric shape: round, oval, heart and decorated according to the event. Therefore, it is important not to forget to prepare and decorate attribute called "treasury" for the wedding. A bridesmaid or a craftswoman from relatives can take on such a duty.
A wedding fundraiser box will add style, fun, and bring some convenience to the organization of the celebration.
You can make a cool attribute with your own hands, decorate in the color scheme of the decoration of the hall or the bride's dress with flowers, ruffles, ribbons, beads
Suitable for base shopping boxes of various shapes, or you can get by with a shoe box or any other.
The shape and style of the money box
A round wedding box as a family bank for money should be tall so that all the envelopes fit. An important element is the cutout in the top cover. Think about how you place the envelopes: Will your box have a cutout or simply remove the lid, then locks or tapes are required. The rule - you gave it, you can't take it away, must be observed. If the cut, then it should become wide and spacious so that envelopes with voluminous decor could get inside without deforming the decorations. If you prefer front loading, then you should consider how to place stylish locks or magnets.

wedding box for money envelopes
A wedding box for money envelopes in the form of a casket is also unusual.
You rarely see a ready-made cardboard form on sale, so you have to make the header yourself
If you turn on your ingenuity, it is easy to make at home a wonderfully fabulous chest for storing a treasury with rounded shapes, roomy, with handles and a reliable latch for locking and unlocking.
You can paint the money box in the form of an ATM with the "Bank of the Bride" logo and a bill acceptor. Or imitate an old chest in Russian national traditions.
Another option is a pirate treasure chest. The main thing is that the gift box is securely made and does not fall apart at the celebration. With this attribute, you can beat a number of scenes to collect money. A do-it-yourself treasury will become an elegant and cool props for any wedding.

Treasury for a wedding in the form of a pirate chest
How to make a treasury for wedding money out of the box with your own hands?
We offer step by step master class for making a wedding treasury for money with your own hands:
- First, design a layout, taking into account the volume and geometry of the lid.
- Draw the pattern drawing on cardboard.
- Carefully iron the folds with a knife.
- Glue the seams with Moment glue. Additionally, you can strengthen the stapler.
- Reinforce the bottom with extra cardboard.
- Securely fasten the frame to the bottom.
- Start decorating.
Good finishing material can serve elegant wallpaper pastel colors or a piece of satin fabric. Trim the seams for masking with lace or braid. An important point is to make a cut in the lid. Add faux flowers, beads, and other voluminous embellishments.
You can make a wedding gift box from an ordinary box from under household appliances. Just cover the box with shiny paper, glue textiles, decorate with flowers. The slot in the lid is finished with a dense edging or braid with glue. So the cut will look neat.
A do-it-yourself wedding box for money can be made in the form of an old Russian tower. More complicated pattern calculation and time for creativity, and a tower for financial assistance will delight those invited. A balcony, a complex roof, window frames will add creativity.

Pattern for the treasury for the wedding
You can make a family bank out of a shoe box. Wallpaper and decorate. Create a cutout. Can finalize the design by inventing a drawer. Do-it-yourself money box for a wedding is not difficult to make. A drop of diligence and the desire to excel contributes to the flight of fantasy.
How to decorate a wedding money box - original ideas
A scrapbooking gift box for money is a luxuriously decorated attribute. scrapbooking- a technique for cutting volumetric patterns from cardboard and paper. This decor is superimposed in a separate layer on the product. So the casket or box takes on a kind of carved look. Everyone, having practiced, will be able to compose a lovely composition on a wedding theme.
You need to make a box for money festive and romantic. The first layer of finishing is the main one. Glitter paper, lace, satin, paper decorations using the scrapbooking technique will create a background. The colors white, cream, lilac, pink, gold will set the mood.

Wedding money box decor
Additional decorations with highlights: pearls, satin ribbons, braid will add tenderness and sophistication. Volumetric flowers made of paper, guipure, silk must be present in the form of compositions in the design. Swans, hearts, rings, monograms- symbols of love will be appropriate. When decorating the treasury, show your imagination, and your thing will be exactly unique.
Decorating a wedding money box will help turn it into a keepsake for many years to come. Perhaps in the future it will store various little things or photos of the family, including wedding ones.
Watch the video of making a box for money for a wedding with your own hands:
How to creatively give money for a wedding in a box?
Jokes and jokes are welcome upon delivery cash gift. Accompany the bride, For example:
“The husband ordered - do it, don’t argue, don’t mind!
This order, perhaps, is good, if you left and are a little cunning, you will turn your husband's order in your own way.
Well, we wish that those who marry live happily and happily, without scandals and fights! So be healthy, live richly! And hand over the box.
Or write this message:
“Dear… (name)! Your wife has access to your wallet, but it's convenient, safe, and profitable to keep money in a savings bank. Here's your own savings bank."
Collecting money for the treasury of the young accompany with humorous scenes:
- Bridesmaids dress up as old women and go around the guests to replenish the treasury. But no one agrees. After this, the robes are thrown off, and the old women turn into young dancers. They are sent again with the treasury to the guests, the casket is quickly filled.
- Another option - a disguised postman will hand over a parcel with money against signature.

Bridesmaid with wedding treasury
Do not be too lazy to create a stylishly decorated treasury for your family or friends for the wedding. After all the details of the celebration are important! They give positive emotions and are remembered for a long time. And the time and money spent on manufacturing are negligible compared to the memories of a fun event. In this way, you can convey your good intentions and sincere joy for the newlyweds.
June 26, 2018, 22:49At the wedding, it is customary for newlyweds to give gifts, which are most often cash. This is the most practical gift for both the bride and groom and guests.
Young people will be able to decide for themselves what to buy with the donated money. And guests do not need to rack their brains over what kind of gift for a formed married couple will be more necessary.

In addition, money takes up little space.

Therefore, an increasingly common trend is to purchase for wedding gifts in the form of money in special boxes, which are called a cash treasury or a family bank.

However, it is not at all necessary to spend money on such an attribute; it is quite possible to make it yourself.

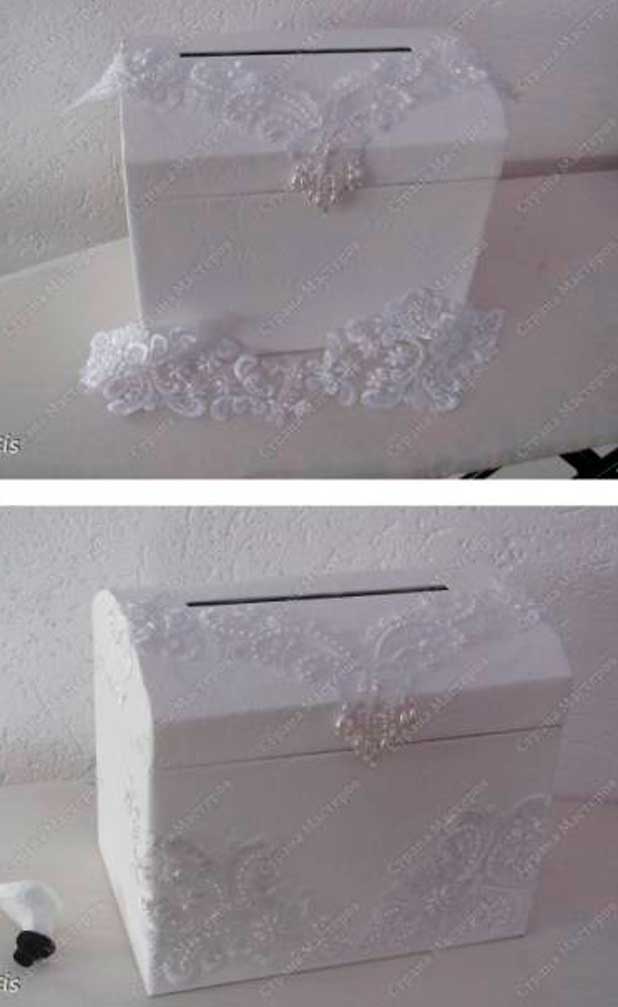
Such a treasury may have appearance a beautifully decorated rectangular box or chest with a hemispherical lid.
Family bank in the form of a box
To make a box for money, in which donated funds will be stored at the wedding, an ordinary shoe box can be used. This container has everything you need - a base and a lid that can be removed and get gifts.

The only thing left for you is to make a special slot, which will easily include an envelope and a postcard. It is also necessary to give a beautiful appearance to your homemade product.

If you did not find a free box, then you can find on the Internet a pattern of a volumetric rectangle without a lid. Then you will have to make in it not only a slot for money, but also a hole for extracting it at the bottom. To create such a product, you can use any thick cardboard.
Money box decoration
If you don't know what color is better to use for a family bank, then take a look at the photo of a white wedding money box.

With a classic look, it looks elegant and somewhat reminiscent of a snow-white bridesmaid dress. If there is no white in the outfit of the young, then black or shades of brown, reminiscent of the structure of a tree, may come up.

You can decorate the box with the most different ways. Since it is cardboard, self-adhesive decorative film will adhere well to it.

You can make more effort and paste over the box with a cloth. Just check first if the fabric is too thin and will not show through outer side designs.
In this case, you will have to additionally wrap it with whatman paper or other thick paper.

In addition to giving the box the main background, take care of the details to decorate it. As such, lace, satin ribbons, beads, rhinestones can be used.

You can buy in the store or make your own flowers from various materials. Fashionable eco style allows the use of living plants or other natural materials.

The main thing is that your box fits the overall style of the event.

Treasury for money in the form of a chest
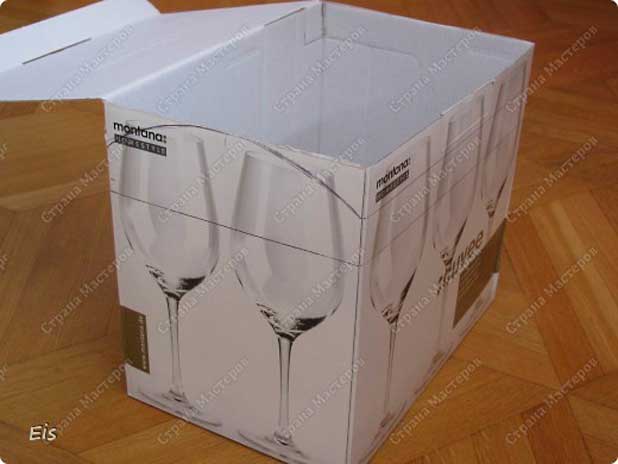
Money chests made from a box look much more beautiful and elegant at a wedding. For such designs, it is better to use not boxes with lids (although they can be turned into works of art if desired), but whole packages.

Then you do not have to separately glue the lid, and your family bank will look very neat when finished.

The design of the chest is different in that it has a smooth rounded lid and a rounded top at the side faces.

One of simple ways when drawing parts with a rounded top is to use a round object. In this case, a regular plate with a diameter equal to the width of the end is suitable.
How to make a chest with your own hands?
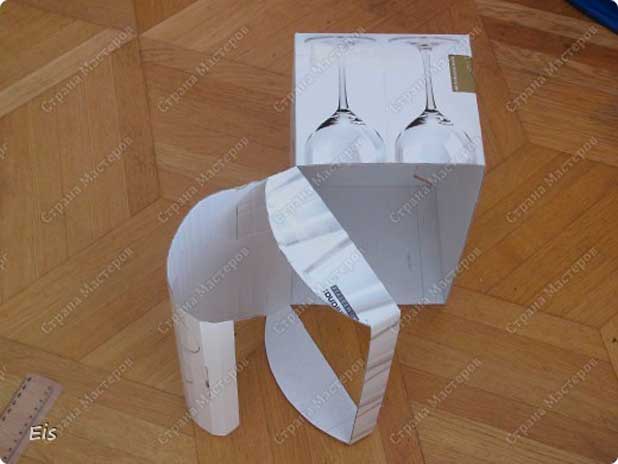
To make a box for money for a wedding in the form of a chest with your own hands, you need to correctly measure all the details of the workpiece. After cutting off all the excess, you still need to smoothly bend the lid of the future chest.

To prevent sharp corners from forming on it, on the back side, you can make shallow horizontal cuts along the width of the box with a clerical knife.


The chest is decorated with the same means as a rectangular box. The only difference can be considered an additional finish of the rounded ends.

To ready product pleasing to the eye for the side walls, it is better to cut duplicate parts from cardboard. In this case, the main structure and flat additional parts are glued separately. And only then the finished part is glued to the side of the chest.

The photo of the completed wedding money boxes looks very beautiful on the border around the edge, which, in addition to the decorative function, can hide all the nuances.

Don't forget to trim the edge of the envelope opening as well. To do this, you can use an additional thin satin ribbon, which will be tucked inside the box.
In this article I will talk about one interesting way transformation of plywood into the image of a box. It's no secret that each of us has many acquaintances, friends and relatives, but sometimes there is a difficulty in choosing a gift, whether it's a birthday, a banquet or a wedding. You always want to present something original, memorable and created with soul. As it usually happens, people do not want to make it very difficult for themselves to choose a gift by choosing easy way, namely, to give money so that a person acquires the thing that he needs or postpones it for the next time, this is already a matter of taste. In this article, the author uses an unusual idea for wrapping money. The originality lies in the fact that you yourself make a banknote in the form of a wooden box, which is more valuable than a purchased gift, and the following information in the article will tell you how to do it. The creative imagination of each person is different, so the boxes for storing money can look completely different: all kinds of shapes and sizes. The box, which will be the result, can then be finalized with decor using decoupage or acrylic painting.
To make your own wooden box for banknotes, you will need:
* Circular saw, can be replaced with a hand saw or an electric jigsaw.
* Sandpaper.
* Screed for joinery, you can use nylon thread.
* Square, screwdriver, ruler, clerical knife, brush, weight.
* Joiner's glue.
* 4mm thick plywood sheet, another 8mm thick plywood sheet.
* Neat decorative loops.
* Self-tapping screws according to the number of holes in the hinges.
After we have all the parts and tools necessary for assembly, we proceed directly to the assembly. Step one.
Using a pencil, draw a line on a sheet of plywood that is 4 mm thick, measuring 19 cm from the edge. Using a jigsaw or a circular saw, make a cut according to the marking. When operating these power tools, use caution and safety measures such as eye protection and gloves to protect your eyes.

After we sawed off 4 mm plywood, we go to 8 mm, we mark the markings on it, from the edge there are two lines of 19 cm and two of 7.4 cm each. Using the same circular saw, we saw off along the marked lines. As a result, you get 6 components, as shown in the photo below. The accuracy of sawing and the evenness of the sides depends on the tool with which you will cut. For further convenience, all parts are numbered. Using sandpaper, the parts need to be sanded.

Step two.
Putting the pieces together. Place item No. 1 on a flat hard surface, the one that measures 19 by 9 cm, this will later be the bottom of the box. Then you will need parts No. 3 and No. 4 with similar dimensions between themselves 19 by 2.3 cm. First of all, we apply carpentry glue on the long side of one of them, it is more convenient to do this, and also more accurate with a thin brush. Being careful, evenly press it to the edge of part number 1. We do the same with item #4.

While the parts to be glued numbered 3 and 4 will hold tight, we move on to the side parts No. 5 and 6. On their sides, which are longer, we apply glue and place them between parts 3 and 4. The ends should be hidden and not form large overhangs and drops, after you are convinced of this, we press the parts for better bonding. Remove excess glue, which is likely to go beyond the edges of the joints, with a clerical knife.

After pressing, in the subsequent setting of the parts, apply glue around the entire perimeter of the box and glue item No. 2 on top, which will eventually be both top and bottom in different occasions. We remove the glue that has gone beyond the edges in the same way as in the previous step.

We align the edges, facing with a corner, and in order for the edges of the wooden box to become as even as possible, we use a screed that will evenly press all the details.

This box will dry for about 20 minutes, but if the workpiece is symmetrical, then this step is not necessary. Find something heavier and press the workpiece with this weight, leaving the glue to dry completely. When the bonding time has passed, you can view the workpiece for cracks, which should ideally be absent. If they are still there, then additionally cover these places with glue and leave pressed with a load for another 20 minutes.
Step three.
When working with wood, an operation such as grinding is necessary, which gives the product a good look and removes all the flaws in the manufacture, made at the rougher stages of processing. Having freed the workpiece from the load that pressed it, you can start grinding. Each side must be sanded so that its surface is smooth and free of burrs, this process produced with each side of the box. Using a grinding wheel, the operating time can be significantly reduced than with manual grinding.

Step four.
In this step, we will cut the box into two parts, it's like in focus, only without the reverse process. Using the markings made around the perimeter of the box, which divides it into two equal parts in thickness, we cut it strictly along the line using a jigsaw, since at this moment we need to achieve greater accuracy. On the same grinding wheel we process two parts, as a result we get two smooth identical parts.
It is best to give money for a wedding - a long-known fact. Gone are the days when young people were given sets and crystal - now the spouses decide for themselves what they need. Some are planning Honeymoon, and others - the purchase of a car or an apartment. And it’s easier for guests - you don’t need to run around the shops in search of the best gift. I put the money in an envelope, and that's it, the problem is solved.
But lately there has been a fashion for objects self made. And this passion touched and gift wrapping. They create boxes in the form of a chest, a cake, a car, a house, etc. Subsequently, they can store family budget or documents. And creating a beautiful box is not so difficult with your own hands.
magic box
To create it you will need:
- thick paper - cardboard, whatman paper, photographic paper;
- glue;
- scissors;
- ruler;
- pencil;
- scrap paper;
- a tool for creasing (creating lines for folding) - a non-writing pen, a crochet hook, a plastic card, a teaspoon handle are suitable for this;
- decorative elements - lace, beads, beads, ribbons, artificial flowers, etc.
Step by step action plan:


Money box
You can make another version of the box. For her you will need:
- thick paper - cardboard, whatman paper,
- glue,
- scissors,
- ruler, it can also serve as a tool for creasing,
- narrow satin ribbon 30 cm long,
- openwork paper napkin,
- scrap paper (you can use any paper instead colored paper and even thin wallpapers),
- decor elements - lace, a string of pearls, small buds of artificial flowers.
Having prepared everything you need, let's get to work:


Money box
If you have the desire and time, you can create a wonderful wedding chest. For this you will need:
- cardboard box,
- glue,
- scissors,
- paper knife,
- scotch,
- creasing tool - it can be scissor rings, an ice cream stick, a plastic card, etc.
- paper or beautiful material for decoration (you can take beautiful wallpaper),
- decoration elements - lace, beads, etc.
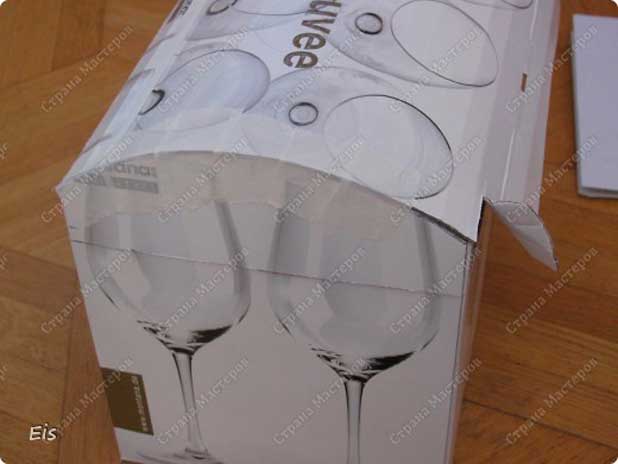
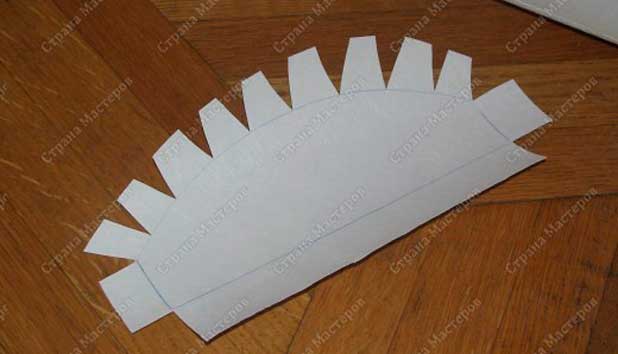
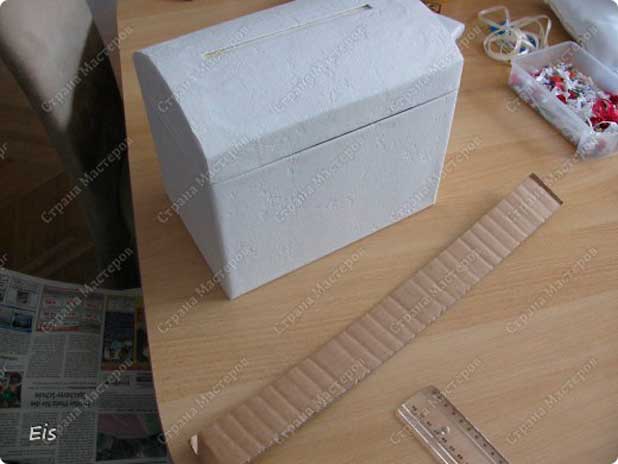
- On the sidewalls empty box apply a contour, outlining the lid of the chest.
- Two lines are drawn from the front side of the box: one connects the lower points of the arcs on the sidewalls, the second indicates the height of the product cover.
- By cutting off the extra elements, the cover format is created.
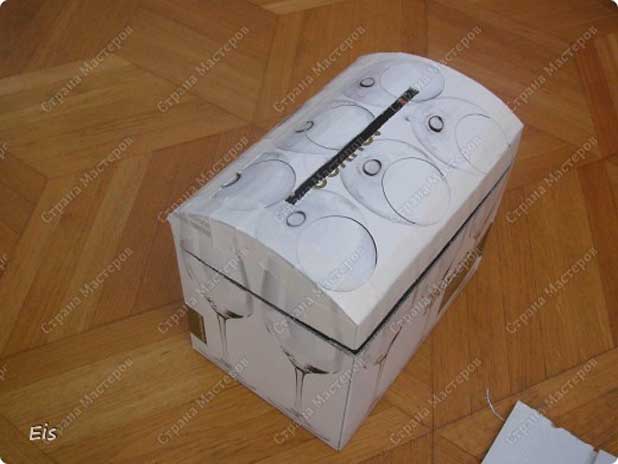
- On the inside of the lid, strips are scored at a distance of about 1.5 cm from each other. This is necessary to create a beautiful bend.

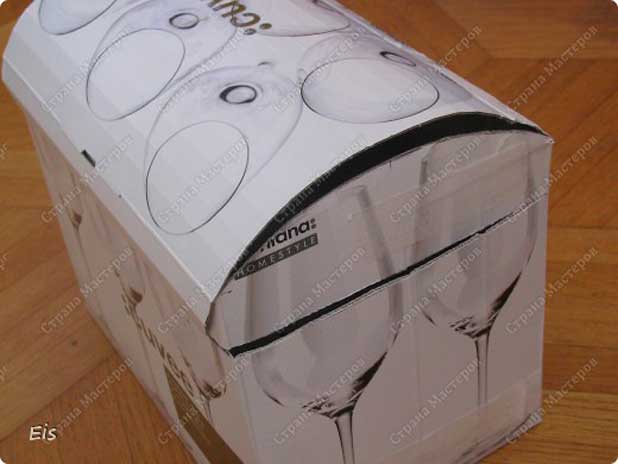
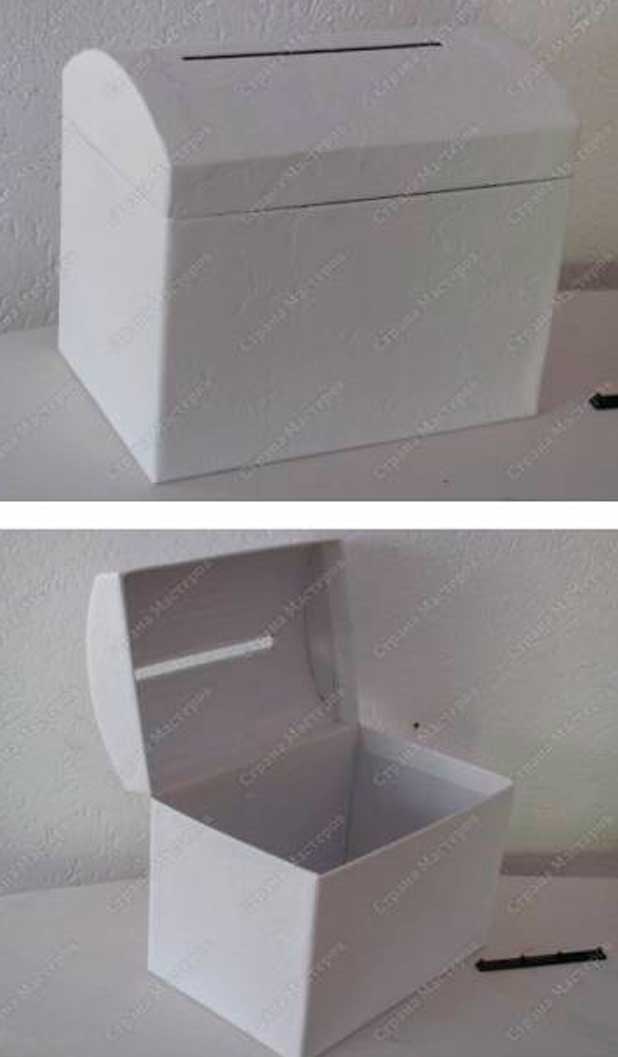
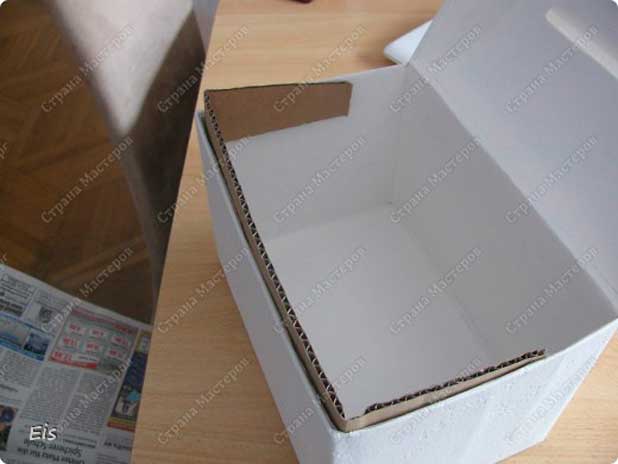
- With a sharp knife, cut off a part of the box along the lower drawn line from three sides - the back side remains intact.
- The lid can be slightly trimmed - there should be a cut of 2-3 mm between it and the bottom of the chest.

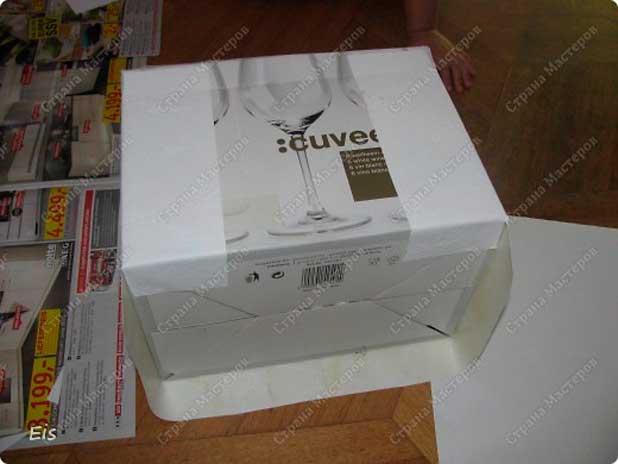
- The parts of the cover are fastened together with adhesive tape. For this purpose, you can use a stapler.
- The excess part of the lid is removed with scissors or a sharp knife.

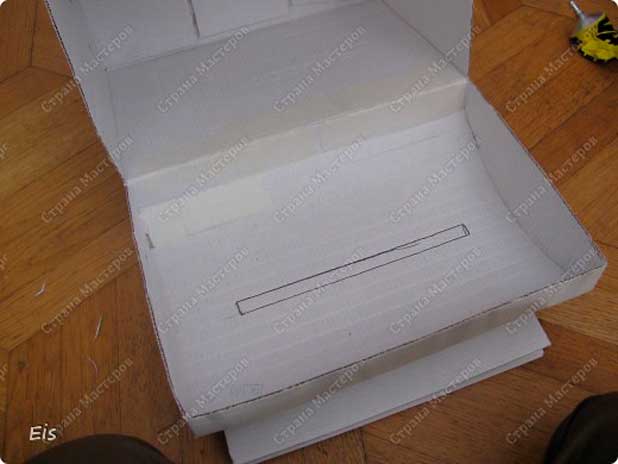
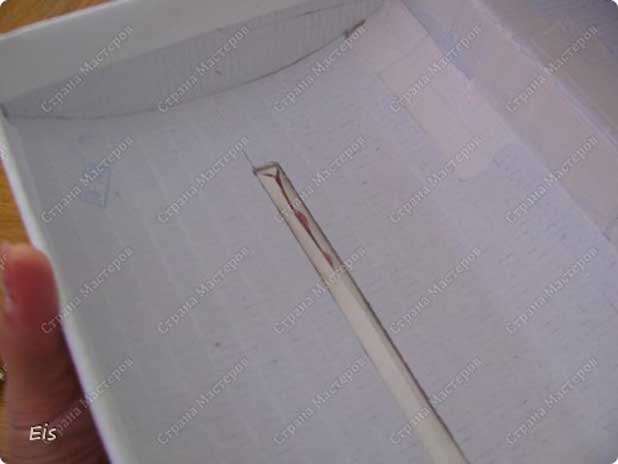
- On the inside of the upper part, a contour of the slot for envelopes with money is drawn, which is then carefully cut out with a knife or scissors. In order for the gift to definitely get into the vault, you should purchase a standard envelope and try on whether it will fit into the slot.
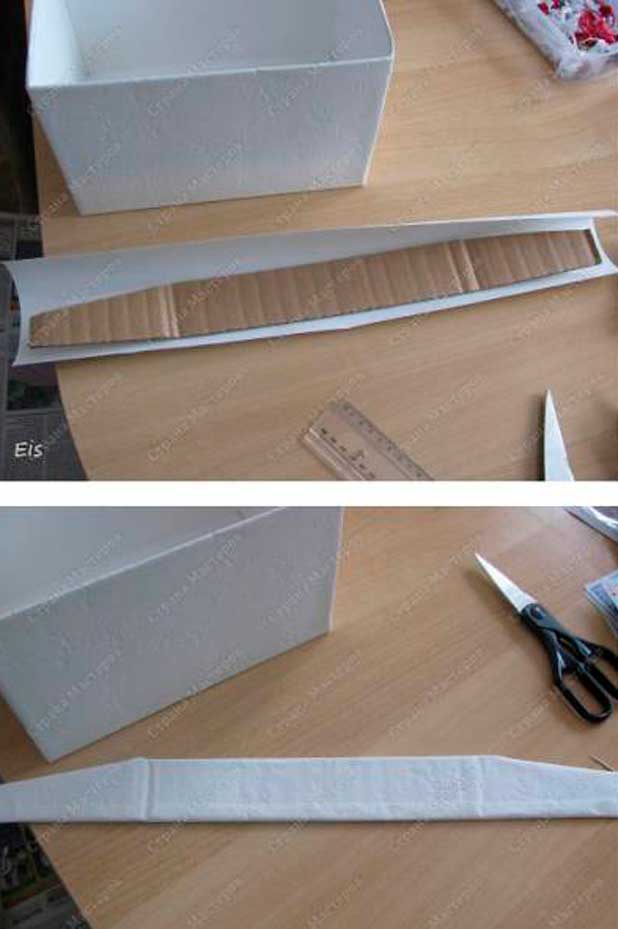
- Now you can start pasting over the chest. To begin with, one large piece should be cut out, with which the front wall and two sidewalls are pasted over. Do not forget to add allowances - about 5 cm on each side. The height will be equal to the height of the wall plus the same 5-6 cm for the gates.

- Having applied glue to the cut out rectangle, paste over the front part and two side parts, after which the remainder is bent over the back.
- Cut corners, tuck and smooth to remove air bubbles.
- Cut out special blanks for the sidewalls of the lid and glue them.

- Having made measurements of the bottom, cover and back wall, cut out the parts of the appropriate size, and then stick them.
- A slot is made in the glued cover, bending the ends of the paper inside the prepared slot for money.

- If the lid of the box turned out to be too heavy and constantly tries to lean back when opened, then a piece of tape can be glued to one of the sidewalls from the inside. You need to measure it in such a way that it does not allow the lid to fall.

- The next step is to paste over the chest from the inside. This can be done both with the same decorative paper and beautiful material. True, the latter option will have to spend a fair amount of time.
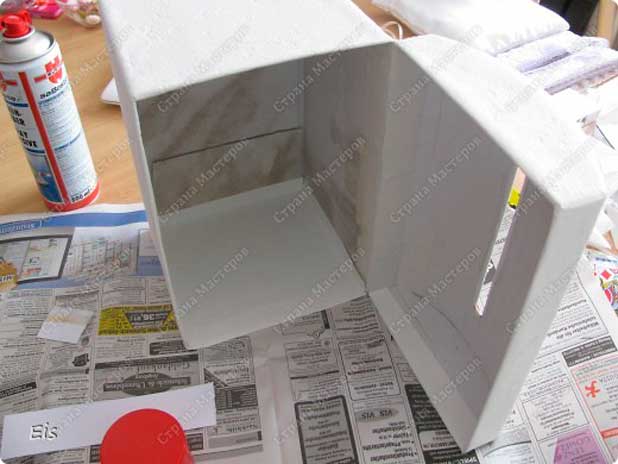
- Strip is taken corrugated cardboard the following sizes: its width is 5 cm, and the length is the sum of the length of the front wall plus 2 times 2/3 of the length of the sidewall. This element is pasted over with the same paper as the whole craft.
- Having smeared it with glue to the middle, glue the strip inside the chest.

- With small scissors, carefully cut a hole for the envelopes.
- And now you can give free rein to your imagination - they decorate the chest with whatever they can and want.