Children's autumn crafts (105 ideas for activities). Children's autumn applications from leaves Autumn applications for children 4 years old
Good afternoon. Today I prepared new package ideas for autumn children's crafts, which are suitable for home fun with children, for classes in kindergarten or school. I will show the brightest autumn crafts, made by children's hands. Here you will find suitable ideas for the smallest children(2-3 years old) and crafts for older children(7 - 10 years). We will make broken applications on the theme of autumn, children's mosaics made of paper, buttons and beads. Draw with paints on autumn leaves, and also make colorful prints of these leaves on paper. I will show you how to make a whole picture book out of natural material and teach you easy way make applications from the leaves. In short, there will be a lot of interesting lessons and master classes. So you will not leave this article with an empty head.
Moreover, the site also has thematic articles - where autumn crafts are laid out on specific topics. Popular themes for autumn are mushrooms, hedgehogs, owls, apples. Such piggy bank articles are convenient for selecting ideas for classes in kindergarten or at school.
So let's see what kind of children's autumn ideas I collected in this article.
Children's autumn crafts
IN THE MOSAIC TECHNIQUE.
Here is a pumpkin craft using the mosaic technique, which is made without glue. We will need a white sheet of paper, a black sheet of cardboard, double-sided tape and filling.
In this example, the mosaic filler is buttons, beads and nail glitter sprinkles. But buttons in our country are expensive. Therefore, it will be great if you just prepare multi-colored (yellow, orange, brown and reddish) pieces of cardboard, finely cut with scissors + beads and sequins. That will be cheaper.

On black cardboard, draw the outlines of a pumpkin. Cut out with scissors. We cut a white sheet of paper to the size of our pumpkin hole on cardboard. And we cover the entire surface of the white sheet with double-sided tape. Gently attach the sticky white sheet to the back of the black cardboard so that it completely covers the pumpkin-shaped hole. And we get a sticky inside for our mosaic. In bowls or on a tray, we lay out the mosaic filler - pieces of paper, cardboard, shards of a broken cup, an orange plastic folder cut into pieces, cut pieces of cardboard and other things that come to your mind.

Your child will be happy to spread small things on the sticky surface of the pumpkin.
If you want to hold such a lesson in a kindergarten, then of course you won’t get enough adhesive tape and mosaic filler for all children. Therefore, I propose to make pumpkins collectively - one for 4 children. Just at the table, 4 children are sitting - they are given one pumpkin for all, and each has a bowl of mosaic filler. Children lay out the mosaic on the pumpkin together - and at the end of the work, when all the large parts are laid, sprinkle the craft with powder.

Glitter powder costs money. Therefore, you can make your own powder coating with a cheaper product. powder can make semolina, dyed orange. Semolina is painted with ordinary gouache, rubbed with hands into a dry homogeneous mass. Another powder can be made from grated dry autumn leaves.
Craft mosaic of colored napkins AUTUMN LEAF .
If square pieces of colored (yellow and red) table napkins are glued randomly on top of each other, you can get excellent material for cutting. autumn leaves.

Below, the master class demonstrates the general principle of creating such a children's autumn craft.
A colored napkin is placed on PVA glue - on top of an office file or film. Pieces of napkin can be torn (as in the photo below) or neatly cut into squares, as in the photo above.

Here sample maple leaf for this children's autumn craft. By the way, This autumn leaf template can also be used as a template for a sticky mosaic craft with double-sided tape (same principle as we just made a pumpkin with our own hands).

You can also cut out cardboard in advance autumn leaf frame template. Put a cardboard frame on a plastic file- colored side down. And with children's hands fill this frame with pieces of napkin. We pour glue-pva directly onto the file and lay napkins. Napkin ukaldka should touch the edges of the cardboard frame. Further, when the craft dries, we separate it from the office file - the entire napkin mosaic will cling to the edges of the frame. And we hang this craft-frame with a mosaic on the window. The sun shines through the bright layers of napkins. A beautiful stained glass autumn children's craft - which is easy to make in kindergarten or in the classroom at school.

Children's autumn crafts
Trees on bushes.
In the same mosaic technique, you can make just such a children's craft in the form of autumn trees. Glue round cardboard circles with colored napkins and insert them into the slot made in toilet paper rolls.

You can cut ovals in the form of leaflets from colored paper. Children will love to collect their autumn tree. For the convenience of work, first we put the tree crown round on the table, stick the leaves on it, and only after that we put it in the slot on the toilet paper sleeve.

You can do it differently. Do not make a slot in the roll, but make a tree crown in the form of a POCKET, which can be easily put on the roll. Just cut out 2 silhouettes of the crown and glue them along the edges - the unglued middle will open up like a hat - and we put it on a roll-sleeve.

Children's autumn crafts
from leaves
for the little ones.
The easiest children's crafts from autumn leaves are crafts for kids. When we offer a child a ready-made coloring book and show that some elements on it can be made from natural material.
Offer the child a lot of leaves and blades of grass of various shapes - and let him choose the part to be replaced - the head, or the tail, or he wants to make ears, paws from natural material.
In the same way, you can use not one autumn leaf, but several at once. Or pave the craft with a whole pack of autumn herbarium (as in the photo with the hedgehog craft).

A lot of interesting ideas on working with autumn leaves, I have collected in a separate training article. I invite you to go into it a little later and learn new foliage craft techniques for this fall.
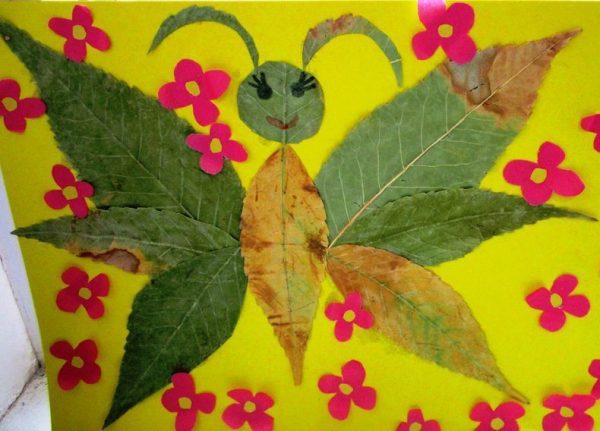
Drawing on autumn leaves.
children's autumn crafts.
The easiest autumn children's craft- this is to paint a large round sheet with red paint and when it dries, draw red dots on it with your finger (not with a brush). And then we glue such a leaf an already prepared blank of a bug drawn on a sheet with black gouache.
If you do not have a round leaf, it's easy to fix. An ordinary maple leaf can be cut in a circle - and you get the desired shape.

We can stick an autumn leaf on paper. And cover it with any pattern, and draw the missing elements next to the leaf.


Before you start drawing we trace the contours of an autumn leaf on another sheet of paper and on this pencil copy draw a sketch of the future crafts. Thus, we check in advance whether all the details of the intended pattern coexist well with each other, as they fit on the autumn leaf.
And then, on a clean sheet of paper, carefully transfer all the elements of the draft sketch with bright, rich colors with a brush.
Some work can be done not with paints - but with bright thick office markers or felt-tip pens (as was done on the frog craft from the photo below).

You can also add colored paper elements to the leaf craft with drawing. Below we see a beet family in the garden. The land for the garden can be drawn, or cut out and colored paper, or made from sprinkling with grated dry autumn leaves (grind dry brown leaves into fine dust, pour pva glue on a sheet of paper and pour leaf powder on it). Or you can use regular tea leaves.

And children just like to paint large autumn leaves in bright colors of gouache.

Or fit stained glass paint- It is thick and lays down with a beautiful glossy layer.

Children's crafts
with prints of autumn leaves.
We give the child a ready-made printable coloring book. A branch and contours of a bird should be drawn on it. The bird should be small - so that there is a lot of free space on the sheet. And the branch should go through the entire sheet of paper - diagonally. This way we can place leaf prints on either side of the branch. We cover the sheet with paint: with a brush, and preferably with a sponge - we dilute gouache with water in lids from cans and give children small pieces of a sponge. They wet the sheet with a sponge and put an imprint on our picture.

If you do not find a suitable finished coloring book on the Internet. You can draw it yourself on a sheet of paper with a black felt-tip pen - and then print it out according to the required number of children (this is if you work as a kindergarten teacher and you decide to take this idea for group classes and 20 or more children).
And also you can translate this picture from the monitor screen - directly from this site- put a sheet of paper on the screen and circle the translucent picture with a pencil. To resize the image to fit your sheet. Press the ctrl key with one hand and turn the computer mouse wheel with the other hand - the image will change size to larger or smaller, depending on where you turn the wheel: towards you or away from you.

Another autumn bird is the peacock. She is often depicted in the form of autumn crafts. We will also make it out of paper and paint. We will need paint to make leaf prints. First, we collect several autumn leaves from different trees - we need long leaves (for the central part of the tail) and small leaves (for the lower part of the tail). From paper, cut out a circle-abdomen and a pear-shaped shape for the head. Beak and eyes.
On a piece of paper we glue our belly of the future bird - and with a pencil around the belly we outline the size of the future tail. - You can immediately place the leaves in a circle - outline their location.
Then we cover each sheet with autumn-colored paint (red, yellow, orange) with a brush - and leave prints on a sheet of paper. We dry the prints and glue the paper parts of the bird. Ready.

Children's autumn crafts
In STAMP technique.
Children really like to make prints with paints using stamps made from a cardboard roll. Ordinary toilet paper is cut in half lengthwise (to reduce the bell, the whole pipe will give too large a petal) - flattened into a petal shape and connected with tape. We get convenient small stamps-leaves. In small bowls (lids from jars are suitable, or plates for flower pots) pour PVA glue and into it add gouache. Glue helps save gouache consumption - the color is just as bright and juicy.
cheap pva glue sold in hardware stores - called UNIVERSAL PVA GLUE or CONSTRUCTION PVA GLUE. It is exactly the same as stationery children's pva - but its price is 4-5 times lower than that of stationery and it is sold immediately in buckets of 500 - 1000 grams. One bucket is enough for 2 months of crafts for the entire kindergarten group. Convenient and cheap.

You can also bend the cardboard roll from above and below into a hollow - and fix it with electrical tape so that it does not unbend. And then you get a stamp in the shape of an apple. With it, you can make autumn children's crafts on the theme of fruits - with homemade preparations - compote or apple jam.
As stamps, you can take real apples cut in half.

The stamp can be cut out of any shape and with an internal pattern - from ordinary potatoes. For example, on an oval cut of a potato, cut out REMOVES in the form of veins of an autumn leaf.

Also, the inflorescence of CAULIFLOWER is a ready-made convenient stamp for drawing an autumn tree. This children's craft is suitable for the youngest children 2-3 years old.

Plain round wine stopper can also be a good stamp for children's autumn crafts in the form of an apple tree.

Children's autumn craft-landscape
in engineering
MIRROR PRINT.
And the print technique can also create such an autumn landscape reflected in the water. We need to divide the sheet into 2 halves horizontally. Bend this sheet along the line (so that there is a ready-made convenient fold line). Then paint the lower part of the sheet under the fold in blue (the color of the water in the lake). And on the top half apply light shade blue sky. Dry it all.
And then VERY QUICKLY, without letting the paints dry, we APPLY BRIGHT SPOTs of trees on the upper half of the sheet - a blunder at speed. And quickly, before they dry, we bend the sheet along our fold line - so that the spots of the trees are PRINTED ON THE BACKGROUND OF THE LAKE. If necessary, repeat this procedure again - apply the same paints to the same places and bend the sheet again. Then we add strokes in the form of tree branches. And if necessary - after drying - once again we go through the blue paint on the lake half of the sheet.

crafts-paintings
from cut leaves
Leaves do not have to participate in the application as a whole - in their natural natural form. From autumn leaves, you can cut any shape - squares, rhombuses, circles. Here on the craft below we see that the sheet is cut into rhombuses and each rhombus is a flying kite. Long blades of grass like the strings of kites, and bright stems like their long tails.

Large details can be cut from a wide maple leaf. This cute pig is made entirely of one sheet, which was cut with scissors.

Leaves are paper given to us by nature. And you can work with leaves like paper. Cut out any necessary details for the application from the leaves and make children's autumn crafts out of them. Simple and fast.


France has a whole children's book, which is illustrated with just such cut-out applications from living leaves. Why don't you come up with illustrations for your favorite stories. You can work with the whole class - and do great teamwork. All illustration crafts must be photographed in good quality and ordered (at a printing house or photo studio) - an album with a story illustrated by children's work. Then this test model can be taken to the publisher - such an idea may be of interest to publishers and your class can produce a real book with a large circulation - and earn yourself an interesting class trip or excursion. Why not.


Children's autumn crafts
OWLS and Hedgehogs.
I don’t know why, but of all the birds, owls are best associated with autumn. It is their silhouettes that artists most often draw when they take on autumn forest landscapes. Well, we will not lag behind the trends of great art and create our own autumn crafts-sketches with wise owls.
Let's start with a simple - but very beloved topic by all children. An owl inside a volumetric hollow. That is, we will make a real 3D tree. It is done very simply - a sheet of paper is folded in half lengthwise - and then again in half. Now we unfold it and see that there are three fold lines on a piece of paper (that is, the sheet is divided into 4 equal long parts - now put the extreme halves of the sheet on top of each other- and we get triangular tube(that is, a pyramid tube - as in the photo below a tree trunk). On this tube (along the middle fold line), we cut an oval hole-hollow with scissors. Now, so that the tube does not turn around, we will fix these extreme halves of the sheet (which we folded on top of each other) with glue - that is, we will close the back of our trunk.

On a sheet of paper (blue background - like the sky), we stick stick-branches. In the middle, we attach our triangular tree trunk to the glue.
Now on a separate yellow sheet of paper draw round owl (nearly the size of a hollow). We decorate the owl with wings from paper of a different color, cut out a triangular forehead also from paper of a different color and eyes from white paper.
To keep our owl in the hollow- we glue a strip of paper crumpled into a ring on the back of the owl (that is, we cut off a strip of paper and closed the ends into a donut ring). We glue this paper ring with one side on the back of an owl - and with the other side we glue it to the bottom of the hollow. It turns out that the owl sticks to the hollow, and does not fall out of it.
Left over from leftover yellow and red paper cut the leaves- stick them on the branches and draw veins on them. Here is such a cute and simple autumn craft - suitable For senior group kindergarten.
And here's another interesting craft on the theme of the OWL. In the photo, the crafts are made from paper plates, but we can just cut out circles from cardboard. Two rounds per child.
Children cut one round in half (these are wings). We cover all the details with glue paint. If you mix paint with PVA glue - in the proportions of glue 4 times more than gouache - then you can immediately stick eyes and a beak on such glue paint - put paper parts right into the liquid paint, and they will stick. Where to get cheap PVA glue immediately in liter buckets (and not in jars of a teaspoon) I have already said a little higher in this article.

More more crafts on the topic of an owl - I posted in separate article
And hedgehogs too good topic for autumn children's crafts. You can add a background of autumn leaves to them.

The craft above is suitable for the older group of kindergarten. We give the children a white paper cone (that is, you need to prepare cones in advance according to the number of children). With scissors, children cut the cone into a fringe. Coat the fringe with glue and attach it to a background sheet of paper. We paint the cone brown (you can immediately make cones from brown paper so as not to waste time painting). And it remains to glue autumn leaves on the children's craft.

You will find a lot of ideas for crafts with hedgehogs on our website in a special article.
Autumn crafts
Children's applications.
Autumn is the season of rain and fog. You can make a craft that tells about this side of autumn. Every weather has its beauty. And it can be reflected in the craft.
Even such an elusive phenomenon of nature as fog. Here with help paper napkins(which we stratify into thin transparent layers) you can make shreds of fog (craft in the photo below).

And the rain craft can be served brightly and cheerfully if you add a bright rainbow to your picture, and make the cloud smile.


Children's craft-application
AUTUMN TREE.
The youngest children can do simple crafts- stick alternately colored ovals of tree crowns. And then circle the lines drawn with a pencil by the educator's hand with a felt-tip pen.
The kid himself will not yet draw so symmetrically and branchedly - but he will be able to draw around ready-made pencil lines. You can work with a felt-tip pen only after the glue has completely dried - for example, after quiet time the craft will just dry out and the children can work without the felt-tip pen getting into the wet glue.

And you can do without drawing with a felt-tip pen. Just cut out thin brown paper slingshots and stick them on top of colored paper tree crowns, as is done in the photo of the children's crafts below.

Apple or pear trees too good idea for autumn children's crafts. You can make one tree with rosy apples. Or you can turn on collective work and give other tables the task of cutting out leaves, flowers, silhouettes of birds flying south. And then put it into one common autumn picture.

I collected a lot of crafts on the theme of APPLES and an apple tree in a separate article called

You can combine application with drawing wax crayons. Each drawn leaflet is first drawn by the child along the lines with white wax crayon (or another color different from the color of the paper itself).
Then he takes scissors and cuts out the leaf without cutting the chalk line. And he collects a tree from such leaves. You can collect a common tree - one for each children's table. Then compare which table turned out smoother, more magnificent, more fun. And give out nominations - the most magnificent tree, the tallest tree, the most iridescent tree, etc. - so that no one is offended.

Autumn wreaths made of colored paper are also a good idea for a children's collective craft for this fall. Each child is given a simple and feasible task for children's hands. Cut along the contour of 1-2 autumn leaves.

Colored paper painting
CARPET OF AUTUMN LEAVES.
Here is such a beautiful craft that can decorate any interior. It is made from ordinary colored paper - with ordinary children's hands. You can do this craft collectively with a group of children of the same class or in kindergarten with older children. preschool age.

On a piece of colored paper - draw straight thin lines of veins. Draw a circle at the end of each line. Then we take scissors and cut out along the contour of these styles.

We paste the cut veins on ordinary leaves of the same shape - but contrasting in color. Then we combine all the leaves into a single canvas. So that it was full of holes openwork. That is, the leaves stick together with each other only in EDGES.

Good luck with your crafts.
Olga Klishevskaya, specially for the site
Autumn, fallen leaves crunch underfoot ... What a pity for this yellow-red fading beauty, crumbling and trampling into the mud. Here is a birch leaf - gently yellow, serrated, here are alders - ribbed, but mountain ash - a family of long leaves on a thin stem. Let's take them home and make beautiful autumn crafts, appliqués. We will also need a piece of colored cardboard for the background and glue to stick the leaves.
How to make an application of autumn leaves
Autumn leaves that have dried on the street are not even and rather fragile, so first we dry the leaves ourselves. We find freshly fallen, bright and beautiful, undamaged leaves, and put them between the sheets of some thick book. We put the book under the press (under something heavy). After a week or even earlier, even autumn leaves for application are ready, they can be easily glued to paper or cardboard with PVA glue.
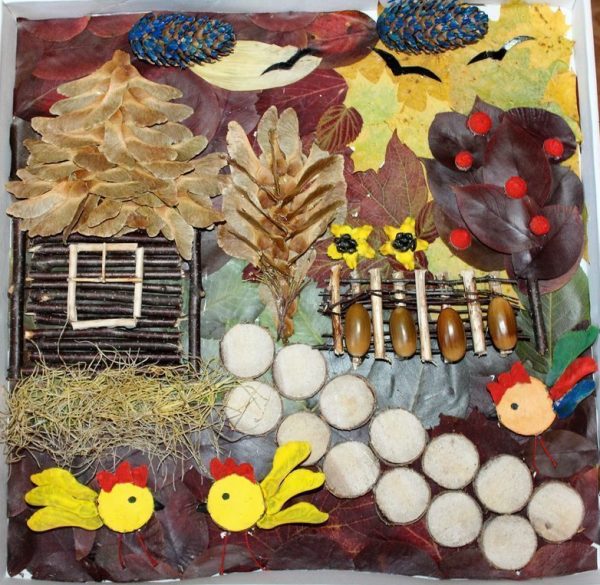
Sequencing
A real artist sees living images in nature, so we will dream up. Let us lay out before us all our harvested and dried wealth and see what it looks like. Take suitable leaves and lay them out on cardboard until you get a picture. You don’t need to glue it yet, at first just spread it out until everything starts to suit you.
When the picture is brought to the ideal, you can stick it. We take one leaf at a time, remembering where it lay, spread it on the back side, glue it in place. If the application is multi-layered, first glue the lower leaves, then a layer of the upper ones. The craft is ready! You can admire!
But what if, well, the ideas of application do not come to mind, and the leaves look only like leaves, and not at all like bunnies and chanterelles? Then use our ideas.
Leaf Craft Ideas
Applications with animals
Leaf Owl:


Red cat


Bird with chicks:


And even an eagle:

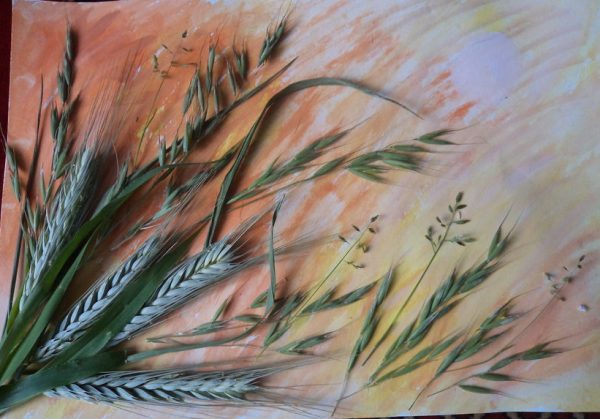
landscapes from the leaves
For a landscape, the background can be painted with watercolors.


still lifes

portraits


The finished application (if it is not voluminous) can be put under the press so that after drying it remains even. Store in a dry place, can be framed under glass.
Do-it-yourself autumn tree made of colored paper. Master class with step by step photos
Master class with step by step photo. Volume application from colored paper "Autumn Tree" on the theme "Autumn" for children of middle and senior preschool age
Author of the work: Karakozova Mlada Vebertovna, teacher of the MADOU "Kindergarten No. 14 of a general developmental type", Syktyvkar, Komi Republic.Purpose: the master class is intended for children 4-7 years old, their parents, teachers preschool education. The application can be used as a guide for GCD (fixing the signs of autumn: leaves change color, leaf fall begins), decorations for playing familiar fairy tales by children, for decorating a group in autumn, a gift for friends.
The application can be both collective and individual. A teacher helps children of middle preschool age, children of senior preschool age can cope with the application on their own.
Target: teach how to make a three-dimensional paper application.
Tasks:
- to form the skill of cutting long strips;
- fix the names of colors;
- to consolidate the skills of accurate cutting and gluing;
- to develop interest in volumetric applications.
« autumn trees»
Orange, red
Glitter in the sun.
Their leaves are like butterflies
Spin and soar.
(author: Oksana Khilik)

For work we need materials:
- colored double-sided paper (one sheet each: red, light green, orange, 3 sheets of yellow);
- colored cardboard (2 brown sheets and a green sheet);
- simple scissors;
- curly scissors;
- glue stick;
- a ruler, a simple pencil;
- 2 plates: diameter - 13 cm and 19 cm (they are not in the photo).

Progress:
1. On cardboard Brown With a simple pencil we circle a plate with a diameter of 13 cm, on green cardboard we circle a plate with a diameter of 19 cm.


2. Cut out circles with curly scissors (for middle-aged children, this work is done by an adult, and older children can handle the cutting themselves).

3. Glue a brown circle in the middle on a green circle (this will be a small clearing base for our tree).

4. A brown sheet (length - 25 cm, width - 19 cm) bent in half. From above, on both sides, mark along the edges of 2 cm with a simple pencil and draw lines, connecting the marks and the edges of the lower part.

5. Cut the workpiece along the lines. You will get 2 parts (the base for the tree).

6. On the lower parts of the base, mark 1.5 cm with a pencil and draw a line. Bend the cardboard along the line as shown in the figure.

7. Glue the base for the tree on top along the edge. Glue the lower part onto the base-clearing, slightly opening the base for the tree. Here's what happens:

8. On 2 sheets of yellow paper, with a simple pencil, we circle a plate with a diameter of 13 cm. Cut it out with curly scissors. You get 2 circles.


9. On sheets of yellow, red, light green, orange color draw with a simple pencil strips 1.5 cm wide.

10. Cut the paper. There are stripes of four colors.

11. Glue each strip into a ring. We glue the rings, lightly smearing glue in the middle, on yellow circles (alternating colors). Rings can be glued both vertically and horizontally, and slightly tilted in any direction. Here's what happens:


12. Glue the lower part of the yellow circle with rings onto the base of the tree. It does not matter if the paper is bent under the weight of the rings.

13. Glue the second yellow circle with rings to the first. Now the paper does not bend.

14. We use the remnants of colored paper for the “fallen” leaves: we make leaves using the paper tearing method.

15. We glue the leaves on the base-clearing (maybe a little on the tree) in random order (you can glue the entire leaf, or you can only part of the leaf, bend the rest, creating a wind effect). Autumn tree is ready!

Application side view:

And here is the crown of the tree:

Fallen leaves:

But such an application we made with children middle group: the guys glued the finished strips into rings and managed to depict a real leaf fall:

An option for using a tree as a decoration for children to play out a familiar fairy tale:

Application options:
1) Use less paper colors for rings and leaves (no orange here):

2) Make a birch tree by replacing the brown cardboard with white.
3) Replace yellow circles with: red, light green, orange.
4) Make a tree for other seasons: winter (white rings), summer (green rings).
I share what I liked on the network ... now is the most deciduous season
For children under 3 years old, it is better to glue freshly picked leaves, as dry ones are too fragile.
"Aquarium»,
Make it simple and fast enough. To do this, you will need blue or blue cardboard, A5 or A4 format, a few dried leaves (you can use bay leaves), buckwheat, crushed peas, green thuja branches, adhesive tape, colored paper and a marker.
Coat the bottom of the cardboard well with glue and sprinkle with buckwheat interspersed with peas. We glue the leaves - these are the bodies of the fish. We cut out triangles from colored paper - these will be tails for our fish and fins. On the leaves, carefully put dots-eyes with a black felt-tip pen. Glue the sprigs of thuja with scotch tape - algae.
Let's make together a very simple but cute craft - an autumn tree.


And even small children they can make their own version of the picture ...
First give them paint - let them paint the canvas - smeared in yellow-red tones as they wish...
And then when the paint dries glue leaves and acorns... and anoint on top with acrylic varnish.
Beauty. Here is a picture of the leaves made by a child. And it is no worse than ... the adult version.
The print technique is simple… even a child will make it… In fact, in the photo below, it is the children's hands that carry out the entire process of stamping leaf prints.
Use ordinary watercolor or gouache, and a regular toothbrush will serve as a sprinkler.
Pictures stamps - from succulent leaves.
Can you leave it on paper? leaf imprint- at all in a clumsy way. Rather, "hammer"
We take paper - put a sheet (juicy green, yellow, red) - cover with a paper napkin - and on top of the napkin we knock-pound with a hammer on the leaf. As a result, juice and pigment from the sheet are reprinted onto paper.
You can print each sheet separately ... laying a leaf after a leaf ... step by step inventing plot compositions.
And you can - immediately unleash all sheet and flower arrangement- in our future picture - cover with a napkin and thresh self-threshold - until the plants are completely torn to pieces.
So that their bright souls remain sealed forever - on your imperishable canvas.
FLAT picture of dried herbs and flowers.
And of course - the standard version of the picture from natural materials. When herbs, leaves and flowers are dried in a crushed flat form between the pages of books.
Age: 2 years old
Teacher: Kolesnikova Anna Mikhailovna, teacher of the GDOU kindergarten No. 4 of the Moskovsky district of St. Petersburg
Purpose: the master class will be useful to educators and parents of children of early preschool age. It is convenient to carry out with a group of children 3-4 people. At the same time, each kid will work with paints and create his own application.
Peculiarities: At the age of up to 3 years, when working with paints with a brush, it is quite difficult for kids to get the result planned by the teacher. In this master class, it is proposed to use an ordinary household sponge when working with paints, which greatly facilitates the work and makes the process more interesting. In addition, classes at this age should be short, so the work on creating an application can be divided into 2 classes (1. Working with paints; 2. Creating an application). And the fact that the master class can be held not with one child, but with a group of 3-4 people is a definite plus for teachers preschool institutions and allows you to connect to the lesson of several children.
preliminary work: Watching how the weather, trees and people's clothes change in autumn. A short story / story about how you can stay dry on a rainy day if you don't forget your umbrella.
Target:
Development in children of artistic and creative abilities, figurative thinking and logic;
Acquaintance with the four primary colors (blue, green, yellow, red);
Tasks: learning
Distinguish four primary colors (blue, yellow, red, green);
Work with paints in an unconventional way;
Work with glue with a brush;
Be careful when creating an application.
Required material:
Gouache 4 colors (blue, yellow, red, green);
1. PVA glue;
2. Container / plate for paint and glue;
3. Brushes (according to the number of children);
4. Household sponges (according to the number of children);
5. 4 sheets of A4 white paper;
6. Scissors;
7. Pencil;
8. Black marker;
9. Napkin, small towel or cloth (according to the number of children);
10. Paper clips or stapler;
11. Frames for finished works 14*14cm (according to the number of children).
Progress
Lesson number 1. Working with paints
1. On an A4 sheet, mark and cut out four squares measuring 11 * 11cm:


2. For each child, we prepare a container (for example, a plate) with paint and wet sponge:

3. Using a sponge, children (or one child) paint over each square in one color:

4. The received work must dry before the next lesson:

Lesson number 2. Creating an application (The first 5 points are performed by the teacher, the rest - teamwork with kids)
1. From the second sheet of A4 paper, cut out a square measuring 14 * 14cm and an umbrella template with a base of 10.5cm and a height of 6cm (if you work with several children, the number of squares will be equal to the number of children in the group):

2. Using the template, mark the umbrella on each square 14 * 14 cm and draw the handle of the umbrella with a felt-tip pen:

3. Using the template, mark one of the colored squares:

4. We connect the colored squares with paper clips or a stapler and cut out the umbrellas, divided into 4 parts:

5. For each child, we prepare a square 14 * 14 cm with a painted umbrella, multi-colored parts of the umbrella, a container with glue and a brush:

6. Each kid (with or without the help of a teacher) glues the parts of the application, pressing them with a napkin.