Christmas decoration made of white paper. Christmas toys made of paper and cardboard. Garland of flags
Even if your home interior is beautifully decorated and it is a pleasure to spend time in any room, there comes a moment when you want a holiday in the middle of everyday life in your house. And then the holiday itself imperceptibly comes according to the calendar. And there is a desire to somehow celebrate this day, to make the rooms smart, to create that very joyful festive atmosphere. And this is wonderful, especially since a few nice details are enough for bright changes in the interior. And for them it is not at all necessary to buy expensive materials and spend a lot of time on manufacturing. Today you will learn how easy it is to make beautiful paper decorations with your own hands.
Basic materials and tools for work
What basic materials and tools will you need to work? It is, of course, the paper itself. Believe me, everything can come in handy: napkins, newspapers, magazines, music books, writing paper, colored paper from sets, colored double-sided paper, whatman paper, corrugated paper, paper with various textures and embossing, design paper, for scrapbooking and others. Your imagination will tell you which paper to use when to get an original decoration that fits the style of your room.
Cardboard, either white or gray, or colored, may come in handy. If you have thick white paper or cardboard, you can use paints (watercolor, gouache, acrylic, etc.) to give the paper the desired color or apply patterns and drawings.
Of course, you will need glue (PVA, glue stick, universal transparent moment), a stapler with paper clips, scissors, a stationery knife, threads with a needle. A figured hole punch can be useful for cutting flowers and other small figures. Such a hole punch is used in scrapbooking and will be very useful if you like to do paper art. But if it is not there, it's okay, the same parts can be made by cutting out the circled template.
For fine and accurate work, you may need tweezers, for example, medical ones.
Well, the most important tool is, of course, your imagination. For many paper decorations, diagrams will be shown, and with some you can easily figure it out yourself. The activity is going to be exciting! Let's get started.
Probably, all of us in childhood decorated window glass with homemade paper snowflakes. So you want to arrange at home under winter fairy tale. And why not deploy a fairy-tale world right on the windowsill? We implement the idea.
You will need thick white cardboard. From it, cut curly pictures according to the template. Glue them together (you can try to do it with an overlap) to get a solid strip of the pattern in the length of the window sill.
Then glue the second same strip. In it, it is advisable to swap the pictures in places or even use other template drawings, you can come up with them yourself.
Now you need to glue the box the same length as the window sill, about 10-15 centimeters wide and about 4-6 centimeters high.

Inside the box we place rectangular pieces of foam rubber. In foam rubber we fix cardboard holders with slots for strips with our figured landscapes. We insert the strips into the holders: one to the front wall of the box, the second to the back wall. We stretch a garland between the landscapes along the box. Light bulbs with white or blue light will look best.
So, turn on the garland, turn off the light and enjoy the fairy tale!

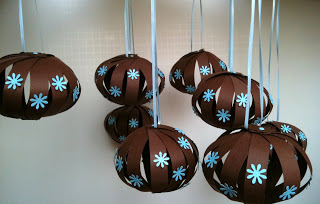
Let's decorate the house for the New Year. This time we are making paper toys for the Christmas tree. Prepare paper of different colors, a ruler and a pencil, scissors, 2 beads and a needle and thread. 
We cut the paper into 18 strips of different colors about 10 centimeters long and about 1-1.2 centimeters wide. We draw and cut out two circles with a diameter of about 2 centimeters.
We string the bead on the thread and thread the double thread into the eye of the needle, as shown in the figure. 
We fold our strips in half. We first string a circle on a thread, and then all the stripes in the order you need (alternating colors, for example). 
Also on the same thread we string the strips from their opposite end. At the end we string a circle, and the last - the second bead. Then we straighten the strips according to the example of a fan. 
So the first Christmas tree toy made of paper is ready! 
Let's move on to the next one. She's going the same way. Only the stripes do not need to be bent (so the toy will turn out in the form of a ball). And the strips are distributed in a circle so that there is a distance between them. Therefore, you should not thread the thread through the toy, as was the case in the first case. It is better to fasten the strips at both ends with rivets (used in scrapbooking) or fasten so that the strips can be opened with a fan.
If you use paper of the same color for stripes, decorate the toy, for example, with small flowers.  They can just be made using the figured hole punch, which we talked about above. You can cut flowers with scissors or even decorate the toy with something else (sequins, rhinestones, sparkles, beads, etc.).
When the toy is ready, we stretch a ribbon at the top under one of the strips, with which the toy will hang on the Christmas tree. If you make ribbons for toys long and different lengths, then the balls can be hung on a chandelier or attached to the ceiling and used as an independent decoration, for example, in a nursery.
And these amazing decorations made of colored paper will be in place for any holiday or will become an original room decor. Making them is quite simple. 
For greater effect, you should make such balls of different sizes and hang them together.
You will need different colors of paper, although plain white paper can also be used. 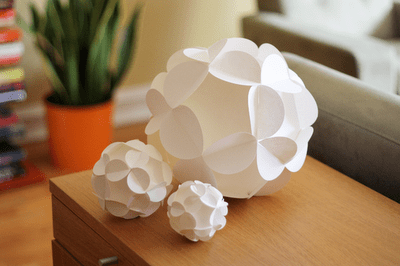
To make one ball, you need to cut out 12 blanks-modules along the contour, make cuts in them in the indicated places and connect the parts of the toy together. 
But these balls are somewhat similar to the previous ones, but they are made differently. 
You need to draw and cut out identical circles from colored paper. Then draw and cut out an isosceles triangle that fits exactly into your circles, touching the circle itself.
We attach a triangle to each circle and draw lines along its sides. Then, along the lines obtained inside the circle, we bend the edges of the circles. You will get many triangles with rounded edges bent outward.
We glue the triangles (former circles) together, applying them to each other with these very bent edges. Look carefully at the photo of the finished toy to understand how the circles stick together.
The size of your colored balls will depend on the diameter of the circles that you draw and the number of these circles.
And again paper decorations-balls

In order to glue such a toy, we again need to draw and cut out circles of the same diameter and different colors. 
We fold the circles with a stack, draw a line along the diameter on the upper circle and connect the circles in several places with a stapler. 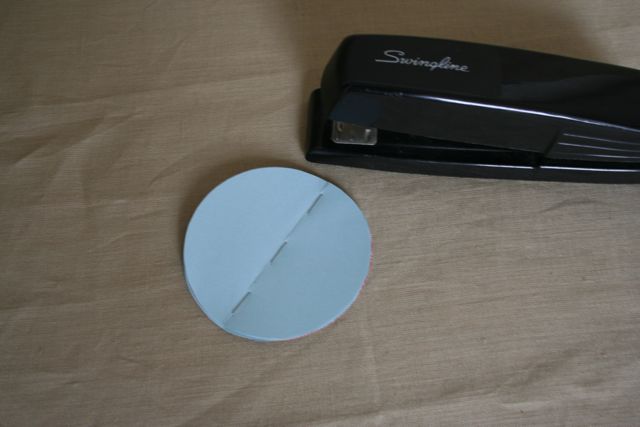
Then we slightly open our circles, like a little book. Now we glue the circles together with a drop of glue, alternating: first from below, then from above. After gluing, we straighten our ball. It remains to attach a thread or ribbon to hang the decoration. 
By the same principle, you can make multi-colored balls much easier and assemble from them paper garland, strung on a thread or lace. 
To make such a ball, we fold the cut out circles in half, and then glue them together, applying the halves to each other. Connecting the balls into a garland, we stretch the thread through the center of each of them.
For a garland, it is not necessary to make balls. You can make toys of different shapes and combine them in one garland.
Such a garland will great decoration for the children's room. Yes, and you can do it with your child, because everything is so simple.
Look for more interesting options for creating paper balls.
Weaving volumetric jewelry from paper
And finally, one of the most complex paper toys among all presented here. But it is much more wonderful than complicated. So, we turn on and develop spatial imagination- we will make woven paper balloon.
Get ready for hard work. In addition to colored paper in two colors, you will need 10 paper clips, a glue stick and tweezers. Better to colored paper was bilateral.
Here is a template that resembles the sun. It’s not worth drawing this one yourself, the bend and thickness of the rays are very important here. Take advantage of this; it may need to be enlarged a bit before printing. After printing out the template with the sun, cut it out and transfer it to colored paper. You should have one sun of each color. 
Additional details that are in the template are parts of the future basket for our balloon.
Lay the sun blanks one on top of the other so that their rays are directed in opposite directions. In the center, 2 suns can be fastened together with glue.
Now we begin directly weaving. We stretch the rays of one color between the rays of another. Then we turn our blanks over and do the same again.
Having reached a certain place, you will need to start shaping the ball. Here we will use paper clips to secure the weave. We now use paper clips until the very end of working with the ball, until we fix the rays in weaving with glue. 
When the ball is ready, you will need to make a basket for it. We take a pre-cut blank, which consists of a circle and a strip. This is the base and walls of the basket. We connect the ends of the strip and get these same walls, then glue the bottom to the walls.
A part that looks like part of a spoked wheel will serve to connect the ball and basket. Connect the ends of the circle of this part with glue. Then glue the so-called knitting needles with their tips to the inside of the walls of the basket, and glue the rim to the base of the ball.
To make it easier for you to understand the principle of working with weaving, you can carefully watch the video of the entire process.
That's all - a magnificent balloon is ready! This DIY paper decoration can decorate a child's room, children's holiday or just become a decor for the mood in your home. You can make several of these balls of different colors and sizes and hang them from the ceiling individually or on a special frame with crossbars, like a pendant. 
If you find an error, please highlight a piece of text and click Ctrl+Enter.
Helpful Hints
To decorate your home, office or another room, it is not necessary to purchase a lot of decorations.
Try to usesome helpful tipshow to make certain decorations and you will have an unforgettable holiday.
It will be much more pleasant to use your imagination and help friends/children/relatives, to create beautiful jewelryfor any interior.
On our website you will also find:
- DIY New Year's gifts
- How to make a Christmas tree with your own hands
- DIY New Year's cards
- DIY Christmas decoration
- DIY Christmas compositions
decorations for the new year,handmadeIt's not that hard to make, you just need a few materials and some imagination.
Christmas decorations for the house. Felt ornament.

You will need:
Felt (preferably 3mm thick)
Ruler
Stationery knife
Scissors
simple pencil
Glue, needle and thread or stapler
1. From a piece of felt, cut a square with scissors, measuring 15x15 cm.

2. With a simple pencil, mark several lines parallel to the sides of the square, leaving about 2 cm between them - you should get 3 parallel lines. Also draw a diagonal dividing the square into 2 equal parts.

3. Place the square in front of you so that the diagonal line runs vertically. Using a ruler and a clerical knife, make cuts on the left and right along the marked parallel lines, not reaching the diagonal (central) line by about 6-7 mm.
* Take your time so as not to spoil the felt.

4. Start folding the ends of the formed squares in opposite directions, securing them with glue, a needle and thread or a stapler (see picture).

4.1 Fold the shortest ends first and fasten them.
4.2 Turn the figure over and secure the middle ends.

4.3 Turn the shape over again (backward) and bend and secure the large ends.

5. Once you have the shape shown in the image, cut off a piece of thread and thread it through the shape. You can add felt balls or small pom poms if you like.

* You can make several of these shapes and thread a thread through them to make a long Christmas decoration that can be hung in any room.
* Try experimenting with different sizes of squares, as well as different numbers of cuts.
Christmas tree decoration. Balls of wire and beads.

You will need:
small inflatable balls
flower wire
beads
Wire cutters (for wire)
1. Inflate a small balloon, leaving a small tail.
2. Put some beads on the wire.
3. Start winding the beaded wire around the balloon, adjusting the beads as needed to make sure they lie flat and look nice. Passing through the tail of the ball, twist the wire and continue on.

* Do not wrap the balloon too tightly so that it does not burst.
4. When wrapped around the ball, do not immediately cut the wire, leave the tail from 80 to 100 cm without beads and start wrapping again to secure the structure.

5. At the end, you need to make a hook out of the wire (see picture).

6. Now you can burst the balloon and pull it out.
The decoration is ready and you can hang it on the Christmas tree or anywhere in the room.


Christmas tree decorations. Button garland.


In this example, I used pale colored buttons, but you can choose bright colors to make the garland look prettier wherever you hang it.
You can use old unwanted buttons or buy buttons in the size, color and shape you need from the store.
You will need:
Buttons
Thread or braid
Everything is pretty simple. Take a look at the pictures - you need to thread the thread through the holes in each button.


You can add a few other details if you like: pompoms, paper flowers and/or snowflakes, etc.
* For this craft, you will need a lot of buttons (about a hundred or more, depending on the length of the desired garland).
* Feel free to involve children in the work, they will love making this simple but original decoration.


Christmas paper decorations. Chain garland.

Similar Christmas garland you can make with your kids and decorate your home or office with it. It looks not only beautiful, but also very fashionable.
You will need:
Golden scrap paper, size 30x30 cm (enough for a garland about 1 meter long)
Light green acrylic paint
Small container for paint
paint brush
Pencil or pen
Ruler
Masking tape (width 2.5-3 cm)
Stationery knife
Glue gun or PVA glue and glue stick
1. Completely cover the non-golden part of the scrap paper with light green acrylic paint.
2. At opposite ends of the paper, make marks of 2.5-3 cm. Using a ruler and pencil, draw parallel lines connecting the marks.
3. Prepare a clerical knife, make cuts, but do not cut off the strips completely - leave enough space so that you can easily tear off later.


4. Turn the sheet over and bend the cuts a little to make them more visible.
5. Glue masking tape to the shiny side of the paper. The pieces of tape should be placed directly over the cuts (see picture).


6. Paint the part of the paper not covered with tape with light green paint and leave to dry.
7. Remove the tape carefully.
8. Gently tear off the paper where you left some space (see point 3). Start making chain links. First, make one ring by connecting the ends of one strip, and then thread the strips through the finished ring and glue the ends.

You should have a nice chain.
How to make Christmas decorations. Snowflake garland.

You will need:
A4 paper
Snowflake pattern template
Pencil
Scissors or utility knife
Glue stick
Twine (thick thread)
Buttons, optional.
1. First you need to fold the paper in a certain way. Here are photo and video instructions on how to do it:
2. Pay attention to the snowflake drawing template, do the same on the piece of paper you folded.

3. Cut out the template with scissors or a utility knife.

4. Unfold the paper. You should end up with a pattern like this:

5. Connect the ends: 1+5, 2+6, 3+7, 4+8.
6. Now you can start stringing blanks on a thread, and attach buttons to the ends of the garland so that the paper patterns do not fall.
DIY Christmas decorations photo. A garland of stars.

You will need:
Paper (plain or color, heavy or printable)
Shaped hole punch (in this case, the hole punch makes the shape of a star)
* Instead of a hole punch, you can use a star template, a pencil and scissors.
* It is not necessary to make asterisks. You can choose any shape you like.


Christmas decoration toys. Pigeons on a tree.


You will need:
White felt
Pencil or pen
pins
pearl beads
Glue (PVA, moment, glue gun)
Silver tulle
White decorative (or real) feathers
silver thread
1. First you need to draw a template for a dove on paper. With the help of Yandex or Google, you can find a simple picture and draw it. Or you can use your imagination.
It is worth noting that the dove has 3 parts - the body, wings and the lower part.


2. Cut out the dove template you have drawn and lay it on the felt, pinning it in place. You need to make two halves of the body, two wings and one bottom. You also need two tulle wings.


3. After you have prepared all the details, start sewing the two halves of the dove's body. Fill the torso with cotton wool or leftover felt.
4. Add wings. Place tulle on top of the felt, if desired. Sew the wings to the body.
5. For the eyes, use pearl beads by gluing them.
6. Prepare a decorative feather and cut a piece of the length you need from it. Insert the feather into the dove. You can fix the pen with glue.


Homemade, handmade Christmas decorations create a very special atmosphere. This is the feeling of a holiday for which they were preparing, which they were waiting for, and for which there is no pity for time.
Making Christmas toys and accessories with your own hands can be a good idea. family tradition. After all, this is a long process when you can get together in the evenings or weekends - and create together. Funny jokes, cozy conversations and, most importantly, without which a real family is not possible - a joint business. Participate in the creation of New Year's toys for the Christmas tree in 2019 from the most different materials everyone can do it - both adults and children, even the smallest ones. You just need to choose the right options and ideas.
And when the holiday is over, put your handmade creations in boxes. Then, until the next New Year, you can sometimes look into them and remember how fun it was to do all this.
Perhaps the most simple toys- Christmas decorations made of paper. You only need scissors, a little glue and a maximum of imagination to make, for example, a beautiful garland. 


A chain of snowflakes, decorated with large decorative beads, can become a decoration in 2019 not only for the Christmas tree, but also for the children's room. Having folded a sheet of paper several times, the shape of a snowflake is cut out in it. Then they unfold. Many of these parts are fastened with glue. The length of the garland can be any.
A colored paper ring will look spectacular on a large Christmas tree if it is itself large. Everything happens according to the following scheme:
- A ring is cut out of a sheet of colored cardboard.
- Then a strip of colored paper is taken, folded like an accordion and glued inside the ring.
- Squares are cut out of colored sheets and placed along the folds of the accordion.
Old toys - in business
In families where children have already grown up, a lot of old toys - soft, plastic, wooden - often accumulate. Why would they gather dust in the closet when they can come up with new ideas and make original jewelry for the tree? 
Toys can be darned a little, tinted, decorated with beads or rhinestones. Then attach ribbons to them - and hang them on the Christmas tree.
Paper Santa Claus
Santa Claus can be different. Paper ones too! Any ideas are welcome in 2019.
Here is one of them:
- The basis for this toy is a paper plate. It needs to be covered with white acrylic paint. Wait until completely dry.
- Then make Grandfather's nose by crumpling a piece of paper and pasting over the ball with white stripes. Eyebrows and cheeks are also formed. Everything is glued to the plate and painted white.
- Then the "face" is covered with a flesh tint. Cheeks and nose are a little red. You can add clarity to the features using a felt-tip pen.
- The mouth and eyes are allowed both to draw and stick in the form of an application.
- A hat for Santa is made of red paper. A triangle is cut out, and a cotton ball is glued to its top. A beard is also made from it - it is better to take a wide strip. And from thinner ones - stick on eyebrows and mustaches.

Ideas "grandfather" can be different!
For example, you can make it in the shape of a cylinder. A large or not very sheet of colored cardboard is bent so that a pipe is obtained. The cap is formed in red. And along its lower edge a white strip is attached. The eyes are cut out of paper, the beard can be made of cotton wool. The nose is made of a foam ball. If you attach legs to the “grandfather”, he will settle very well by the Christmas tree in 2019. 
Such Santa Claus will turn out great from felt or other suitable materials.
Quite simply
There are very simple options for the 2019 Christmas tree. So, a garland of corrugated colored paper is made in just a few minutes. The main thing is to know the technology.
We simply cut the material into narrow strips, and then twist it, forming separate segments. And so on ad infinitum. We glue the parts. This is a very delicate decoration. 
Other ideas - cut corrugated paper into wide bands. Make a fringe along both their edges. And then just twist a little. 

A little more difficult is a garland of colored circles. You can buy such large confetti in the store. They are folded in half around the thread or fishing line and glued together. 
In the course is everything that is at hand! Colored napkins transform before our eyes and turn into bright bouquets. 
To do this, fold each napkin several times, and then give any shape to the “petals”. Fasten in the middle with a stapler and straighten. You can connect two napkins of different colors. When a lot of blanks accumulate, they are strung on a thread - a garland is obtained.
In addition to the garland, many different things can be made from napkins. New Year's crafts, for example, a Christmas tree. It is very simple in execution and anyone can cope with such a Christmas tree.
Garlands for every taste
Garlands can be made from anything. For example, from triangles of fabric. Or from squares of felt. Or from old small soft toys.
And even from popcorn mixed with beads! You can tie together a lot of sweets in a beautiful wrapper with bright ribbons. 
The remnants of wallpaper, preserved after repair, are suitable as a material. They can be cut into strips, which are then glued into rings, inserting one into the other. 
Knitted ornaments
Crochet or knitting enthusiasts can use their skills to create Christmas tree decorations in a big way. Various knitted things are in fashion in 2019. The ideas are simply amazing.
Knitted snowflakes from the remnants of yarn can be assembled into a garland and hung, for example, on a window. 
They knit different animals for the Christmas tree, including the symbol of 2019 - the Pig. are good knitted grandfathers Frosts and Snow Maidens. And you can tie the Christmas tree itself.
Balls and balls
What Christmas tree in 2019 without balloons? These Christmas decorations you can do it yourself from paper, felt from wool, make from other materials. The main thing is to find good ideas.
Old factory balls become an excellent basis for such products, it is better if they are made of plastic or foam. Then they won't break.
For decor, it is proposed to take beads - you can find plastic or glass beads in your grandmother's jewelry box, you can take beads. Today, many decorative beads are sold. This chain is wrapped around the ball in the form of a spiral. Each coil is glued.
An interesting solution in 2019 is to take 3 strands of beads of different colors and sizes. And alternate them in the design of the ball. When the entire surface is covered with beads, the tip of the thread is hidden and fixed with glue. The loop for hanging the toy is fixed to the cord.
A ball for a Christmas tree can be made from thick paper or cardboard. If it has a drawing on it, fine. The toy will look more spectacular if the material of two contrasting colors is used. 
To create these Christmas decorations:
- Twenty circles are cut out: equally of both colors.
- Then each is bent in the middle, unfolded and bent at a right angle.
- Again they unbend and make "wings" - only three.
- Ten circles are glued together alternately - the side of the ball is obtained.
- Then they make its “tops”, connecting five circles each.
- Everything is assembled into a common structure.


winter flowers
A styrofoam ball in 2019 can turn into a luxurious, exquisite decoration in the French style. It will take only a pack of pins with decorative heads in the form of beads. And colored paper, from which flowers with four petals are cut. Such blanks can also be found in art stores.
Putting together two parts, they are pierced in the middle with a pin and attached to the ball. Unusual Christmas decorations are obtained. 
Instead of flowers, you can use sequins or other ideas.
Threads, PVA glue and balloon needed for making openwork toys for the Christmas tree or decorating the room. 
The technology is simple. First, the balloon is inflated. Then the glue is diluted in water. A thread is wetted in it, which is wrapped around the warp. You can make a toy of the same color or different shades.
The number of turns depends only on your desire. For drying, the product can be hung on something. And when everything dries well, pierce the rubber ball and remove it. Such a cobweb looks interesting and elegant. It can be decorated with beads, bows or something else. Christmas decorations in such light style will please many. 
Bump after bump
Christmas decorations from cones are made quite simply, but they always look spectacular. For example, a ring:
- The basis for it can be ordinary clothes hangers made of thick wire. They form a circle. You don't have to touch the hook.
- Having untwisted the connection of the ends of the wire, cones are strung on one of them. They can be used in in kind or painted, for example, with gold or red paint.
- Before or after stringing, a small plastic ring is attached to each cone with glue.
- Having finished picking up the wreath, the wire is connected again and twisted.
- A large satin bow is tied to the base of the hook.
- An additional charm is given to the wreath by sprinkling it with sparkles or decorating it with beads, ribbons, bows or artificial snow.


Such a decoration, made in the main shades of the decoration of the Christmas tree, will look especially stylish.
improvised material
Fans of everything unusual will love the holiday decor ideas in 2019 from completely unexpected things.
So, a snowflake for a Christmas tree can be created from ordinary wooden clothespins:
- You will need a few clothespins and glue. To begin with, each is divided into 2 parts. The spring is removed and set aside.
- The halves are pressed with flat sides of 2 pieces and connected with glue. Then a snowflake is assembled from such parts.
- You can finish this or paint the product with silver paint, sprinkle with sparkles or beads, after lubricating the clothespins with glue.

Old notes also become a source of inspiration when creating New Year's decor:
- First, a square is cut out of the sheet. Then it is folded in the form of an accordion, which is tied with a thread in the middle. The ends are left free to make a hanging loop out of them.
- Straighten the accordion so that a circle is obtained and glue its edges.
- You can decorate the toy with a circle of cardboard of the same shade as the paper. Sequins and rhinestones are also a suitable decoration.


Old photos and postcards turn into bright original balloons in the blink of an eye:
- Each sheet is cut into strips with a width, for example, about one and a half centimeters. Then they pick up a needle with a thread threaded into it and sew the strips from one end, then from the other.
- You can use a button with a long awl instead of a needle. Having pierced the strips with it, the tip is bent.
- A loop or ribbon bow is glued to the upper edge of the ball. Several of these toys create an interesting elegant garland. You can put light bulbs inside the balls.


If spending on New Year's paraphernalia is not included in your plans, then do-it-yourself New Year's paper toys will be your way out.
In addition, such original gift on the tree will be remembered for a long time.
The sacramental meaning of the New Year and Christmas is in the rapprochement of family members. And what brings people together better than joint creative work?! Making New Year's toys with your own hands in the company of household members is an exciting activity in itself, not to mention its results - original New Year's decorations that can be hung on a Christmas tree.


If you make toys with your own hands from glass, porcelain, beads, then it will take a lot of time and require certain skills. Against this background, paper toys are a simple option that you can make with your child and put on the Christmas tree. Let's bring step by step diagrams and video master classes - 2018 making such crafts with your own hands.

Christmas paper balls
To make this Christmas tree decoration with your own hands, you will need a minimum of materials. The main thing here is patience and sleight of hand. Do not be discouraged if you do not immediately get a toy, as in the photo - such decorations require some skill, which will come with time. Therefore, immediately tune in that the first toys will not turn out to be the most accurate. But the result will exceed all expectations and justify your efforts!

Paper Christmas balls: making stencils
So, in order to make this christmas ball on the Christmas tree, you must perform the following sequence of actions:
- Print the stencil on the printer. We suggest using the following drawings:


- Then take thick sheets of colored paper and circle the stencil with a pencil.
Advice! If the printer allows, stencils can be printed immediately on colored paper. This will save time and effort.
- Carefully cut out the details of the future toy.
- Arrange the resulting blanks in the shape of a flower. Fasten the center with a circle cut out of colored paper, firmly gluing it, as shown in the photo.

Christmas balls made of paper: the main work
To carry out further work will require sleight of hand.
- The most responsible and interesting step is weaving. To do this, successively weave one strip into another, as shown in the photo.

Advice! Use paper of different colors to make the toy more interesting and colorful. And so that the toy does not fall apart when weaving, use clothespins.

- When you are almost done weaving, then glue the ends of the paper ribbons.
- In the part of the ball where you glued the circle (see step one), make a small cut in the form of a line. Paste in it beautiful ribbon and glue it on. It is better to singe it beforehand so that it retains its original appearance.

The original New Year paper toys of the new 2018 are ready! Using different stencils and colors, you can create a variety of balls. Another interesting version of the 2018 ball with your own hands can be seen in the video:
Interesting New Year's paper toys for the celebration of 2018 can also be made in the form of lanterns. This option christmas decoration came to us from our grandmothers and was popular in those days when toys were hard to find on sale. The flashlight is even easier to make than the previous toy. Even a child can be involved in the process of its creation. An interesting option crafts in the form of a flashlight can be seen in this video:
magic lamps

Lamps for the new 2018 can be made from improvised materials. To do this, you only need scissors, glue and colored paper or cardboard packaging:
- Take two sheets: one is yellow, the second is a contrasting one, for example, purple. Cut out two rectangles. Yellow - 100x180 in size, purple - 120x180 (with millimeters).
- Take the yellow rectangle and glue its edges into a tube shape. Next, set it aside and proceed to the purple part. You should fold the sheet in half and make cuts with scissors, leaving room at the edges. We also glue it in the form of a tube, like a yellow sheet of paper or cardboard. The photo shows how to make a red flashlight. The sequence of actions is similar.
- If you cut everything carefully, then the yellow tube should go into the purple one. At the same time, it must not be pushed through to the end. Its edge must be smeared with glue, and only then insert the resulting yellow flashlight into the purple tube completely. The same must be done on the other side. Slightly pull up the purple part to release the yellow. Coat it with glue. This will fix the yellow leaf in purple.
- To make the flashlight more realistic, you should make a handle. To do this, cut a narrow strip of purple paper or cardboard and glue it to the flashlight.
- Your magic flashlight is ready. This is one of the most simple crafts even a child can handle it.

How to make a flashlight with your own hands for the celebration of 2018, you can see in this video:
Asterisk 3D made of paper
Another popular Christmas tree toy for 2018 is the star. Rare tree does without it. This toy is both spectacular and easy to make. To do this, you will need the same materials as in the manufacture of the previous decoration. It remains to add only a thread. Read the master class or watch the video.

- From colored paper, you need to cut out two squares measuring 10x10. You can use your imagination to the fullest: your stars do not have to be yellow. Use purple, red, blue, pink colors! And your Christmas tree will sparkle with different colors.
- On a sheet of colored paper, fold in half twice, and then two folds diagonally.
- Make small cuts on the edges of the paper and fold into the corners (as shown in the photo).

- Glue the corners in the center, leaving the rest of them free (this will give the future star volume). You should get some kind of rays.
Advice! Hold the corners while gluing with your finger. That way they stick better.
- Repeat the above procedure with the second sheet of colored paper.
- We glue the two halves of the star into one. Do not forget to put the edge of the ribbon between them, for which you will hang the star on the Christmas tree.
- Give the star time to dry. This will take approximately 20 minutes.


How to make a star with your own hands, you can see in this video.