Kanzashi May 9 do it yourself. Beautiful do-it-yourself brooches in kanzashi technique. Salt dough crafts
By Day Great Victory On May 9, there are many options to express your respect and gratitude to the Heroes of the Second World War, your pride in the Motherland, and patriotism. We bring to your attention various techniques for making fakes, which will be a wonderful gift or decoration for May 9th.
On a postcard, a poster in the form of an application, you can depict festive and military attributes (). Can be used for decoration colored paper, sequins (sequins), threads. For the background of the application, a printout or a newspaper clipping with an article about the surrender of Nazi Germany, about the victory of the USSR, military poems or songs with notes may be suitable. Origami crafts always impress with their visual complexity, but in reality everything is simpler than it seems. By May 9, any work can be decorated with stars, as well as whole modules of paper triangles.triangular module
To create an element, fold the sheet in half lengthwise, then in half widthwise. Turn the workpiece over, bend the corners so that you get a triangle (see picture), bend it in half. The element has 2 corners and 2 “pockets”, thanks to which these modules can be assembled into a complex structure. To do this, insert the corners of one part into the “pockets” of the other. For the strength of the fake, the joints are fixed with glue.
Asterisk element
Cut the paper into 1x26 cm strips. Take one strip, loop one end, tighten slightly. Next, with a long “tail”, wrap the workpiece several times so that you get a regular pentagon. Hide the tip under the strip. Now you need to press on each side of the pentagon so as to form the star itself. Of the many such stars, you can lay out any picture with a mosaic, they will greatly decorate the festive fake.


The basis of the isothreading technique is the ability to perform circular and angular filling. Numerous schemes for isothread are presented on the net.


Salt dough crafts
Cross-stitch, satin stitch, beads, and, in principle, in any way, is a great way to congratulate everyone on the Great Victory. Decorations from ribbons using the kanzashi technique () using the St. George ribbon are more relevant than ever on May 9th.
Surely, everyone knows the kanzashi technique. In this technique, you can create a huge number of products that will have a very beautiful appearance. It is worth noting that crafts by May 9 from kanzashi look especially attractive. In our article you can find those ideas that will appeal to schoolchildren.
Kanzashi crafts
Beautiful brooches that are not difficult to make.
Even schoolchildren can make a beautiful brooch that can be fastened to the Victory Parade. In this case, the following materials will be required:
- Segments of the St. George ribbon. One should be larger and the other shorter.
- Black satin ribbon.
- Thread with a needle.
- Scissors and glue.
- Lighter and pin.
- Decor elements.
Progress:
- A piece of St. George's ribbon measuring 30 cm is folded in the shape of the number 8.
- With another smaller piece, wrap the "eight" in the center. Fix it with glue on the walls or from the inside.
- From the black ribbon, lay out the base of the bank. In this case, join the tips in the center from the bottom. Connect them with a cross.
- Now assemble the item. On top of the black cross, fasten the element from the St. George ribbon that you have turned out.
- Then in the center you need to add decor elements.

Brooch for Victory Day using kanzashi technique.
If you decorate a Victory Day themed brooch with a flower that was made using the kanzashi technique, then it will also look quite beautiful. To make crafts you will need:
- George Ribbon,
- Satin ribbons in orange and black
- Glue and decorative elements,
- Scissors, tweezers, and a lighter.
On a note! The process of creating the next brooch is more labor intensive. Therefore, you are advised to be patient.
Progress:
- An orange and black ribbon must be cut into squares that will have sides of 5 cm. 7 squares are cut out of the black ribbon, and 14 from the orange one. The cuts of the squares must be treated with a flame. As a result, you will prevent shedding.
- Now it's time to start making petals. In work it is recommended to use tweezers. So it will be more convenient.
- Fold the square orange color two diagonally. The result is a triangle. Fold it in half again.
- Take the opposite corner with your fingers, and cut off the edge that you held on to with tweezers. The cut is treated with a flame.
- Secure the petal with tweezers. Bend the ribbons at the same time in a parallel way. Fire the cut.
- The black square folds in exactly the same way as the orange one. It is worth attaching to the orange square. The result should look like this: There should be a black blank inside the orange blank. There should be a small leaflet in the black blank.
- Sharp corners that were formed behind the tweezers need to be cut off. The edges are treated with fire.
- Form a loop from the St. George ribbon, which will be the basis. Place the resulting flower on it. Then you can attach the clasp.
On a note! The number of petals on the brooch may be different.

How to decorate a St. George ribbon brooch with the colors of the Russian flag.
In this article, we list crafts for May 9 from kanzashi ribbons. To make the following craft, use the following materials:
- george ribbon,
- Satin ribbons in the colors of the Russian flag,
- Beads or rhinestones
- Scissors, pin, glue,
- Lighter or matches.
Progress:
- Take the ribbons in the color of our flag. Cut them into squares. The sides of these squares should be 5 cm long. You should prepare: 2 blue and 2 red squares. Cut 3 pieces from the white ribbon.
- Fold each of the squares diagonally like the brooch we made earlier. Then fold again to get a drop. Cut off the corner, and treat the cut with a flame. These manipulations should be carried out with the rest of the petals.
- Now start assembling. First, use white petals, connect a couple of elements to each other at an angle. Fasten the ends with glue. Place the third leaf between them. The result is a septenary construction. The center lobe should protrude upwards over the side lobes.
- After that, the petals of red and blue are glued in pairs.
- Now take the St. George ribbon. Cut off a piece from it, which will be equal to 20 centimeters. Form a loop. The connection point must be secured with glue. Lubricate gently the wrong side of the tricolor, which turned out to be glue. Press this element against the front side of the tape blank. The corners of the loop from the tape should be cut off, and also fixed with fire.
- Decorate the junction with rhinestones or beads. They must be attached with glue.

Finally
Basically, crafts for Victory Day from kanzashi look like beautiful brooches. Of course, these are not all ideas. And on the Internet you can find other master classes. But in this article, we have proposed only the simplest ideas that are quite pleasant to bring to life with your own hands.
Hello, dear readers! With all my heart, dear women, Happy Holidays! Peace, kindness, love and prosperity to your family! How are you feeling? Spring? Yes, I have, the sun is shining brighter, the days are warm, even if the weather has always been like this and has not deteriorated. The soul is waiting for something, some kind of renewal, something that cannot be expressed in words, first of all, it is probably waiting for purification, and now is the time for it, the time of Great Lent. And I continue the needlework theme, I go far ahead, but time is so fleeting that we don’t have time to look back and May is already knocking at the door. And this means you need to prepare a kanzashi brooch by May 9, moreover, I have prepared for you detailed wizard class with photos and videos, there will be several brooches so that you have a choice.
I don’t know how things are in other cities, but we always have a holiday on May 9 in the city, congratulations to veterans, who, unfortunately, are already so few, concerts for children and adults, competitions, exhibitions, fairs, they sell a lot of products from tapes, including kanzashi by May 9, the choice is very wide, people's imagination works at 200%). Of course, I make brooches for Victory Day on my own, and for all relatives who are going to be on a holiday in the city on this day and decorate their clothes. Last year I did it to my daughter, if you remember from a tricolor ribbon using St. George's. They looked very cool on the head of the dochuli, it’s a pity that you can wear them only once a year, now they are waiting for the next exit to the street).
I was going to make a master class for you on kanzashi brooches by May 9 last year, but something didn’t work out, it didn’t work out in time, because it’s always lacking in spring, I want to walk more on the street with children and enjoy the spring sun, what master classes and articles are already here), so you need to somehow set yourself up that the blog is also a child and he needs time to devote, at least a little bit, even though spring is in the yard, so that he grows and matures, he needs food in the form of my master classes.
I will offer you several options for kanzashi brooches to choose from. All of them are very easy to do, I specially selected simple and quick options so that even a beginner can handle it. The first brooch is a tricolor spikelet.
Kanzashi brooch for May 9 "Spikelet tricolor"
For this brooch we need:
- Satin ribbon white, blue, red 5 cm wide
- St. George ribbon (satin or any other) 2.5 cm wide
- Plastic star, 2 white semi-beads for decorating the brooch
- glue gun
- Scissors
- Candle
- Tweezers
First you need to cut the tape into squares 5 by 5 cm, for one spikelet we need six white squares, 4 blue and 4 red. Since we will be making a double sharp petal, we will use two squares for one petal. If necessary, if the ribbon is very loose, you can singe the edges of the squares on the candle. After that, we add a simple sharp kanzashi petal, from such petals we get wonderful ones.

Let me briefly remind you of the sequence of folding such a petal: we fold the square into a triangle, again into a triangle, hold the resulting triangle between the fingers of the left hand for the time being, fold the exact same triangle from another square, put one triangle on the other, as shown in the photo and connect the lower corners . We cut off a little at the junction, clamp it with tweezers and solder it on a candle. The lower edge of the petal is also cut off a few millimeters and singed on a candle. Double sharp petal is ready. So we need to make three white double petals, two blue and two red.

Now we heat up the glue gun and first glue the white petals in this order, first two between each other, then glue the third one between the two so that it is slightly above them. Next, we glue two blue ones and attach them to the white ones and two red ones, which we then glue to the blue ones, we get such a spikelet of the Russian tricolor.
Now let's decorate our kanzashi brooch by May 9 with half beads and an asterisk, here, of course, there are no clear recommendations on how and with what to decorate, the options are endless, you can fantasize a lot, this is the simplest decoration option, I liked it for its simplicity and rigor. Glue half beads and an asterisk also with hot glue.

At the last stage, you need to make the basis of the brooch from the St. George ribbon, my ribbon is not satin, but from some material, unfortunately, I don’t know what, but it doesn’t matter, it can be from any material, as long as St. George. We need 20-25 cm of it. We fold the ends of the ribbon in half and cut it obliquely to get pointed beautiful tips. Then we fold the tape as shown in the photo, putting a little on top of each other, I glued the tapes together with a drop of hot glue. On the right side we glue our tricolor spikelet, and on the reverse side I attached a small pin, you can buy a special round base for a brooch, they are sold in needlework stores.

The next brooch, the master class of which I want to show you, will be with tulips.
Kanzashi brooch for May 9 with tulips
For a brooch with tulips we need:
- Red and white satin ribbon 5 cm wide
- Satin ribbon Green colour 2.5 cm wide (I also have a silver trim)
- green floral wire
- White ribbon 0.6 mm wide with silver trim - 15 cm
- White half bead
- Scissors
- glue gun
- Small pin (or special brooch base)
- soldering iron
- Glass or wooden board
- metal ruler
- White thread, needle
- Candle
- Tweezers

We will make tulips for brooches using the same technology that we made flower petals when decorating. Only the color of the ribbon will differ, and the manufacturing sequence is no different. I didn’t even shoot the video again, because this petal was already shown to me and I will post the last video. Cut the ribbon into 5cm x 5cm squares.

I decided to make two red tulips and one white, you could make everything red or white, it's up to you. For one tulip, we need two squares of ribbon 5 by 5 cm.
Here you can see detailed video an inverted kanzashi petal, from which we will make tulips for a brooch.
We fold the usual sharp petal, only then we turn it out, you can see the sequence in the photo and video lesson. To get a whole tulip, you need to glue two inverted petals together.

To make leaves for tulips, we will use a green ribbon 2.5 cm wide, I had a ribbon with a silver border at home, I will use it. For one leaf, we need a piece of tape 10 cm long, fold it in half so that front side was inside. For more clarity, watch the video tutorial on how to make such a green leaf, just keep in mind that the video tape is wider, and in this case we need a tape 2.5 cm wide, from the video you can just see the manufacturing technology.
We heat up the soldering iron, put the folded tape on the glass board, apply a metal ruler diagonally from above and draw a line of soldering irons, we get such a green leaf. We need three of these leaves. When they are all ready, glue a tulip bud inside each leaf. After that, you need to glue the green leaves together, thus forming a bouquet of three tulips.

Now you need to make stems of tulips from floristic wire, I cut off three stems of 4 cm each, twisted them together and pasted them on the back of our bouquet of tulips from ribbons. By the way, if you missed my huge detailed article with step-by-step photos and videos on how to do it, then I recommend that you definitely watch it.

To decorate the bouquet, I decided to make a small bow from a 0.6 mm white ribbon with a silver edging. We need a segment of 15 cm, we fold it with a bow, as shown in the photo, I decided to sew this one in the middle with threads, and on top, in the place where I stitched it in the middle, I glued a white half-bead with hot glue. Then I glued this bow to a bouquet of tulips. So he looks prettier.
We make the basis for the kanzashi brooch with tulips in exactly the same way as I showed you above, using a St. George ribbon with a length of 20-25 cm. It remains only to glue the resulting bouquet to a correctly folded St. George ribbon. On the reverse side of the brooch we attach a pin or a special fastener for a brooch.

Kanzashi brooch for May 9 with a carnation
For such a brooch we need:
- Red satin ribbon 5 cm or 4 cm wide
- Green satin ribbon 2.5 cm wide
- St. George ribbon 2.5 cm wide (20-25 cm)
- cotton swab
- Tape green color
- Scissors
- Candle
- Hot glue
How to make a satin ribbon carnation
I never thought that a satin ribbon carnation could be made so simply and easily. To do this, we need a red satin ribbon 5 cm wide. Cut six squares of ribbon 5 by 5 cm. If you want the carnation to be smaller, you can take a ribbon 4 cm wide. Carefully cut out circles from these squares, cutting corners, circles you need to try to make as large a diameter as possible. Now we need a candle.

We bring the edge of the circle to the lower flame of the candle and quickly with our fingers, until the tape has cooled down, we make a scar, in the video you will see this process in live action, if something is not clear from the photo. When all the circles have been processed in this way, we take one circle, bend it in half, and again in half, glue it with hot glue at the fold at the bottom.

It turned out a separate detail of the future carnation, we need 6 such details. When they are all ready, we glue them together, we get such a small and neat carnation. Now we will make carnation leaves, they are thin in a natural flower, we will try to make similar ones, we cut out thin long leaves 4-5 cm long from a green ribbon 2.5 cm wide, I cut it out by eye without templates, I think that each of you saw a carnation live and remembers what leaves it has. We process the cut leaves on a candle, make bends and scars, see the video for more details.

FROM cotton swab cut off the cotton heads and leave only a plastic stick. We wrap it with green teip tape and glue the leaves and the flower of the carnation itself to the stem with hot terminals. For decoration, I decided to make a small white bow on this carnation from a satin ribbon. Only I didn’t sew it, but simply glued it with hot glue and attached a red half-bead to the middle, just the same color as the carnation.

Glue the bow to the bottom of the carnation stem. It remains only to stick the carnation on the basis of St. George's ribbon and pin on the reverse side, or a special blank for a brooch with a clasp, which must first be glued with hot glue.

Here are some simple kanzashi brooches for Victory Day, I wanted to invite you to do it, it’s both beautiful and patriotic, and you can do it yourself, it will take you no more than an hour to make one brooch. You can watch a video tutorial on how to make a kanzashi brooch with a carnation.
Dear friends, what is happening on May 9 in your cities and villages, probably also a holiday and many exhibitions where you can buy such products from satin ribbons?

In our city, there are a lot of people who do this seriously, they make it to order, I'm just an amateur, I create slowly for my loved ones, there is no more time left. I could offer you a couple more ideas for kanzashi brooches by May 9, but in order not to bore you with this article, I will complete it, I hope that you will find mine useful step by step photos how to make a satin ribbon brooch for May 9th.
DIY crafts for May 9- part patriotic education preschoolers, they can be performed at home with parents, older sisters, and brothers, in kindergarten in a team with other children. As a rule, in kindergarten, pupils are offered the most simple ideas, for example, a three-dimensional star or several carnations tied with a ribbon. pupils of elementary grades also perform, a school exhibition is organized specially for the created works. At school, children already have enough skills to work with various materials so can make compositions.
Performing with young children DIY crafts for May 9, photo guided by a master class, you introduce the children to the history of the country, its tragic and heroic stories, explain to them the significance of this holiday, so that from early childhood they do not perceive Victory Day as entertainment and celebration, but put great meaning into this national holiday. In addition to children, craftswomen are also busy with creativity on the eve of the holiday, for example, they can make beautiful brooches using the St. George ribbon.
DIY crafts for May 9
Of course, the most popular option is to perform for the holiday, which you can give to your grandmother. If veterans live on your street, you and your children can congratulate them and bow low for their courage and self-sacrifice in the struggle for the Motherland.
Postcard picture can be made by children senior group kindergarten, we will use a mixed technique that involves working with different materials, as well as a different approach. In this case, we need thick cardboard for the base, for example, gray or light blue, as well as white and yellow colored paper, in addition, you can use red colored paper or red napkins. In progress crafts by May 9 do-it-yourself master will use scissors, a pencil and PVA glue. For a child, glue must be poured into a small container, for example, into an iron lid and provided with a brush to work with.
Our postcard will consist of two parts: a red star and snow-white flowers that resemble apple blossoms. For the red star, we will use paper lumps, and we will make the petals using the origami technique. Do not worry that origami is too difficult for a child, because in this case we only need to make a few folds to make a curved petal.
With your fingers, you need to cut off pieces of a red napkin and roll balls out of it. We recommend that you pre-roll a lot of balls and put them in a bowl, then stick them along the contour.
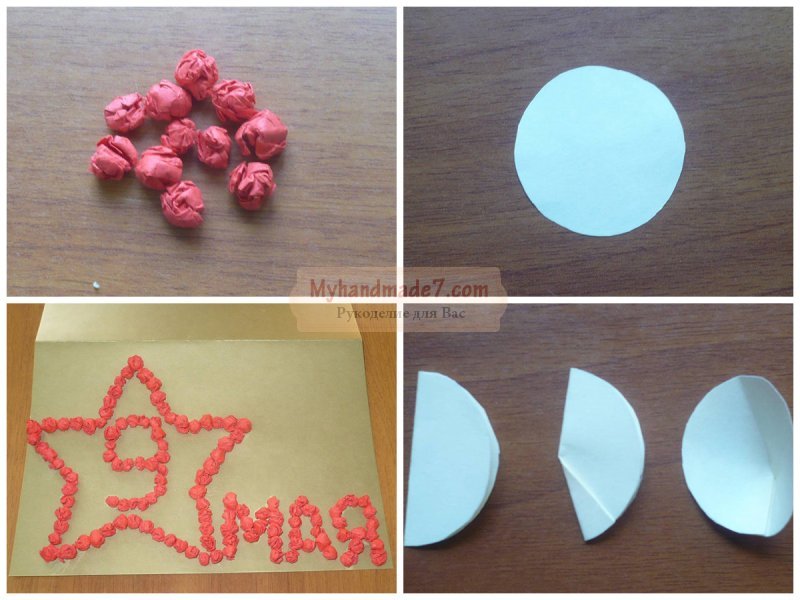
If the child will make a postcard, then the cardboard should be folded in half and decorate the front side. With a pencil, you need to draw the outline of a star, and inside it is the number "9", next to the word "May". On this contour it is necessary to stick red lumps, dipping them with the lower part in glue. While the glue dries, you can do the petals, for each you need to cut a circle 2.5 cm in diameter. Each flower will consist of five petals, and at least three of these flowers will be needed to decorate the postcard.
DIY postcard for May 9 can also be decorated with carnations, which are a symbol of the holiday. In this article, we will also tell you how to make a carnation flower using napkins, paper or corrugation.
For apple color, we need to fold one circle in half, and from the bottom we bend the corner inward and glue it, now when you open the petal, it will have a curved shape. The petals must be glued overlapping, and the core should be decorated with yellow balls.

Craft "Tank" by May 9 with your own hands
Ideas on how to make voluminous crafts by May 9 with your own hands that can become part of the composition. You can make a three-dimensional star and make Eternal flame, you can make an airplane by printing templates on a printer and then gluing them together, or using corrugated cardboard, you can get a real tank. When you and your children do similar crafts, you can tell them about military equipment. Especially such creativity will be interesting to boys who are always interested in military subjects.

To create a tank, we will use the quilling technique, but we will not create small elements, but only large ones using corrugated cardboard. A student of an elementary school can cope with a similar task, and work with corrugated cardboard- pure pleasure. To make the tank look realistic, we will choose dark green or gray cardboard. In the process of work, we need a pencil, ruler, scissors, glue. For quilling, a special tool may also come in handy, but if it is not at hand, then you can use a toothpick.

The cardboard must be cut into strips: you will need one strip 2 cm wide, and 10 strips 1 cm wide. All prepared strips must be twisted into a spiral, and the ends fixed with glue. As a result, we got wheels for our tank (rollers). One row of rollers on each side will consist of five such spiral wheels, which must be glued together and wrapped in black paper.

A large spiral will be used as a tower, and you also need to twist the tube, which will serve as a muzzle. To assemble the tank, you need to glue all the details on a cardboard square: first the tracks, on top - a tank turret with a muzzle. Then it remains to glue additional elements, and draw a star on the tower.
Now you are ready do-it-yourself tank craft by May 9, if you want it to become part of the composition, then you can make camouflage for it, put small trees and tin soldiers next to it. Preschoolers can try to mold from plasticine.

DIY crafts for May 9
The St. George's Ribbon is one of the main symbols of the Victory Day, so when creating it, children will definitely use it. In order not to have to glue the striped ribbon from separate strips of paper, you can go for a little trick and print the ribbon template on the printer, then cut it out and glue it. You can also find a ribbon bow template that can be used to decorate a postcard for a veteran.
The card can be decorated with red carnations, which are used to create corrugated paper. Ready-made flowers are glued to a cardboard base on one side, and the second remains lush, which allows you to create voluminous crafts. In addition to corrugations, napkins can also be used to create carnation buds.

Depending on the size of the flower, we need to cut circles of the required diameter from the corrugation, and then fold the circles so that as a result only a sector of a different eighth of the circle remains. You can see more details on how to fold a circle in the picture.
To do crafts by May 9 with your own hands, we need to get bulk flower, therefore, from the edge to the center, it is necessary to make many incisions, as we do "grass" for children's applications. Then the elements should be unfolded and the fluffy tips straightened. In the center of each circle, you need to drop a little glue, and then fold it in half.
From green colored paper, it is necessary to cut out the sepals and stalk with leaves. Form an application on cardboard: glue a red bud, stalk and sepal. From below, all flowers should be tied with a bow, which should be glued over the stems. In addition, the child can draw green stems with a felt-tip pen and write a congratulatory inscription.

Do-it-yourself voluminous crafts for May 9
For the smallest, you can offer to perform very simple do-it-yourself children's crafts for May 9. Pupils junior group kindergarten, it is difficult to work with scissors, so we have prepared for them original idea- a three-dimensional star, which should be decorated with paints.
For crafts, we need a template, which in duplicate must be printed on a printer. Each star will consist of two halves. Rays are separated on the star - they should be painted in orange and black, alternating them, as shown in the master class.

At the end, it is necessary to bend the blanks along the fold lines, this step can be started after the paint has dried. The two halves should be glued together with PVA glue.
If there is no template, and for an application or composition for the competition, you must complete sprocket, you can use another idea to create it. To do this, you need to use colored paper, on which with a pencil draw the outline of a six-pointed star. We will use one extra ray to make the asterisk voluminous. The resulting workpiece must be bent to determine the fold lines that separate the rays, then bend all the rays to the center to get clear fold lines.
Between the two beams, an incision should be made to the middle of the workpiece, put one beam on top of the other and glued. Now you have a star with a voluminous central part, and its rays should be glued onto a cardboard base when creating an application.

Do-it-yourself original crafts for May 9
If you are wondering which original crafts by May 9 with your own hands a real craftswoman can make, then you should, first of all, pay attention to the St. George ribbon, because with its help you can get a beautiful brooch using the kanzashi technique.
On the Victory Day parade, it is customary to attach a St. George ribbon to a pin on a jacket or blouse, but you can do beautiful flower as when working with satin ribbons. You can add the colors of the Russian flag to such a brooch, make it multi-layered. Your friends will be delighted if you present them with such a gift on the occasion of a national holiday.

Even those craftswomen who are not familiar with the kanzashi technique can do DIY crafts by May 9, video will tell you in detail how to properly form the petals. When working with ribbons, it is very important to process the edges with a lighter so that the threads do not crumble. To work, place a candle on the table, first cut the tape into squares, then process its edges with fire, holding the cut with tweezers so as not to burn yourself. The finished brooch can be glued onto a pin.
No one can argue that brooches have recently become an integral part of a person who follows fashion. I remember that our grandmothers always wore beautiful, shiny brooches for the holidays and it was believed that this sophisticated product emphasizes the taste of its owner. But like everything in the world, fashion changes a little, but the basics remain the same. So with the brooches there have been different changes. Modern craftswomen have developed this art so much that now everyone can choose an exquisite product for themselves or learn how to make such an ornament on their own. Here is one of the holidays where people massively put on a themed accessory is Victory Day. But why buy in a store and spend money if you can make brooches by May 9 with your own hands, while having a lot of fun?
Basically, these brooches are made with the symbols of this holiday. The most commonly used St. George ribbon or star. So in the master classes presented below, it will be possible to learn how to make a brooch, which should then be worn on Victory Day.

There is no limit to the imagination for creating such accessories. Some needlewomen also use beads in the manufacture of brooches, they are made from ribbons, badges, and artificial flowers. And the important thing is that every beginner is able to cope with such a task.
kanzashi style
This workshop will show you how to quickly and easily make a very interesting kanzashi-style St. George ribbon brooch. This product is suitable for both adults and children. The execution technique is not difficult, it is important to adhere to step by step description and then everything will work out even for those who first decided to make such an accessory.

What you need to make:
- an orange satin ribbon, the width of which will be 5 cm;
- the same width and black satin ribbon;
- glue, you can use a glue gun;
- scissors;
- candle;
- St. George ribbon;
- pin for our decoration;
- bead;
- a small patch of black felt;
- compass, measuring ruler, chalk.

We take an orange ribbon and cut into squares so that they are 5 cm in size, of which we should get 7 or 8 petals. We form a petal, for this we take one square and fold it diagonally. After, we should bend the corners of the triangle as shown in the photo below. With the help of a candle we fasten the corners, and we get a petal. Next, fold the side corners as indicated in the photo, carefully look. We fasten the corners with a candle, and now we have the first petal ready. In the same way we make the rest of the orange squares.
Now we make double petals, for this we cut 8 black squares and 6 orange ones. We fold each triangle and then put it on top of each other, as shown in the photo below.


Next, we need to solder the corners with a candle. We fold the resulting part in half and again connect it with a candle. The photo below shows how such a petal should look like. In the same way we form other petals.
Now you need to make sharp orange petals. To do this, cut 6 orange squares. Fold each square to make a triangle. Then we fold it again, and solder the corners. We connect the resulting corners and also fasten them with the help of fire. Get a corner. Then we fasten with the help of fire and get an angular petal.


Now, using a compass on the felt, make a circle, the diameter of which will be 3 cm. Then cut it out. We measure 25 cm on the St. George ribbon and cut it off. Now we fold it as you like, it can be in the form of a droplet or as indicated in this master class. When will we form desired shape, fasten the tape with glue.
Alternately glue double petals and pointed petals onto a circle of felt. When you get a flower, attach round petals on top of it with glue, as shown in the photo below. Glue a black round bead into the middle of our flower. And the next step is that we attach the flower to the tape using the same glue. And in order to keep our brooch, we fasten a clasp on the reverse side, which can be in the form of a pin. Our holiday brooch is ready.


