We sew a frog with our own hands. Do-it-yourself soft toy frog. Master class: felt frog
Soft toy Frog with your own hands. Patterns, photo
Master class on making a soft toy "Kwaka-Zadavaka"
Author: Kuzmina Elena Vitaustasovna, head of the “Soft Toy” circle of the MUK KDO (TsDT B. Gryzlovo), Serpukhov district, Moscow region.
The master class is intended for children from 12 years old, teachers, parents, as well as everyone who loves toys made by their own hands.
Appointment of the master class: gift, toy, decoration of a musical corner in a group or class.
Goals:
Raise interest in making toys with your own hands
Tasks:
Prepare a gift with your own hands
Prepare the design of a music corner in a group or class
We want to swim, we want to jump in the meadow,
We never lose heart anywhere
Funny, green, lupy,
We heard that the earth is round like a ball,
And we want to go everywhere
We know for sure that it is impossible to live otherwise,
On green land, in blue water.
Funny, green, lupy,
The whole world is like a warm reservoir for us,
You may think that we are croaking,
In fact, we sing the song.
And if suddenly trouble comes, then
With a smile we look in the face of trouble,
We know for sure that it is impossible to live otherwise,
On green land, in blue water.
Funny, green, lupy,
The whole world is like a warm reservoir for us,
You may think that we are croaking,
In fact, we sing the song.
The song of the frogs from the cartoon "Kwaka-Zadavaka"
Materials needed for work:
Velvet green
colored fabric
Sintepon
Red satin ribbon (width 0.5 cm)
Ribbon for decoration (width 3 cm)
Threads by color
Scissors
pins
Pencil
Eyes
Sewing machine

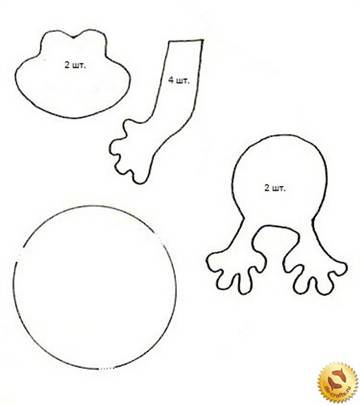
Patterns are printed on an A4 sheet.


We circle the details on the fabric, be sure to observe the direction of the thread. We cut it out, leave allowances for the seams 0.7 cm. We DO NOT CUT THE PIT line (between the legs)! Paired parts are cut out in a mirror image, we monitor the number of parts.

Fold the upper and lower parts of the muzzle face to face, grind them in an arc.

Turn inside out and stitch along the edge.

Here's what we should get.

Now take the red satin ribbon and fix it on the edge of the mouth on one side ...

... and on the other. Got a mouth.

We grind the legs back and front.

We cut the corners close to the line, try not to cut the thread.

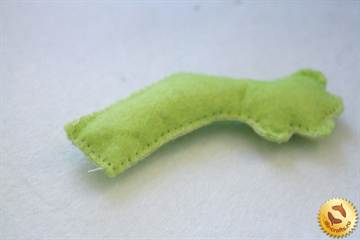
We turn the paws and stuff them loosely, starting with the fingers.

We sew the muzzle to the body.

We adjust the front paws on the body according to the markup.

We sew the back of the head to the body.

Fold the back and front halves of the toy face to face, chop them with pins and grind. For eversion, we will have unstitched edges at the bottom of the legs.

I remind you that the step line is not cut!

And now we cut it (the step line) to the very corner. Try not to cut the line.

We make incisions on the head.

We turn our Frog inside out and fill it with padding polyester.

We collect the bottom of the legs on a thread with a basting seam, ..

... pull together, leaving room for the foot, ..

... insert the foot, bend the allowances inward and sew with a blind seam.
Blind Stitch - Hide the knot from the wrong side at the beginning of work, then sew a small stitch "forward needle" on the side of the trouser leg, "cross the road" and do the same stitch on the side of the foot. Tighten the thread, the seam will become invisible (i.e. hidden).

Here are our paws.

Glue on the eyes.

For a bow, cut off 12 cm of a wide ribbon, fold it in half, grind it.

We turn it inside out, fold it so that the seam is in the middle and collect on a thread with a basting seam.

We tighten the thread, wrap it several times around the place of assembly and fix it. The bow is ready.

We decorate our Frog with a bow. Really, sweetie?

To decorate a musical corner, one frog is not enough. We need to make friends for him.
For example, like this. To do this, cut the body along the dotted line and cut out the top and bottom of any color separately (do not forget about the allowances at the cut). Then we sew using the master class.

And how do you like this Frog? ..

... or like this?

To dress these cute creatures, we cut out the pants according to the pattern.

For work we need:
Textile
Threads
Scissors
pins
Buttons
Pencil
Sewing machine

We circle the details on the fabric, be sure to observe the direction of the thread. The step line (between the legs) DO NOT CUT OUT!

We grind the front and back parts. Now you can cut the step line.

We process the side and step cuts with a zig-zag seam.

When processing the step line, we change the width of the zigzag stitch.

We sew the top and bottom of the pants with a seam in the hem (for this, we bend the cut by 0.5 cm and again by 1 cm, we sew).

Pants are almost ready.

We take a strip of fabric for the strap, fold it in half, and grind it, leaving one edge not stitched.

We cut the corner close to the line.

We twist. Unstitched edge is folded inward and ironed.

Iron the straps and pants.

On back half panties, we attach the straps (not with a stitched edge) and adjust them close to the line.

Front side.

We dress our Frog, attach the straps and fasten them with buttons.

This is how we dressed him.

It remains to distribute the tools. Who will like it.

At the Pretty Toys Workshop - big choice frog patterns. We offer you to sew a funny toad, a Frog Princess, a funny frog and even a whole family. Do you know what creature is believed to bring money? Of course, the frog! It is believed that the more these amphibians surround you, the faster wealth will grow. It's time to think about how to sew a frog, and get ready to get rich.
You can turn the queen of the swamps into the queen of a child's room or your sofa. Sewing a frog toy with your own hands is a pleasure, the main thing is to find pieces of fabric of different colors, the only condition is that there must be a green tint everywhere! To create a primitive toy, you will need: green fleece, yellow, white and red felt, two large black beads, embroidery threads, scissors, needle, filler. Be sure that all the work will not seem like some kind of dreary hard labor and boring pastime. It will fly by unnoticed and leave pleasant memories!
For sewing a frog with your own hands according to a pattern, you can use any fleecy fabric (someone creates from a substitute for leather and satin). The size of the toy may vary. We offer to sew both a compact animal and a full-size pillow. Products are stuffed with synthetic winterizer, millet, peas, lentils. Finished toys are decorated with glasses, a scarf, a tie, beads, and so on. Paws can be sewn or connected with a rope hinge. Fantasy has no limits! Frogs made using the Tilda technique deserve special attention. Cheerful, cozy, natural.
If you sewed an original frog toy according to the Pretty Toys pattern, send it in the photo. We will be happy to receive useful advice. Our Workshop is regularly updated, we will be happy to add a new interesting pattern to it. On the shelves of shops there are a lot of toys, interesting and not very. But only a hand-made toy is truly original and unique. If you have some free time, make the most of it!
This cute little felt frog will happily settle into the children's room and meet other toy inhabitants. You can sew such a frog from soft green felt. The pattern of this toy is simple and consists of a small number of parts, so it can be made quite quickly.
To make a small frog, we need:
- - felt green, pink, white and yellow flowers;
- - threads of green, white, yellow, pink and black;
- - scissors;
- - synthetic winterizer;
- - a needle;
- - paper in a cage (for making a pattern of a toy);
- - pencil.

How to make a small frog
1. The pattern of this little frog consists of only five parts. On paper in a cage, draw a frog's head, a torso with hind legs, a front leg, a tummy, a small flower. We cut out the drawn parts of the pattern from paper.

2. Let's straighten a sheet of green felt on the table, put the details of the head, paws and torso on it. We circle each detail the required number of times and cut it out. For a toy frog, we need two parts of the head, two parts of the body and four parts of the legs.

3. From white felt, you need to cut out the detail of the eyes in one copy.

4. Cut out one detail of the tummy from pink felt.

5. Cut out one small flower from yellow felt.

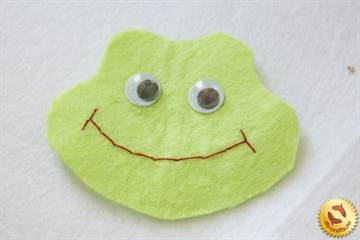
6. Sewing a toy frog, let's start with the head. First, take one part of the head, attach the white part of the eyes to it and sew it with basting stitches of white thread. Stitches should be small and even.

7. This part of the head is compatible with another part of the head and sew them with buttonhole stitches of green threads, leaving an unsewn section at the bottom.

8. Now sew the body of the frog. To do this, first take one part of the torso, attach a pink part of the tummy to it and sew it with pink threads, making small basting stitches.

9. Fold this part of the torso with the second part of the torso and sew with green threads along the edge, making buttonhole stitches, and leave an unsewn section at the bottom.

10. Fold the details of the front legs of the frog in pairs and sew them with green threads with buttonhole stitches, moreover, you need to leave a hole on each leg.

11. Take a synthetic winterizer and evenly fill all parts of the toy - paws, head and torso.

12. Sew a hole on the body of the frog with green threads, making neat buttonhole stitches.

13. Attach the head to the body and sew green threads with hidden stitches.

14. On each front foot, carefully sew a hole with green threads.

15. Sew the paws to the body with the same green threads, while making sure that the paws are at the same level.

16. With black threads we will embroider small pupils on the white part of the eyes, the pupils should be located at the same level symmetrically.

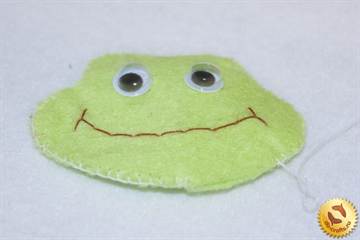
17. With pink threads, we will embroider a small mouth in the form of an arc for the frog.

18. Take a flower cut out of yellow felt, attach it to the detail of the frog's belly and sew it with yellow threads, making small basting stitches.

The little felt frog is ready. This frog can be not only an ordinary children's toy, if you sew a loop of ribbon or colored decorative lace to the figurine, then the frog can serve as a key ring or pendant for a children's bag. If you sew several of these frogs, you can make a mobile for a crib or stroller. In addition, such a frog can turn into Christmas tree toy and decorate the Christmas tree.

Hello to all my subscribers and guests of this blog! Ekaterina is in touch with you. As I promised in one of my articles, today I will share with you patterns of felt toys. The selection will not be too large, I offer you only what I liked most, what I found on the Internet.
Remember mine, from it you can also take some ideas and ideas on how to sew these wonderful, and most importantly beautiful, unique felt toys on different topics. If you are not fond of needlework, then perhaps you like to crochet such a charm in the amigurumi style, then go to this one and knit the most important symbol of the upcoming New Year.

Well, whoever sees and thinks about what kind of material this is for the first time, I will say right away that this is the most unpretentious and easy-to-use material. With it, you will definitely not know grief, it does not crumble and the details are cut out very neatly and beautifully the first time.
Now the world does not stand still so much that innovations continue, and in this direction too, for the smallest, you can even make a carousel over the crib.
And for more children, there are ideas and options for work from various animated series, just imagine how happy a child will be if you give him, for example, a set from the Superwings cartoon.

Or like mimics.

Penguin Pororo.

When my kids were a little younger they were very fond of watching Peppa Pig, of course, within reason).

Kitty, you can even make it soft, just stuff it with padding polyester.

Did you recognize these beauties? Yes, yes, paw patrol.

For the smallest babies, toddlers or smeshariki are perfect. I can send the schematics and the master class to anyone who needs it, write a comment at the bottom of this article (I will gladly share what is in my piggy bank with you).

At home we have an alphabet made of felt fabric with little animals and animals. Isn't it brilliant? How do you think?


If you need all this fun alphabet in the form of animals, write.

Girls can sew such a doll.

The holidays are coming soon and that's why I wanted to present you with something so magnificently beautiful, how do you like this idea? How much is here different options and a squirrel, a lion cub, a zebra, a penguin, bat and even pikachu.


Master class on how to sew felt souvenirs
Now it has become very fashionable to sew toys for children who have just been born or when they are one year old. Usually they do it in the form of a name and some kind of plot. I suggest you watch this video, just those who do not know how to sew the details of felt toys correctly, this video will help you figure it out, see all the stages of work:
Well, of course, if you dream of sewing any fairy-tale hero or cartoon characters, then be sure to use this video instruction, based on it you can later make animals or little men of absolutely any kind, the main thing is to find and print a template for the one you planned to sew:
Christmas felt toys for the New Year 2018
When the time for New Year's Eve comes, everyone will immediately start creating, so here are some ideas for you.
Craft in the form of a deer.
House with a white cover made of snow.  Christmas tree beauty.

Gingerbread men.

Heart.

The symbol of this year is a dog, so you can make it on the Christmas tree, below I will present you even more schemes with different breeds of puppies.

Patterns of New Year's toys from felt
Of course, the symbol of any year are mittens, mittens, Christmas trees, horses, as all these accessories always adorn the spruce.


You can even make a keychain and give as a souvenir. 


Or here is a table set.

Christmas bell.

Schemes and patterns of animals from felt for beginners
Now I offer you quite simple schemes, for those who are at the very beginning of the journey. Choose and do well!
Funny kitty.


Teddy bear in all its glory.


The giraffe is adorable.


Insects such as butterflies and bees.

Bookmark for books in the shape of a delicate butterfly.

Little sister fox.


This bunny with long ears won me over.

Doggy and puppy.


These are such naughty cute puppies.


Owl toy.

A cockerel and a family of hens and chicks, which can be made for Easter.


You can sew various other little animals, for example, it can be a monkey, a mouse, an elephant, a lion, a pig or a bear. They all have the same scheme, just decorate the muzzle in a different way.


I also really liked the idea of an angel.

Toys for children developing fine motor skills of hands
For the smallest, there are options for crafts in the form of puzzles, it looks quite interesting:


Or you can make such a game, pick up "clothes" for the animal))).

Or make a finger fairy tale or cute animals.

The most famous fairy tale Teremok.
Or lacing.


That’s all for me, what I liked myself and shared with you, so take threads, a needle, scissors and felt and create different masterpieces. All pleasant creative fruitful work. See you later))).
Sincerely, Ekaterina Mantsurova
Who doesn't like soft toys? After all, interest and love for these subjects does not pass even in adulthood. And especially small children like such toys, but it is difficult to constantly acquire something that is increasing in price every day. Therefore, you can save money and learn to sew on your own. One of the most popular toys is a frog, which can not only be sewn, but also knitted, made from improvised materials. In our master class, we will learn how to make it from fabric, namely, we will see how a felt frog will be made.
Everyone remembers such toys in their childhood, especially in the crib at night. These best friends not only convenient to use, but also safe, because the baby will not hurt himself, will not hit himself, he can only tear, but even here the mother can come to the rescue and carefully sew the product. Therefore, novice needlewomen should pay their attention to this material, which will help to please the child and at the same time create exactly that frog from fairy tales that will be able to serve for a long time.

mischievous frog
Now modern needlewomen are able to create any toy, while spending a minimum of money and time. But beginners will have to allocate their own free time a little more. After all, those who have already got the hang of it can do everything in a few hours, and those who are just starting to learn the basics of sewing toys will have to tinker a little. In our master class, we will learn how to make a frog out of felt. The fabric itself is strong enough and at the same time soft, so it is perfect for sewing toys with your own hands.
What we need:
- frog pattern;
- green felt;
- red felt;
- threads in the color of the main fabric;
- red threads;
- eyes that are used for sewing toys;
- synthetic winterizer;
- scissors;
- needle;
- paper;
- chintz fabric with flowers;
- two buttons.
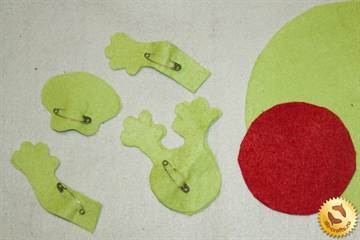
We transfer the pattern to paper and cut out all the details of the future frog. Then we apply it to the fabric and with the help of a crayon we apply a contour to the fabric. When everything is drawn, cut out everything from the fabric. Everything that has a pair is put together and fixed with pins. And with the help of scissors we equalize all the bumps. We begin to sew together the details from the body. We sew carefully and do even seams because we are working on front side. You need to trim the paws. See the photo below for how it should look. Then we begin to fill them with padding polyester using a pencil or pin. Again we begin to sew in a circle and work until a small hole of up to one centimeter in size remains. We fill the body of the frog with synthetic winterizer through this hole. And when the entire abdomen is filled, we sew everything together.


We take a red circle and stitch along the edge, after which we do not cut the thread, do not fasten it, but simply tighten the product, as shown in the photo below.
Threads can be used in different colors, it does not matter, since they will not be visible later.
Now you need to tighten it well so that you get a tight circle, then cut the thread, and our collar is ready. Until we need it, so we set it aside.
We begin to make the head of our princess. We take glue and glue the eyes to the right place. And if there are no such eyes, then you can take a thread and embroider yourself. We embroider the mouth of the frog with red threads. When everything is done on the muzzle, put it aside. Let's get to work with the upper paws. It is recommended to sew from the shoulder and further along the brush. Next, stuff it tightly with synthetic winterizer. Then we sheathe further, but at the same time leave a transverse hole and stuff it with padding polyester to the end. And only after that we can close the part. We do the same with the second leg.

We return to the head of the frog. We sew the two parts together, but leave a hole in the neck area. Then we fill it completely with synthetic winterizer. Make sure everything is evenly filled. We just need to put all the pieces together. We begin the first to sew on the paws, it is best to collect them on top into an accordion. To hide all the flaws, we sew on a red collar. And only after that we sew the head of the frog.
Here our frog is almost ready, now we need to dress it. We take a colorful fabric, the width of which will be 9 centimeters, and the length - 20 cm. Now we sew the fabric and collect it from one edge. It turns out the skirt that we put on the frog. And from two small strips of fabric we form straps, which we decorate in front with two buttons. Now the princess is ready!