How to make a canopy for a crib. Do-it-yourself canopy for a crib: a master class on making, as well as useful tips on choosing a material and fastening. Canopy attachment for cot
The canopy over the crib looks very gentle and beautiful, creates comfort. The baby will sleep comfortably in a covered space.
There are many options for canopies. Today we will analyze one of them. It is more unique because we have come up with the basis. 🙂 Try to sew these curtains with your own hands.
You will need:
- 1.5m x 5m of fabric (cotton, silk, chiffon, fine linen, tulle, or any lightweight suitable fabric, not necessarily sheer)
- ribbon for decoration (you can also use various flowers, bows, etc.)
- machine, thread, scissors
I made from silk.
P.S. By the amount of fabric: If you want the canopy to completely cover the crib + assembly, then you will need about 4 m of fabric + fabric per hat. If only one half of the crib and side, then we take 1.2 m less. If only a headboard, then 1.5 m of fabric will be enough.
How to sew a canopy for a crib
First you need to come up with a basis on which our canopy will rest: we made such a device from an ordinary plastic bending pipe, which twists in a spiral and remains a “tail” - a holder.
Here's what it looks like:
The base clings to the wall by the tail (and the “tail” itself must be screwed to some kind of base (plank, plate, etc.) with screws.
Here, as you can see, there is one "extra" curl, we made it to hang toys. You can do one turn.
P.S. Also, the basis for the canopy can be bought separately in the store.
Progress.
First, cut off 1 m from the main fabric for the canopy “hat”, which will be worn over the ring.
Here's what the pattern looks like:

So, we sew the curtain itself. Actually, everything is simple here, you just need to process all the edges (bottom and side) and make one big hem on top across the entire width to thread the base. We first make a basting and sew on a typewriter (a bend of about 3 cm + 0.5 cm for a small hem).

We sew a hat. It’s more complicated here (if you don’t want to, then you can not sew it :)
Cut out a circle from the fabric according to the diameter of your base (I have 42 cm.)  We make a frill-frill around the entire edge.


Cut out a long strip of fabric to make a frill. Its width and height are optional. Length: 1 m left for me (because there are large folds).
Fold in half lengthwise to make it lush and more beautiful. We fasten to the circle with the help of needles or basting, creating folds.

From the bottom, from the back edge, we sew a ribbon, for which we will tie the hat to the base so that it does not fall off.
We make a bow from satin ribbons and attach it to the canopy cap in the place where the curtains diverge.

We fix the base to the wall above the crib with bolts. We put our finished curtains on the base, starting from the left side.


This is how you can sew a canopy for a baby bed with your own hands.
Many consider the canopy to be a dust collector, but in fact it does not allow dust to enter the crib, if it settles, then on it. And then we will quickly wash it!))
Also, these curtains protect the baby well from insect bites in the summer (especially if the house is located outside the city) and from drafts.
The children's room in the house occupies a very special place in its significance. After all, in fact, it becomes a refuge, a kind of shelter for the baby. The center and citadel of the children's room, during the first few years of a child's life, of course, is the crib. This is not just one of the elements of the furniture or the interior of the children's room. It is designed to protect the innocent sleep of the baby. It is known that physiologists have recorded the dependence of the calmness of a child's sleep on the external environment in which he is. From that, at all times, parents tried to equip the place in which the baby sleeps as best as possible.
A crib for a newborn should protect him from drafts, dust, and flying insects.
The technique of arranging a bed with a light cape attached to the ceiling came to Europe from Ancient Persia. At some point, a person realized that in a hot midsummer night it is not very convenient and pleasant to protect yourself from insects by covering the body directly with a cloth. And so the first canopy was invented.

To do this, it is necessary to hang a canopy from a beautiful cheerful fabric on it.

The canopy fixed according to the instructions will reliably protect the baby, give him and his parents peace, comfort and tranquility.
For centuries, this practical tool has been used as simple people and members of the nobility. At the same time, of course, the products placed in the royal bedchambers were distinguished by their beauty and luxury.

You can sew it with your own hands, but, for those who are not confident in their tailoring abilities, special stores offer inexpensive kits that include the interior of the crib and canopy.

To decorate the cornice with Velcro, a lambrequin is attached to it.
The canopy is one of those things that, in addition to the aesthetic component, also carries a purely functional component. Such things never go out of furniture fashion, they can change, the demand for them can increase or decrease, but they have been and will be. Today, this element of the interior is returning to wide use. However, it is intended primarily for cribs.

But it is not enough to buy a beautiful canopy, it is important to correctly assemble the canopy on the crib, which will help the instructions, as well as hang it correctly.

This is the most reliable fastening, since the screws will not loosen from the inevitable touch to them during manipulations inside the crib.
Cover over the child
The canopy in the nursery gives the room a unique flavor of a fairy tale, a small kingdom in which the child will feel like a little prince or princess. The practical component of the product is that with it it will be possible to forget about the use of mosquito aerosols, creams and fumigators. Under the light fabric of the canopy, there is less dust and draft. Daylight and artificial light “softens”.

If the canopy is one piece with the bed, the canopy is fixed on a hanging tripod.

If you do not intend to rearrange the baby's crib in the next six months, then the canopy can be fixed on the ceiling above the crib.
Intending to equip the children's bedroom with a small canopy to make right choice you need to know what they are. They differ in location, and in the way they are attached.

Among the wide variety of models, you need to choose a beautiful, comfortable canopy for a crib.

The structure is fixed with screws to the back of the cradle and the joints are closed with plugs for greater strength.
Location options
The choice of the future location of the canopy over the bed depends purely on your aesthetic tastes and ideas about beauty. When choosing a location, you choose how the fabric will fall from the holder and how the folds will form on it.
- Above the bed.
At the same time, the falling waves resemble a sharp roof over a small house. Traditionally, this is a "boy" option.
- Headboard location.
The fabric falls slopingly to the "bullet" at the feet. This option is suitable for girls and older children.
- Along the entire perimeter.
A special frame is mounted, which can be either an independent structure or be a continuation of the crib, fixed on it. The canopy forms, as it were, a separate room, four even woven walls and a ceiling. This arrangement is universal, it is suitable for both boys and girls. Becomes decisive color scheme. By the way, it is this arrangement of the canopy that is most popular today for adult large beds.

The child will often have to be taken out of the cradle and put back, if the fabric constantly interferes, then soon you will get tired of this device, you remove it and put it away.

The principle of hanging the canopy depends on the type of ring.
Mounting methods
When deciding how to attach a canopy to a crib, it is imperative to take into account the location of the crib in the space of the room in relation to walls, doors, and other furniture. This is what should determine the method of attachment. And here we will use a new term - the holder.
For reference. The holder is the supporting part of the overall structure.
So, light material is attached to the holder, which in turn can be fixed as follows:
- on the side wall
- on the past;
- at the head of the bed;
- to the wall of the room itself;
- on the floor;
- on the ceiling.

The canopy consists of a fabric canopy and a structure holding it.

The canopy holder is a soldered or detachable metal ring, tripod and attachments to it.
Advantages of a canopy
- Often all the necessary parts are bought complete with the cradle itself. Models of cribs can have a variety of shapes, from simple rectangular to complex with a twisted pattern of wood.
- The design itself is prefabricated, easy to install due to a small number of parts.
- The wide base of the holder allows the canopy to have good stability without having to be screwed to the floor.
- Along with the wall-mounted version, a purely stationary version is assumed, i.e. fastening with screws to the surface.
Let's consider how the installation is carried out using the example of mounting on a wall, a former or a crib headboard.
The assembly kit usually includes:
- tripod (straight long tube, the length of which determines the final height of the canopy);
- holder (rod of rectangular or rounded shape);
- rings that will hold the fabric, help it slide, moving along the holder;
- fastening screws.

A canopy for a baby crib is a cape made of lightweight fabric that is attached above the baby crib using a special fastener.

It is important at what height the canopy will be.
Assembly algorithm:
- taking into account the location of the crib in the room and which of its sides it is closer to the wall, we choose the place for attaching the tripod;
- firmly fasten the tripod to the surface of the wall or bed of the bed;
- install the holder rod on the top of the tripod;
- we put hanging rings into the loops on the curtain;
- we hang the matter with the rings threaded into it on the holder;
- by hand, pressing on the structure, we check the reliability of fastening.

Many years ago, in the eastern sultanates, canopies served as canopies over the throne or government box.

You need to fasten the canopy to the rack simultaneously in two halves of the ring, starting from the center.
Modern designs of canopies suggest the possibility of easy change of the curtain material itself. This is very convenient, given the wide range of its functions. From thick fabric, obstructing light, to the lightest tulle, saving from annoying midges.

Of course, many dads and moms think why clutter up the space with “dust collectors”.

Before proceeding with fixing the canopy, assemble the holder to its full length, this will give you the opportunity to pre-adjust the height at which you want to place it.
It is also possible to remove and re-put on the curtain material on the holder, the process is similar to the care of curtains and curtains. The product in this case does not become a "dust collector" in the house.

So maintaining the hygiene of the children's room will not be a huge deal.

In this case, the canopy covers the bed less, but does not restrict access to the outside world.
Perhaps we will not be mistaken if we say that the generation of young people who are becoming parents today is unlikely to have slept under canopies in their infancy. But it's so natural to try to give your children what we didn't have in childhood.

If the crib is located along the length of the wall, then the mount is located in the middle of one of the long sides of the crib.

If the location of the crib is along the width of the room wall, then the holder is attached to the headboard.
VIDEO: Do-it-yourself fastening of a children's canopy
A detail of a medieval interior, the canopy is popular again. Assigning to him the important function of the guardian of children's sleep, many parents hang a canopy on a crib. The air canopy performs several tasks at once. It scatters sunlight, protects from annoying insects and dust, protects from drafts and strange prying eyes.
For babies who are not yet accustomed to the surrounding space, the canopy creates a soothing atmosphere of a cozy nest. Older children will appreciate the unusual canopy design. The house of a fabulous animal or the castle of an enchanted princess turns into a favorite place for games.
A one-of-a-kind thing can be made by hand even for those who do not consider themselves sewing virtuosos. If the last time you cut the fabric was in home economics class, don't worry: an accurate pattern is not a necessary sewing step.

Fabrics are light and dense
When deciding on the material for the canopy, make a choice in favor of light natural fabrics in calm pastel shades. Delicate material should be easy to wash and dry quickly. Chintz and satin, cambric and cotton, tulle and chiffon, organza and linen fabrics that are purchased to sew a canopy.
Heavier variations of the material are suitable for rooms with drafts and if the bed is close to the window. Silk, tapestry, plush, velvet create twilight, conducive to good rest.
You can stock up on two versions of the canopy: do-it-yourself summer version of transparent tulle and winter version of dense tapestry.
The length of the product varies from short to long, reaching to the floor. Practical moms and dads choose curtains just below the level of the mattress. In curtains that are too long, not only a child, but also an adult risks getting confused.
It does not matter if the pattern appears to you as an intricate drawing, similar to the design of a complex engineering structure. Each mother can sew a decoration on a crib with her own hands, showing love and imagination. There would be a desire.
Mounting types
It is important to decide on the type of canopy for a crib. The device can be fixed:
- on the walls of the crib with a bar-holder. An option suitable for arranging a bed for the smallest;

- on a rectangular bed frame, being part of the overall design. The most expensive solution, it allows you to create a personal island of peace and quiet, a place for solitude and relaxation;

- on the wall at the head or along the long edge of the bed. In this case, ceiling cornices are used. Spectacular, truly royal drapery will be appreciated by girls and girls;

- on the ceiling with a hook.

The last two options are static, the first two are mobile, the canopy can be moved around the room along with the bed. Make sure that the basic safety rule is followed when installing the canopy - a secure fastening is made.
Manufacturing
Sew simple model with your own hands is easy. Approximate dimensions finished product depend on the height of the location and shape of the holder, the length of the canopy, the size of the bed and design features.
To make a canopy, you will need:
- fabric with a width of at least 1.5 m, a length of 2-3 m;
- decorations: lace, frills, fringe, tassels;
- tape for processing the edge, not less than 5 m;
- strong braid for decoration of the upper part. Length not less than 3.5 m, width not less than 6 cm. If you plan to decorate in the form of one or more bows, add the length;
- frame ring, which can be purchased at a needlework store. The holder is easy to make with your own hands from a fairly thick wire. An ordinary large embroidery hoop, an old lampshade and a sports hoop will do.
Step by step procedure:


Space for design
Fastening to the frame in the form of a braid is not the only possible way:
- the easiest way is to make a linen version with your own hands: bend the top edge and stitch it at a distance of 5-6 cm, as for an elastic band on a skirt. This version of the drawstring is more suitable for dense fabrics. Thin tulle may not withstand a serious load and quickly become unusable;
- a more sophisticated way: instead of a crepe ribbon, use loops and buttons. Such an instance will not be worn, but put on the holder, as in the photo:
- supply the canopy with ribbons and tie them on the frame to make flirty bows;
- suitable for thick fabrics. Punch holes in the canvas of the upper part of the canopy, put them on metal rings and pass through the holder tube. This method is often used for curtains in the bathroom.

For a craftswoman who creates a unique thing with her own hands, a real scope for imagination opens up. Ribbons, buttons and other accessories are chosen to match the curtains or, conversely, stop at contrasting options.
A canopy for a crib is an author's solution that does not require large time and financial costs, as well as special skills. A romantic canopy, made by hand with love and diligence, transforms the interior, introducing unique notes of originality and home comfort.
Sleep is a moment of magical oblivion. The more soundly and calmly a person sleeps, the healthier he is. Therefore, it is so important to take care of the safety and serenity of sleep. In children's rooms, the child's sleep is protected by a canopy.
Canopies have been placed over royalty since ancient times. Previously, this design was truly luxurious: over a huge oak bed, a thick layer of velvet with gold tassels hung from the beams, and under it was a light flowing tulle. Now the canopy looks much simpler.
Many interiors of children's rooms, especially for girls, contain this element as a decoration. The most common canopies consist of a wire frame and airy tulle and fit perfectly into any environment.
But few think about the true functions of the canopy:
- Protection from the light - Royals are always very gentle, they should not be allowed to be awakened by light in the morning.
- Protection from dust and insects - light tulle saves in the summer from annoying insects in the bed.
- Protect young children from prying eyes.
- Draft protection.
Depending on the design of the canopy, it will combine various functions, and in some types even all.
Examples of the design of canopy beds for children are presented in the following video:
For a newborn
Based on even one function of this - protection from unwanted looks - one can judge whether a canopy is needed for a newborn. Yes and everyone else beneficial features of this decor only confirm this guess.
A small, still fragile organism needs protection so much. Choose the lightest canopies in so that the child does not feel the weight of the canopy. Canopies for newborns need to be thoroughly washed, otherwise there will be no protection from dust, but its completely unnecessary accumulation.
Photo of a four-poster bed in the interior of a children's bedroom
For a child over 3 years old
At the age of three years, children show maximum activity. Many parents worry about the safety of their children and strive to minimize all dangers. Everything the child comes into contact with should be soft, round or light.
Some believe that in a canopy, children can get confused or stuck in the frame. If the child is indefatigable, endlessly explores something with his hands, just makes a lot of movements, then it is better to refuse the canopy.
In the vast majority of cases, canopies are safe, it is difficult to get confused in the design if it is installed correctly. Read the package carefully or ask the store if this product is suitable for children 3 years of age and older. Then there will definitely be no problems with this decorative element.

For teenager
The stereotype makes us think that the canopy is something of tulle with openwork lace and ruffles, hanging only in the rooms of little girls. But it's not. Masters of textiles create canopies for teenage rooms of the most unusual colors and materials.
Children in transition often consider themselves adults, so they demand stylish rooms. Canopies made of dense colorful fabric will perfectly cope with the design of any interior. Moreover, you can hide behind a canopy, which also corresponds to the desires of teenagers - personal space is fenced, you can dream about something intimate.
For children who are not yet adults, but no longer infants, a canopy will help decorate the playroom. In the boyish room, the canopy turns into the sails of a pirate ship. The girls room becomes a princess bedroom with a king size bed.
Canopy over the bed for a teenager

Dimensions of the canopy over the children's bed
Before I buy a canopy for a crib, you need to find out the dimensions of the product that suits you. These options will depend on:
- mounting heights;
- curtain lengths;
- material;
- bed size;
- Canopy design.
You choose the length of the curtains yourself. Most often, for young children, they prefer to hang canopies with long edges. The average cost of the simplest fabric for such a design is 160 cm, not counting the decor. The decoration may take a little more, depending on how you decorate your canopy.
The standard canopy size is calculated from the perimeter of the bed and the distance from the holder ring to the bed post. If you are not going to sew a canopy with your own hands, but simply purchase it separately, then these measurements should be enough.

Types of holders for him
There are three types of fasteners for cribs:
- holder in the middle;
- Headboard holder;
- Holder around the perimeter of the bed.
Infants who need to be protected are sheltered behind a canopy, which is attached to the first type of holders. Children from three years old are most often protected by a canopy, which is fixed above the headboard. The third type is suitable for children who sleep in cribs without sides.
To place the first or second type of canopies over the crib, you need to fix the rod in the required place (in the middle or above your head), set the required height. Pull the upper part of the canopy onto the oval or round frame of the holder and gently straighten it.
If you see that the fabric on the base of the canopy is much larger than the diameter of the holder, don't be alarmed. String all the fabric, and then form a beautiful assembly out of it.
The holder around the perimeter of the bed can be different in appearance, but its essence is the same - a frame is placed above the bed, through which the fabric is thrown. The frame is mounted either on poles from the bed or on the ceiling.
Canopy holder Himmelstange für Wiegen

Popular manufacturers
There are a lot of manufacturers of these accessories on the furniture market. For example, for buyers wide selection canopies over the bed in the children's room is represented by Ikea. The assortment starts with bright medium-sized canopies for 1,500 rubles and ends with voluminous beautiful anti-mosquito canopies for cribs for 3-5 thousand. Here you can find both classics and a canopy in the form of a huge green leaf.
The next brand of canopies is Feretti. Prices for light elegant canopies start at 1000 rubles. The most expensive ones cost up to 6,000 rubles. Decent quality, nice appearance, but it is difficult to find colorful canopies of an unusual shape.
Elite canopies from Baby Expert are already several times more expensive, on average 15-17 thousand. But at the same time, they remain among the leaders in sales and are popular because of the quality of the goods, expensive fabrics and a pleasant appearance.
Popular models of children's canopies
 Bryne - Ikea
  baby expert
  Kura-Ikea
  Mysig-Ikea
  Lova-Ikea
  Feretti
 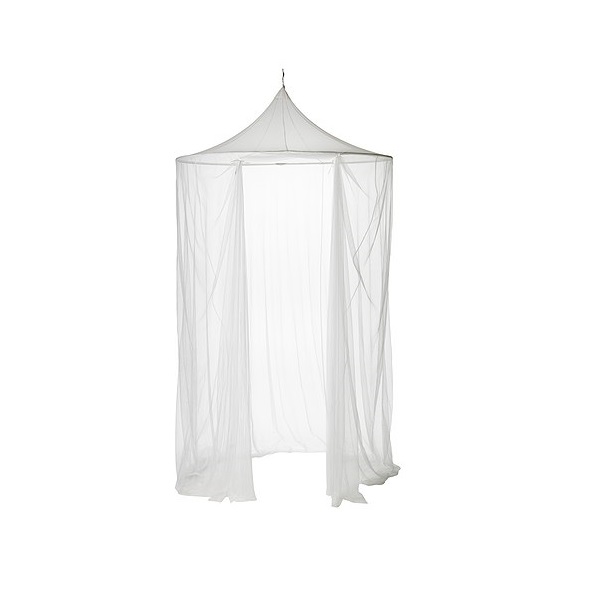 Solig-Ikea
How to DIY
Many craftswomen sew canopies "by eye". That is, at their discretion, they measure the fabric and get down to business. Let's reveal some of their secrets.
- Canopies are best to have two. If you are going to sew a canopy, then sew immediately and warm winter version and summer easy. In summer, tulle will protect from dust and insects, in winter from drafts and cold.
- Don't worry about the price of fabric. If it is not possible to purchase expensive fabric, then take the cheapest one as a base, and decorate the canopy as you wish with small pieces of beautiful fabric.
- Choice of fabric. On the summer period the most ordinary curtain tulle (mesh or solid) will do. The main thing is the exceptional naturalness of the fabric. Well in the nursery there will be chintz or silk.
For mounting on the frame, the base is treated in a special way. Some make loops or sew decorative hooks. The easiest way to fasten the top of the canopy is to fold over the edge and sew at a distance of three to five centimeters, as for the elastic on underwear or a skirt.
The basis for such a canopy can serve as an outer circle from a large diameter hoop. If you have suitable ready-made curtains with a drawstring, use them to make a canopy.
You will need:

Ready-made curtains with a drawstring;
Braid for decoration;
The outer circle is from a large diameter hoop;
Sewing machine;
pins;
Scissors.
1. Pin the ribbon to the bottom of the curtains.

2. Sew the tape on the sewing machine.

3. Remove the attachment from the hoop.

4. Place the curtains on the hoop.

5. Put the mount back in place. The canopy is ready, it remains only to fix it on the wall above the bed.

2. Canopy on a hula hoop base for a crib or chair

It is a little more difficult to sew such a canopy, but the result is impressive - it is practically an awning that can comfortably cover a crib or chair from the light.
You will need:

Two types of canopy fabric;
plastic hoop;
Velcro tape, she is "Velcro";
Sewing machine;
pins;
Scissors;
Cardboard and pencil for making a template.
1. Determine the desired length and width of the fabric for the main part of the canopy. The length will be equal to the length of your canopy plus hem and seam allowances. The width will be your hoop girth x 1.5 for the drapery (if you want more pleats, multiply the hoop girth by 2), plus seam allowances. Cut out the detail of the main part of the canopy.
2. Determine the length and width of the trim strip for the canopy. The length will be equal to the girth of the hoop plus allowances for seams, the width - according to your desire (for example, about 30 cm). Cut out two pieces of blanks for the canopy bar.

3. Draw a template to create the zigzag edge of the canopy plank. To do this, divide the length of the bar (recall, it is equal to the length of the girth of the hoop) by the number of corners of the zigzag you need. This will be the width of each corner. Draw a pattern on cardboard like the one you see in the photo and cut it out. Then transfer the design to the fabric using the template.
4. Cut out the corners on both pieces of the canopy trim.

5. Lock one of the canopy plank pieces into a circle front side inside and pin with pins.

6. Attach the second piece of the canopy strip to the first one face to face so that the corners match, and pin it together.

7. Stepping back 1 cm from the edge, stitch the details of the canopy strip along the side with zigzag cutouts.
8. Cut off the protruding corners and make cuts on the inner corners so that the edge looks neat after turning out.

9. Turn the piece of the canopy bar inside out, straighten the corners and iron.
10. Sew the top piece.

11. Cut out the loop detail for which the canopy will be hung.

12. Fold buttonhole piece in half right side in and sew. Unscrew the hinge piece.
13. Fold the part in half, as shown in the photo, and iron.

14. Cut out 8 triangles to form the top of the canopy. Formula for constructing triangles:
Width of base of triangle = 1/8 of hoop circumference + seam allowances
The length of the triangle (from the middle of the base to the top) = ¾ of the diameter of the hoop
15. First sew the sides of 4 triangles. Then sew the other 4 in the same way. Before connecting both resulting canvases into a cone, firmly sew a loop to one of them, as shown in photo 15.

16. Now you can stitch both fabrics into a cone.

17. Spread the finished cone on the work surface and place the hoop on top. Trim the corners.

18. Assemble the main part of the canopy.
19. Fold the three parts - the main, planks and cones - in the sequence shown in the photo, and pin them together. Sew all the details on the machine.

20. Sew pieces of Velcro to the canopy on the inside.
21. If your hoop doesn't match, you can paint it or wrap it with colored tape or tape to match. It remains to attach the hoop to the canopy from the inside and hang the canopy by the loop.


3. Canopy in vintage style: a master class

Such a canopy performs primarily a decorative function, making the bed more comfortable. If you want the canopy to cover the entire length of the bed, you can lengthen its free edge (respectively, more fabric will be needed).
You will need:
Canopy fabric;
Braid for decoration;
Scissors or cutting knife;
Sewing machine;
pins;
Something round - as a template for building the rounded edges of the canopy (large bowl, pot lid, and so on).

2. Using the template, round off the corners of the free part of the canopy.


3. Finish the edges of the canopy.

4. Sew decorative ribbon on three sides of the canopy.

5. Using two cornices, hang a canopy over the bed.

4. Canopy in a romantic style: master class

For such a canopy, it is best to use tulle or other thin translucent fabric.
You will need:
Canopy fabric;
Ribbons or braid in color;
Hooks for hanging the canopy;
A pair of sticks for hanging the canopy;
Round plugs for decorating sticks from the ends;
Threads with a needle;
Pencil and ruler.
1. Mark on the ceiling where the 4 canopy hooks will be attached.

2. Screw the hooks into the ceiling.

3. Tie a braid or ribbons to the hooks - two long free ends should remain.

4. Tie the ends of the ribbons and thread your canopy fabric through the loops formed - this way you can measure the right amount of fabric. Also mark the places where the canopy is attached to the sticks.

5. Cut the fabric.

6. Fasten the fabric on the sticks - first pin it off, then sew it on by hand.

7. Decorate the ends of the sticks with plugs, putting them on glue.

8. Tie ribbons or braid to the ends of the sticks.

9. Attach the string to the hooks on the ceiling by hanging the canopy. Ready!

P. S. If the fabric requires it, between paragraphs. 5 and 6, process the sections by sewing them on a typewriter or manually.
5. A simple canopy based on a hoop: a master class


Such a canopy is attached on the basis of a hoop, as in one of the master classes above, but it is much easier to make it - you can not even sew, but use fabric glue.
You will need:

Canopy fabric;
Strong braid;
Strong cord or twine;
Scissors;
Adhesive for fabric.
1. Decide on the length and width of the canopy and cut out the part.

2. Cut off a few pieces of braid - they should be long enough to wrap the hoop with each overlap.

3. Wrap the pieces of braid around the hoop and glue the ends of each piece into a ring.


4. Tuck and finish the bottom and side edges of the canopy part - this can also be done with fabric glue.

9. From the cord, make a loop through which you can hang the canopy.
