How to make a Christmas tree out of paper? Paper Christmas tree How to make a Christmas tree from seven A4 sheets
The Christmas tree is one of the main attributes of such a large-scale holiday as New Year. Nobody forgets about it, buying live or artificial Christmas trees to their home and decorating it with different outfits, souvenirs, garlands. We will make a Christmas tree out of paper, which can be placed somewhere in the apartment (for example, on the table), or it will not even be a shame to give such a craft to relatives or friends. Next, we will deal with several ways to create Christmas trees from paper.
How to make a Christmas tree out of paper (1 way)
You will need green paper, a ruler, compasses, glue, scissors and a pencil (or a tube for juices, cocktails).

- Using a compass, draw a few circles on paper. Each next circle is 1-2 cm smaller than the previous one. Choose the number and size of the circles yourself, depending on what size you want to see the Christmas tree in front of you.
- We fold each circle in half once, a second time and a third time (that is, you need to fold each circle three times in half). To make the fold lines clear, we draw along the edges with scissors.
- We straighten the circles. We cut a hole in the center of each that matches the diameter of a pencil or tube (depending on what we will use). It is also worth saying that the circles are the tiers of our future Christmas tree.
- We glue the pencil or tube with green or brown paper.
- Now we begin to collect the Christmas tree. All tiers are strung on a pencil.
- We decorate the top of the Christmas tree with a beautiful bead or star. Decorate the Christmas tree, if desired, you can sparkle

How to make a Christmas tree out of paper (2 way)
You will need green paper, scissors, pencil, glue, compasses, ruler, needle, wire.
On green paper, draw a circle with a compass, the size of the lower tier of the future Christmas tree. Next, draw another circle inside the first circle, stepping back from the first one a little more than half the radius.
- Using a ruler, divide the circle into 12 sectors.
- Along the lines of cases, an incision to the inner (second) circle.
- We turn each sector into a cone, which we fix with glue.
- Similarly, we create the rest of the blanks, gradually reducing their size.
- We make a hole in the center of each blank with a needle.
- We turn the bottom of the wire into a spiral.
- We collect all the tiers of our Christmas tree on a wire. We fix on top a cone made of paper.

How to make a Christmas tree out of paper with your own hands using the quilling technique (3 way)
You will need: green paper strips 5 mm wide and four strips of 1 cm each, red and yellow strips 3-5 mm wide, toothpicks, glue (instant and PVA).

- We use four green strips having a length of 30, 20, 15 and 10 cm. Using a toothpick, we twist them. We remove the part from the toothpick and let it bloom a little. We fix the end of the strip with PVA glue. We give all the spirals the shape of a drop by holding and slightly pulling one of the ends of the spiral up.
- Tightly wrap wide green stripes on a toothpick and glue the tip to them, preventing it from blooming. This will be our tree trunk.
- For the top of the Christmas tree, we make a drop from a green strip with a length of 30 cm.
- Now we begin to collect the Christmas tree, fixing its elements with instant glue. We glue the parts of the trunk and give the glue time to dry.
- We insert a toothpick inside the trunk and glue our droplets-twigs. We start gluing with the smallest ones, which we glue to the top of the Christmas tree.
- We make toys from yellow and pink stripes by twisting the paper without using a toothpick. You can fasten the ends until the paper is unwound, or you can make the toys a little looser and give them the shape of small droplets. Glue balls to the branches you like.
- We glue the drop at the very top (do not forget about it), and decoration on it.
- You can make, if desired, a stand. To do this, you will need to make nine curls from white paper strips. Tightly glue the curls together. Now we fix the Christmas tree on a snowy white stand with glue.
How to make a Christmas tree out of paper with your own hands (4 way)
You will need: green cardboard, glue, scissors, adhesive tape, colored paints, pencils, felt-tip pens. Stickers, glitter, etc. can be used as additional decorations.
- Fold a sheet of cardboard in half and cut it along the fold line.

- Fold the resulting parts in half again.
- Draw a half of the Christmas tree on one of the cardboard halves opposite the fold (see picture).

- Fold the sheets together and cut with scissors along the drawn line. As a result, you will get two Christmas trees of a similar size.
- Mark the middle of each tree discreetly using a ruler.
- Make an incision on one tree, starting from the top to the middle, and on the other from the bottom (base) to the middle.

- Insert the Christmas trees into the cuts to end up with one voluminous Christmas tree.
- To give the Christmas tree more stability, use adhesive tape - use it to glue the lower and upper halves.

- To decorate the Christmas tree, use pencils, felt-tip pens, sparkles and other materials. You can use a hole punch to make small multi-colored circles, which then stick on the Christmas tree. An asterisk can be glued to the top of the head with tape.

How to make a Christmas tree out of paper (5 way)
You will need: colored cardboard, glue, scissors, a hole punch, a small stick with a diameter approximately equal to the diameter of the holes that are obtained from the hole punch, decorations to taste. 
A rectangular cardboard is taken, folded several times as shown in the picture above, and then pierced in the center with a hole punch. Then this cardboard is cut at an angle so that the craft in the end does not look like a Christmas tree (see picture). We drag our stick into the hole, and if it does not hold firmly, then we can fix it with glue. We decorate the Christmas tree. Jewelry can be attached with glue. Such a Christmas tree can be placed somewhere (if you make a basis for it), or you can hang it somewhere. 
How to make an origami Christmas tree (6 way)
The material for such a Christmas tree will be one large magazine or several small magazines. If the magazine has a hard cover, then you can simply remove it.
Do the following for each page:
- Starting from the top right corner, fold the page at a 45 degree angle.
- Fold the sheet diagonally in half again.
- The corner that extends from below the borders of the magazine must be tucked up.
- We also do this procedure with the rest of the pages and as a result we get a beautiful origami Christmas tree.


How to make a Christmas tree out of paper using the origami technique (7 way)
First, you will need to make triangular modules, from which the Christmas tree will take shape. They are easy to make. You just need to know how to make them and be careful when creating them.

Modular craft
1. We fold the module
2. We collect twigs
3. We begin to collect the Christmas tree
How to make a Christmas tree from corrugated paper (8 way)


How to make a Christmas tree from paper strips with your own hands (9 way)

You will need:
- colored cardboard or green colored/wrapping paper
- tape (in this example, its width is 6 mm and length is 25 cm)
- fine brush
- 1 brightly colored bead (golden in this example)
- a few beads of a different color (in this example, 12 brown beads)
- scissors
- ruler
- pencil
1. Draw and cut strips of colored cardboard 4 cm wide and long: 8, 10, 12, 14, 16 and 18 cm.


2. With the tip of scissors or a needle, make 3 holes in each strip: 1 on the right, 1 on the left and 1 in the middle.


3. Take a thin brush and make a small loop at one end.


4. Start threading a thin brush through all the holes in the paper strips. Start with the longest strip and add the next one in descending order. Add 2 beads between each strip.
5. When all paper strips are used, add 1 bright bead to the top of the Christmas tree.


6. Make a loop at the end of the brush so that the craft can be hung. Cut off the excess part of the brush.
7. Pass the ribbon through the loop and tie the ends into a knot.

How to make a Christmas tree out of colored paper (10 way)
You will need:
- thick cardboard or fiberboard
- skewer
- PVA glue, super glue or hot glue
- colored cardboard (possible with patterns and ornaments)
1. Cut a rectangle out of cardboard, which should be slightly larger than the base of the future Christmas tree.
2. Stick the skewer into the cardboard and secure it with glue.


3. Cut out several circles of different sizes and colors from colored cardboard, 3 circles in each group. Make a small hole in the center of each circle.
4. Add a drop of glue to each hole and start stringing circles onto the skewer, starting with the largest. The distance between the circles can be up to 1 cm.
5. Cut out a star from cardboard and glue it to the top of the Christmas tree.

How to make a beautiful paper Christmas tree with roses for the new year (11 way)


You will need:
- old newspaper or unwanted book
- cone
- PVA glue
- scissors
- beads (optional)
1. Make a cone out of paper and make many roses - a few large ones for the base of the cone, medium ones for the central part, and small ones for the top part.
* If you purchased a foam cone, then you need to paste over it with pieces of newspapers (see image).
To make roses (any color), follow these simple instructions:

- Cut out squares of 10x10 centimeters from thick paper.
- Draw spirals on the squares.
- Cut out a circular strip along the intended spirals.
- Wind the paper spirals from the outer edge to the inner.
- Wrap the pink bud tightly and fasten the tip with glue.


2. Start gluing the paper roses to the cone, starting at the bottom of the cone and moving towards the crown.

3. If desired, you can glue 1 bead in the center of the roses - this way you can decorate all the roses or just some.

4. You can add one more piece of jewelry to the crown - it can be a piece of tinsel, a bell or an asterisk.
* If you want to learn how to make an asterisk, visit .
How to make a Christmas tree out of paper (12 way)
You will need:
- colored paper, colored cardboard, an old music notebook or an unnecessary book
- PVA glue
- curly scissors and simple scissors
- thick cardboard
- skewer
- glue brush (optional)
- decorations (sequins, bows, beads, buttons, stars).
1. Cut out a platform for the future Christmas tree from cardboard.
2. Insert the skewer into the cardboard platform and secure it with glue.
3. Start cutting out squares from paper. It will be more beautiful if you cut with curly scissors (they can be found in stationery).
* You need to cut 9-10 squares - first 9 squares with a side of 20 cm, then 9 with a side of 18 cm and so on, reducing each group of squares by 2 cm.
* Choose the total number of squares yourself. You can also choose the size of the squares yourself - if your Christmas tree is high, then you can reduce the size of the next group of squares by more than 2 cm, and if it is short, then less - 1-0.5 cm.
4. Cut out a few small squares from cardboard that will be between the squares of colored paper.
5. Start stringing 3-4 squares of colored paper, between which there will be a small cardboard square.
* If you use 3 squares between the cardboard parts, it is most convenient to cut 9 squares of each size.
* You can fix the squares on the skewer with glue.
6. To decorate the Christmas tree, you can gently apply some glue with a brush to the tips of the squares, then gently sprinkle glitter on them.
7. On the crown, you can glue a button with a bow or something else - an asterisk or a bead, for example.
How to make an original Christmas tree from colored Japanese paper with your own hands (13 way)
You will need:
- colored cardboard
- thick paper with a pattern (can be replaced with colored cardboard)
- colored or wrapping paper (you can use a page from an old magazine)
- a white sheet of A4 paper
- 2 skewers
- pencil and ruler
- PVA glue or glue stick
- scissors
- a darning needle (if necessary).
1. Cut out 14 rectangles of 2 of the same size from colored cardboard. In this example, 2 rectangles are 21 x 28 cm, two more are 18 x 28 cm, then (also 2 each): 16 x 28 cm, 13.5 x 26 cm, 12 x 26 cm, 9 x 25 cm, and 6 x 22 cm.
2. Preparing the basis for the Christmas tree:
Cut plain A4 paper into strips 2 cm wide. Roll the strip into a circle, add a little glue at its end and glue the next strip (see image). Repeat the same action until you glue all the strips into one large circle with a diameter of 3.5 cm.
* The larger the circle, the more stable the tree will stand.
3. Take a large rectangle of colored cardboard and start folding it with an accordion, 1.5 cm wide. Cut the ends of the accordion into a rounded shape.
4. Fold the accordion in half and glue the sides - you have a semicircle.
5. Repeat the same with the second rectangle, then glue two semicircles to form a circle - these will be the branches of the lower level of the tree.
* To secure the halves of one circle, you can pass a thin wire through them and twist its ends from the back.
6. Make similar images for 6 more levels of your Christmas tree.
7. Take a color or wrapping paper and cut off several small rectangles from it, about 2 cm wide, with which you will later cover the skewers.
The skewers will play the role of the tree trunk.
8. Thread the skewers through one large circle. Since you need to leave gaps of about 2 cm between the circles, these gaps need to be hidden, so we will wrap them in small rectangles of colored paper.
9. After each circle, wrap the skewers with colored paper, 2 cm wide, and glue its ends. Continue repeating this action until all branches of the tree are put on skewers.
10. It remains to insert the skewers into the round base (see point 2) and fix them with glue.
* You can decorate the top of the Christmas tree to your taste - a paper star, a bead or a button.
Watch also other videos on how to make a Christmas tree out of paper:
Now you know about the many ways to create a Christmas tree out of paper. Happy crafting!
Summary: How to make a Christmas tree with your own hands. Original Christmas trees made of cones and tinsel. Photos and templates of Christmas trees made of paper. Homemade origami Christmas tree. Candy tree.
Even toddlers can take part in preparing for the New Year and making New Year's crafts with your own hands. For example, even a two-year-old can make a Christmas tree from an ordinary cone and plasticine. You just need to teach him to roll balls of different colors from plasticine and fix them on the cone. The base of the Christmas tree is a spool of thread wrapped in foil.
Here are more complex options for Christmas trees made from cones. In the first case, the bump was painted acrylic paint in green and white colors. In the second variant pine cone decorated with beads.


From a large number of cones, you can make such a Christmas tree with your own hands. The basis for the Christmas tree is a cone made of thick paper or cardboard, which is then pasted over with cones on all sides with a glue gun. Decorate the finished Christmas tree with beads and large beads.

Another very simple homemade tinsel Christmas tree. You can make it in literally five minutes.

To do this, you need to make a cone out of cardboard and stick tinsel on it in a spiral.


Candy tree. DIY candy tree. How to make a candy tree
If, before wrapping a cardboard cone with tinsel, you can fix sweets on the future Christmas tree with adhesive tape, you will get a sweet Christmas tree made of sweets. Detailed New Year's master class how to make a Christmas tree from sweets, see the photo below or follow the link. When creating a Christmas tree from sweets, it is convenient to use double-sided tape.


A large number of Christmas trees can be made with your own hands from paper. Let's start with the simplest Christmas crafts.
DIY paper Christmas trees
DIY Christmas tree made of paper (option 1)

Print on thick paper or cardboard and cut out the blanks with scissors >>>> Bend each Christmas tree in half and glue them together. This Christmas tree is made according to the same principle as the Christmas ball from our previous article. See link >>>>

According to the same principle, openwork Christmas trees are made from the Country of Masters website.

Epson's Singapore site offers ready-made Christmas tree templates:


DIY Christmas tree toy (option 2)
If you have an unwanted cardboard box, then from it you can make such a Christmas tree using the same technology.

DIY Christmas tree toy (option 4)

And you can make a curly Christmas tree by pasting the base-cone of cardboard with strips of twisted paper.


DIY Christmas trees made of paper (option 10)
To make such a Christmas tree, you must first cut out circles of different diameters from paper. You will also need a wire and a stand, which will be successfully replaced by a half of a large "kinder surprise". The Christmas tree is easily assembled on a wire, and, most importantly, it is easily disassembled. See link >>>>


Origami tree from a magazine
This origami Christmas tree is very easy to make with your own hands. Small format magazines that can be found in any home are suitable as material.

Work plan:
The procedure described below must be done with each page in the magazine. If the cover is thick, you can simply peel it off (tear it off).
1. We bend the page, the upper right corner, at an angle of 45 degrees to ourselves.

2. Once again, fold the sheet in half diagonally.

3. We pass all fold lines with a fingernail or other object so that they do not open, especially thick pages.
4. The lower corner, which goes beyond the boundaries of the magazine, is turned up.

Thus, we add up all the pages in the advertising magazine.

The result is a cute origami Christmas tree.

Origami tree from a magazine
Another model of origami Christmas trees from for the New Year. Unlike the previous origami tree from a magazine, the pages here do not fold, but are figuratively cut out according to a template.

The manufacturing principle is very simple. It is necessary to prepare a half-Christmas tree template, circle it on one page and cut it out. Further, the cut page will itself be a template for other pages. You can cut several pages at once, but you should not cut a lot at once, as the cut line will turn out to be uneven (jammed) and the tree will not open well.

The tree itself turns out to be more one-sided; to achieve volume, you can fold and glue 2-3 magazines together. But trust me, she looks good.
Christmas tree origami from modules. modular origami Christmas tree
Collect from triangular modules Origami Christmas tree is not difficult at all. It consists of individual branches, so you can make Christmas trees of a wide variety of shapes and sizes. In addition, from such branches you can make New Year's compositions, make toys, snowflakes, stars. See the New Year's master class at the link >>>>

Christmas tree coloring on the wall
Large Christmas tree coloring on the wall. Separate parts of this New Year's beauty must be printed on 22 A4 sheets and pasted on the wall in the correct sequence. The advantage of this New Year's paper craft is that the Christmas tree is made in black and white, so the printer's ink consumption is small. In addition, this Christmas coloring book with many small details will captivate the child for a long time. Link >>>>

Do-it-yourself Christmas tree from napkins
Master class on making a very beautiful, unusual Christmas tree from napkins can be found at the link >>>>

How to do christmas trees from corrugated paper
The Land of Masters website invites you to make two Christmas trees with your own hands from corrugated paper.
Option 1. Candles and the Christmas tree itself are made of corrugated tubes. Link >>>>

New Year is the most fun and most children's holiday. Even adults are not afraid to look ridiculous in red Santa Claus hats and with a bunch of gifts. What can we say about the children, who in this joyful mess are trying to participate in all matters! The main attributes of the New Year are Santa Claus and a Christmas tree. Traditionally, a large Christmas tree is decorated with toys and tinsel, round dances are danced around it. But what if you make an unconventional Christmas tree? A beautiful do-it-yourself paper Christmas tree will not pretend to be the centerpiece, but it can decorate a nursery or become a souvenir gift. Believe me, such a Christmas tree will find a use for itself. 
A Christmas tree is made from paper, cardboard, colored and corrugated paper, tinsel and any other materials at hand. It is easy and fun to do: the kids take part in the work with great pleasure. Two-year-old children, for example, can roll up plasticine balls, which then become a toy, or glue a small piece in the place indicated by adults. And the memories of the joint craft will last for several days.
There are at least a dozen ways to make a paper Christmas tree with your own hands, but in any case, you will need:
- Paper (colored, corrugated, thick - whatever)
- ruler pencil
- Glue and stapler
- Scissors
- Sometimes a compass
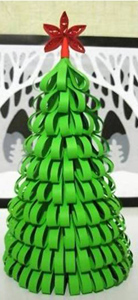
Model No. 1. Volumetric paper Christmas tree
First, the base of the Christmas tree is made - a cone. If the tree is planned to be large, the cone is made of whatman paper (it can be replaced with four A4 sheets glued together). The center is marked in the center of the wide side, we draw lines from it to the two lower corners, cut it off (do not forget to leave an allowance for gluing), cut off the semicircular base, glue it, check whether it is even. On this basis - a cone - you can make several different options Christmas trees. You can get a big Christmas tree out of paper if you make a large cone, and a small one on a small cone. A different ways the manufacture of needles will generally be misleading: it may seem that these are different Christmas trees.
 To make the blank cone look like a Christmas tree, we make needles from colored paper. Traditionally, the needles are green, but it can be assumed that there is snow or frost on the branches - the choice of color is up to you. We outline the rectangles: for the lower needles, the width of the rectangle is 7 cm. We make a trapezoid from the rectangle: the upper side is cut off. The wide side is folded into a triangle and fastened with a stapler or glue, it is convenient to glue the top to the cone.
 Volumetric needles can be replaced with circles glued to the top. If you cut circles of different shades of green, the tree will look more original.
The needles are glued in rows, starting from the bottom. To make the Christmas tree look beautiful, every three rows we reduce the size of the needles. That is, we first draw rectangles of 6.5 cm, then 6 cm and 5 cm. We draw the top of the Christmas tree with a small cone, the bottom of which we cut with triangles. If desired, the Christmas tree is decorated with sparkles. You can use ready-made sparkles, you can finely chop the tinsel. Apply glue to the needles and sprinkle glitter on them.
The second version of the Christmas tree-cone
We build a frame, cut thin short strips from colored paper, wind each strip on a pencil. The stripes take on a twisted look. With a certain skill, you can twist the strips of paper with scissors: gently draw the blade of open scissors from one end of the strip to the other, while pulling the strip. Glue the twisted strips to the cone. You can decorate the Christmas tree with anything: sparkles, bows, balls, stars.
The third version of the Christmas tree-cone
 Glue drop needles onto the prepared frame. We make needles from strips of green (or any other) paper, glue their ends together - we get a drop. Glue larger drops at the bottom of the cone, smaller ones at the top.
The fourth version of the Christmas tree-cone
Wide strips of paper cut into fringes are glued to the base. Again, the strips are wider at the bottom (respectively, the needles are longer), at the top the strips are narrower. The color of the needles can be any: green will make it natural, multi-colored - decorative. We cut the strips into small “needles”, not cutting to the end about 1.5-2 cm. After the glue dries, the needles can be bent upwards - carefully draw a scissor blade from the base of the needles to the ends. Such a Christmas tree made of corrugated paper will look beautiful.
Model number 2. Christmas tree made of paper and cardboard
Cardboard will need double-sided. We fold a sheet of cardboard in half, draw the outline of the Christmas tree. We draw exactly the same contour on another sheet. We cut out both contours, then we make cuts along the axis to the middle: on one Christmas tree from above, on the other from below. We insert the parts into each other. We decorate with tinsel, balls (glass or paper), sparkles - anything. In the photo - slotted toys.
A similar Christmas tree can be made from colored paper. It will require 4 sheets. Fold each sheet in half, cut out a triangle. The resulting parts are glued together and cut at an angle of the needle. You need to twist them before the glue has dried.
Model number 3. Christmas tree made of colored paper
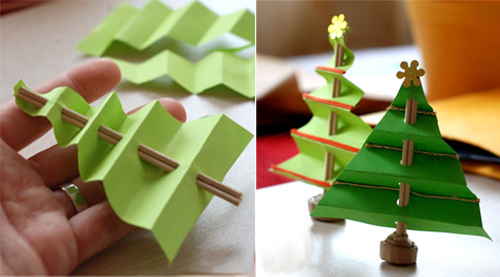 For this model, you will need thick paper. It is done simply: cut out a triangle, fold it with an accordion, make a through hole into which we insert a stick-rod. To make the Christmas tree stable, the stick can be inserted, for example, into an eraser. Such a Christmas tree can become a small souvenir or decorate workplace. She will definitely create a New Year's mood.
Model number 4. Christmas tree in papercraft technique
 How such a Christmas tree is made of paper, the diagram shows clearly. It is necessary to cut several circles of different diameters (the bottom of the Christmas tree - from circles of a larger diameter, the top - from circles of a smaller one). Circles are drawn and cut, needles are folded. Finished tiers are strung on a rod. We decorate the Christmas tree with sparkles, beads, foil bows - the fantasy is limitless.
Model number 5. folding herringbone

For such a Christmas tree, several circles of different diameters are cut. The diameter and number of circles depends on the desired size of the Christmas tree. Fold each circle in half 4 times, unfold and straighten the circles. The trunk of the Christmas tree can be made from an old pencil, a straw for a cocktail, a wooden stick - all this is wrapped in colored paper, the tip is glued. In the center of each circle we cut a small hole (it should be smaller than the diameter of the trunk in order to hold on tighter). Circles-tiers are strung on the trunk, starting from the bottom. A Christmas tree stand can be made from a wooden coil, cork, lid from plastic bottle, plasticine, glued from thick paper.
Model No. 6. Paper origami - Christmas tree
In this popular technique, you can make any figures, including Christmas trees. How a paper tree is made using the origami technique, the video will demonstrate better than any words. We offer two options.
But the third option is more difficult.
Model No. 7. Christmas tree in a hurry.
For this Christmas tree you will need a color printer, paper, scissors with glue, hands and a few minutes of free time. We print a Christmas tree template from paper, cut it out, fold it, glue it.
The Christmas tree is the most important idea for creativity in preparation for the New Year. The stories revolve around her. New Year's cards, toys, home decorations. And it is not surprising that even the ways of making a Christmas tree from such simple material, like paper, there is a huge amount. And each option is different from the other.
Some crafts are easy to make and even a child can make them, others require a certain skill, perseverance. Some models of volumetric Christmas trees are not ashamed to give, they look like works of art.
Selecting the required material
To make a Christmas tree out of paper with your own hands, a wide variety of paper and cardboard is used. In most cases, this is ordinary colored paper and cardboard, although Christmas trees made from corrugated paper also look interesting. In addition to colored paper and cardboard, often required:
- scissors;
- ruler;
- pencil;
- glue;
- stapler;
- stationery knife;
- wire.
For postcards: simple but original
First, let's look at Christmas trees that look great on postcards or as New Year's toys on big forest beauties.

A simple version of the Christmas tree consists of several squares of paper or cardboard rectangles of different sizes:
- Cut out five squares from paper from largest to smallest. If you're making a Christmas tree out of designer cardboard, cut out 2:1 aspect ratio rectangles and go straight to step 3.
- Fold them in half.
- Fold the top corners down towards the middle. So that the free edges are at the bottom.
- Start gluing from the top.
- The top corner of each module must overlap the previous part.

A similar modular Christmas tree is made up of 5 origami modules. This model, made of designer cardboard, can be hung on a Christmas tree. See step by step wizard Class. Squares can be made in any size, but they do not have to be the same. For example, make the largest square with sides 10 cm, and let the others differ from each other by one centimeter.
 |
Take a square sheet of designer cardboard. |
 |
Fold it in half diagonally, then unfold and connect the other two corners. |
 |
On a sheet of cardboard, you should get these fold lines. |
 |
Now, along these fold lines inward, we start one of the faces of the cardboard pyramid. |
 |
Then we put the opposite side inside. |
 |
We smooth the folds with our fingers. |
 |
On both sides, we got two free edges. We take the top layer by the corner and bend it to the middle of the triangle. |
 |
We do the same on the other side. |
 |
The module can be glued to the postcard using double-sided tape. |
 |
Subsequent modules are nested inside the previous ones in turn. It turned out the original Christmas tree. Glue a ribbon or thread through the top of the tree to hang it as a decoration. |
We propose to study step by step instructions for the manufacture of a paper Christmas tree from loops. It is suitable for making postcards, appliqués or hanging decorations if you attach a loop to it. From the materials you need only a square sheet of green colored paper. Also, prepare a ruler, pencil, scissors and glue.
 |
We take a square sheet of paper. If you have an A4 paper, fold it diagonally with the sides aligned and cut off the excess. |
 |
We retreat from the fold one centimeter and draw a parallel line with a simple pencil. |
 |
Set aside one centimeter along one of the cut lines. |
 |
Then we draw parallel lines, connecting the points with a line parallel to the fold. |
 |
We cut two sides at once along the lines, having previously secured a sheet of paper with paper clips so that it does not move. |
 |
Then we unfold the workpiece. |
 |
Now the task is to glue all the strips to the middle. First, we perform the operation with one side. Then on the other. |
 |
Cut off the top at an angle. |
 |
At the top, you can cut a star out of red paper and glue it with glue. |
To decorate a postcard, a Christmas tree made of paper tubes is suitable.

- Need to cut a few strips different lengths from colored paper, cardboard, leftovers wrapping paper, wrappers.
- A round pencil will serve as a template.
- Just wrap a strip of paper around the pencil, placing it lengthwise.
- Glue the tube along the cut.
- From the finished tubes, form a Christmas tree.

The Christmas tree is placed not only outside the postcard, but also inside. When opened, the card turns into volumetric figure. And it's very easy to make it. It is necessary to fold several sheets of colored paper of different sizes with an accordion and glue it to opposite sides of the postcard.
Try folding a triangular sheet of paper like an accordion from the base to the top.
Volumetric models: schemes, instructions, master classes
Light options for voluminous Christmas trees can be made in half an hour with your child. And most of the time will take its decoration.
cone based
The simplest option is a cone made of colored cardboard or a regular landscape sheet wrapped in colored paper or corrugated paper. First, take a sheet, roll it into a cone, secure the edges with a stapler or glue. cut the cone so that it is stable.
If corrugated paper is planned on top, then it is best to put it on double-sided tape. Cut off thin strips of tape and stick along the cone in several places. Wrap the cone with paper, tuck the excess edges inward.

You can decorate such Christmas trees with buttons, ribbons, bows, rhinestones, carved pictures, in general, whatever your heart desires. Decorations are simply glued on.
But this is a “smooth” Christmas tree, and there are also options with “needles”, also based on a cone. Corrugated paper "needles" may look like this:


Just make a fringe out of paper. After gluing the needles in a circle on the cone, you get the following result:

The needles can be curled a little so that it does not fit too tightly to the base, but is fluffy, for this they use a pencil or scissors. The paper is wound on a pencil, and the tip of the scissors is drawn along the fringe.
And how do you like the Christmas tree for the New Year, in which the needles are made of circles of green paper different shades? It looks beautiful, but the work is painstaking and will take time.

There is another manufacturing option.

The base is a cone, which is pasted over in a spiral with a pigtail of crumpled paper. Glue is applied to the base. The tape is slightly overlapped.
Video: how to make a corrugated paper pigtail for a Christmas tree
Fir-trees-vytynanka
Openwork voluminous Christmas trees, made of paper using the vytynanka technique, are original in themselves, and if they are also decorated with beads, then there will be no limit to their charm.

In order to make such beauty, you will need a clerical knife or nail scissors (they are not very convenient to work with), but first of all you need a template. Pre-print the template or simply transfer the drawing you like to paper from the monitor screen. It is best to cut the pattern with a knife, placing a wooden board. The number of parts at your discretion: from 2 pieces or more. The more details, the more magnificent the Christmas tree. When all the details are cut out, put them together, sew with a running stitch with a needle and thread along and bend so that the sectors are evenly spaced.
We suggest you choose the appropriate templates:


We considered the case when the parts are fastened in the middle, but there are options when they are glued along the edges. For this, 4 parts are used. During gluing, the edges should be clamped with paper clips so that the parts do not stick out.

Origami
Previous options for making bulky Christmas trees have all involved cutting and gluing. But it can be done by folding. This method refers to the ancient Japanese art of origami. See how to make a figurine in the video.
Video: three-dimensional origami Christmas tree
Video: origami Christmas tree - variation
Modular
common paper christmas trees, which are assembled from modules. For example, from circles of cardboard. You will need:
- compass;
- scissors;
- wooden stick;
- glue;
- beads;
- base.
Draw a circle on a sheet of cardboard with a compass, cut it out. Fold four times. Cut off the tip from the top. Then form an accordion along the folds. Then you should string the parts on a skewer. They start from the top, glue is applied to the hole in the bottom part so that the part does not slide along the skewer. The basis can serve as a spool of thread, a wine cork. The scheme is clearly shown in the photo.

Modules are also performed using the quilling technique. For example, from 9 tiers of 6 quilling droplets in each, a wonderful Christmas tree is obtained.

In addition to paper, you will need scissors, glue and a wooden skewer.
- Cut out narrow strips from a sheet of paper.
- Fold the droplets and rings using the quilling technique.
- Make a base around the skewer.
- Put a ring on the skewer, secure with glue.
- Then assemble a module of six drops, gluing them together, and put them on a skewer.
- Then again comes the ring and the new module.
- So alternate to the very top.
Note! Modules must be different sizes. Start with the largest in diameter, end with the smallest.
It is quite difficult and time-consuming to make a Christmas tree that looks like this:

Video: making a corrugated tree
This is another stylized Christmas tree made of round elements. To make it, you will need several circles of paper of different diameters and a wire on which these circles will subsequently be fixed. The circle is divided into 12 sectors with a pencil, cut them without reaching the middle and glue each petal.

The process is shown in detail in the video.
Video: making a needle Christmas tree
And one more interesting option- from newspaper tubes.


Helpful Hints
You can make a lot of different things out of paper. Christmas trees one is prettier than the other. All you need is a few simple tools that you can find at home or in any office supply store, a little time and imagination.
On our website you will also find:
- 20 small DIY Christmas trees that will decorate any home
- DIY Christmas decorations
Here are some of the most interesting ideas on turning paper into a beautiful Christmas tree:
Christmas tree made of paper (photo instruction)


Origami tree (diagram)


Video instruction:
Christmas tree made of paper with your own hands: cardboard cylinders from toilet paper


Video instruction:
Christmas tree made of green paper

Video instruction:
Corrugated paper Christmas tree


Craft "Christmas tree" from paper (video instruction)
How to make an origami tree out of paper (video)
How to make a Christmas tree from paper strips with your own hands

You will need:
Colored cardboard or green colored/wrapping paper
Tape (in this example, its width is 6 mm and length is 25 cm)
Fine brush
1 brightly colored bead (golden in this example)
Several beads of a different color (in this example, 12 brown beads)
Scissors
Ruler
Pencil
1. Draw and cut strips of colored cardboard 4 cm wide and long: 8, 10, 12, 14, 16 and 18 cm.


2. With the tip of scissors or a needle, make 3 holes in each strip: 1 on the right, 1 on the left and 1 in the middle.


3. Take a thin brush and make a small loop at one end.


4. Start threading a thin brush through all the holes in the paper strips. Start with the longest strip and add the next one in descending order. Add 2 beads between each strip.
5. When all paper strips are used, add 1 bright bead to the top of the Christmas tree.


6. Make a loop at the end of the brush so that the craft can be hung. Cut off the excess part of the brush.
7. Pass the ribbon through the loop and tie the ends into a knot.
Volumetric Christmas tree made of paper for children

You will need:
Scissors
Compasses or several round objects of different diameters (saucers and plates, for example)
Wooden bead and sandpaper (optional)
A skewer or any smooth thin stick.
1. Draw several circles of different sizes on paper and cut them out.

2. Fold each circle in half, in half again, and in half again.


3. Cut off the tip of each folded circle with scissors.


4. When all the circles are ready, unfold them and start stringing on a skewer, starting with a large circle and ending with a small one.

5. Insert a skewer into a wooden bead and use sandpaper to make the underside of the bead more even so that the tree stands better.
*Instead of a bead, you can make from a cardboard platform for a fir-tree. Just cut out a square or circle from thick cardboard and insert a skewer into it. For reliability, you can glue several cardboard circles and then insert a skewer into them.
DIY paper Christmas tree. We use old magazines.

You will need:
2 magazines
PVA glue
5 wine corks (optional)
Aerosol paint (optional).
Below is a video instruction
1. Fold each page of the magazine as shown in the pictures. Bend the lower end and hide inside.


2. Repeat the process until all pages are folded. You will have half a Christmas tree.
3. To make a complete Christmas tree, take the second magazine and fold its pages in the same way as before.
4. Glue both halves together.

5. If desired, you can make a Christmas tree trunk, for this, glue 5 wine corks and glue them to your paper Christmas tree.
6. You can decorate the Christmas tree with beads on a thin wire, tinsel, or other small decorations.
Video instruction
Christmas tree made of colored paper (master class)

You will need:
Thick cardboard or fiberboard
PVA glue, super glue or hot glue
Colored cardboard (possible with patterns and ornaments).
1. Cut a rectangle out of cardboard, which should be slightly larger than the base of the future Christmas tree.
2. Stick the skewer into the cardboard and secure it with glue.


3. Cut out several circles of different sizes and colors from colored cardboard, 3 circles in each group. Make a small hole in the center of each circle.
4. Add a drop of glue to each hole and start stringing circles onto the skewer, starting with the largest. The distance between the circles can be up to 1 cm.
5. Cut out a star from cardboard and glue it to the top of the Christmas tree.
Do-it-yourself volumetric Christmas tree from old paper

You will need:
Cardboard or foam cone
PVA glue or hot glue
Scissors
Pencil
Compasses or round object (plate, saucer)
Jewelry (bells, beads, tinsel).
1. Draw several circles of the same size on the newspaper and cut them out.

2. Fold each circle in half and in half again.

3. To make the base of the Christmas tree, you need to cut out a few squares, fold them into triangles and glue them exactly to the base of the cone as shown in the image.

4. To cover the top of the cone with paper, simply glue a piece of newspaper to it (see image).

5. Start wrapping the cone with folded newspaper circles starting at the bottom and working towards the crown (see image).

6. Glue a bell, star, or other decoration to the crown. Around the Christmas tree you can glue tinsel, small Christmas decorations or just a bright ribbon or lace.
Beautiful Christmas tree made of paper with roses for the new year

You will need:
Old newspaper or an unnecessary book
PVA glue
Scissors
Beads (optional).
To learn how to make these roses, visit HERE .
1. Make a cone out of paper and make many roses - a few large ones for the base of the cone, medium ones for the central part, and small ones for the top part.
* If you purchased a foam cone, then you need to paste over it with pieces of newspapers (see image).

2. Start gluing the paper roses to the cone, starting at the bottom of the cone and moving towards the crown.


3. If desired, you can glue 1 bead in the center of the roses - this way you can decorate all the roses or just some.
4. You can add one more decoration to the crown - it can be a piece of tinsel, a bell or an asterisk.
* If you want to learn how to make an asterisk, visit HERE .
Christmas tree made of paper (in stages)

You will need:
colored paper, colored cardboard, an old music notebook or an unnecessary book
PVA glue
Curly scissors and plain scissors
Thick cardboard
Glue brush (optional)
Jewelry (sequins, bows, beads, buttons, stars).

1. Cut out a platform for the future Christmas tree from cardboard.
2. Insert the skewer into the cardboard platform and secure it with glue.
3. Start cutting out squares from paper. It will be more beautiful if you cut with curly scissors (they can be found in stationery).
* You need to cut 9-10 squares - first 9 squares with a side of 20 cm, then 9 with a side of 18 cm and so on, reducing each group of squares by 2 cm.
* Choose the total number of squares yourself. You can also choose the size of the squares yourself - if your Christmas tree is high, then you can reduce the size of the next group of squares by more than 2 cm, and if it is short, then less - 1-0.5 cm.
4. Cut out a few small squares from cardboard that will be between the squares of colored paper.

5. Start stringing 3-4 squares of colored paper, between which there will be a small cardboard square.
* If you use 3 squares between the cardboard parts, it is most convenient to cut 9 squares of each size.
* You can fix the squares on the skewer with glue.
6. To decorate the Christmas tree, you can apply gently with a brush a little glue on the tips of the squares, then gently sprinkle sparkles on them.
7. On the crown, you can glue a button with a bow or something else - an asterisk or a bead, for example.
Original do-it-yourself Christmas tree made of colored Japanese paper

You will need:
colored cardboard
Thick paper with a pattern (can be replaced with colored cardboard)
Colored or wrapping paper (you can use a page from an old magazine)
White sheet of A4 paper
2 skewers
Pencil and ruler
PVA glue or glue stick
Scissors
Darning needle (if necessary).
1. Cut out 14 rectangles of 2 of the same size from colored cardboard. In this example, 2 rectangles are 21 x 28 cm, two more are 18 x 28 cm, then (also 2 each): 16 x 28 cm, 13.5 x 26 cm, 12 x 26 cm, 9 x 25 cm, and 6 x 22 cm.
2. Preparing the basis for the Christmas tree:
Cut plain A4 paper into strips 2 cm wide. Roll the strip into a circle, add a little glue at its end and glue the next strip (see image). Repeat the same action until you glue all the strips into one large circle with a diameter of 3.5 cm.

* The larger the circle, the more stable the tree will stand.
3. Take a large rectangle of colored cardboard and start folding it with an accordion, 1.5 cm wide. Cut the ends of the accordion into a rounded shape.

4. Fold the accordion in half and glue the sides - you have a semicircle.

5. Repeat the same with the second rectangle, then glue the two semicircles to form a circle - these will be the branches of the lower level of the tree.

* To secure the halves of one circle, you can pass a thin wire through them and twist its ends from the back.

6. Make similar images for 6 more levels of your Christmas tree.
7. Take colored or wrapping paper and cut off several small rectangles from it, about 2 cm wide, with which you will later cover the skewers.
The skewers will play the role of the tree trunk.
8. Thread the skewers through one large circle. Since you need to leave gaps of about 2 cm between the circles, these gaps need to be hidden, so we will wrap them in small rectangles of colored paper.

9. After each circle, wrap the skewers with colored paper, 2 cm wide, and glue its ends. Continue repeating this action until all branches of the tree are put on skewers.
10. It remains to insert the skewers into the round base (see point 2) and fix them with glue.

* You can decorate the top of the Christmas tree to your taste - a paper star, a bead or a button.
Big Christmas tree made of paper

You will need:
Sheets of green paper (preferably 2 shades - the lighter ones will be at the top of the Christmas tree, and the darker ones at its base)
Cardboard cylinder 2 pcs. (from paper towels)
PVA glue or hot glue
Scotch tape (if necessary)
Big bow.

1. From green sheets of paper, you need to twist a lot of cones of about the same size. Fasten the edges of the cones with tape or glue so that the cones do not unwind.

* Try to keep all the cones in one place for attaching with adhesive tape or gluing with glue so that they are not visible when creating the Christmas tree.
2. Glue two cardboard cylinders together so that the tree can become tall.

3. On the cylinders, draw lines at the same distance from each other so that you can evenly glue the cones.
4. Start folding the tree. Apply glue to the tip of one cone and press it to the cylinder, or rather to the drawn line. It is better to start gluing the cones from the bottom up.

* Glue so that the opening of the cone is on the side of the cylinder (i.e. tree trunk).
5. Glue the entire row of cones, pressing them firmly against each other and, if necessary, gluing them together.
6. Move up and glue the next row of cones. But you should not stick cones on the top of your head.

For the top of the Christmas tree, it is best to glue several cones together. Glue a large bow to them and "put" the whole structure on the cylinder. It doesn't have to be glued on.

