And how to cut the silhouette of the dress. A-line dresses are the perfect solution for any type of figure! Learning to create patterns for trapeze dresses on our own
Fashionable dress with cuffed sleeves. The owner of such a dress will look elegant and stylish, regardless of age and build.
In tailoring the dress is simple, here it is important to guess with the fabric. If you are just starting to learn tailoring, choose more docile fabrics. For masters with experience, advice is not needed, they will do everything correctly and without prompting.
Soft fabrics are great. A combined dress with sleeves made of transparent silk or lace fabric looks good.
The pattern is given in life size without seam allowances in four sizes. Printed on a regular printer.
Note: Regarding the size - here you should focus primarily on the girth of the chest, since the style of the dress is quite loose and the increases along the waist and along the hips are quite large.
The pattern is sent instantly by e-mail.
Click the button GET A PATTERN- a few simple manipulations and the pattern appears in your email box. It is this method of obtaining a pattern that is the most optimal for today - quickly, inexpensively, without advertising and without problems. When checking your mail, make sure that you have entered the address indicated on the site. You open a letter with a pattern, print it out on a regular printer, glue it, cut it out to the desired size and the patterns for cutting are ready.
Even in exceptional cases, if you have any questions upon receipt of the pattern, we will not leave you and will bring the matter to its logical conclusion.
Note: first print one sheet with a 10x10 cm control square. Check that its sides correspond to exactly 10 cm. Achieve this using your printer settings. Now you can print all the pattern sheets and assemble them into one puzzle, according to the pattern, using narrow adhesive tape or a glue stick.
Before cutting out the pattern pieces, take a tape measure and compare your measurements with the pattern dimensions. Check all girths, length of the product. Determine the optimal size for yourself and cut out the details of the pattern.
CUT DETAILS
Fabric consumption 1.8-2.0m (depending on size) with a width of 1.4-1.5m.
ATTENTION! The pattern is given without SEAM ALLOWANCES! (When cutting, you must add them).
- Before the dress - 1 piece with a fold
- The back of the dress - 2 parts
- Sleeve - 2 parts
- Cuffs - 2 parts
- Front neckline - 1 piece with a fold
- Turning the neck of the back - 2 parts
TAILORING THE DRESS
- Overcast all open cuts during sewing. Each knot after the sewing operation should be ironed (iron, ironed, etc.) - this process is called wet heat treatment (WTO).
- Reinforce the details of the facings and cuffs with an adhesive gasket.
- Process the darts on the front of the dress and on the back.
- Stitch the middle seam of the back to the mark, leaving a place on top for sewing in the zipper.
- Sew the zipper into the center back seam.
- Then connect the back and front along the side and shoulder sections.
- Stitch the shoulder sections of the facings. Finish the neck.
- Prepare the sleeves: stitch the cuts, gather the bottom, sew the cuffs.
- Stitch the sleeves into the armholes.
- It remains to hem the bottom of the dress.
Besides:
Silk paper for transferring the pattern from the pattern sheet; pencil, paper scissors; tape measure; tailor's pins; tailor's chalk; a piece of cardboard; glue stick; scissors for cutting and small scissors for needlework; burda carbon paper, gear wheel for pattern translation; needle sewing machine and a hand sewing needle.Pattern:
Rounded scallops along the lower edge of the front, back and sleeves, red grosgrain ribbon along the entrances to ...
dress pattern
…Pink colour so it is easy to find on the pattern sheets. Lay the silk paper on the pattern sheet and pin. Translate the details of the pattern in your size along the appropriate contour lines and do not forget about markings and inscriptions. Pay attention to the lines and data for the 120 V model. Details 11 and 12 are templates for the scalloped hem of the dress and sleeves. Glue the re-shot scallops to the cardboard and cut them out.Tip: the cutting process can be greatly facilitated if parts 3-5 and 7-10 are retaken twice and parts 4, 5, 7 and 8 are glued along the middle lines.
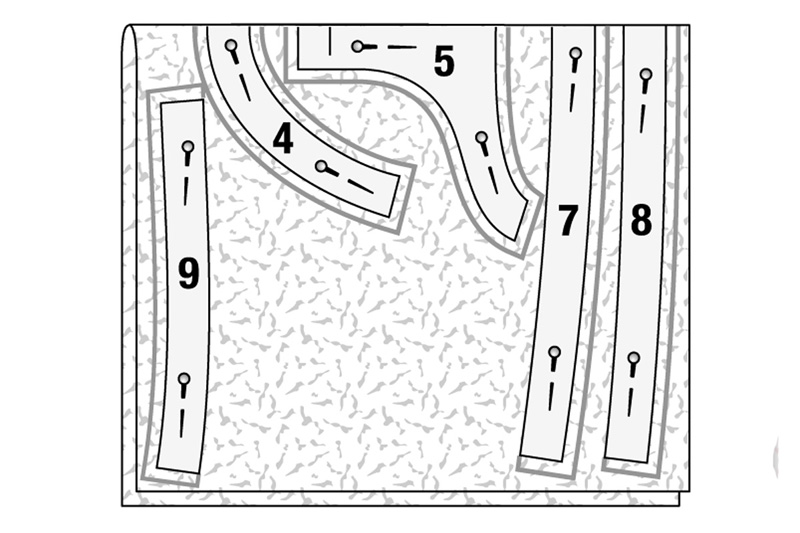
Pink extra pattern on pattern sheets A and BA: Items 1, 2, 4 and 5
B: details 3, 7-12
Sizes 34-44
Layout plan
…shows how to arrange paper pattern pieces on fabric. Pin the details of the paper pattern.
1 Front with fold 1x
2 Folded back 1x
3 Sleeve 2x
4 Turning the front neck with a fold 1x
5 Turning the neck of the back with a fold 1x
7 Turning the lower edge of the front with a fold 1x
8 Turning the lower edge of the back with a fold 1x
9 Sleeve facing 2x
10 Burlap pocket 4x
Step 1. Open front and back

From one edge of the fabric, measure 75 cm and put marks with pins (front side). Then fold the fabric right side inward, aligning the edges at the marked line. Place the details of the paper pattern 1 and 2 on the fabric to the folds. Pin it. Mark the allowances around the details of the paper pattern with a tailor's chalk: 1.5 cm for all seams and along the cuts. Cut out the details.
Step 2. Cut out the rest of the details

Lay the remaining piece of fabric right side up. Place the details of the paper pattern on the fabric according to the layout plan and pin. Details indicated on the layout plan (lower left) with dotted lines, cut out a second time symmetrically (see advice on the left). Mark the allowances around the details of the paper pattern with a tailor's chalk: 1.5 cm for all seams and along the cuts. Draw a bias binding for the air loop © directly on the fabric: 6 cm long and 2 cm wide. Cut out the details.
Step 3. Interlining G 785
Fold the interlining in half lengthwise with the adhesive side inward. Place parts 4, 5, 7 and 8 on the interlining to the fold, put on part 9. Pin. Along all cuts, except for the upper cuts of the facings (parts 7, 8 and 9), draw allowances 1.5 cm wide. Cut out the details. Iron the gasket to the details from the wrong side: details 4 and 5 - to the corresponding parts from the main fabric, details 7, 8 and 9 - along the lower sections of the front, back and sleeves.
Step 4. Seam lines and markings

Fold the parts duplicated by the gasket in half again with the right side inward / right sides, pin the paper pattern parts again. Transfer the contours of all pattern details (seam lines) to the wrong side of the cut details using a gear wheel (cutter) and carbon paper. For pockets on part 1, the alignment lines and cuts, on parts 2 and 5, the lines of the middle of the back along the folds from the top to the transverse marks, transfer to the front side with large running stitches.
Step 5. Interlining formband

Iron the interlining formband from the wrong side along the cuts of the necks and armholes of the front and back so that the chain seam on the interlining is aligned with the marked seam line on the cut details.
Step 6. Darts

Before fold along the middle line of each chest tuck front side in. Pin off the lines of the tuck, sew from the side cut to the top of the tuck. Make a notch at the beginning of the line. At the top of the tuck, do not backtack, but tightly tie the threads of the stitch. Press the tuck depth down.
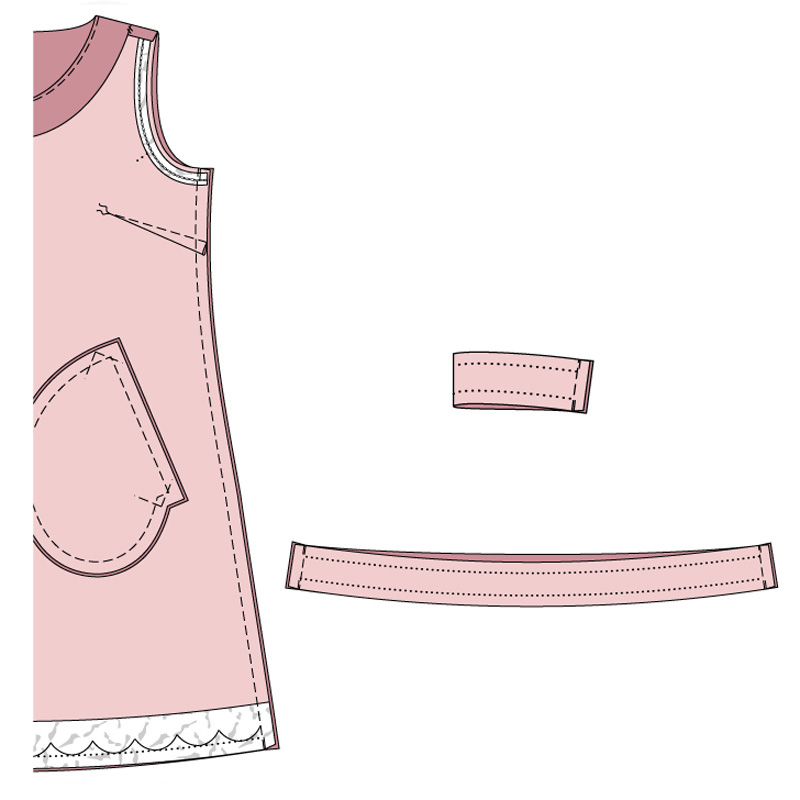
Step 7 Pocket Entrances

Iron strips of padding measuring 16 x 3 cm to the front over the markings of the pockets. Pin one burlap of each pocket to the front right side to the front side, aligning the marked lines of the pocket. Lay a line around the marked line of the pocket at a distance of 2 mm, at the ends of the line, lay the line across. Before cutting between the seams, make oblique notches in the corners close to the stitches. Turn the burlap of the pocket to the wrong side through the slot, iron the entrance to the pocket.
Step 8: Sew Ribbon

Cut the ribbon into 2 equal pieces. On each segment, mark the middle. Pin the middle of each ribbon at the top end of the pocket (corner). Turn the tape from the corner down and pin along the entrance to the pocket. Iron the corner. At the lower end of the pocket, tuck the ends of the tape along the alignment lines obliquely to make a corner. Iron on. Place one end of the tape under the other end. Sew the rep tape along the pocket entrance to the edge. Stitch the straight outer edges of the tape without fastening the pocket burlap. Leave the ends of the stitches hanging down.
Step 9 Pockets

Lay the other burlap of each pocket over the already sewn pocket burlap, right side to right side. Pin the pocket burlap along the marked seam line. Go ahead. Overcast seam allowances. At the ends of the pocket, stitch the corners of the rep tape to the edge, fastening from the wrong side of the pocket burlap. Bring the ends of the threads of the lines with a needle to the wrong side and fasten.
Step 10. Shoulder seams, air loop

Before lay on the back with the right side to the front side, cut off the shoulder sections. Go ahead. Iron the seam allowances and overcast. Do the same for the shoulder seams on the neckline. Iron the seam allowances. Overcast the inner cuts of the facing. Fold the bias tape for the air loop in half lengthwise with the right side inward. Lay a line at a distance of 5 mm from the fold. Do not cut the stitching threads short, but thread the darning needle through the eye and tie tightly. To turn the needle out, pull the eye forward through the handle.
Step 11. Turning the neck
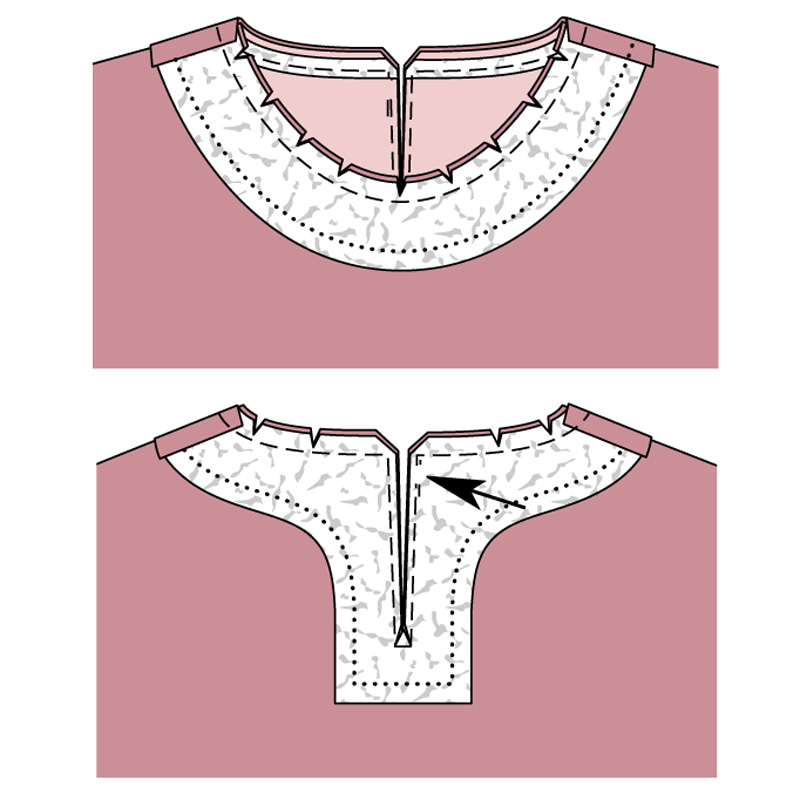
Lay the neckline on the dress right side to the right side, aligning the shoulder seams. Chip the cut marks and neck lines. Sew along the marked neck line and around the opening mark at a distance of 3 mm, leaving a 1 cm section open in the seam along the right edge of the opening at a distance of 5 mm from the neck line for the air loop (arrow). At the bottom end of the slit, sew a few stitches across. Cut the allowances along the cut of the neck close to the line, make notches in the areas of rounding. Cut the back and facing between the lines, make notches in the corners.
Step 12: Finish the neckline and back slit

Form an air loop from the roll. Insert the loop between the back and facing, pull the ends through the open sections outward. Sew up the open section of the seam. Turn the neck facing upwards and stitch over the seam allowances of stitching close to the seam to the maximum possible length. Turn the facing to the wrong side, iron the neck. Sew the inner edge of the facing to the allowances of the shoulder seams. Sew a button to the left edge of the back slit according to the loop.
Step 13: Marking the Scalloped Edge

Along the lower sections of the front, back and sleeves, mark the scalloped squares with a pencil. For this, lay out the details wrong side up. Apply templates with scalloped edges along the marked lines of the bottom: on the front and on the back, using template 11, draw 12 scallops, respectively, on the sleeves using template 12 - 6 scallops each.
Step 14. Side seams, sleeve seams, facing seams
Before lay on the back with the right side to the front side, chop off the side sections (control mark 3). Go ahead. Fold the sleeves lengthwise with the front side inward, pin off the sections of the sleeves (check mark 4). Go ahead. Iron the seam allowances and overcast. Similarly, perform the side seams on the facing of the lower cut of the dress (control mark 6). On the facings of the sleeves, chop short sections right side to the right side, stitch. Iron the seam allowances.
Step 15. Stitch the facings

Overcast the upper sections of the facings. Pin the bottom edge of the dress to the bottom edges of the front and back, lining up the side seams. Lay the line along the marked scallops. Stitch length: 2-2.5 mm. In the corners between the scallops, do not lay the line exactly into the corners, but sew one stitch across. Pin the facings of the sleeves to the lower sections of the sleeves with the right side to the front side, aligning the seams of the sleeves with the seams of the facings. Stitch along the scalloped edges.
Step 16 Finish the Bottom

Trim seam allowances close to the seams. In the corners and rounded areas, make notches close to the stitches. Turn the facings to the wrong side. Sweep out the scallops. Iron the edges. Sew the inner edges of the facings by hand with loose stitches.
Step 17: Roll up the sleeves

To gather the hem of each sleeve from to, lay stitches on both sides of the marked seam line for sewing in the sleeve with large stitches. First, pin each sleeve only to the bottom of the armhole with the right side to the front side, aligning the seam of the sleeve with the side seam, as well as transverse marks 5 on the sleeve and on the armhole in front. Then align the upper transverse mark on the collar of the sleeve with the shoulder seam and pin off. Fit the sleeve along the rim to the size of the armhole, pulling the fabric onto the threads of the gathering lines. Chip the sleeves with the armhole, evenly distributing the assembly. Pull up the sleeve.
Step 18: Stitch in the sleeves

Sew sleeves from the side of the sleeves, starting the lines from the seams of the sleeves. Remove basting and gathering stitches. Iron the stitching seams of the sleeves gently from the side of the sleeves, ironing the assembly. Overcast the allowances of each seam of the sewing in of the sleeve together. Iron the seam allowances for sewing in the sleeves on the sleeves.
Photo: U2/Uli Glasemann. Illustrations: Karin Niering. Text: Marianne Simon.
The material was prepared by Yulia Dekanova
Beautiful models of a flared silhouette remain fashionable for women for many seasons. Even a novice craftswoman can sew this. A-line dress will look attractive on a slender girl, suitable for full ones. This style is indispensable for pregnant women. It is worth trying to cut and sew clothes of a free silhouette.
How to sew a trapeze dress
You can choose options for flying dresses for all occasions by looking at photos in fashion magazines and sew them yourself. It is good to wear them with elegant jewelry, a suitable bag. It will look beautiful on the figure:
- warm sundress for autumn;
- long evening dress with raglan sleeves;
- short dress with pleats;
- classic model in black and white fabric;
- elegant dress with an elongated hem at the back, decorated with a flounce;
- bright summer sundress a-silhouette.
To sew a trapeze dress, you can use a ready-made pattern for modeling. Experienced craftsmen can do the work themselves. Beginners can make a template from a T-shirt or T-shirt. For a girl, you can sew a dress without a pattern. For work you need:
- choose the right material;
- take measurements of the girth of the hips, waist, length of the product;
- buy a fabric with a margin of 5 cm for seams in a long size, threads, oblique trim.
Trapeze dress - pattern
It’s easy to make a free-style model if there is a ready-made base pattern. It is only necessary to make a simulation, as in the photo. The pattern of a trapeze dress is performed as follows:
- circle the existing contour on paper;
- set aside 6-7 cm along the hem towards the side;
- connect the dot with a line to the armhole;
- for greater freedom of style, you can draw a straight line down from the top of the undercut to the hem;
- make a cut on it;
- combine the side groove;
- cut off the excess;
- the pattern is ready.
A-line dress for a girl
It is very easy to sew summer clothes for girls. A trapeze sundress is cut out using a T-shirt as a template. You need to choose a bright material - yellow, red or green with an interesting print. The length of the fabric is finished product. A trapeze dress is sewn for a girl like this:
- the material is folded in half;
- pin a T-shirt to him;
- draw a contour;
- make a line at the bottom of the armhole.
How to cut a trapeze dress? It is necessary to measure the circumference of the girl's chest. Followed by:
- put a centimeter on the line half of this value;
- smoothly connect the obtained points with the top of the shoulder;
- of them, draw the lines at an angle downwards to the desired amount of flaring;
- cut out the silhouette;
- scribble seams;
- overcast the edges;
- process the armhole, hem and neck with an oblique trim;
- cut and stitch a pocket;
- trim with lace.

With a collar
A loose-fitting collar can change a lot. You can look at the photos in magazines and choose a variety of styles for any occasion. A-line dress with white collar colors will suit for a ceremonial event. Depending on the style of this detail, you can use outfits in different situations. Apply Collar:
- rack - for a business image;
- clamp - for a romantic meeting;
- small, round, lace - for wedding dress;
- strict, contrasting color - an outfit for serious negotiations.
Sleeve
You will need your favorite t-shirt to get the job done. The pattern of an A-line dress with a sleeve is done like this:
- t-shirt folds in four on a sheet of paper;
- sleeves are folded up so as not to interfere;
- contour is outlined;
- a line is drawn along the length of the product;
- a quarter of the volume of the hips plus 7 cm is deposited along it;
- connected by a line to the bottom of the armhole;
- cut along the contour - the base is ready;
- a sleeve folded in half is circled;
- the required length is added;
- cut out;
- the pattern is ready.
On a coquette
Combined trapezoid dresses look very impressive, in which the coquette is made of a different material. You can choose a contrasting fabric color for it. A pattern of a trapezoid dress on a yoke is made according to a pre-made sample, followed by modeling. The following options are possible:
- for a round yoke, it is required to draw a curve that repeats the neckline at a distance from it - the size is selected depending on the styles;
- in the case of a straight line, a horizontal straight line is made corresponding to its height, not more than 25 cm - the armhole line.

At one time, the style of the dress, invented by the great Yves Saint Laurent, made an extraordinary sensation. Replacing the form-fitting silhouette that has long been in demand in the fashion world, the loose cut of the trapezoid has moved away from the repetitions of the female body. Nevertheless, the image of a woman was not lost in the abundance of fabric and did not begin to resemble a veil, designed to hide the seductive curves of a female figure. Thanks to the image from Yves Saint Laurent, the dress only emphasized the extraordinary femininity and even some girlish helplessness of its owner, thereby giving free rein to the male imagination. The first, they are classic, models of a-line dresses, which appeared in 1957, were sleeveless outfits, with an A-line, without a hint of a waistline. Let's show you a popular pattern for creating a stylish a-line dress!
But despite a good period since the birth of the style, the relevance of the dress has not been lost to this day. It is still popular among women, including because of its uniqueness: in summer versions, the dress is sewn from airy, flowing fabrics, in winter, half-woolen warm models will look great.

Today's variability of the classic model will not leave indifferent any fashionista. During this time, the trapezoid has changed and gone beyond the classical model: sleeves appeared, the waist was designated, and the fashion for length changed several times.
In the 40s and 50s, a length slightly below the knee was preferred. In the 60s, women became bolder and opted for the minimum length of the dress. In the 70s, the flower children lengthened the skirt to the floor.
Learning to create patterns for trapeze dresses on our own
Today's length depends solely on the owner's mood: from a defiant mini to a strict maxi.
The cut of the dress can also be with options, so girls who want to hide the flaws of their figure should pay attention to it. For overweight and pregnant women, the trapezoid will become an assistant, hiding the volume of the figure. Depending on where the expansion of the dress begins, different tasks of draping problem areas are solved. If the trapeze starts from the armhole, almost near the shoulders, then the dress will help hide the waist or a rounded tummy. If the expansion starts from the waist, then you can divert attention from the overly wide hips.
You can complement an elegant outfit with a thin turtleneck, dressed under a dress, or an elegant jacket, which will fit perfectly into the office style.

A variety of prints and bright fabrics will not need additional decorations, as they are good on their own. But if you add them with bright accessories, then a memorable image of the hostess will be provided.
Popular in the sixties, British supermodel Twiggy is still the most famous admirer and lover of the trapeze style (see photo). And you can trust her, because she was the style icon of her time. All women of fashion looked up to her and imitated in everything: from transparent thinness and short haircut and ending with clothing preferences.

As mentioned above, the style of the dress is universal for any type of figure and will suit different age categories: for both women and girls. And in order to show off in a new thing, it is not necessary to search for the right thing in clothing stores. It is enough to set a goal and then you can sew Nice dress on one's own.
There is an option to use ready-made patterns, which today can be downloaded from any site, but we suggest building it yourself, especially since the pattern is simple and even a novice craftswoman can handle it. At the same time, it doesn’t even matter what time of the year the dress is sewn and whether it will have a sleeve: the same pattern is used in both the first and second cases, and the sleeve pattern is built separately.
A pattern of a trapezoid dress is built like a regular pattern, with the spacing of individual measurements. A trapezoid is good because it does not need darts for the waist.

From these drawings, you can make different models of a trapezoid: both classic A-line silhouettes, with different skirt lengths, and a boat dress, with a characteristic neckline.
For the summer version, you can do it even easier: just take your T-shirt, circle it on the fabric, adding allowances for the seams and expanding downwards, and the pattern is ready.
This dress will look both on its own and with an additionally dressed belt.

The richness of the texture and color of the fabric, of course, is the preference of the fashionista. As for fabrics, it is advisable to choose flowing, well-draped materials - they will add their touch to the future image of the girl.
Be trendy, be stylish and be talented.
Video on the topic of the article
In order to fix the material and finally make sure that it is possible to sew a dress on your own, we present to your attention a video:
A dress or a sundress-a-line is the perfect solution for any type of figure! Modern models women's dresses are striking in their diversity. But how to choose your ideal style, which will not only hide the flaws of the figure, but also emphasize its dignity? A-line dresses and sundresses are a unique solution for women of any age and physique.

What is a trapezoid style?
The name of the style speaks for itself. After all, its pattern is made in the form of a trapezoid, the narrow part of which is directed upwards. This design solution allows you to visually adjust the figure, giving it a feminine shape. Today you can find various variations of styles on the theme of the trapezoid. It can be both classic styles and casual models. But all of them are united by practicality and ease of use. Therefore, if your collection does not yet have a sundress or a-line dress, it's time to get it. After all, in it you will always look fashionable and modern.

Dresses and trapeze sundresses also fell in love with pregnant women. After all, its free cut does not restrict movement and gives the image elegance. And this is exactly what you need in the period of expectation of the child. 
Sewing material
This fashion style can be made from almost any fabric. However, the most popular models of world designers are made from linen, thick knitwear, cotton or staple. The choice of material depends not only on the time of year, but also on the whole image as a whole. It’s good if your collection includes sundresses and a-line dresses made from different fabrics and designed for different cases. After trying on this piece of clothing once, you can no longer refuse it.

What to combine fashion dress trapeze or sundress?
The choice of accessories for this model will depend not only on the situation, but also on the material from which it is made. So, linen sundresses, trapeze dresses go well with jewelry made of wood or natural stones. At the same time, shoes with both flat soles and wedges are welcome.
Dresses, trapeze sundresses made of thick drape or knitwear, which are customary to wear in the demi-season period, are usually worn with high boots or ankle boots. From outerwear, you can give preference to a raincoat or an elongated fur coat. If you have purchased summer dress from staple or thin cotton, you can safely combine it with sandals and bright jewelry. The main thing is that the whole outfit looks harmonious in color and style.

Today, lace trapeze dresses, which are lined with light fabric, are very popular. Wearing such a model, you will get a very gentle and romantic look. In this case, it is worth giving preference to pastels and any light colors. Indeed, this season, calm colors have received the greatest popularity.

A-line dress styles for slim girls

It would seem that owners of ideal proportions do not need to choose a trapeze style. However, do not immediately write off this model from the accounts. After all, with the help of a flared dress, you can perfectly diversify your wardrobe and impress others. A-line dress with sleeves or sleeveless for slender girls can be either short or mid-knee length. In this case, it is worth focusing on the details. For example, pick bright shoes high heels that accentuate slender legs. A-line dress goes well with wide-brimmed hats and massive jewelry. But remember that only girls with a thin physique can try on such accessories.
A-line dress style for full

Pear-shaped style will be an excellent choice for full ladies. After all, a sundress or a-line dress hides figure flaws and visually slims. At the same time, you should pay attention to monophonic models and large prints. If you cannot boast of the ideal proportions of the legs, then choose a model that is mid-knee length. However, in this case, heels will be a mandatory component. You can also try on long trapeze dresses. But do not choose too wide a cut. The hem of such a dress should be no more than shoulder width. Otherwise, you will get the image of a very obese lady.
Sundress, a-line dress: do-it-yourself pattern
Today, many people sew clothes with their own hands. The trapezoid style, the pattern of which is very simple, can be created at home. To do this, you need a piece of fabric equal to the length of the future product. Of all the measurements, you will need only the circumference of the chest. According to the scheme, which is presented below, you should make a markup on your piece of fabric.

Modeling a pattern of a trapezoid dress.

You can independently adjust the width of the dress, as indicated in the diagram. But do not forget about the darts in the chest area. After all, it is they who make the style of the dress feminine, and not like an ordinary bag. If you are interested in a pattern of an a-line dress with a sleeve, then you can take measurements from any T-shirt that fits you well. This method is well suited for beginners in the field of sewing.

If you are using knitted fabric, then your sewing machine must be equipped with a special foot for stretch fabric.
The seam should be processed along the line of the shoulders and along the entire length of the product. If the fabric falls off a lot on the cut, then it needs to be processed on an overlock. As you can see, sundress and a-line dress, the pattern is very simple, can be created in just half an hour. At the same time, you will receive a unique product that cannot be found in any designer collection in the world! You can decorate the dress with a brooch or other accessories, depending on your image.