Group decoration for winter in kindergarten. How to decorate a kindergarten for the New Year? Ideas for children and adults. We create festive figures from cardboard
Let's decorate our beloved house or garden for the wonderful holiday of the New Year! Fairy pendants, garlands, decorations for doors or windows! In anticipation of the fabulous new year holiday I want to bring magic to every corner of the apartment, the kindergarten group and the school office.
The process of creating a festive atmosphere helps to pass the agonizing wait and tune in to the right wave.
To make interior decoration more interesting, with your own hands, together with children, you can prepare simple but original decor elements. Even during their manufacture, you will experience a lot of pleasant moments and get a powerful charge of positive emotions.
We suggest trying to make such crafts to decorate the room for the New Year with your own hands, such as:

Christmas tree from a garland. It is enough to fix the garland on the wall in the form of a Christmas tree and hang a few Christmas balls.

Christmas tree made of snowflakes. She can decorate a window or a wall - just form a pyramid out of snowflakes.

As a decoration for a kindergarten for the New Year, you can make collages from photographs of children. For example, turn each photo into Santa Claus by gluing a cap and a cotton beard to it.
With the approach of the most beloved holiday of the children, each teacher also turns into a designer, trying to please his wards with the elegant decoration of the group's room.
So that on the eve of the New Year the children come to kindergarten with joy, and the unique feelings of inspiration and anticipation of the coming magic do not leave them for a minute, we ourselves have to become a little magicians. Enlivening and decorating the interior with garlands, pendants, snowflakes, coniferous branches, cheerful holiday characters, etc., etc. See what ways teachers from different regions of Russia and abroad have found to create a cozy atmosphere and pre-holiday magic. Colleagues generously share their ideas and achievements in the field of New Year's decoration of groups in the publications of this section.
Great options for New Year's interiors - for your inspiration.
Contained in sections:Showing posts 1-10 out of 2608 .
All sections | New Year's decoration. We decorate the group for the New Year
Target: to consolidate the knowledge and skills to draw patterns based on the Gzhel painting, conveying its characteristic features. Software tasks: Educational: -continue to teach the features and elements of Gzhel painting; - consolidate drawing techniques in technology "dab with shadow", "droplet"...
 The job of a music director creative: writing scripts, creating costumes and images of heroes and music room decoration. In our kindergarten to registration the halls are serious. Together with colleagues, we are developing a hall project, involving creative...
New Year's decoration. We decorate the group for the New Year - New Year's decoration of the group
Publication "New Year's decoration ..."  This is the end of everyone's favorite season, winter! Such a long-awaited, fun time for children of all ages: snowball fights and ice slides, frosty patterns on glass and the time of New Year's miracles. And our task is to make this holiday bright and memorable. Choose decoration for...
 MAAM Pictures Library
 "Kingdom of Zimushki Zima" New Year the most beloved and magical holiday. Both children and adults are waiting for him. This year in our kindergarten there was a competition for the best design of the group for the New Year holidays. The main criteria were: the design of the group in the same style, attracting...
 This year New Year's party in preparatory group"B" was based on the fairy tale by G.Kh. Andersen "The Snow Queen". The main characters of fairy tales, and these were Uliana Kostyuk and Denis Kravchuk (Kai and Gerda) were looking for snow queen that stole from children new Year gifts. On the way to the children...
New Year's decoration. We decorate the group for the New Year - Photo report on the design of the "New Year's Tale"
 Decoration of the hall in kindergarten for the New Year holidays. We, like children, expect a miracle, Not looking at our age, at years. And we are still waiting for the New Year, And we are always waiting for a miracle and joy! May this winter and magical holiday Fulfill all the desired dreams: Love, health, good ...
 Winter is a wonderful time of the year: wonderful nature and main holiday, which we are all waiting for - New Year! Together with the children we prepare decorations for the long-awaited holiday. Making windows in apartments, houses, shops, shop windows of shopping centers, various institutions with improvised means ...
Content
Are you a responsible mother who volunteered to decorate a kindergarten for the New Year, a teacher who is entrusted with this solemn and festive mission, or just a needlework lover who will gladly help make the child’s second home beautiful on New Year’s Eve? In all these cases, our kindergarten decorating tips and ideas will come in handy. We have collected the coolest ideas, so stock up on material, there is still time to prepare everything.
We decorate the walls
For the New Year's decoration of the walls to the maximum, the following materials and tools will be needed:
- colored paper;
- colored cardboard;
- felt;
- tapes;
- twine;
- Christmas balls;
- twigs;
- cones;
- paints;
- scissors;
- PVA glue;
- paper in silence;
- glue gun;
- ruler;
- patterns and stencils.
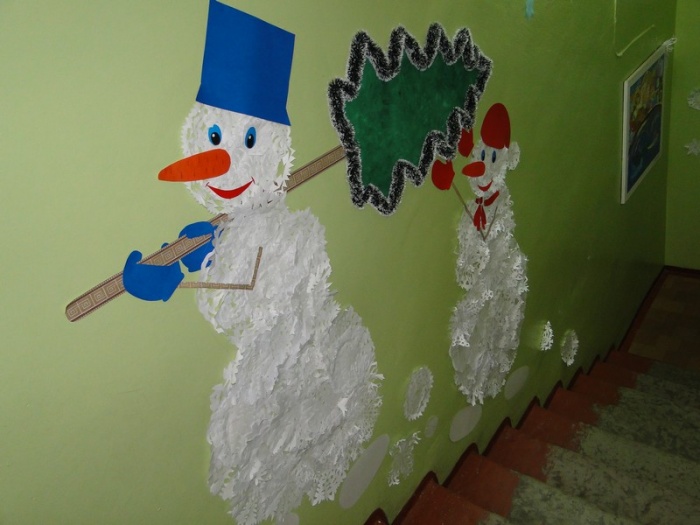
What can we do with all this list? Paper applications on the wall, for example, a Snowman from several round white balls, a Christmas tree, paper garlands, snowflakes, garlands with felt toys, garlands made of natural materials. A group decoration for the New Year might look something like this:
From white paper, you need to cut openwork circles, prepare a hat, eyes, mouth, and you can make a carrot nose out of felt.

A Christmas tree is made in much the same way. Fasten the parts with tape. A garland can be made from rectangular narrow pieces of paper or from round logs that need to be stitched with a typewriter.

From wooden sticks for the wall, you can create a whole installation - voluminous Christmas tree with balloons, bows and children's toys. Complement the composition with an electric garland and hang it somewhere on a narrow wall.

Twigs can be collected together with the children on the street. You can even give a task to parents so that they, along with their children, bring a Christmas toy for decoration.
The walls can be painted. Unless, of course, management allows and you feel the talent of an artist in yourself. Although you can always use a stencil and paints, which are then easily washed off the glossy surface of the wall.

The stencil must be carefully cut with nail scissors and use spray paint. Use a combination of paint + paper + felt and other materials to create an interesting Christmas composition on the wall.
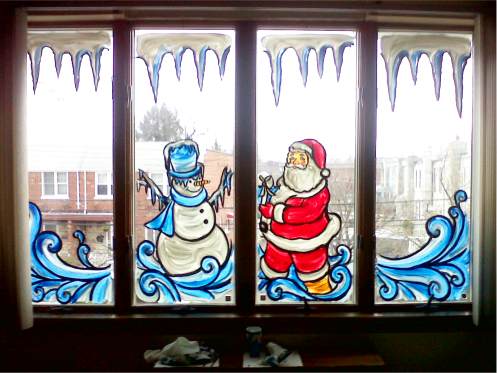
We paint windows
How to decorate a kindergarten for the New Year? Use windows! For starters, you can write them down. Use paint on glass or a folk remedy:
- water;
- toothpaste;
- natural dyes.
In a small amount of water, you need to dilute a few peas of toothpaste, add the desired natural dye and boldly go to decorate the windows in the group. The drawing will hold on all holidays, and if desired, it is usually easily washed off with water.
And you can use a regular children's stencil for drawing and a sponge for washing dishes.

We decorate windows and window sills
Do not forget that in addition to painting windows, you can also decorate them with various garlands, decorate curtains, and also use a window sill. Various paper installations with garlands are a great way to decorate a group for the New Year.

On the windowsill you can arrange a whole exhibition of New Year's works of the children.

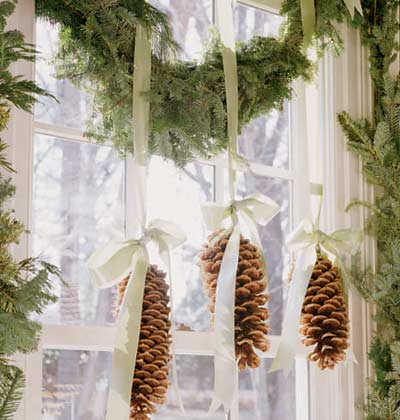
The window in the kindergarten group can also be decorated with ribbons, cones and spruce branches with Christmas toys. Use any ideas and materials that come to mind for decorations: acorns, chestnuts, walnuts, bows, beads, paper snowflakes, flowers from paper in silence. In our articles, we have repeatedly told how to make flowers from different types paper, take ideas into service for decorating a kindergarten for the New Year.
Decorate with paper flowers

Making a snowman out of disposable cups
Children like three-dimensional figures so that you can come up, touch, take a picture. For the New Year, a snowman from plastic cups. Stock up on materials:
- plastic glasses - 200-300 pcs.;
- stapler;
- black paint or material for eyes and buttons;
- orange material or nose paint;
- red paper for the mouth;
- scarf;
- Christmas decorations.
First you need to make a base of plastic cups - connect them together in a circle of the diameter that you want the Snowman to be in volume. Cups are easily interconnected with a stapler.

You need to lay rows of glasses on top of each other, creating a dome. Connect with a stapler not only adjacent glasses, but also rows.
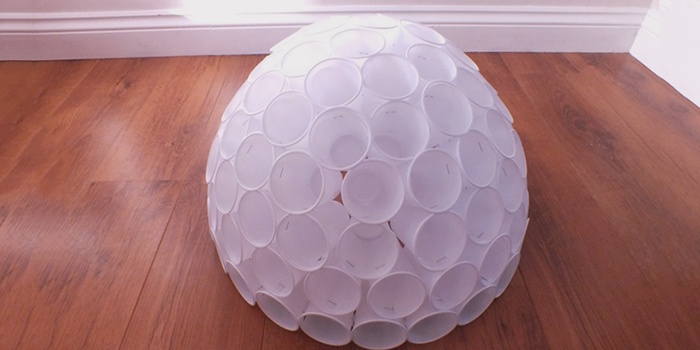
Step by step, you will need to make two or even three of these domes. After that, the Snowman needs to be decorated, to give him, so to speak, a human face. Colored glasses can be used, they can be dyed, fabric can be used, Christmas decorations or colored paper. You can put a garland in the middle of the product so that the Snowman glows beautifully - here is the decoration of the kindergarten group for the New Year.
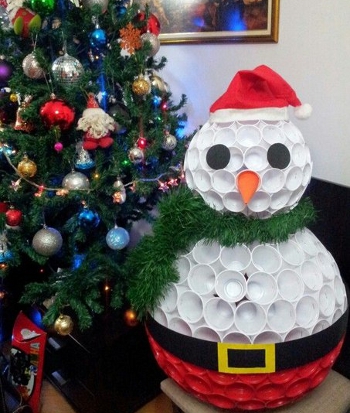

By the same principle, you can make Santa Claus or come up with some other character. Twist, think, perhaps, from plastic cups you can make a symbol of the coming year - a dog.

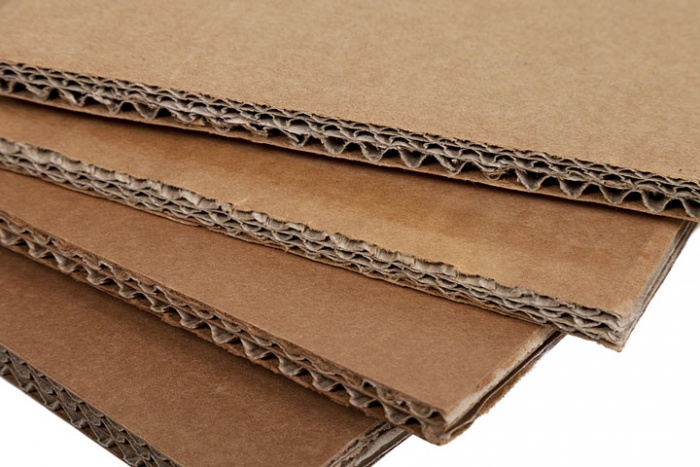
We create festive figures from cardboard
But not from ordinary cardboard, but from the one in which they bring electronics, they sell shoes. In general, you need a very thick brown cardboard. We will make of it, for example, a deer.
You can also use plywood for a deer or elk, but then you will need a little more resources - a jigsaw and strength. To assemble such a figure, you need a stencil.
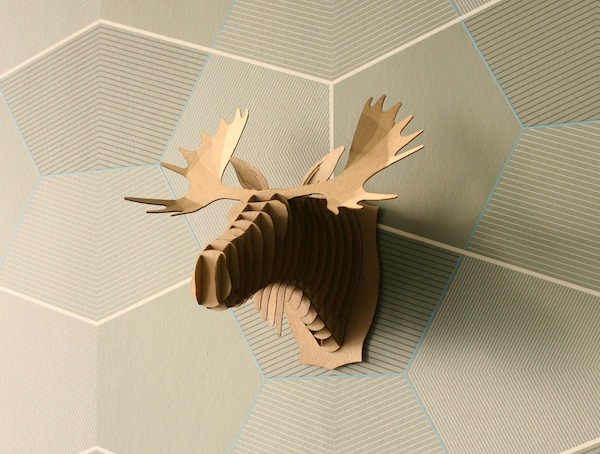
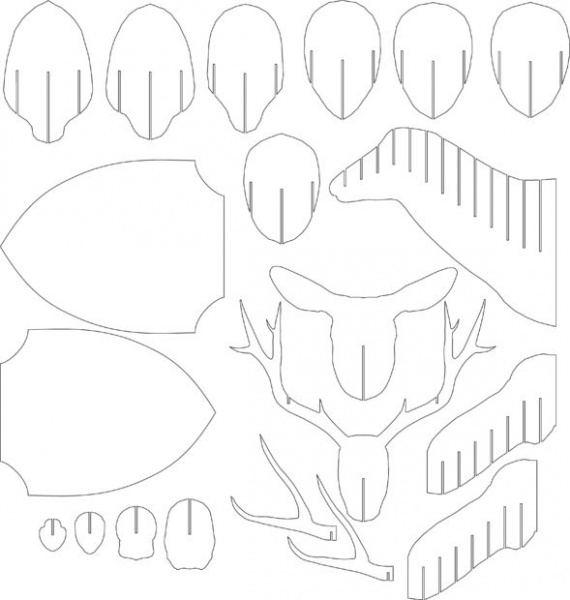
You need to carefully cut out all the details and cut the grooves so that you can then assemble the installation. You don't even need glue to work. You can use a simpler design to decorate the group for the New Year and not spend a lot of time.

And literally from three parts you can make such a deer:
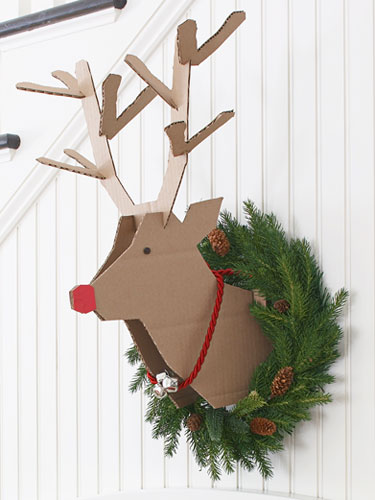
Decorating a group for the New Year in kindergarten does not have to be pompous, using all possible materials. Sometimes it is enough to fix just such a simple cardboard composition and hang a few stylish garlands and the group will already be transformed.
We decorate the stairs
We have not taken into account another field for activity - these are stairs. Decoration for the New Year in kindergarten can be placed on a flight of stairs or decorate the handrails of the stairs themselves. And here rain, decorative Christmas tree branches, ribbons, and bows with cones can come into play. We have selected several interesting ideas on the picture:

Look luxurious natural materials- twigs, berries, cones. Of course, you need to take into account the fact that the decoration is being prepared for a kindergarten, where there are a lot of mischief-makers.

As an example, take the following option - simple, but very elegant. Use plastic or Stuffed Toys.

Decorate cabinet doors
You can beautifully decorate the doors of the cabinets - such a New Year's decoration for the group in the garden can become its hallmark. For each locker, you can sew a boot made of felt or any other material, you can create beautiful wreaths from improvised means, New Year's compositions based on wooden photo frames.
Everyone is looking forward to the New Year, especially children. It is all the more joyful if the environment is conducive to the expectation of a miracle and magic. Therefore, it is necessary to take care in advance about what the interior of the New Year's kindergarten will be like.
There are many ideas for making holiday decor from improvised materials, which allows you to involve not only parents, but also children in this troublesome and at the same time enjoyable activity. Joint work, fantasizing, manifestation of creative skills unites and is remembered for many years.
This article has compiled tips on how to decorate a group for the new year using easy-to-work budget materials.
The most suitable surface on which to place themed decor is free walls. There are many design options - it can be an applique, panels, stickers and paper crafts, balls, streamers and garlands, a flat Christmas tree or wreaths.
Important! In the manufacture of jewelry, it is necessary to give preference to decorative techniques and materials that are easily removed from the surface without damaging it, and also comply with all safety standards.
Christmas tree on the wall
An interesting solution would be to place on the wall paper christmas tree. It will not take up free space and will not become an obstacle for children. The value can be chosen at your discretion.
For its manufacture you will need:
- Foam or cardboard base;
- Corrugated green paper. You can combine several shades or add unexpected bright colors;
- Of the tools you will need: adhesive tape, marker, scissors and PVA glue.
The first step is to make a frame from a cardboard sheet. If the tree is large, it is recommended to use several sheets or foam fragments.
- Strips of the required width are cut out of corrugated paper and cuts are made to the middle of the workpiece, imitating needles.
- The resulting strips are glued sequentially from bottom to top, keeping their horizontal position so that the craft looks neat. In principle, you can complicate the task and cut out strips of a wavy or zigzag shape - this will allow you to get a more expressive appearance of the Christmas tree.
- Given that the decoration should be temporary, the base is not attached directly to the wall, but a hook is used for this purpose on the back of the frame. For temporary fastening, you can use double-sided tape, securing it along the contour of the craft.
- If desired, you can make a Christmas tree trunk from a piece of cardboard or polystyrene pasted over with brown corrugated paper and attached to the craft with adhesive tape.
Panels and stickers
Panels are temporary decorations that can be easily removed or hung elsewhere. For its manufacture you will need:
- For the base you need a piece of colored fabric. If the decorative plot details are white, then it is better to take dark blue or gray with a silver sheen, for example, satin;
- For shapes and letters- dense White paper, on which it will also be possible to apply glitter or paint with paints;
- Scissors and glue- for fixing the elements of the panel on the fabric.
- The necessary details are cut out of paper using stencils, or by depicting them by hand. Then they are applied to the canvas and, having fixed their location, they are glued.
Another easy way to make a panel is with a photo frame.
To make it, you should prepare a photo frame, a piece of cardboard right size, fabric scraps and superglue. First you need to think over the plot of the application, and then proceed to implement the idea.
The work takes place in the following sequence:
- The cardboard must be attached to the fabric base, which will serve as the background of the image, and add 5-6 cm along the perimeter;
- The fabric is cut and glued to cardboard front side. The stock of matter is filled on the back side and glued;
- Figures are cut out of thick paper, which will make up the plot. They are used as a stencil for cutting out fragments from pieces of fabric and drawing their location on the canvas;
- Then the finished fragments are glued in the desired sequence and the panel is inserted into the frame.
An interesting way is to use buttons for panels. The base is prepared in the manner described above, only an insert of thin foam rubber is made between the fabric and cardboard. After that, buttons of different diameters and colors are sewn on, and the product is inserted into the frame.
Panels made of salt dough, which are kneaded from flour (1 glass), salt (1 glass) and cold water (250 ml), are distinguished by high decorativeness and originality. The dough should be tight.
Important! To prevent the material from drying out quickly, it is placed in a plastic bag.
After the main details are molded, they must be left to dry - and only after that can they be painted. Do not make them too voluminous - so they will dry longer, and it will be more difficult to fix them on the base.
The basis can be dense fabric pasted on cardboard. Finished parts are glued with superglue and framed.
You can use ready-made stickers to decorate the wall. The clipart is so diverse that it allows you to create a variety of New Year's compositions in the interior.
Fairy lights
Garlands are a universal decoration, diverse both in appearance and purpose. The garland can decorate the wall, the space under the ceiling, the window, the door and the Christmas tree. Can be purchased finished jewelry, but those that are made independently look no less festive.
A chain consisting of paper rings can be made together with a child. In kindergarten, you can ask parents and children to complete one small chain, and then combine them all into one garland - this will clearly show the kids how the New Year holiday can unite and create, bringing everyone, without exception, the joy of celebrating the New Year.
Making a chain garland is as follows:
- Of the materials and tools you only need paper, scissors and glue. Rings can be made from ordinary colored paper, foil, with a pattern, or from wallpaper scraps, which can have not only a bright pattern, but also embossing or a pronounced texture;
- Thin strips up to 1.5 cm wide and 8 to 12 cm long are cut out of paper. To make the rings more decorative, you can use curly scissors;
- The first strip is folded into a ring and fixed with glue. Gluing subsequent strips occurs in a similar way, after passing them into the previous ring.
You can make a chain of links without the use of glue. This will require:
- A template is made from thick paper or cardboard - a half of the link;
- The required number of squares or rectangles are cut out of colored paper, which I fold in half;
- The template is applied to the fold, circled and cut out;
- The chain is assembled by threading each element into the previous one.
The garland of flat circles looks original and is very quickly made. It will look equally impressive in vertical and horizontal arrangement.
For its manufacture, you will need a teip tape (sticky tape made of fabric), which is used by florists. White or colored paper, or ready-made round stickers. Alternatively, you can use medical white cotton. Then you will need a strong thread and a needle.
The manufacturing process is as follows:
- If a narrow teip tape (0.5 cm) was not at hand, then a wider one can be divided into several strips of the required length;
- When using ready-made sticker circles, one is peeled off and fixed on a tape, and the second is glued to it on the other side so that the braid is in the middle between them;
Advice! In order for the tape to become sticky, it must be stretched or warmed in the hands.
- If the mugs are made of paper, then they are smeared on the inside with glue to fix them on the tape. Instead of a teip tape, you can use a regular fabric braid or a strong thread.
A snow garland made of synthetic wool is another way to decorate the New Year's interior in kindergarten. To do this, it is enough to slightly moisten your hands with water, and form the required number of not very dense lumps of the desired diameter from cotton wool. Then, using a needle, cotton balls are strung on a long, strong thread in increments of 6-10 cm.
Garlands of thread balls look very magical, stylish and spectacular, and if they are combined with LED lighting, then a charming atmosphere is created at all - thanks to the unusual shadows that appear on the walls and ceiling of the room.
Such balls are made elementarily. This is a universal DIY Christmas decoration for the interior, since its cost is negligible, and you can use such a garland in any position and place: on the wall, under the ceiling, in the window opening and even on the Christmas tree.
Of the tools and materials you will need the following:
- Multi-colored threads that are used for knitting (yarn) or floss;
- Helium or PVA glue;
- Round air balloons;
- Colorless varnish;
- Needle;
- A tube of cream or vaseline;
- Container for glue in the form of a shallow bowl;
- Decor in the form of rhinestones, sequins, beads, small plastic snowflakes;
- To assemble a garland, you will need a ribbon with LEDs or twine.
The work takes place in several stages:
- Ordinary round balloons are inflated to the required size. Here the main thing is not to make a mistake with the diameter, balls from 5 to 7 cm will look most accurately;
- The surface of each ball is lubricated before winding - this can be vegetable oil, petroleum jelly or regular hand cream. This is done so that the thread does not stick to the ball - after it bursts, the thread structure may be deformed;
- The glue is poured into a bowl so that it is possible to wet the thread, but there is another more “clean” way - a plastic jar of glue is pierced through with a threaded needle. Pulling the thread, it will be covered with a uniform layer of glue.
Important! It is necessary that the thickness of the needle matches the thickness of the thread as much as possible, otherwise the latter will be either too dry or wet, which will affect the final result.
- The process of making a ball consists in winding a thread passed through glue on the base. The winding must be tight. If the ball is subject to additional decor, then it is performed at this stage;
- The finished product is left to dry, you can use a hair dryer to speed up the process. The thread should be not just dry, but solid. Only after that you can burst the inner ball and carefully remove it;
- The final touch will be fixing the balls on a decorative cord or a finished garland with light bulbs.
Advice! If you buy a garland that runs on batteries, and not on the mains, this will allow you to hang the decoration anywhere in the garden.
We decorate the ceiling
Ceiling decoration is no less important - this is how it is created Christmas story in the interior. There are several ways to decorate the ceiling plane.
Rain
With the help of rain, they usually decorate the ceiling, the lamp and the Christmas tree, its threads are hung along the wall or in the window opening.
There are several ways to fix the rain:
- With the help of push pins under the ceiling, you can stretch threads or fishing lines that intersect in any direction or parallel to each other. Then you can hang rain or other decor, such as voluminous paper stars to decorate the New Year's interior;
- You can fix the rain with a transparent narrow double-sided tape;
- With the help of rain, you can decorate ceiling lights;
- The old reliable way is to use cotton wool and soapy water. A piece of cotton wool is wound on a thread of rain, moistened with water and fixed on the ceiling.
helium balloons
All children love balloons and they are especially delighted with those that float in the air themselves. Decorating a group in kindergarten with them is a great solution. As ponytails, rain or serpentine can be tied to the balls, which will create a festive atmosphere with their flicker.
Important! Helium balloons are short-lived, so they must be hung about 3 to 5 days before the matinee, after which the kids can take them home.
Snowflakes
Symbol winter holidays are snowflakes that can be made from paper and fixed on any surface. They are hung on the ceiling on threads or rain, on the walls - in the form of a garland or streamer, fixed on the windows with a piece of double-sided tape. Below are a few ways to make snowflakes:
- by the most in a simple way is a method that came from childhood, when a multi-layer sector is cut off on each side, forming figures and curls. To make such a snowflake, you will need to purchase white or colored paper, a pencil and scissors. They operate as follows:
- a sheet of A4 or A5 format is smoothed out on a flat hard surface, a circle is drawn on it with a compass or using a round plate, then cut out;
- to get a six- or eight-layer sector, the resulting circle is folded several times in half (3 or 4);
- then proceed to the manufacture of snowflakes, creating beautiful pattern using ready scheme or your own imagination. Using a pencil, the pattern is applied to the workpiece, and the drawn diagram is cut out with sharp scissors;
- the workpiece is unfolded and smoothed with an iron and cloth (without steam);
- A voluminous large snowflake can be made from several fragments, each of which is cut and glued separately.
You can give originality to such a snowflake with the help of sparkles, which are applied to a surface smeared with glue;
- Using the quilling technique, you can make an elegant and very beautiful snowflake.
This is a complex method that requires certain skills and time, but the result is striking in its beauty. There is a way to make a snowflake in a somewhat simplified way.
You can use a newspaper or an old unnecessary book, or a stack of white soft paper, glue and decorative sparkles.
| First, cut out the required number of strips (2 x 20 cm) - 7 stacks, each of which should contain from 6 to 10 strips. Size may vary. It is important that the strips bend well and keep their shape; | |
| The strips are folded in half and assembled in such a way that the middle one is longer and the side ones are reduced. Excess length is cut off; | |
| The resulting petal is tied with a thread or fishing line and pressed with a heavy object, such as a book or a table lamp. You will need to make 8 similar parts; | |
| Then you need to make the core of the snowflake. To do this, 15 strips of the same length are cut out, stacked, twisted into a ring and fixed in this position with a fishing line or thread. To make the part durable, the strips can first be lubricated with glue; | |
| The petal at the end is smeared with adhesive and attached to the core. In order for the two parts to stick together firmly, you should hold them for a while, pressing lightly; | |
| The rest of the parts are glued in the same way; | |
| A dried snowflake is decorated with sparkles, lubricating its petals with glue; | |
| You can thread a thread through the top petal to hang a snowflake on a Christmas tree or window. |
We decorate windows
In kindergarten in groups there are always very large windows - is this not a reason to pay special attention to them when decorating the room for the main winter holiday!
There are many ways:
- Glasses can be decorated with gouache;
- The pattern can be applied with toothpaste;
- The window opening can be framed with paper garlands;
- Decorate with Christmas wreaths;
- Use the "vytynanka" technique;
- Decorate curtains with paper snowflakes;
- Use ready-made stickers;
- Do not forget about the windowsill, on which you can place the New Year's crafts for the pupils.
Snowflakes
For the manufacture of snowflakes, white napkins are used, which are easy to stick to glass due to their small thickness. Such a snowflake can be four-, five-, six-, seven- or eight-pointed.
Having cut out the required number of snowflakes, they are distributed on the window in a chaotic manner or creating a certain composition in the form of a Christmas tree or a fairy-tale character.
Toothpaste
You can decorate the window with white toothpaste.
Each kindergarten has its own "design team" - these are educators and parents who prepare the premises in the kindergarten for the holiday. But there are also kindergartens where preparing for the New Year is a joint project of parents, children and teachers. A jointly developed plan for the decoration of the halls, in which everyone actively participates. Mom and dad, who have creative experience, are a real source of ideas that they bring to life. Those who are not distinguished by special talents simply help to decorate the Christmas tree and the hall.

A great Christmas design idea could be assembling custom pieces and all sorts of activities with kids, from cute kids handprints. The kids are actively involved in this process, because everyone is happy that his hand will be involved in the holiday.
The number of colored strips of paper, rain, toys that need to be attached will take a long time - this means that you have to start preparing in advance. Collaboration allows parents and teachers to become a single team that teaches children the basics of design.
On the eve of the New Year holidays, children create a thematic kindergarten which can also decorate the room and group. Painted snowflakes with ornaments, many colored paper chains made by children's hands are traditional decorations for the New Year's holiday.

Decor, according to the symbols of 2018
The Christmas tree is decorated according to a variety of decor styles. On the New Year tree there are not only toys, but also garlands, tinsel, beads with ribbons. In what style to decorate a tree for 2018?

Designer Tips
 The symbol of the year is the Yellow Dog, so it is necessary to choose jewelry in yellow tones. The tree should also be "dressed" in yellow shades. Even in kindergarten, it is important that its design meets the norms of style - this forms the taste of children:
Retro: the main condition is the use of retro toys and the appropriate decor of the room;
Rustic: the Christmas tree can be decorated with products from natural materials, hand-made toys are welcome;
Traditional: many colorful toys, tinsel, garlands;
European: toys are designed in one color, gold and silver toys, ribbons and garlands are used;
Ultra-modern: bright colors, unusual solutions, visualization of a Christmas tree made of hanging toys, drawings and posters on the wall.

 How to decorate the top?
The top of the tree is traditionally adorned with a star that symbolizes Bethlehem. This ancient custom reminds us that it was the Star of Bethlehem that pointed the way to the cave where Jesus was born. But this is not the only decoration that can be on top of the Christmas tree, it will also work:
Snowflake;
Ribbons;
Flowers;
Stylish and unusual top or the best children's craft.

How to choose toys and how to decorate the Christmas tree?
The choice of toys largely depends on young children. The holiday should not cause injury, so do not use glass decorations. It is necessary to protect little curious explorers from glass and other breakable toys.
Choose soft toys or plastic, preferably without glitter. You can decorate the Christmas beauty with origami paper toys. If you want to make the tree look more trendy and glamorous, try hanging fruits, cookies, candies and small tangerines on it, which will look creative and freshen up the room with a wonderful scent.
Paper stars and twinkling lights are one of the most simple ideas Christmas decoration, which you can make with the children from foil and colored paper.
A great decoration option is a garland. Take multi-colored ribbons and make compositions, attach them to the branches of the Christmas tree. The decor looks great, delighting you with its simple beauty. Especially if the children made their own decorations.

Options for placing toys on the Christmas tree
The Christmas tree is decorated in a certain style or just hangs toys randomly. Sometimes a certain symmetry is preferred. What options for arranging toys on a tree exist:
Horizontal,
Vertical,
Spiral,
Wave.

Decoration elements: do-it-yourself garlands for the Christmas tree
Garlands are the brightest attribute of Christmas tree decoration. With each new century, the garland took on a wide variety of forms and was modernized. LED lamps are now replacing electric lamps. They are durable and safe for children.
Serpentine and tinsel for the Christmas tree have long been an integral part of the decor. Tinsel comes in different colors and sizes. There are even ones with imitation snow on the tips, with stars and circles, cones and snowflakes. Recently, spruces have become fashionable to decorate with objects. self made and decorative elements. And tinsel and serpentine decorate windows, walls, cabinets.

Choosing a combination of colors on the Christmas tree in 2018?
 Color plays an important role in decorating and shaping children's taste. Since the yellow dog will become the symbol of 2018, golden colors, brown, bright color of saffron are used in the design of New Year's beauty. These colors go well with green needles. It is also recommended to choose decorations in red colors - matte and lacquered. Decorate the Christmas tree warm colors grapefruit and orange. it color solution will fill the group in kindergarten with light and comfort.

What is the best thing to decorate in a group?
Unusual and festive appearance the room is given branches and garlands on the walls, complemented by snow from cotton wool or foam. From these improvised materials, children can create compositions. A separate place must be allocated for children's crafts.
 We must not forget about the windows - snowflakes, paintings, stickers will give the room a festive look. On the pages of the site you can find information on how to decorate windows.
 What is a New Year's kindergarten without costumes? According to the scenario, children are given roles, and the task of parents is to embroider or order festive clothes. In kindergarten, there are usually no unusual costumes, and girls become traditional snowflakes, and boys become bunnies or snowmen. The older the children, the more difficult the holiday and the most interesting costumed scenarios.
How to decorate a group in kindergarten for the New Year 2018: Video