Download schemes isothread. Pictures with isothread: diagrams with descriptions. Tone thread graphics
The isothreading technique is simple and interesting, it is able to fall in love with both adults and children. Schemes for creating isothread with numbers are extremely simple even for junior schoolchildren, but at the same time very beautiful and varied in their theme for adults. In our article you will find color schemes with numbers using the isothing technique and schemes with numbers that are designed for children. You can also print the schemes prepared for you for free for every taste and for any occasion.
The isothreading technique is very beautiful and varied, but, like any needlework technique, it has a number of rules:
- Do not make knots, fasten the corners of the thread with tape or glue on the wrong side.
- Marking must be done on the wrong side of the product
- Make holes with a thin needle from the inside. If embroidery implies you have a thick thread, then do it with front side and a thick hole.
- When making a small pattern, use a sharp needle and fine thread
- The smaller the markup, the more refined the pattern.
- The segments must be the same, follow the markings
- Prepare your cheat sheets, the finished pattern will be much better and easier to see
- The pattern is best done on plain paper, then attach it to the prepared material and pierce holes.
- Do not use wool thread for embroidery. They do not have the necessary brilliance and beauty. The drawing will look faded. Shiny threads are best for working with the isothreading technique.
- At the beginning and at the end of work, fasten the thread especially tightly. If you need to add a piece of thread, secure it with tape from the wrong side of the product.
- If the thread is tangled, try to unravel, do not make knots. Just try to measure the desired length of thread. Too long a thread is very inconvenient to work with.
- At the end of the work, try to hide the wrong side of the product. If you did on cardboard, hide big size cardboard. If this is a small postcard, you can seal it with white paper.
Having studied the techniques of isothread, and having completed several shapes, you can create your own patterns for the image you like.
We study isothread schemes for children with numbers: we teach children how to perform
The isothreading technique is so simple that both children of older kindergarten groups and children of primary school classes can do it. After teaching a child several elements of embroidery and having received an interesting picture, the child is able to perform the technique more skillfully than an adult! The only “but”: the schemes must be prepared by an adult. With a prepared and numbered scheme for children with numbers, the child can be given not a sharp needle, but an embroidery needle with a blunt end.
This technique can serve as an excellent help in preparing for school, it causes perseverance, interest, and with proper help and attention from an adult, it will develop the main qualities of the child, such as “I can” and “I did it myself (a)”. For high school students, this technique is perfect as valentines, greeting cards friends and teachers. Also, this technique helps to develop the child's motor skills, needle handling, abstract thinking, and the ability to concentrate. Soon the child will begin to come up with new patterns for embroidery, which will be unexpectedly joyful for parents and important for the child.

Any picture you like can be turned into the art of embroidering with isothread - broken into circles and corners, pick up the colors you want and proceed to execution. Make art with kids!
A step-by-step master class on creating beautiful flowers with your own hands
In our master class you will find color schemes with numbers using the isothing technique, learn how to perform simple and more complex elements, as well as get acquainted with the technique of making other various products. Also here you can find free schemes suitable for you.
Scheme - an explanation for the execution of the flower. We embroider a flower in steps 1 - 10, petals in steps 1 - 10 and 1 - 13. On the places marked in green, we sew beads. The leaves are also embroidered 1 - 10, 1 - 14 and 1 - 12. The stem of the flower is embroidered in steps 1 - 4.
Scheme for transferring to the wrong side of the material:

Scheme - explanation. In place of the yellow dots, we use beads or beads. Embroider flower petals in steps 1 - 10, embroider stems in steps 1 - 3.
Transfer scheme:

Scheme - explanation. We embroider the flowers in steps 1 - 14, 1 - 15, 1 - 16. We embroider the leaves, starting from the point marked in green. We embroider the stems in steps 1 - 3.

Scheme - explanation. We embroider the middle of the flower in steps 1 - 10, sew beads along the contour marked in yellow. We embroider leaves in steps 1 - 10. Stems, in steps 1 - 3.
Scheme for transfer to embroidery:

Bell

Lotus

Thistle is made according to the principle of embroidering an arc with triangles. This type of technique is used when you need to flash a picture in a fan-like manner. Blooming flowers have thickenings, which are performed by the oval filling technique, just like buds. To perform a thistle, not complete filling is required, but only until the contour closes. The stems are made with regular stitches, and the leaves with the corner filling technique. All elements are made with green threads, except for the thistle flowers - they are made with purple threads.
Dandelion

If you perform a flower as in this diagram in a semicircle, then its filling should be done, as in a thistle, with triangles. If you decide to add round flowers, then they should be done with simple stitches. The length of these stitches should be equal to the diameter of the circle. Leaves are made according to the technique of making an angle. The angle can be any.
Video on the topic of the article
Every mother knows perfectly well that the full development of her crumbs is a priority. Train fine motor skills, perseverance, you can develop imagination and accuracy with the help of applied art. Embroidery on cardboard, thread weaving - all this has a common name - isothread. You will find her schemes with numbers for children in today's article.
Learning the basics of filament graphics
What needlewomen do not come up with, trying to surprise with their skills and originality. So, in recent years, isothread has become very popular. Pictures with diagrams can be found without much effort on the global network, but before you start creating a masterpiece, you need to master the technique of embroidering on paper.
Isothreading is an ancient form of art that has been forgotten over time, but today craftswomen are happy to revive traditions. Embroidery with threads on paper allows you to create real masterpieces - three-dimensional paintings.
Mothers who care about the development of their babies try to teach their children to thread weaving at the age of 5-6 years. This practice allows you to develop fine motor skills, and not only. The kid will learn to fantasize, become neat, assiduous, and be able to show his talent.
You already have a general idea of the isothread technique. Before we look at diagrams for beginners and pictures with numbers in stages, let's study the main aspects of modeling crafts in this style:
- The basis of embroidery is thick cardboard or other paper of appropriate thickness. Some needlewomen use boards.
- You can choose any threads, the main thing is that they are strong and elastic.
- For children, you need to select soft, bending needles so that the baby does not get hurt during work.
- As you know, the threads tend to pile. To avoid this, it is enough to rub the thread with wax.
- To make the picture homogeneous and openwork, a minimum distance must be made between the points.
- The child can number the puncture sites. It is easy to do it yourself. It is important to know the rules for numbering.
- Almost any masterpiece created in the isothread style is based on three main pillars - filling in the corners various kinds, arcs and circles.
- The drawing must be transferred using carbon paper to the wrong side of the base. First, make punctures in accordance with the numbering.
- If you use a base that is too dense, punctures are made with a large needle, the tip of which must be heated over a fire.
- We fix the threads on the wrong side with clerical glue.
- For isothreads, you can use small carnations. But this method of embroidery is best practiced at an older age, since the baby can get hurt.
We study the technique of isothi together with the baby
As already mentioned, embroidery on paper is based on several methods. Before you start creating full-fledged paintings, hone your skills on individual simple elements.
Basically, the following methods of thread graphics are used in practice:
- contour;

- solid;

- volume;

- combined.

You need to start with small pictures and only after your child has fully mastered the technique of embroidering corners, circles and arcs. If the kid can't count, it doesn't matter. Help him with your tips. Just specify where you want to direct the thread.
To captivate the baby with such an activity, you need to choose interesting pictures, for example, let the boy embroider a boat, and the girl - a butterfly or a flower. Also use multi-colored threads. The play of colors will not only attract the child, but also allow him to show his imagination and creative thinking fully.
Create a masterpiece in isothread style
If you have already learned the basic ways to embroider in the isothread style, then you will need patterns for beginners. You can make pictures with numbers step by step for children yourself or use ready-made templates. Try to embroider a snowman with your child.

You can also embroider the original cockerel. To do this, you just need to learn how to finish the contour and fill the circles with threads.

If you are new to this business, try to make it beautiful, but at the same time very a simple picture. Let's embroider colorful balloons floating in the sky together.
Necessary materials:
- thick sheet of paper;
- multi-colored pencils;
- threads;
- needles;
- copy paper;
- scissors;
- glue.
Step by step description of the creative process:

Isolate schemes
To create images using isothread, you will need:
-
- cardboard, paper or other solid support
- scissors
- ruler
- needle
- compasses
- colored woolen threads or threads made of


Also useful in the process of working in the technique of thread graphics will be:
- soft elastic mat as a substrate for cardboard and paper for easier piercing of holes with an awl
- a simple pencil for transferring, diagrams and marks
- an awl or gypsy needle for piercing harder bases for work (thick cardboard, CD discs)
- glue (PVA, "Moment", "Dragon", "Titanium")
If a CD disk is chosen as the basis for working in the isothreading technique, then a lighter or a lighter will also be needed for work in order to glow the awl and use it to make neat holes in the CD disk.
The key to success in the isothreading technique is provided by:
- good selection of creative materials
- accuracy of work
- original
In the framework of this review article, we propose to consider all of the above parameters, which largely determine the quality of work in the isothread technique.


Selection of materials for work in the isothreading technique.
All materials that are used to create beautiful products using the isothread technique can be divided into two groups. On the one hand, these are materials for the basis of compositions, on the other hand, threads.
As a basis, thick cardboard of different colors and shades is most widely used by craftsmen. In children's creativity, less thick paper is used to create isothread compositions.


The thread based on velvet paper looks very nice, but its use requires a certain level of skills in the technique of isolating, since the paper is less elastic and capricious in work. In addition, the cost of velvet-coated paper is much higher than the cost of colored cardboard.
Not so long ago, it became popular to use old CDs as the basis for filament graphics. They are embroidered with threads, making original various decorations. Such a base is much stronger than cardboard and the products last longer, but in order to pierce the holes for the threads, you have to use a hot awl or a gypsy needle.
We offer you to look at the finished photos of the work in the technique of filament graphics on disks, this review also contains more than one understandable isothread scheme for CDs.


Regarding the threads, floss threads are recognized as the most versatile, which are such for several reasons. Firstly, floss threads are affordable, secondly, they are freely available, and thirdly, this is a wide palette of colors for creative self-expression.
But if we talk about the beauty of the threads used in the work, and the products themselves with their participation, then, undoubtedly, the most delightful works are obtained from silk threads.

For children's creativity usually inexpensive threads are chosen with or without glitter, usually these are common ones - iris or floss.
Woolen threads are not suitable for the threading technique, and are not used due to the high content of piles.
In many contemporary works in the isothread technique, in addition to threads, you can find sequins, beads, beads and many other decorative additional elements. Their presence is not necessary at all, and appears in various works, mainly when designing in the technique of isothreading and CDs. All additional decorations for the technique as a whole are not fundamental, it is a matter of taste and creative ideas of a particular artist.

The creative process in the technique of isothreading. Adviсe.
The key to success in the isothreading technique is patience, coupled with accuracy and precision. With interesting things on hand, there are two ways to follow the pattern. Firstly, you can transfer the scheme to the back of the base, but this will take time for creativity. The second option is to find on our website and print out your favorite scheme for filament graphics and put it under the base, after fixing it.
- try not to use staples and paper clips so that the paper does not move during operation. Purchase paper clips from the store.
- At the initial stage of work, while piercing holes according to the layout diagram, do not hold the base on weight, use a soft substrate. As a substrate, you can use a sheet of thick felt, corrugated cardboard or a cork rug.
- If none of the listed materials is available, the remains of linoleum after repairs or folded newspapers can be used as a substrate.
- For beginners to master the technique of thread graphics, it is recommended to choose ready-made isolate diagrams for beginners, containing the exact and complete numbering. The points for piercing and embroidery in such schemes are usually located at greater distances than is customary in the isothreading technique. Thanks to this, the works are less openwork, refined and clear, but they are easier to master for a beginner.
- It is necessary to pierce holes in the base, whatever it is, from the front side, then the surface of the base from the front side will remain smooth and will not change its original appearance.
- Before you start creating diverse crafts using thread graphics, practice filling in corners, circles and arcs with thread. In this review article, the topic of filling an angle, a circle and an arc in the thread technique is touched upon a little lower.
- In order to achieve a clearer, more accurate drawing, when transferring the scheme to the base, make half the distance between the alleged punctures. You have to double more work and spend more time to carefully fill all the holes with threads, but the result is worth it and, moreover, will exceed all your expectations.
Our site contains surprisingly beautiful and original works in the technique of thread graphics. You can get acquainted with which you can in our section "". Paintings, postcards, panels and many other beautiful, and most importantly original, rare decorative things can be made by hand by mastering the technique of thread graphics together with our craftsmen.
The collection of master classes, in which, in addition to photographs depicting the details of the creative process, there are key ones will allow everyone to master the technique of thread graphics in the shortest possible time. Informative articles on relevant topics will also be useful, if you have a desire to learn, and master a new technique for isothing.
Before creating your first paintings with thread graphics, you need to master the technique of two basic schemes: filling a circle and filling a corner.

Filling the circle.
1. Draw a circle of the desired diameter and divide it into an even number of equal parts.
2. Select any chord for the circle. For example, 8-22
3. From the inside of the base, insert the needle and thread at point 8 and draw to point 22
4. Further from 22 to 1, etc., following the figure.
Note that the chord must complete two circles.
Having mastered this technique, you can download isolate diagrams for free and create your first masterpiece in a few hours.

Corner filling.
1. On a solid base, draw an angle
2. Break each side of the corner into equal segments. There should be an equal number of segments on each side of the corner.
3. Make punctures at each point (except for the 27th point).
4. The needle with the thread is inserted from the wrong side from point 1 to point 26.
5. After the thread is drawn from the 26th point to the 25th point, etc.

More openwork and interesting works in the isothread technique are obtained using the “filling the arc” technique for embroidery. When filling in the arc, ornate monograms are obtained, which are often missing in the works of beginners, and which open up great opportunities for self-expression. In the photographs for this review, you will find not only the arc filling scheme itself, but also see how you can successfully use this technique using the example of the work of different masters presented below.


Everything is very simple, according to this scheme, you first need to draw an arc on the back of the sheet, and then make markings and pierce holes. All markup divides the arc into equal parts between points; for accurate marking, a compass and a transparent ruler are used. Then the process of filling the arc with threads begins, in the order indicated in the diagram by numbers. The direction of movement is also marked with direction arrows. Filling the holes step by step, the main thing is to concentrate and not be distracted so that you do not have to redo the work.
After all, if you put a thread with a needle into the wrong hole once, even if you pull the needle back exactly, the hole can stretch (or break at all) and the finished product using the isothreading technique will look messy. Be careful and do not hesitate to look at all the time, because they are created, developed to help master this technique. If during work you feel that you do not have enough patience, you need to put aside painstaking work for a while. creative work and change activities.

If long time embroider, you can achieve amazing results and develop hand memory, then your hands will automatically perform the actions necessary for work. You can draw an analogy with the virtuoso blindfold playing of musical instruments. But this skill comes with experience and training, and for beginners there are isolate diagram for beginners, which will gradually introduce you to the course of things.
There are many interesting works, which use only one of the three proposed options for thread graphics, and there are those that successfully combine all three. So that nothing hampers your creative self-expression, you need to master all the available variations. And for creative inspiration, we offer you to look at interesting and patterns that you can implement in your future works. It is likely that some of the ones presented here will be useful in the design of postcards and in the technique of thread graphics on the eve of the upcoming holidays.


In the isothreading technique, wonderful, unique, unique ones are obtained. Depending on the theme of the holiday, our website contains master classes containing both universal and examples of work, and dedicated to a specific topic, for example, "" or New Year theme. So, using the technique of thread graphics, you can make with your own hands unusual in all respects, memorable valentines, which cannot be bought anywhere, but can be made with love with your own hands. You can also create home decor items with your own hands, for example, come up with an original large drawing to your liking and implement it using filament graphics, then arrange the finished work into a beautiful one with your own hands or purchase a baguette in a store. Connect your imagination, and ideas and master classes for realizing your creative potential are waiting for you on our website in the appropriate headings.
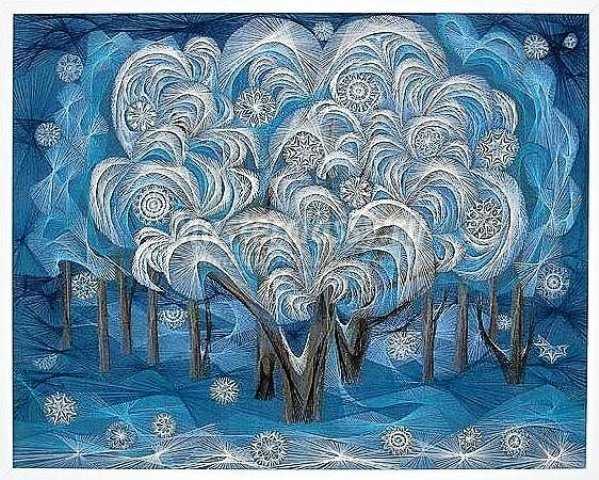
Isothreading is only at first glance a complex technique. In fact, it is enough to master just two embroidery techniques: filling in a corner and a circle. And using them, you can create many unique paintings that can be equated with paintings. Panels embroidered using the isothread technique will decorate the walls of your apartment. Such work will look great with solid wood furniture. Also, small embroidered pictures will be used to design postcards. In this master class, needlework for the home, we will practice embroidering a circle and a corner. And framed embroidered dandelions can decorate the interior of your room or become a souvenir for friends. In our work, isothreading schemes for beginners, numbered by numbers, will come to the rescue. Thanks to them, every beginner can make a panel using the isothread technique.
Isothread: master class
For work you will need:
- Sheet of velvet paper. In this master class, black is used, because. on a black velvet background, the drawing looks more impressive. But you can choose a different background, as long as the background color does not match the color of the threads you have chosen.
- White sewing thread - dandelion balls.
- Green threads of two tones - for leaves, stems, veins. A darker color will go to the stems and veins.
- sewing needle
- A pin in the form of a needle with a ball at the end. Easy to poke holes
- Scissors
- Glue stick
Photo 1,2,3,4
First, let's practice embroidering a circle and a corner. Let's start with a circle. Draw a circle by hand or with a compass. Divide its circumference into 16 equal parts (in half, every half in half, every quarter in half, every eighth in half). Photo1
Enter the numbering as shown in the figure. This should be done from the wrong side. Photo 2
We pierce holes in each division. We start to embroider. The arrows in the diagram show the direction of the thread. We exit at 1, we enter at 2, we exit at 3, etc. until you have sewn the whole circle. Photo 3
The embroidered circle on the front side looks like this: photo 4
Isothread: diagrams for beginners
Photo 5,6,7,8 
From the wrong side: photo 5
Let's go to the corner. Draw it. Divide each side into an equal number of parts. Each approximately 0.5 - 0.7 see photo 6
We number the divisions, as shown in the figure: photo 7
We embroider the corner according to the same principle as the circle. We exit at 1, we enter at 2, we exit at 3, we enter at 4, etc. As a result, the front side will be the following figure ( green color): photo 8
Isolate: dandelion flowers
Well, finally, let's get down to the colors in the technique of ripping. First, draw them on a sheet of writing paper. Copy the picture provided to you. Immediately divide the balls and leaves into pieces. Move the drawing to the back of the background.

Isothread: technique
Dandelion balls will be embroidered as circles, leaves - corners.
Let's start with the balls. We embroider them with white threads. We embroider each piece of the ball as a circle. To do this, from the wrong side, divide the circle into parts, the length of which is approximately 0.5 cm. We pierce the holes with a pin. We embroider.

We do the same with the rest of the parts.

Two balls.

Three balls.

You can sew the edge of each balloon. Then the contour will be clearer. But I do not do this precisely so that the contour is not clear. To make the dandelion fluffy loose.
Each piece of the leaf - the gap between the veins - is embroidered as a corner. To do this, we draw a sheet from the wrong side into corners, divide it into segments of 0.5 cm. We pierce. We embroider.

We embroider the entire sheet in the same way.


Do the same with the rest of the leaves.

We embroider sepals. They are embroidered as open circles.

We embroider the veins and stems with a darker thread. They are embroidered as follows: the entire stem is divided into segments of 1 cm. Number them in order. Exit at 1, enter at 3, exit at 2, enter at 4, etc. Here is such a technique to isolate, we hope that our master class taught you how to create isothread flowers according to ready-made schemes for beginners. By acquiring skills, you yourself will be able to draw diagrams using the isothread technique.
In the meantime, dandelions are ready.

But, of course, the panel should be framed. Preferably under glass as well. wet cleaning for velvet paper is not recommended. And under glass, the work will look more dignified and chic.

Happy creativity!
"Isothread- no less fascinating and entertaining needlework technique. You can also find other names: thread graphics, thread image, embroidery on cardboard, thread design, isography. The main thing is openwork pattern on clear geometric lines.
When you look at the finished work, in which the threads are intricately intertwined, you might think that it is very difficult to repeat. But when you master the basics of embroidery on thick paper or cardboard, then any complex pattern is within your power. Beginning craftswomen should hardly take on complex compositions, it is important to learn how to make basic motifs, there are not so many of them compared to other techniques.
The main motives of isothy
The first motive corner filling .
First, take a sheet of cardboard and draw a right angle. The length of the sides is 8-10 cm. After each centimeter, put a dot and make a hole with an awl. Beginners are recommended to immediately put down the numbers along which the needle will move.
So, the first round! The needle enters the cardboard from the wrong side (the knot remains there) to the number 1, moves along the front side to the number 2. 
Then from the wrong side, go to the number 3.

On the front side, go to the hole at number 4.
Move down to 5 and loop into hole 6.

Next you can see the segment 7-8.

And by the same principle, you must fill in all the segments in the graphic drawing.

When the principle of filling is clear, you will not need to draw numbers, you will start working from memory.
Angles can be of different lengths and any degree, but the principle of filling them is the same, but the result is different.
To reinforce your understanding, watch this video lesson:
The second motive is circle filling .
Here, too, there are some nuances that beginners should be aware of.
You need to draw a circle and put points on equal segments. The more dots, the denser the pattern will be. Further, everything depends on the distance at which the turns of threads will lie. On the examples in the photo you can see the options!
The longer the piece of thread, the closer the filling is to the center of the circle. If the coil lies shorter, there will be weaves of threads near the edge of the line.


When working with circles, you also need to write down the course of the thread in numbers in the first stages.
The oval and the drop are filled according to the principle of a circle or corner motif. You will understand everything in practice.
Another principle of the isothread technique when all the work is done from one point . For example, a graphic drawing is a heart. There are two options for filling it out.


The movement is sequential.
 Here the turns fall with a step back.
 These fill options can be used for any pattern. When you master the main motives, then you will combine and combine them at your discretion.
Helpful information
Beginners will be interested in some tips and subtleties of technique isothread . Let's dwell on them in more detail.
— For the base it is better to use thick paper or smooth cardboard; works on velvet cardboard are less common.
- To draw a drawing, you need a simple pencil, preferably hard and well-sharpened, so that the line of motifs is thin.
- A ruler is also useful for drawing lines and angles, a compass for forming circles of different diameters.
— Awl it is better to use a short but sharp one. They need to pierce the cardboard from the front to make the work look neater.
— Needle It is advised to take with a large eye so that the thread passes easily.
— Threads you can use any, but floss and iris are considered the best for this technique. Works made with woolen thread look great on velvet paper.
- Pierce holes should be on the substrate, so as not to damage the table cover. It is recommended to use a piece of cardboard from the packaging box or thick foam.
— To secure the thread on the wrong side, you can use narrow tape or PVA glue.
- So that the thread does not get tangled during operation, cut off a piece that is not too long.
The isothreading technique is used to make postcards, panels, paintings, notebook covers, bookmarks.
- At the initial stages, it is important to monitor the density of embroidery. If you pull hard on the coil, you may tear the cardboard. A weak thread clamp will sag and look messy on the finished work.
- To hide the flaws on the wrong side, the work must be glued to cardboard or placed in a frame without glass.
Painting "Butterfly" in the technique of isothreading (master class)
Now let's move on to practical work. When all the basics of the technique are clear, you can start embroidering a separate item. For example, butterflies. It will consist of simple patterns when the entire image is filled.

To work, you need the following materials:
- a set of colored cardboard;
- a graphic image of a butterfly (in which all points are drawn);
- floss threads of two colors (yellow and green);
- awl;
- needle;
- scissors;
- thin tape.
step by step

Take colored cardboard of such a shade that the threads you have chosen are clearly visible. For example, purple, if the embroidery is yellow and green threads.
Place an image of a butterfly on cardboard and make holes with an awl. Do not forget about the substrate, so as not to spoil the work surface.

In the graphic figure, distribute the direction of movement of the needle with numbers.

Here is a base with holes needed to work.

Take a needle, insert a thread into it and begin to form segments.


This is how openwork weaving should turn out.

Do not forget to secure the edges of the threads with tape from the wrong side of the work.
The second yellow wing must be done symmetrically.


When you embroider the lower wings, you can change the color of the threads so that the work comes out brighter.
You can even embroider the base in one color, and then start another shade along the edge from shorter segments.

To form the body and antennae of the butterfly, you just need to sew the segments in a straight line and return.
This is what the finished job looks like.
It is better to seal the reverse side with a white sheet of paper to hide embroidery errors.
Agree, it will be nice to receive such a work as a greeting card.
I hope my detailed story about the isothing technique and a good example of work will inspire you to original ideas and soon beautiful embroidered products will appear in your home.
Regards, Tatiana!"

When you master the isothreading technique, you will be able to create such beautiful pictures, as in this video, do it yourself:
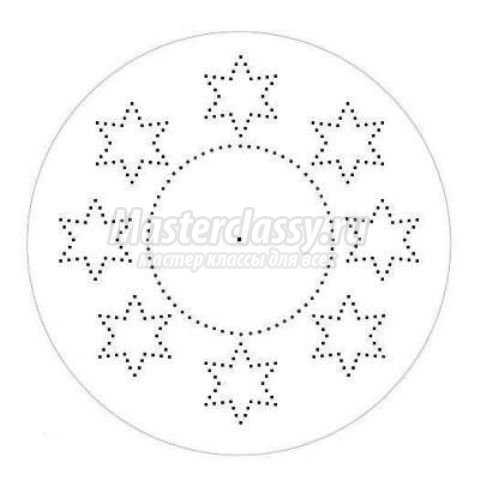
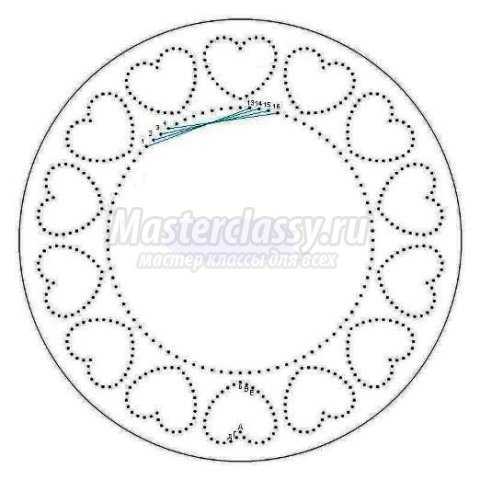
Schemes and templates
For beginner needlewomen can come in handy ready-made schemes and templates with numbers. You can print pictures from the Internet and embroider by numbers.
Hearts:


Flowers:


How to make original panel of threads and nails
And Tatyana's story about the practical application of this technique:
"In our office they work creative people both boys and girls. And our department is located on the second floor. You have to climb one flight of stairs. And he's so dull and monotonous. On a rainy morning, my co-worker offered to "revive" the wall on the stairs. We did not dare to paint on it, since our office rents this room for rent. Therefore, it was necessary to make some kind of large panel or, in extreme cases, paint a picture.
Found an interesting technique on the Internet string art. It is based on the use of studs and threads. An image is obtained when the turns of threads are intertwined in a certain pattern between the nail heads. The whole idea was appreciated and set to work on its implementation.
After the repair, there was a piece of drywall measuring 1 by 2 meters in the pantry. We decided not to cut it into pieces, but to use it as a whole. The girls drew a bird of happiness in the center of the base (in fact, an ordinary peacock), on the sides of it - two trees and at the bottom of the work - impromptu grass bushes.
The guys bought large nails with wide heads and drove them in at a distance of about 2 cm from each other throughout the graphic image. Moreover, the carnations on the bird itself are very densely dotted, somewhere in 0.5 cm. This is so that the pattern turns out to be filled and the turns of threads fit well.
When all the work of the men was completed, the turn of the girls again came to show the dexterity of their pens. We have selected amazing threads for all elements of the work. Lilac on the feathers and red on the body are thin threads of the “iris” series, and thick threads on the circles of the tail and crowns of trees are textured threads for knitting.
Weaving had to be done in technique isothread, strictly according to the drawing. This is such a gorgeous bird!

 Trees are easier to form, since it was only necessary to hide the base a little, so the turns of threads were intertwined in a chaotic manner. Pay attention to how the threads on the trunks are shaded and the textured ones look good on the crown.


 Then the guys offered to make a frame for the panel to make the work look more interesting. They nailed a piece of wood around the edge of the base.
The work was complex and painstaking, but the result was worth it. It turned out a beautiful and bright panel of threads and nails.

Now our flight of stairs is the most colorful in the entire building. And if fate throws us to a new place of work, then the picture will go along with our team.
We'd love to see photos of your work!
Like the product and want to order the same from the author? Write to us.
More interesting:
Submit your photos
Do you make beautiful crafts too? Submit photos of your work. Best photos we will publish and send you the diploma of the participant of the competition.See also:
DIY wedding card
What could be better than happy holiday in life than a wedding? On this day, I want everything to be...
DIY cards - scrapbooking
The girl, who signed the name Tradicia, told how she makes postcards with her own hands. "Recently...
Wood burning technique
Pyrography - wood burning At present, the art of wood burning (pyrography) has become ...
How to do salty dough, recipes and secrets
All about salt dough Perhaps my statement will seem strange to some, but salt dough can ...
Making a postcard for Valentine's Day using quilling technique
Another crafting tutorial original postcard for St. Valentine's Day in quilling technique from...